

CO2 Air Quality Monitor INVMonitor de calidad del aire CO2 INVArt. No.: 7004040
INSTRUCTION MANUAL
Manual Download
Visit our website via the following QR Code or web link to find further information on this product or the available translations of these instructions.

http://www.bresser.de/download/7004040
SERVICE AND WARRANTY:


[PDF]
GENERAL WARNINGS
![]() RISK OF CHOKING!Keep packaging material, like plastic bags and rubber bands, out of the reach of children, as these materials pose a choking hazard.
RISK OF CHOKING!Keep packaging material, like plastic bags and rubber bands, out of the reach of children, as these materials pose a choking hazard.
![]() RISK of ELECTRIC SHOCK!This device contains electronic components that operate via a power source (ac adaptor). Only use the device as described in the manual; otherwise, you run the risk of an electric shock.
RISK of ELECTRIC SHOCK!This device contains electronic components that operate via a power source (ac adaptor). Only use the device as described in the manual; otherwise, you run the risk of an electric shock.
![]() RISK of FIRE/EXPLOSION!Do not expose the device to high temperatures.Excessive heat or improper handling could trigger a short circuit, a fire, or an explosion.
RISK of FIRE/EXPLOSION!Do not expose the device to high temperatures.Excessive heat or improper handling could trigger a short circuit, a fire, or an explosion.
![]() RISK of property damage!Do not disassemble the device. In the event of a defect, please contact your dealer. The dealer will contact the Service Centre and can send the device in to be repaired, if necessary.
RISK of property damage!Do not disassemble the device. In the event of a defect, please contact your dealer. The dealer will contact the Service Centre and can send the device in to be repaired, if necessary.
EC DECLARATION OF CONFORMITY![]() Hereby, Bresser GmbH declares that the equipment type with part number:7004040 is in compliance with Directive:2014/53/EU. The full text of the EU declaration of conformity is available at the following internet address: [PDF]
Hereby, Bresser GmbH declares that the equipment type with part number:7004040 is in compliance with Directive:2014/53/EU. The full text of the EU declaration of conformity is available at the following internet address: [PDF]
SOFTWARE & MANUAL DOWNLOAD:
 http://www.bresser.de/download/7004040
SCOPE OF DELIVERY
- CO2 Air Quality Monitor INV
- Screw
- Stand
- Micro USB cable
- AC power adapter
- Software via Download
- Instruction Manual
 |
Power on/off button |
 |
• °C/°F (switch Celsius/Fahrenheit)• UP button (increase settings value) |
 |
• „ALM“ Alarm button (activate or deactivate CO2 alarm)• LEFT button (move left to change an item in settings) |
 |
• RIGHT button (move right to change an item in settings) |
 |
• „REC“ Record button (start recording)• DOWN button (decrease settings value) |
 |
• Mode button (hold down to enter settings) |
MONTAGE
| 1 | Buttons |
| 2 | Wall mounting |
| 3 | A threaded hole on the main unit (for the stand) |
| 4 | Micro USB port |
| 5 | Screw for stand |
| 6 | A threaded hole on the stand |
| 7 | AC power adapter |
| 8 | Micro USB cable for AC power adapter |
![]()

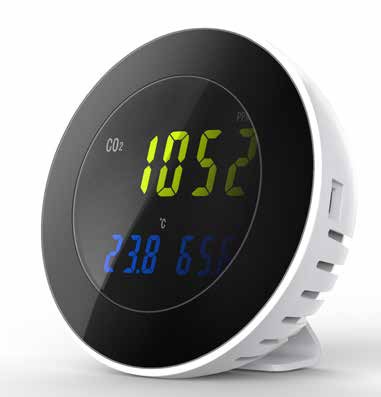
DISPLAY
- Carbon dioxide display area
- Temperature display area
- Humidity display area
A1: Chemical formula CO2A2: Battery level indicatorA3: Set date (Month, day, minute, seconds)A4: Recording in progress indicatorA5: PPM Value. PPM stands for “parts per million” and shows the concentration of carbon dioxide in the ambient air.A6: Year/hourA7: Alarm enabled indicatorA8: TemperatureA9: °C / °F indicatorA10: Humidity unit (%RH)A11: Humidity

CO² LEVEL:
| CO2 level | Status | Description |
| 250 – 350ppm | Outside | Normal outdoor air level. |
| 350-1000ppm | Well ventilated, Ideal | Typical level indoors with good ventilation. 1000 ppm = Recommended maximum level in a closed room. Considered maximum comfort level in many countries. |
| 1000-1200ppm | Under ventilated | Poor air quality – requires ventilation. General drowsiness, discomfort, and odors. |
| 2000-5000ppm | Very. poorly ventilated | Danger! You may experience severe headaches, vomiting/ nausea, and dizziness within 20 minutes. |
| above 5000ppm | Totally unacceptable | Danger! Headache and dizziness in 5 to 10 minutes. Increased risk for health damage by prolonged exposure. |
TECHNICAL DATA
| Power supply | AC/DC power adapter DC 5V 2000 mA |
| Built-in battery | 3.7V lithium battery |
| Record mode |
|
| Record storage | 12700 |
| Response Time | Within 1 second of any change in CO2 |
| Carbon dioxide measurement range | 0 – 9999 PPM |
| Accuracy | + 70 PPM ±3% readings |
| Resolution | 1 PPM |
| Temperature measuring range | _10° to +70°C (14° to 158°F) |
| Temperature resolution | 0.1°C |
| Temperature accuracy | ±0.3°C |
| Humidity measuring range | 0 to 99.9% RH |
| Humidity resolution | 0.1% |
| Humidity accuracy | ±3% |
| Work condition | 0 – 50° C (0 – 85% RH) |
| Storage condition | -20 – 60° C (0 – 90% RH) |
| Dimensions | 107x107x33 mm |
| Weight | 210 g |
STAND OR WALL MOUNTYou can either mount the device on the wall (2) or use the supplied stand (6). To use the stand, you must first remove the screw (5) on the back of the unit and then use this screw to attach the stand to REC the back. Tighten the screw hand-tight.
CHARGING
The device has a built-in rechargeable lithium battery.When the low battery symbol [![]() ] is displayed on the screen, please charge the unit using the AC power adapter. Connect the micro USB cable to the device, then to the AC power adapter and then the AC power adapter to the wall socket. Alternatively, connect the unit to a computer USB port for charging.
] is displayed on the screen, please charge the unit using the AC power adapter. Connect the micro USB cable to the device, then to the AC power adapter and then the AC power adapter to the wall socket. Alternatively, connect the unit to a computer USB port for charging.
START THE DEVICEConnect the AC power adapter to the micro USB port (4) of the device. Press the power on/off button to start the device. After switching on, the device begins preheating. The LCD displays a countdown of 30 seconds. The buttons are not operational during this time. Once the countdown is finished the device enters the normal measurement state.
SETTINGS MODE
Press the MODE button for about 2 seconds to enter the settings mode. The first settings option is carbon dioxide alarm. Choose the PPM value when the alarm should start.
Press the right or left button to select the position to be changed. Press the up or down button to adjust the value.Press the MODE button for about 2 seconds to confirm and switch to the next setting.
Settings sequence: Carbon dioxide alarm > Date setting (Month / Day / Year) > Time setting (Minutes / Seconds / Hour) Finally, press the MODE button for about 2 seconds to save the settings and exit settings mode.Note:The factory default carbon dioxide concentration alarm value is 2000 PPM. All settings can also be made via the included software. To check the time, it is necessary to hold down the MODE button to enter the settings mode.
CARBON DIOXIDE ALARM
Press the Alarm button to activate or deactivate the carbon dioxide alarm. The alarm will sound once the concentration of carbon dioxide reaches the alarm value. Press the left button to deactivate the alarm sound. Press the left button again to reactivate the alarm sound.
SOFTWARE DOWNLOAD:www.bresser.de/download/7004040The software allows you to save and display your recorded data. Install the software by following the setup instructions and then start the software. Now connect the device via the micro USB cable to your computer and press the power on/off button.In the Software, click on the USB icon [![]() ] to establish the connection.
] to establish the connection.
When you click on „Set Time“ the current time will automatically sync and set on the device.
RECORDING AND RECEIVING DATAClick on „Set Param“ to enter the settings menu and set parameters as appropriate.Here you can choose two ways to record the data:Method 1: ImmediatelyMethod 2: Manual
Method 1: ImmediatelyThis method is used when you record data while the device is connected to your computer. Choose the number of records and set an Interval. Then choose „Immediately“ and click on „OK“ to begin recording.„REC“ flashes on the display. The flashing frequency is the same as the recording interval, indicating that measurement of the instrument is carried out. The data received can only be checked once the recording is done. Wait until the recording is finished or click on „Stop Recording“ and then click on „Data Download“ to save the recorded data. You can now open the saved data file to see your recordings.
Method 2: ManualThis method allows you to take the device to a location, record the data there and then go back to your computer to download the recorded data from the device.First, connect the device to a computer and establish the connection. Then click on „Set Param“ to enter the settings menu and set parameters as appropriate. Then choose „Manual“ and click on „OK“. Unplug the device from the computer and take it to the location where you want to record the data. Press the „REC“ button on the device to start recording. After you bring the device back and connect it with a computer, click on „DataDownload“.
Note:Each time you click on „Set Param“, the previously recorded data is overwritten. Therefore, please save measurement data in time.
CLEANING AND MAINTENANCE
Before cleaning the device, disconnect it from the power supply (disconnect ac power adapter)! Only use a dry cloth to clean the exterior of the device. To avoid damaging the electronics, do not use any cleaning fluid.
DISPOSAL Dispose of the packaging materials properly, according to their types, such as paper or cardboard. Contact your local waste disposal service or environmental authority for information on the proper disposal.
![]() Do not dispose of electronic devices in the household garbage! As per Directive 2002/96/EC of the European Parliament on waste electrical and electronic equipment and its adaptation into German law, used electronic devices must be collected separately and recycled in an environmentally friendly manner.
Do not dispose of electronic devices in the household garbage! As per Directive 2002/96/EC of the European Parliament on waste electrical and electronic equipment and its adaptation into German law, used electronic devices must be collected separately and recycled in an environmentally friendly manner.
WARRANTY & SERVICEThe regular guarantee period is 5 years and begins on the day of purchase. You can consult the full guarantee terms as well as information on extending the guarantee period and details of our services at [PDF]
ContactBresser GmbHGutenbergstraße 246414 Rhede · Germanywww.bresser.de
 @BresserEurope
References
[xyz-ips snippet=”download-snippet”]