BRESSER CO2 Air Quality Monitor Smile
GENERAL WARNINGS
![]()
![]()
![]()
![]() RISK OF CHOKING!Keep packaging material, like plastic bags and rubber bands, out of the reach of children, as these materials pose a choking hazard.
RISK OF CHOKING!Keep packaging material, like plastic bags and rubber bands, out of the reach of children, as these materials pose a choking hazard.
RISK of ELECTRIC SHOCK!This device contains electronic components that operate via a power source (ac adaptor). Only use the device as described in the manual; otherwise, you run the risk of an electric shock.
![]() RISK of FIRE/ EXPLOSION!Do not expose the device to high temperatures. Excessive heat or improper handling could trigger a short-circuit, a fire or an explosion.
RISK of FIRE/ EXPLOSION!Do not expose the device to high temperatures. Excessive heat or improper handling could trigger a short-circuit, a fire or an explosion.
RISK of property damage!Do not disassemble the device. In the event of a defect, please contact your dealer. The dealer will contact the Service Centre and can send the device in to be repaired, if necessary.
EC DECLARATION OF CONFORMITY![]() Bresser GmbH has issued a “Declaration of Conformity” in accordance with applicable guidelines and corresponding standards. The full text of the EU declaration of conformity is available at the following internet address: www.bresser.de/download/7004020000000/CE/7004020000000_CE.pdf
Bresser GmbH has issued a “Declaration of Conformity” in accordance with applicable guidelines and corresponding standards. The full text of the EU declaration of conformity is available at the following internet address: www.bresser.de/download/7004020000000/CE/7004020000000_CE.pdf
SCOPE OF DELIVERY
- CO2 Air Quality Monitor Smile
- AC adaptor
- Instruction Manual
UKCA Declaration of Conformity
![]() Bresser UK Ltd. has issued a ,,Declaration of Conformity” in accordance with applicable guidelines and corresponding standards. The full text of the UKCA declaration of conformity is available at the following internet address: www.bresser.de/download/7004020/UKCA/7004020_UKCA.pdf
Bresser UK Ltd. has issued a ,,Declaration of Conformity” in accordance with applicable guidelines and corresponding standards. The full text of the UKCA declaration of conformity is available at the following internet address: www.bresser.de/download/7004020/UKCA/7004020_UKCA.pdf
Bresser UK Ltd. · Suite 3G, Eden House, Enterprise Way, Edenbridge, Kent TN8 6Hf, Great Britain
DISPLAY

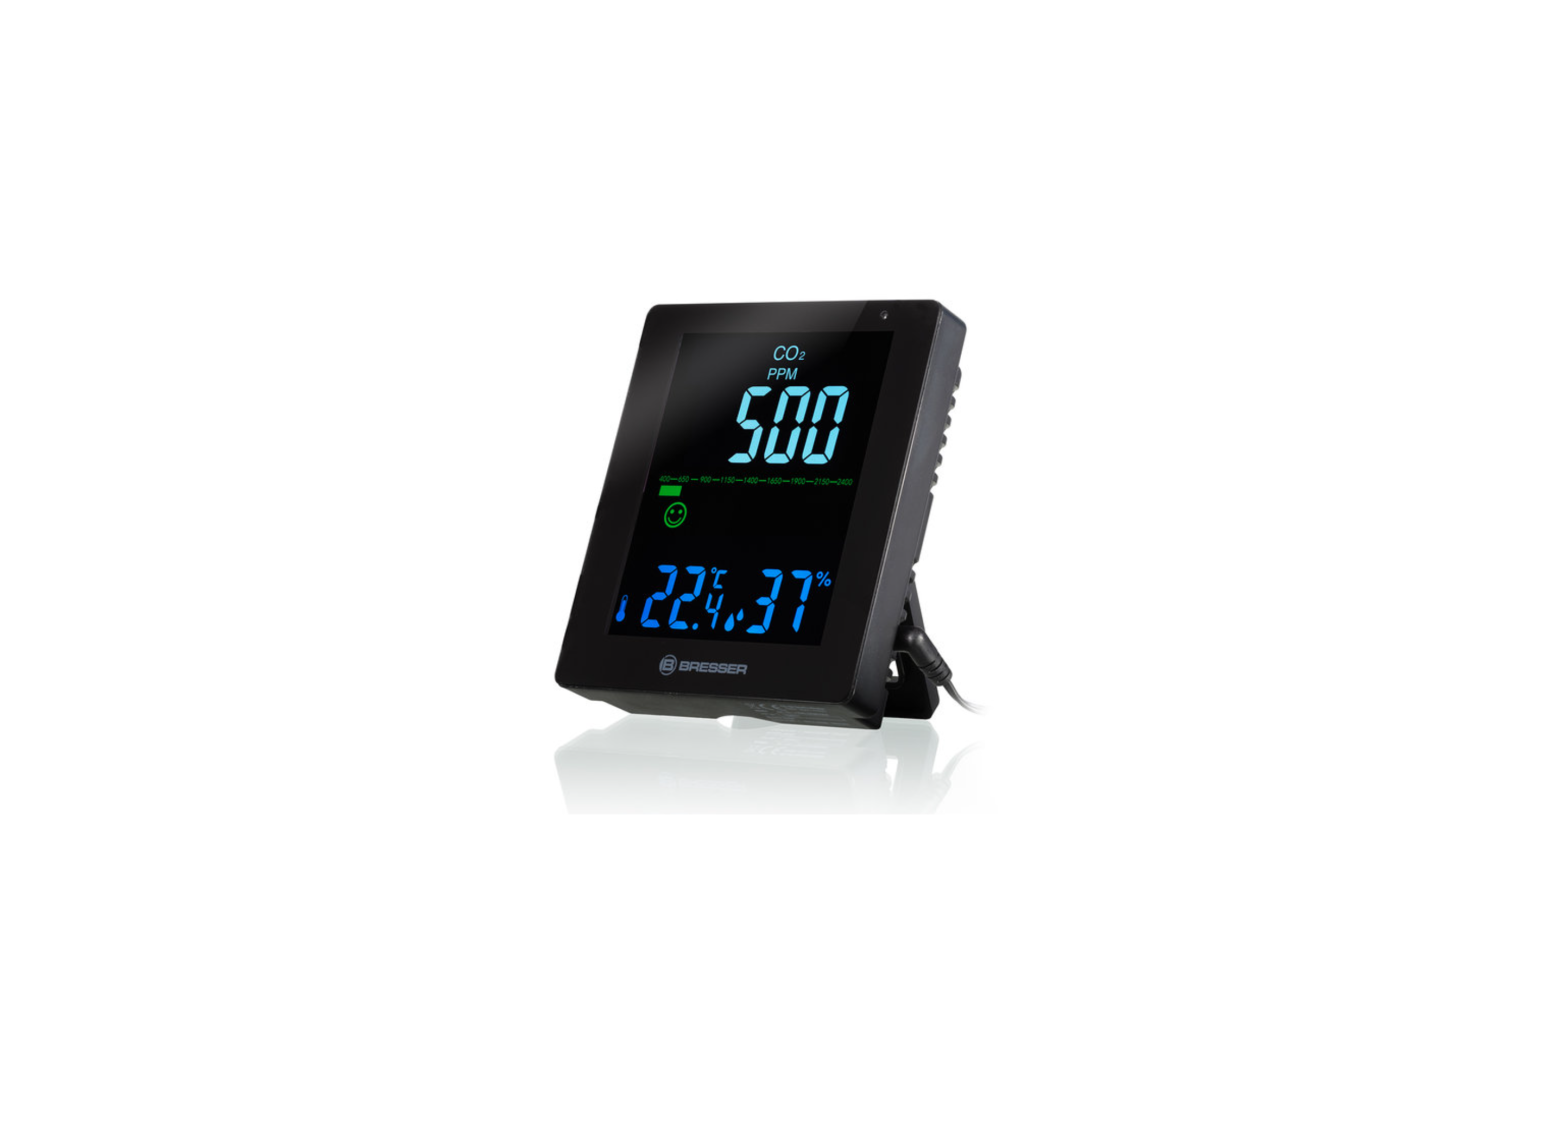
A1: CO2 Alarm Sound: ONA2: Set upper and lower alert of CO2 level (default at 800 PPM). flashes when current CO2 is >800 PPM.A3: Auto scrolling of alternate displays of MAX => MIN => Current reading of CO2 + Temp + RH%A4: PPM Value. PPM stands for “parts per million” and shows the concentration of carbon dioxide in the ambient air.A5: Graphical display of current CO2 level.A6: Symbols for CO2 levels. appears A9 and flashes when current CO2 is over 2000 PPM.A7: Symbol for MIN/MAX valueA8: TemperatureA9: Symbol for TemperatureA10: Symbol for HumidityA11: HumidityA12: Hi-/Low alarm for temperature/ humidity.
A1: Dimmer (Backlight)A2: DownA3: UpA4: MemoryA5: Alert on/offA6: Set
CO² level display
| Icon | CO² level | Status | Description |
 |
400 – 600ppm | Outside | Normal outdoor air level. |
 |
601–1000ppm | Well ventilated, Ideal | Typical level indoors with good ventilation. 1000 ppm = Recommended maximum level in a closed room. Considered maximum comfort level in many countries. |
 |
1001–1500ppm | Under ventilated | Poor air quality – requires ventilation. General drowsiness, discomfort and odors. |
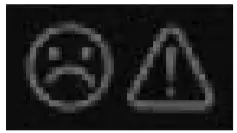 |
1501–2000ppm | Very poorly ventilated | Danger! You may experience severe headaches, vomiting/nausea, and dizziness within 20 minutes. |
|
above 2000ppm | Totally unacceptable | Danger! Headache and dizziness in 5 to 10 minutes. Increased risk for health damage by prolonged exposure. |
TECHNICAL DATA
| Power consumption | AC adaptor |
| Specification | |
| Sensor Type | Long Life NDIR Sensor 400-5000ppm |
| Response Time | Within 15 seconds of any change in CO2 |
| Operating Temp | 0° to +50°C); (32° to 122°F) |
| Temperature measuring range | 0° to +50°C); (32° to
122°F) |
| Temperature resolution | 0.1°C |
| Temperature accuracy | ±1°C |
| Humidity measuring range | 20 to 95% RH |
| Humidity resolution | 1% |
| CO2 measuring accuracy | ± 50ppm+5% reading value (Example: If reading value is 1000ppm, then tolerance is 50+1000*0.05=100ppm, so it is 1000±100ppm) |
| Default setting | |
| CO2 alert | Low – 400, High – 2000 |
| RH% alert | Low – 35%, High – 60% |
| Average value | 15 minutes |
| CO2 voice alarm | Off |
| Display of outside measuring range | |
| CO2 – 400ppm (lower than 400 PPM) | HI (over 5000 PPM) |
| Temperature – LO (lower 0°C / 32°F) | HI (over 50°C/ 122°F) |
| RH% – 20% (lower than 20%) | 95% (over 95%) |
|
Operating mode |
[ SET ] | [ UP ] | [ DOWN / C/F ] | [ ALARM / ON/OFF ] |
DIMMER |
||
|
Normal |
press | — | °C / °F | Celsius or Fahrenheit change | CO2 ALERT ON or OFF selection | CO2 MAX, MIN, loop mode selection | LIGHT brightness dimmer. Turn on or turn off. |
| hold | Enter CO2 and humidity Exceed standard setting mode. | Enter manual calibration mode. This process takes 20 minutes. | — | — | — |
— |
|
|
Alert setting |
press | — | — | — | — | — | — |
| hold | — | — | — | — | — |
— |
START THE DEVICE
Connect the ac adaptor to the unit. After switching on, a beep sounds and the room temperature and humidity are shown on the display. During the first 150 seconds, the CO2 display (value and progress bar) starts preheating and will show —-.
CO2 UPPER LIMIT AND LOWER LIMIT EXCEED STANDARD SETTING
![]() Single press [ALARM ON/OFF] to set the Alarm sound on or off.
Single press [ALARM ON/OFF] to set the Alarm sound on or off.![]() Press and hold the SET button: CO2
Press and hold the SET button: CO2![]() => CO2
=> CO2![]() => RH%
=> RH%![]() => RH%
=> RH%![]()
![]() Single press to view MAX => MIN => Current (CO2+TEMP+RH%)
Single press to view MAX => MIN => Current (CO2+TEMP+RH%)
- Long press SET button about 2 seconds, CO2/PPM/
 shown on, value 400 flashes, press UP or DOWN button to set CO2 lower limit exceed standard value. (lower limit Max value can not be bigger than the upper limit Min value. The Min value is 400, setting unit is 10ppm/set).
 - Long press SET button about 2 seconds, CO2/PPM/ shown on, value 2000 flashes, press UP and DOWN button to set CO2 upper limit exceed standard value. (upper limit Min value can not be smaller than the lower limit Max value. The Max value is 5000, setting unit is 10ppm/set).
HUMIDITY UPPER LIMIT AND LOWER LIMIT EXCEED STANDARD SETTING
- Press SET button, humidity and shown on, humidity value flashes, press UP or DOWN button to adjust lower limit humidity range (lower limit Max value can not be bigger than upper limit Min value, the Min value can be set to 25%, setting unit is 1%/set.
- Press SET button, humidity and shown on, humidity value flashes, press UP or DOWN button to adjust upper limit humidity range (upper limit Min value can not be smaller than lower limit Max value. The Max value can be set to 90%, setting unit is 1%/set)
REMARKS
- Long press of the UP or DOWN button makes the value run faster.
- Lower limit of humidity set as 30%, when humidity lower than 29%, only flashes.
- Upper limit of humidity set as 80%, when humidity higher than 81%, only flashes.
- After setting all values, press SET button to save desired value or wait for about 10 seconds.
CO² ALARM ON/OFF
- Default setting is OFF ( symbol is not visible).
- Press ALARM ON/OFF button to activate CO2 ALARM function, symbol appears.
- When CO2 value goes up to desired upper limit value, alert rings and flashes.
ALERT MODE:
- Lower than 200 ppm, rings every 3 seconds
- Lower than 500 ppm, rings every 1 second
- Over 800 ppm, rings twice every 1 second
- Press ALARM ON/OFF button to quit alerts, alert period is 2 minutes.
- Press ALARM ON/ OFF button, turn off CO2 ALARM function, disappears.
- When CO2 value goes up to the desired lower limit value, only flashes, no alert rings.
AUTO CALIBRATION
The automatic calibration function means that the sensor will intelligently judge the zero point based on the environmental concentration and calibrate itself after a period of continuous operation (7 days). Calibration takes placeautomatically every 24 hours after the unit has been switched on. The zero point of automatic calibration is 400ppm.
MANUAL CALIBRATION
- Find an area with fresh air, CO2 value lower than 400ppm.
- Press and hold UP button to enter manual calibration mode. CAL letter flashes. This process takes 20 minutes, after 20 minutes, CAL letter stop to flash and manual calibration is finished.
°C / °FDefault setting is Celsius degree, press DOWN button to change to Fahrenheit.
BACKLIGHT
![]()
![]()
![]()
![]()
![]()
![]()
![]()
![]()
![]()
![]()
![]()
![]()
![]()
![]() ²
²
The default setting is high backlight. Press the DIMMER touch button to dim the display to a darker backlight. Press the DIMMER touch button again to turn off the backlight.
CO² MIN/MAX/ CYCLE DISPLAY FUNCTION
- Press MEM/ button, Max value of CO2, temperature, humidity for the last 24 hours is displayed.
- Press MEM/ button again, MIN value of CO2, temperature, humidity for the last 24 hours is displayed.
- Press MEM/ again, the average value for the past 15 minutes of CO2, temperature, humidity is displayed.
- Press MEM/ again, the average value for the past 8 hours of CO2, temperature, humidity is displayed.
- Press MEM/ button, with 1 short beep sound to exit.
HISTORY CLEANING
- Press MEM/ button once to enter any mode, then long press MEM/ to clean all values.
CLEANING AND MAINTENANCE
Before cleaning the device, disconnect it from the power supply (disconnect ac adaptor)! Only use a dry cloth to clean the exterior of the device. To avoid damaging the electronics, do not use any cleaning fluid.
DISPOSAL
![]() Dispose of the packaging materials properly, according to their type, such as paper or cardboard. Contact your local waste-disposal service or environmental authority for information on the proper disposal.
Dispose of the packaging materials properly, according to their type, such as paper or cardboard. Contact your local waste-disposal service or environmental authority for information on the proper disposal.![]() Do not dispose of electronic devices in the household garbage! As per Directive 2002/96/EC of the European Parliament on waste electrical and electronic equipment and its adaptation into German law, used electronic devices must be collected separately and recycled in an environmentally friendly manner.
Do not dispose of electronic devices in the household garbage! As per Directive 2002/96/EC of the European Parliament on waste electrical and electronic equipment and its adaptation into German law, used electronic devices must be collected separately and recycled in an environmentally friendly manner.
WARRANTY & SERVICE
The regular guarantee period is 5 years and begins on the day of purchase. You can consult the full guarantee terms as well as information on extending the guarantee period and details of our services at www.bresser.de/warranty_terms.
Bresser GmbHGutenbergstraße 2 46414 Rhede · Germanywww.bresser.de
 report this ad
References
Bresser | Startseite | Expand Your Horizon mit BRESSER
bresser.de/garantiebedingungen
bresser.de/warranty_terms
Bresser | Wir erweitern unsere Garantie, Sie Ihren Horizont! | Expand Your Horizon
Bresser | Startseite | Expand Your Horizon mit BRESSER
index · powered by h5ai 0.26.1 (http://larsjung.de/h5ai/)
[xyz-ips snippet=”download-snippet”]