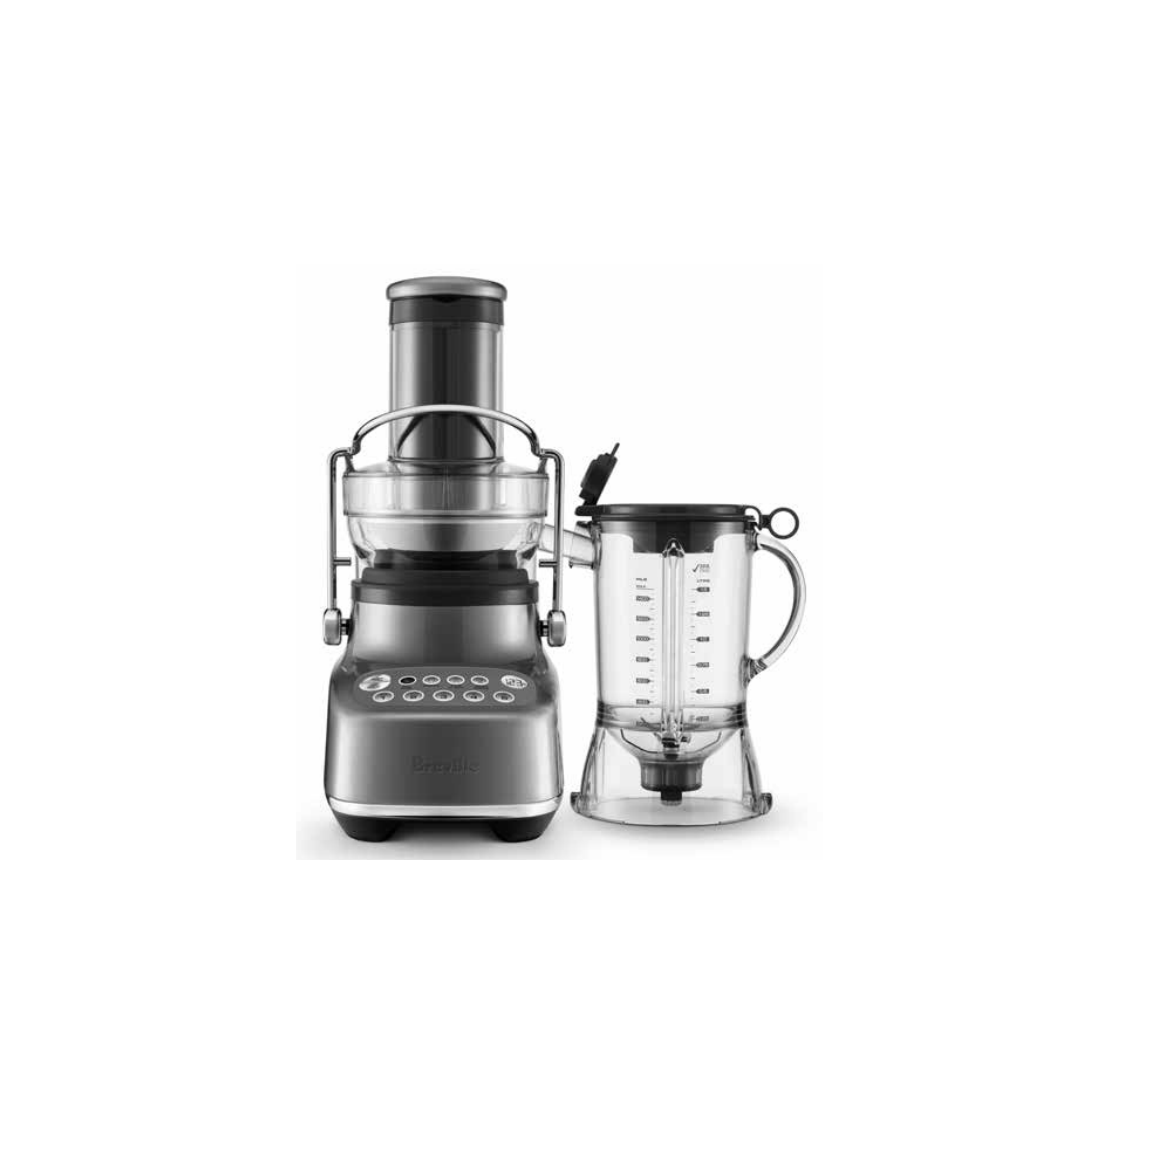
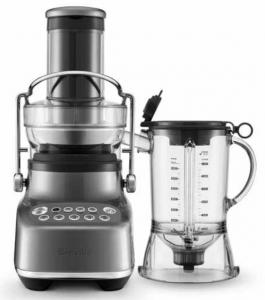
Breville 3X Bluicer
BREVILLE RECOMMENDS SAFETY FIRSTAt Breville we are very safety conscious. We design and manufacture consumer products with the safety of you, our valued customer, foremost in mind. In addition we ask that you exercise a degree of care when using any electrical appliance and adhere to the following precautions.
IMPORTANT SAFEGUARDS
READ ALL INSTRUCTIONS BEFORE USE AND SAVE FOR FUTURE REFERENCE
- Before using the first time ensure your electricity supply is the same as shown on the label on the underside of the appliance. This appliance is equipped with a power cord having a grounding wire with a grounding plug. The appliance must be grounded using a properly grounded outlet. This appliance incorporates an earth connection for functional purposes only.
- Do not, under any circumstances, cut or remove the third (ground) prong from the power cord or use an adapter.
- Consult a qualified electrician if the grounding instructions are not completely understood, or if doubt exists as to whether the appliance is properly grounded.
- The installation of a residual current safety switch is recommended to provide additional safety when using all electrical appliances. Safety switches with a rated operating current not more than 30mA are recommended. Consult an electrician for professional advice.
- Remove and discard any packaging materials safely, before first use.
- To eliminate a choking hazard for young children, discard the protective cover fitted to the power plug safely.
- Always ensure the appliance is properly assembled, as per instructions, before use. Using the appliance without being properly assembled may cause product malfunction, product damage or pose safety risk including personal injury.
- This appliance is for household use only. Do not use the appliance for anything other than its intended purpose. Do not use in moving vehicles or boats. Do not use outdoors. Misuse may cause injury.
- Position the appliance on a stable, heat resistant, level, dry surface away from the counter edge, and do not operate on or near a heat source such as a hot plate, oven or gas hob.
- Fully unwind the power cord before operating.
- Do not let the power cord hang over the edge of a counter or table. Do not let the power cord touch hot surfaces or become knotted.
- Do not leave the appliance unattended when in use.
- If the appliance is to be left unattended, cleaned, moved, assembled or stored, always switch off the appliance by pressing the ON | OFF button to OFF. Switch off and unplug from the power outlet.
- Turn the appliance OFF, then unplug from the outlet when not in use, before assembling or disassembling parts and before cleaning. To unplug, grasp the plug and pull from the outlet.Never pull from the power cord.
- Regularly inspect the power cord, plug and actual appliance for any damage. If found to be damaged in any way, immediately cease use of the appliance and return the entire appliance to the nearest authorised Breville Service Centre for examination, replacement or repair.
- Keep the appliance and accessories clean. Follow the cleaning instructions provided in this book. Any procedure not listed in this instruction booklet should be performed at an authorised Breville® Service Centre.
- This appliance is not intended for use by children or by persons with reduced physical, sensory, or mental capabilities, or lack of experience and knowledge. Close supervision is necessary when any appliance is used near children. Children should be supervised to ensure that they do not play with the appliance.
- Children should not play with the appliance.
- Cleaning of the appliance should not be carried out by children.
- The appliance power cord, and any components, attachments or accessories should be kept out of reach of children aged 8 years and younger.
- Never use attachments or accessories that are not supplied with this product or authorised by Breville to be used on this product. Failing to follow this instruction may cause product malfunction, product damage or even pose safety risk.
- Do not attempt to operate the appliance by any method other than those described in this booklet.
- Do not move the appliance while in operation.
- Do not operate the appliance on an inclined surface.
- Do not push food into the feed chute with your fingers or other utensils. Always use the food pusher provided.Do not place hand or fingers into the food chute when it is attached to the appliance.
- Do not juice stone fruit unless seeds and/or stones have been removed.
- Make sure the product is turned OFF and the stainless-steel filter basket has stopped rotating and the motor has completely stopped before releasing the safety locking arm and/or attempting to move the appliance, when the unit is not in use, and before disassembling, cleaning and storing.
- Any significant spillage onto the surface under or around the appliance, or onto the appliance itself, should be cleaned and dried before continuing to use the appliance.
- Be careful when handling the stainless-steel filter basket as the small cutting blades at the base of the filter basket are very sharp. Mishandling may cause injury.
- Blender blades are sharp, take care when handling, emptying and cleaning the blender jug.
- Remove rind from all citrus fruit before juicing.
- Do not use the appliance if the rotating sieve (filter basket) or lid is damaged.
- Always make sure juicer cover is clamped securely in place before motor is turned on.
- Do not operate without the pulp container in place.
- Do not unfasten interlock arm while unit is in operation.
- Do not juice more than 3kg (approximately 6 pounds) of carrot at a time.
- Avoid putting the blender jug on the motor base while the motor is still spinning.
- Do not operate without any ingredients in the jug.
- Never attempt to operate with damaged blades, or with utensils, or any foreign objects inside the jug.
- Do not put the jug in extremes of heat or cold, for example placing a cold jug into hot water, or vice versa.
- Lid must be firmly secured to the jug before operation to ensure internal contents do not escape, spray or overflow.
- Do not remove the jug from the motor base while blender is in use.
- Do not use blender while OVERLOAD PROTECTION is flashing on the LCD. If this occurs, unplug the blender and wait for 30 minutes until the motor has cooled. Once cooled, you will be able to use the blender as usual again.
- Do not process hot or boiling liquids. Allow to cool before placing into the blender jug.
- To protect against electric shock, do not immerse the power plug, cord or appliance in water or any liquid.
- Authorised Breville Service Centres can be found on our website www.breville.com
FOR HOUSEHOLD USE ONLY SAVE THESE INSTRUCTIONS
 Components
 Components
A. Food pusher (not dishwasher safe)B. Juicer cover (dishwasher safe)C. Stainless steel filter basket (dishwasher safe)D. Filter bowl surround (dishwasher safe)E. Interlocking safety arm Stops motor base operating without cover locked into place.F. Control panelG. Durable motor baseH. Inner measuring cup (dishwasher safe)I. 1.5 litre blending jug & lid (dishwasher safe)J. Juicing nozzle (dishwasher safe) Can be placed over spout to juice directly into a cup.K. Drip stop plug (dishwasher safe)L. Pulp container (dishwasher safe)M. Cleaning brush (to clean the filter basket)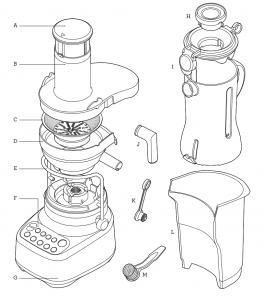
Assembly
 Assembly
BEFORE FIRST USEWash the lid, inner measuring cup, jug, the filter bowl surround, filter basket, juicer cover, food pusher and pulp container in warm, soapy water with a soft cloth. Rinse and dry thoroughly.Place motor base on a flat, dry surface such as a countertop. Ensure that the appliance is switched to OFF at the motor base and the power cord is unplugged.
JUICING
- Place filter bowl surround on top of the motor base.
- Align the arrows at the base of the stainless-steel filter basket with the arrows on the motor drive coupling and push down until it clicks into place to create a secure fit with the motor base.
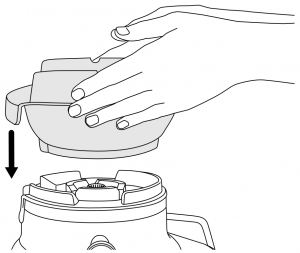
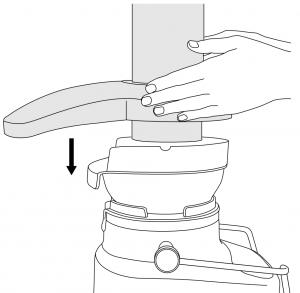
- Place the juicer cover over the filter bowl surround, positioning the lower part of the feed chute over the stainless steel filter basket.
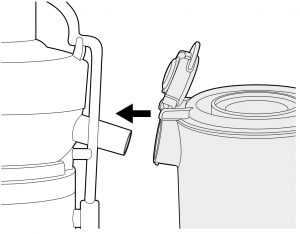
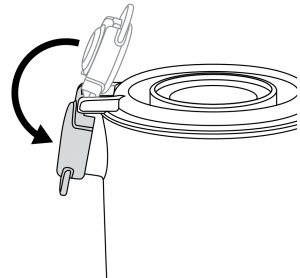
- Raise the safety locking arm up and locate into the two grooves on either side of the juicer cover.
- The safety locking arm should now be in a vertical position and locked into place on top of the juicer cover.
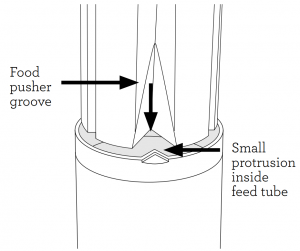
- Slide the food pusher down the food chute by aligning the groove in the food pusher, with the small protrusion on the inside of the top of the feed tube.
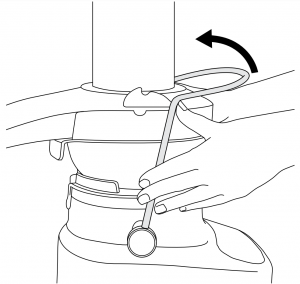
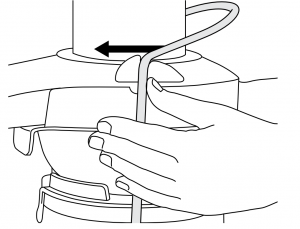
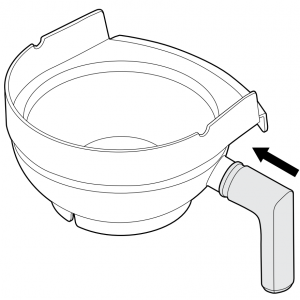
- Place the pulp container into position by tilting and lifting the motor base slightly. Insert the pulp container under the juicer cover on the back ensuring the front edge is tucked under the back lip of the filter bowl surround and the bottom edge is clipped into the bottom of the motor base.
- Drip stop plug can be fitted over juice outlet nozzle. It then allows the outlet to be plugged to prevent dripping after juicing.
- Optional: For juicing into a cup the Juicing Nozzle can be fitted onto the juice outlet nozzle.
- Fit the lid to the blender jug and position jug under juice spout.


BLENDING
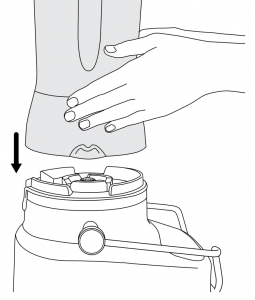
- With the blender jug in the upright position place it on the motor base. The handle of the blender can be positioned to the left or right-hand side of the appliance.
- Raise the safety locking arm up and locate into the two grooves on either side of the blender.
- Add food or liquid into the blender jug ensuring not to exceed the ‘MAX’ mark.Place the blender lid firmly into position on the top of the blender jug. Insert the clear, inner measuring lid into the blender lid and turn clockwise to lock into position. The jug features a Breville® Assist™ Lid. This allows the lid to fit tightly onto the blender jug, avoiding displacement during operation.
- Do not fill the blender jug above the ‘MAX’ line.
- Ensure the spout cover of the blender lid is clipped into place and closed. The ring pull design allows the user to easily remove the lid with a simple leverage action.After appliance is assembled into blender or juicer configuration, plug power cord into a 220–240V power outlet and turn on.Press the ON / OFF button to turn the appliance on. The ON / OFF button will illuminate. The LCD timer screen will illuminate with ‘0:00’ displayed.
 After appliance is assembled into blender or juicer configuration, plug power cord into a 220–240V power outlet and turn on.Press the ON / OFF button to turn the appliance on. The ON / OFF button will illuminate. The LCD timer screen will illuminate with ‘0:00’ displayed.
 Functions
 Functions
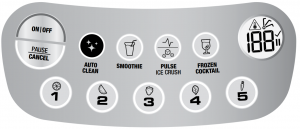
GETTING STARTED
The ON / OFF button powers the unit into READY mode.
PRESET PROGRAMS
BLENDING
The appliance has 4 preset functions:Smoothie, Pulse / Ice Crush, Auto Clean and Frozen Cocktail. These pre-programmed cycles automatically adjust the blending time and speeds to optimise blending results.These programs are only activated when your appliance is in blender set up.They can’t be used when your appliance is set up in juicing configuration.Select the required function by pressing the corresponding function button. The unit will start to operate, and the selected function button will illuminate. The timer will start to count down and program will end automatically when it reaches ‘0:00’.The program and timer can be paused by pressing the pause button. Resume by pressing program button again, or cancel by pressing pause again.The program can also be cancelled at any time by pressing the ON|OFF button. The timer will reset to 0:00
Smoothie
For dairy-based smoothies, a combination of speeds and pulses are designed to combine and aerate ingredients into a smooth and creamy texture.
Pulse / Ice Crush
A program of continuous pulsing designed to chop food into an even consistency or crush ice cubes. Use the PULSE button when the food that is being processed is too thick or coarse to circulate within the blender jug.The maximum amount of ice cubes the blender can blend at any one time without liquid in the jug is 1 standard ice tray or 250g.
Frozen Cocktail
For creating ice-based cocktails and drinks like Margaritas, Daiquiris and Slushies, an ice crush program is followed by a short blend.
Auto Clean
Use to remove most of the ingredients off the blender walls and blades. Add 2 cups of warm, soapy water and press the clean button. For harder to clean, sticky or thick ingredients, add ½ teaspoon of dishwashing detergent for extra cleaning power.For best results, clean the blender jug this way immediately after use. The Auto Clean function only cleans the blender jug. It doesn’t clean the juicer.
Speed Control Selection
There are 5 speed buttons. Speed 1 combines more delicate foods with a folding motion, good for combining wet and dry ingredients. Speed 5 is the fastest setting and is ideal for breaking down ingredients to create sauces, salad dressings and other finely blended mixtures.
JUICING
Most fruit and vegetables such as apples, carrots and cucumbers will not need to be cut or trimmed to size as these will fit whole into the feed chute. Ensure vegetables such as beets, carrots etc. have all soil removed, are washed well and trimmed of leaves before using.
- Plug the power cord into your 220–240V power outlet.IMPORTANTDo not load feed chute with produce before the Juicer has reached the selected speed.
- Turning the Juicer OnSelect desired speed setting by pressing button 1-5. Use lower numbers (1-3) for soft fruits and vegetables and higher numbers (4 and 5) for hard fruits and vegetables. See Speed Selector Guide table on the next page to match speed and produce type for maximum yield. “Low” range, while it may not maximise yield of some produce, allows you to extract juice at a significantly lower noise.
- With the motor running, place food into the feed chute and use the food pusher to gently guide food down. To extract the maximum amount of juice, always push the food pusher down slowly.
- Full Blender JugYou can keep juicing until the jug is filled to MAX. level.
![]() WARNINGNever use fingers, hands or utensils to push food down the feed chute or to clear the feed chute. Always use the food pusher provided.
WARNINGNever use fingers, hands or utensils to push food down the feed chute or to clear the feed chute. Always use the food pusher provided.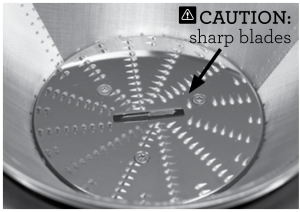 The stainless steel filter basket contains small sharp blades to cut and process fruit and vegetables. Avoid touching the blades when handling the filter basket.
SPEED SELECTOR GUIDE
|
FOOD TYPE |
SPEED |
| APPLES |
5 |
| BABY SPINACH |
5 |
| BEETROOTS |
5 |
| CAPSICUMS |
5 |
| BLUEBERRIES |
3 |
| BROCCOLI |
4 |
| CABBAGE |
5 |
| CARROT |
5 |
| CELERY |
2 |
| CITRUS FRUITS (peeled) |
1 |
| CUCUMBER |
2 |
| GINGER |
4 |
| GRAPES (seedless) |
2 |
| HONEYDEW MELON (peeled) |
3 |
| KALE |
4 |
| KIWI (peeled) |
4 |
| MANGO (peeled, stone removed) |
2 |
| MINT |
5 |
| PEACH (pit removed) |
2 |
| PEARS |
4 |
| PINEAPPLE (peeled) |
4 |
| RHUBARB |
4 |
| SQUASH |
5 |
| STRAWBERRIES |
3 |
| TOMATOES |
3 |
| WATERMELON (peeled) |
2 |
| ZUCCHINI |
4 |
Care & Cleaning
 Care & Cleaning
Ensure the motor base is turned off by pressing the ON / OFF button. Then unplug the power cord.
CLEANING
- Remove Blender Jug.
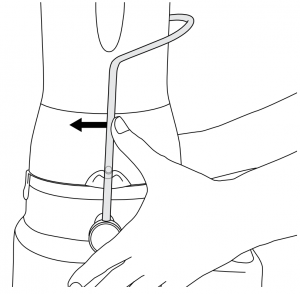
- Disengage Locking Bar, pull up entire Juice Collector Assembly and take to sink.
- Remove Pulp Container.
Empty as much pulp as possible into bin/ compost. Rinse all parts after use (except the motor base) under running water to clear away the majority of juice and pulp. Wash in warm soapy water with a soft cloth.To avoid food drying on to the blades, mesh or transparent parts, rinse and wash as soon as possible after use.
PULP CONTAINER
To minimize cleaning, you can line the pulp container with a biodegradable bag to collect the pulp.
MOTOR BASE
Wipe down with a soft damp cloth. Do not immerse the motor base in liquids.
CLEANING AGENTS
Do not use abrasive scouring pads or cleaners on either the motor base or the jug, as they may scratch the surface. Use only warm soapy water with a soft cloth.
JUG AND LID
In order to keep your Jug clean and avoid food drying on the blades and jug, follow the below steps as soon as possible after use.Rinse most of the ingredients off the jug and lid.Fill the jug with 500ml of warm water, fit the lid and press the AUTO CLEAN button.If thick or sticky ingredients require extra cleaning power add a few drops of dish liquid detergent.Rinse the jug and lid again and/or wash separately in warm soapy water with a soft cloth or bottle brush.It is most effective to clean the jug immediately after use.
DISHWASHER
All parts except for the motor base and food pusher are dishwasher safe. The blender jug can be placed on the bottom shelf of the dishwasher, however the lid and inner measuring cup should be washed on the top shelf only. However, washing parts on a regular basis in the dishwasher can shorten the life of them due to prolonged exposure to harsh detergents, hot water and pressure.Cleaning the parts in the dishwasher may also cause parts to deteriorate so inspect the parts regularly and stop using the product if any signs of damage is noticed.
FILTER BASKET
To ensure consistent juicing results, always clean the filter basket thoroughly immediately after use, using the brush provided.If pulp is left to dry, it may clog the fine pores of the filter mesh, which can affect juicing performance. The filter basket can be soaked in hot soapy water for 10 minutes, if necessary
STUBBORN FOOD STAINS
Strong smelling foods such as garlic, fish and some vegetables such as carrots may leave an odour or stain on the blender jug and lid. To remove, soak blender jug and lid for 5 minutes in warm soapy water. Then wash with a mild detergent and warm water, rinse well and dry thoroughly. Store jug with the lid off.
STORAGE
Store the appliance upright with the blender jug assembled on the motor base, or beside it. Do not place anything on top. To allow air to circulate, keep the lid off.![]() WARNINGOils in citrus rind can damage the material of your blender jug if being exposed to it for a longer period. Always clean your blender jug immediately after processing citrus rind.
WARNINGOils in citrus rind can damage the material of your blender jug if being exposed to it for a longer period. Always clean your blender jug immediately after processing citrus rind.
Troubleshooting
 Troubleshooting
| LCD screen turns on but appliance doesn’t respond to controls. |
|
| Food is unevenly chopped |
|
| Food is chopped too fine or is watery |
|
| Excess pulp building up in the stainless-steel filter basket |
|
| Pulp too wet and reduced extracted juice |
|
| Juice leaks between the filter bowl surround and the juicer cover |
|
| Juice sprays out from spout |
|
| Juice in filter bowl is left after juicer stopped |
|
| Motor appears to stall during juicing |
|
| All control panel lights flash and Overload Protection displayed on LCD screen |
|
Breville Customer Service Centre
Australian CustomersPhone: 1300 139 798Web: www.breville.com
New Zealand CustomersPhone: 0800 273 845Web: www.breville.com

Breville, the Breville logo and the Twin Turbo Pro are registered trademarks of Breville Pty. Ltd. A.B.N. 98 000 092 928.Copyright Breville Pty. Ltd. 2019.Due to continued product improvement, the products illustrated/photographed in this brochure may vary slightly from the actual product.
References
[xyz-ips snippet=”download-snippet”]