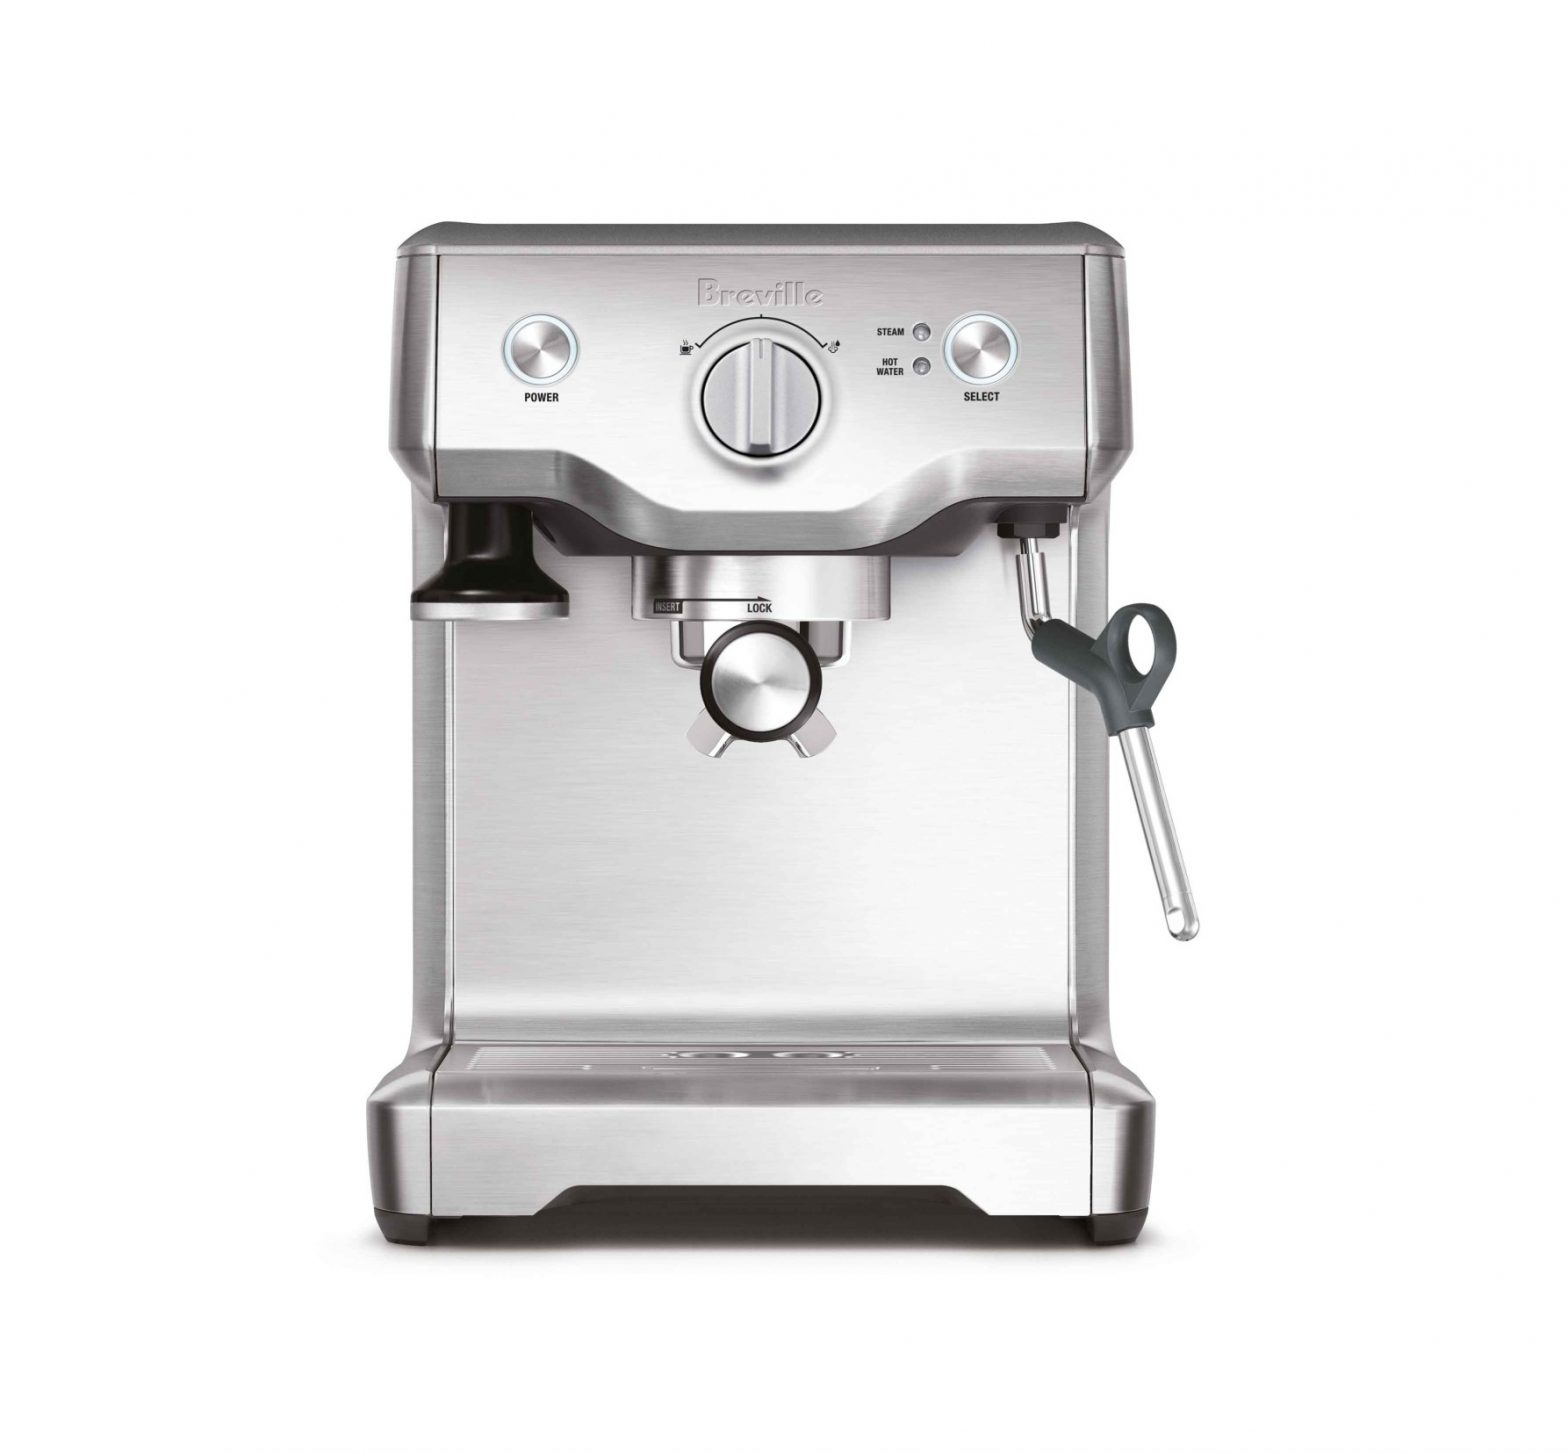
Breville BES810 Duo-Temp Pro Instructions
BREVILLE RECOMMENDS SAFETY FIRST
At Breville we are very safety conscious. We design and manufacture consumer products with the safety of you, our valued customer, foremost in mind. In addition we ask that you exercise a degree of care when using any electrical appliance and adhere to the following precautions.
IMPORTANT SAFEGUARDS
READ ALL INSTRUCTIONS BEFORE USE AND SAVE FOR FUTURE REFERENCE
- Carefully read all instructions before operating and save for future reference.
- Remove and safely discard any packaging material and promotional labels or stickers before using the Breville Duo-Temp™ Pro for the first time.
- To eliminate a choking hazard for young children, remove and safely discard the protective cover fitted to the power plug of this appliance.
- Do not place the Breville Duo-Temp™ Pro near the edge of a bench or table during operation. Ensure the surface is level, clean and free of water and other substances.
- Do not use the Breville Duo-Temp™ Pro on a sink drain board.
- Do not place the Breville Duo-Temp™ Pro on or near a hot gas or electric burner, or where it could touch a heated oven.
- Always ensure the Breville Duo-Temp™ Pro is properly assembled before connecting to power outlet and operating. Follow the instructions provided in this book.
- Allow the espresso machine to cool for 2 minutes between each coffee making cycle.
- The appliance is not intended to be operated by means of an external timer or separate remote control system.
- Do not use attachments other than those provided with the Breville Duo-Temp™ Pro.
- Do not attempt to operate the Breville Duo-Temp™ Pro by any method other than those described in this book
- Use only cold, tap water in the water tank. Do no use any other liquid.
- Never use the Breville Duo-Temp™ Pro without water in the water tank.
- Ensure the portafilter is firmly inserted and secured into the Group Head before using the machine.
- Never remove the portafilter during the extraction as the machine is under pressure.
- Do not move the Breville Duo-Temp™ Pro whilst in operation.
- Do not leave the Breville Duo-Temp™ Pr unattended when in use.
- Do not touch hot surfaces. Allow the Breville Duo-Temp™ Pro to cool down before moving or cleaning any parts.
- Do not place anything, other than cups for warming, on top of the Breville Duo-Temp™ Pro.
- Always switch off the Breville Duo-Temp™ Pro by pressing the POWER button to ‘Off’, switch offat the power outlet and unplug if appliance is to be left unattended, if not in use, before cleaning, before attempting to move the appliance, disassembling, assembling and when storing the appliance.
- Keep the appliance and accessories clean. Follow the cleaning instructions provided in this book.
![]() WARNINGTo avoid the risk of injury, do not open the brew chamber during the brew process.
WARNINGTo avoid the risk of injury, do not open the brew chamber during the brew process.
IMPORTANT SAFEGUARDS FOR ALL ELECTRICAL APPLIANCES
- Unwind the power cord fully before use.
- Do not let the power cord hang over the edge of a bench or table, touch hot surfaces, or become knotted.
- To protect against electric shock do not immerse power cord, power plug or appliance in water or any other substance.
- This appliance can used by children aged from 8 years and above ifthey have been given supervision or instruction concerning the use of the appliance in a safe way and if they understand the hazards involved.
- Cleaning and user maintenance shall not be made by children unless they are older than 8 and are supervised. Keep the appliance and its cord out of reach of children.
- This appliance is not intended for use by persons with reduced physical, sensory or mental capabilities, or lack of experience or knowledge, unless they have been given supervision or instruction concerning use of the appliance by a person responsible for their safety.
- Children should be supervised to ensure they do not play with the appliance.
- It is recommended to regularly inspect the appliance. Do not use the appliance if power cord, power plug or appliance becomes damaged in anyway. Return the entire appliance to the nearest authorised Breville Service Centre for examination and/or repair.
- Any maintenance other than cleaning should be performed at an authorised Breville Service Centre.
- This appliance is recommended for household use only. Do not use this appliance for anything other than its intended use. Do not use in moving vehicles or boats. Do not use outdoors.Misuse may cause injury.
- The installation of a residual current device (safety switch) is recommended to provide additional safety protection when using electrical appliances. It is advisable that a safety switch with a rated residual operating current not exceeding 30mA be installed in the electrical circuit supplying the appliance. See your electrician for professional advice.
![]() WARNINGFully unwind the cord before use.
WARNINGFully unwind the cord before use.
FOR HOUSEHOLD USE ONLY SAVE THESE INSTRUCTIONS
Features
PID TEMPERATURE CONTROL
Electronic PID temperature control for increased temperature stability.
AUTO PURGE
Automatically adjusts water temperature after steam for optimal coffee temperature.
THERMOCOIL HEATING SYSTEM
Integrated stainless steel water coil accurately controls water temperature.
LOW PRESSURE PRE-INFUSION
Applies low pressure at the start of the extraction to gently expand grinds for an even extraction.
SWIVEL STEAM WAND
Easily adjusted to the ideal position for texturing milk.
THE RAZOR™ PRECISION DOSE TRIMMING TOOL
Trims the puck to the right level for a consistent extraction
Components
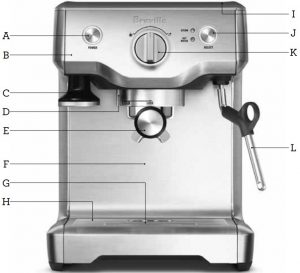
- A. POWER button surround illuminates when machine is switched on.
- B. Thermocoil heating system accurately controls water temperature.
- C. Integrated removable tamper for tamping control.
- D. Group head for easy positioning of the portafilter.
- E. 54mm stainless steel portafilter with commercial style spouts.
- F. Extra-tall cup height for coffee mugs
- G. Drip tray full indicator
- H. Removable drip tray
- I. Cup warming tray
- J. SELECT button for steam or hot water
- K. Control Dial for espresso, steam and hot water.
- L. Swivel steam wand easily adjusts to perfect position for texturing milk.
NOT SHOWN
- Removable 1.8L water tank filled from the top with integrated water filtration.
- Storage tray located behind the drip tray for storage of accessories.
CUSTOM DESIGNED ACCESSORIES
- Razor™ Precision Dose Trimming Tool
- Single wall filter baskets for freshly ground coffee.
- Advanced dual wall filter baskets for pre-ground coffee.
- Water filter
- Stainless steel milk jug
CLEANING ACCESSORIES
- Cleaning tool
- Silicon cleaning disk
- Cleaning tablets
- Descaling powder
Functions
BEFORE FIRST USE
Machine PreparationRemove and discard all labelling and packaging materials attached to yourespresso machine. Ensure you have removed all parts and accessories before discarding the packaging. Clean parts and accessories (water tank, portafilter, filter baskets and jug) using warm water and a gentle dish washing liquid and rinse well. Wipe the outer housing and drip tray with a soft damp cloth and dry thoroughly. Do not immerse the outer housing, power cord or power plug in water or any other liquid.The water filter located inside the water tank will need to be removed before washing the water tank.
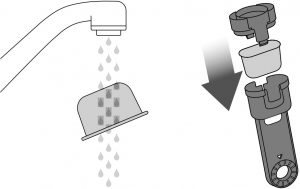
Conditioning the Water Filter
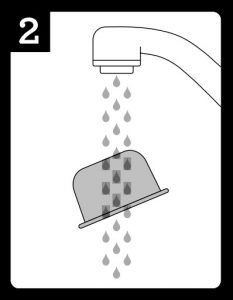
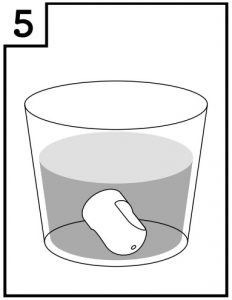
- Remove filter from the plastic bag and soak in a cup of water for 5 minutes.
- Rinse filter under cold running water.
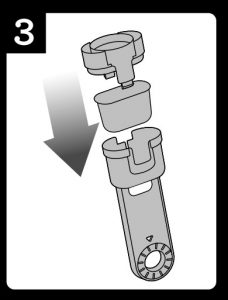
- Insert the filter into the filter holder.

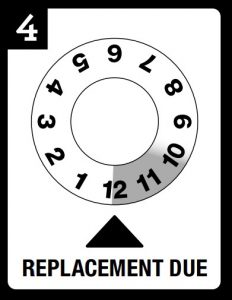
- Set the dial date 2 months ahead.
- To install filter, push down to lock into place.
- Slide the water tank into position and lock into place.
![]() NOTEDo not clean any of the parts or accessories in the dishwasher.
NOTEDo not clean any of the parts or accessories in the dishwasher.
FIRST USE
Initial Start Up
- Fill tank with water
- Press POWER button
- A pumping sound will be heard. The machine will reach operating temperature and go into ‘Standby’ mode.
FLUSHING THE MACHINE
It is recommended to complete a water flushing operation, without ground coffee, to ensure the machine has been conditioned.When the machine has reached ‘Standby’ mode, run the following 2 steps.
- Turn the Control Dial to the ‘Espresso’ position for 30 seconds.
- Turn the Control Dial to the ‘Steam’ position to activate steam for 10 seconds.
- Repeat this cycle several times.
![]() NOTE
NOTE
To purchase water filters contact Breville Customer Service Centre on 1300 139 798 (Australia) or 0800 273 845 (New Zealand).
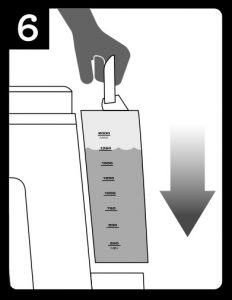
FILLING THE WATER TANK
- Ensure the water filter is securely fitted inside the tank.
- Fill the water tank with cold tap water to the maximum mark on the side of the tank and slide the water tank back into position at the back of the machine.
- Plug the power cord into power outlet and switch On at power point.
- Press the POWER button. The POWER button surround will flash while the machine is heating. When the correct temperature has been reached, all the button surrounds on the control panel will illuminate.
![]() NOTECheck the water level before use and replace the water daily. The water tank should be filled with fresh, cold tap water before each use. Do not use de-mineralised or distilled water or any other liquid.
NOTECheck the water level before use and replace the water daily. The water tank should be filled with fresh, cold tap water before each use. Do not use de-mineralised or distilled water or any other liquid.
COFFEE PREPARATION
Dose & Tamping the Ground CoffeeIf using whole bean coffee ground directly before extracting, use the Single Wall Filter Baskets. If using Pre-ground coffee, use the Dual Wall Filter Baskets. Insert the correct Filter Basket into the portafilter. Fill the Filter Basket with ground coffee, tap down to collapse the coffee, then using the integrated tamper, tamp down firmly (approx.. 15-20kg of pressure).
It’s important to apply consistent pressure every time
- As a guide to dose, the top edge of the metal cap on the tamper should be level with the top of the filter basket AFTER the coffee has been tamped. This will minimise under or over dosing the coffee.
- Wipe excess coffee from the rim of the filter basket to ensure a proper seal in the group head is achieved.
TRIMMING THE DOSE
The Razor™ precision dose trimming tool allows you to trim the puck to the right level for a consistent extraction.

Refer to Coffee Making Tips & Preparation, page 12 for more details.
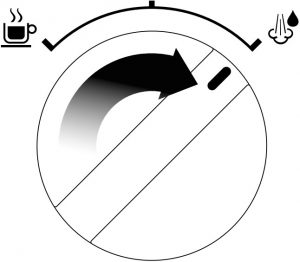
EXTRACTING ESPRESSO
Insert the Portafilter into the Group Head & lock into position. Turn the Control Dial to the ‘Espresso’ position. A pumping noise will be heard. After a few seconds, coffee will begin to brew into the cup.
When sufficient coffee has flowed into the cup, turn the Control Dial to ‘Standby’. This will stop the flow of coffee. Breville recommends approx. 30 sec of extraction.
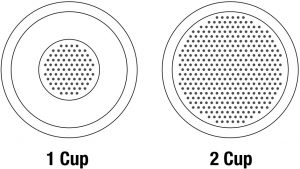
![]() NOTEFor optimal flavour when using a 1 CUP filter, you should extract approx. 30ml. When using a 2 CUP filter, you should extract approx. 60ml.
NOTEFor optimal flavour when using a 1 CUP filter, you should extract approx. 30ml. When using a 2 CUP filter, you should extract approx. 60ml.
LOW PRESSURE PRE-INFUSION
The low pressure pre-infusion gradually increases water pressure to gently expandgrinds for an even extraction before increasing to full pressure.
![]() WARNINGThe metal parts of the portafilter will be very hot.
WARNINGThe metal parts of the portafilter will be very hot.
![]() NOTEIf machine is run continuously for 30 minutes, allow machine to cool for 5 minutes before each use.
NOTEIf machine is run continuously for 30 minutes, allow machine to cool for 5 minutes before each use.
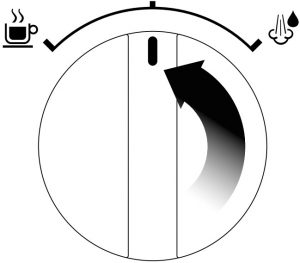
TEXTURING MILK
The Duo Temp™ Pro is equipped with a commercial style steam wand.
- Before inserting the steam wand into the milk, it is recommended to purge the steam wand.
- Turn the Control Dial to ‘Steam’.
- The ‘Steam’ LED will illuminate.
- It may take a few moments before the steam appears.
- Pause the steam by returning the dial back to the ‘Standby’ position. This will avoid the milk splashing out of the jug.
- The Steam will Pause for 8 secs.
- Insert the wand into the milk and set the Control Dial to the ‘Steam’ position to texture milk.
- To stop the steam set the Control Dial to the ‘Standby’ position and remove the jug.
NOTEWhen the espresso machine creates steam, a pumping noise can be heard. This is the normal operation of the 15 bar Italian pump.
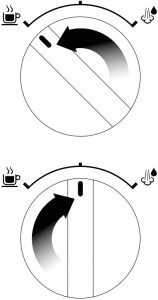
HOT WATER
The machine features a separate Hot Water function that dispenses hot water from the Steam Wand.
To use the Hot Water function:
- Press the ‘SELECT’ button and the Hot Water LED will illuminate.
- Direct the spout outlet towards thedrip tray.
- Turn the Control Dial to ‘Steam’.
To turn the hot water off, turn the Control Dial to the ‘Standby’ position.
![]() NOTE
NOTE
The machine will automatically default to ‘Steam’ when the appliance is first switched on.
Both Steam and Hot Water functions cannot be operated at the same time.
![]() WARNING
WARNING
- Hot water may drip from the Steam Wand.
- Always direct spout outlet towards the drip tray
AUTO PURGE
For extracting espresso immediately after using the steam function, this machinefeatures an auto-purge function. The auto purge function ensures the ground coffee will not be burnt by the initial water flow from the thermocoil being too hot. The water is automatically released internally into the drip tray ensuring that the thermocoil is at optimal temperature for extracting espresso. Your espresso will always be extracted at the optimal temperature ensuring only the best flavours are extracted.
COFFEE MAKING TIPS AND PREPARATION
PRE-HEATING Heating your cup or glass
A warm cup will help maintain the coffee’s optimal temperature. Preheat your cup by rinsing with hot water and place on the cup warming tray.
Heating the portafilter and filter basket
A cold portafilter and filter basket can reduce the extraction temperature enough to significantly affect the quality of your espresso. Ensure the portafilter and filter basket are preheated with hot water before initial use. Wipe the filter and portafilter dry before dosing with ground coffee as moisture can encourage channelling where water by-passes the ground coffee during extraction
Single Wall Filter Baskets
The Single Wall filters (1 & 2 CUP) are designed to be used with freshly groundcoffee and allow you to experiment with grind, dose, and tamp to create a more balanced espresso.
Advanced Dual Wall Filter Baskets
The Dual Wall filters (1 & 2 CUP) aredesigned to be used with pre-ground coffee and regulate the pressure to help optimise extraction and crema regardless of the grind, dose or tamp pressure.
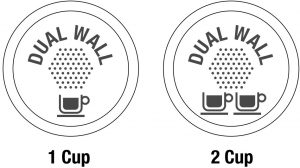
The Dual Wall filters have DUAL WALL stamped on the underside of the filter.
The Grind
When grinding coffee beans, the grind size should be fine but not too fine. The grind size will affect the rate at which the water flows through the ground coffee in the filter basket and the taste of the espresso. If the grind is too fine (looks like powder and feels like flour when rubbed between fingers), the water will not flow through the coffee when under pressure. The resulting espresso will be OVER EXTRACTED, dark in colour and bitter in flavour.
Coffee Dose and Tamping
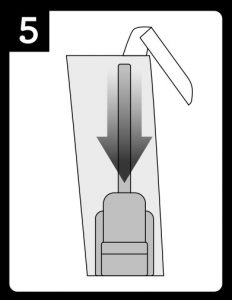
- Wipe coffee basket with a dry cloth.
- If using Single Wall filter baskets, grind enough coffee to fill the coffee basket. You may need to experiment with the amount of coffee to achieve the correct dose.
- Tap the portafilter several times to distribute the coffee evenly in the filter basket.
- Tamp down firmly (using approx. 15-20kgs of pressure). It’s important to apply consistent pressure every time.
- As a guide to dose, the top edge of the metal cap on the tamper should be level with the top of the filter basket AFTER the coffee has been tamped. This will minimise under or over dosing the coffee.
- Wipe excess coffee from the rim of the filter basket to ensure a proper seal in the group head is achieved.

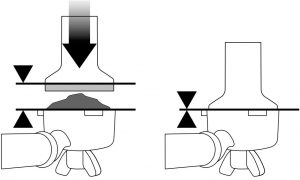
TRIMMING THE DOSE
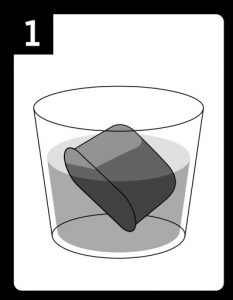
The Razor™ precision dose trimming tool allows you to trim the puck to the rightlevel for a consistent extraction. Dose the Portafilter with freshly ground coffee and tamp down with between 15-20kg of pressure.
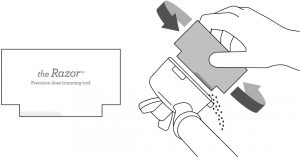
Insert the Razor™ into the coffee basket until its shoulders rest on the rim of the filter basket. The blade of the dosing tool should penetrate the surface of the tamped coffee. Rotate the Razor™ dosing tool back and forth while holding the portafilter on an angle over the knock box to trim off excess coffee. Your coffee filter basket is now dosed with the correct amount of coffee.
![]() NOTEWhen using the 1 CUP Single Wall Filter basket, you may need to make the grind finer and also decrease the grind amount to ensure a correct dose and extraction.
NOTEWhen using the 1 CUP Single Wall Filter basket, you may need to make the grind finer and also decrease the grind amount to ensure a correct dose and extraction.
EXTRACTION GUIDE
|
– |
GRIND | GRIND DOSE | TAMP | SHOT TIME |
OVER EXTRACTED BITTER
|
TOO FINE | TOO MUCH | TOO HEAVY | OVER 35 SEC |
| BALANCED | OPTIMUM | 8-11g (1CUP) 16-19g (2 CUP) | 15-20kg | 25-30 SEC |
UNDER EXTRACTEDUNDERDEVELOPED
|
TOO COARSE | TOO LITTLE | TOO LIGHT
|
UNDER 20 SEC |
PURGING THE GROUP HEAD
Before placing the portafilter into the group head, run a short flow of water through the group head, turning the Control Dial to the ‘Espresso’ position. This will purgeany ground coffee residue from the group head and stabilise the temperature prior to extraction
INSERTING THE PORTAFILTER
Place the portafilter underneath the group head so that the handle is aligned with the INSERT position. Insert the portafilter into the group head and rotate the handle towards the centre until resistance is felt.
EXTRACTING ESPRESSO
- Place pre-warmed cup(s) beneath the group head and turn the Control Dial to the ‘Espresso’ position until the required volume is reached.
- As a guide, the espresso should start to flow after 8-12 seconds (infusion time) and should be the consistency of pouring honey.
- If the espresso starts to flow before 7 seconds you have either under dosed the filter basket and/or the grind is too coarse. This is an UNDER EXTRACTED shot.
- If the espresso starts to drip but doesn’t flow after 12 seconds, you have either over dosed the filter basket and/or the grind is too fine. This is an OVER EXTRACTED shot.
- A great espresso is about achieving the perfect balance between sweetness, acidity and bitterness.
- The flavour of your coffee will depend on many factors, such as the type of coffee beans, degree of roast, freshness, coarseness or fineness of the grind and dose of ground coffee.
- Experimenting by adjusting these factors just one at a time can help to achieve the taste of your preference.
TEXTURING MILK
There are two phases to texturing milk. The first is stretching the milk to aerate it and the second is swirling the milk to make it silky smooth. These two operations should blend into one.
- Always start with fresh cold milk.
- Fill the jug just below the V at the bottom of the spout.
- Position the steam tip over the drip tray and turn the Control Dial to STEAM position, purging any condensed water.
- Turn the Control Dial to ‘Standby’ position to pause the steam, insert steam wand tip into milk and turn dial to STEAM position.
- Insert the steam tip 1-2cm below the surface close to the right hand side of the jug at the 3 o’clock position.
- Keep the tip just under the surface until the milk is spinning clockwise, producing a vortex (whirlpool effect).
- With the milk spinning, slowly lower the jug. This will bring the steam tip to the surface of the milk and start to introduce air into the milk. You may have to gently break the surface of the milk with the tip to get the milk spinning fast enough.
- Keep the tip at or slightly below the surface, continuing to maintain the vortex. Texture the milk until sufficient volume is obtained.
- Lower the tip beneath the surface, but keep the vortex of milk spinning. The milk is at the correct temperature (60-65°C) when the jug is hot to touch.
- Turn the Control Dial to the ‘Standby’ position before taking the tip out of the milk.
- Set the jug to one side, turn steam on to purge out any residual milk from the steam wand and wipe steam wand with a damp cloth.
- Tap the jug on the bench to collapse any bubbles.
- Swirl the jug to polish and integrate the texture.
- Pour milk directly into the espresso.
- The key is to work quickly, before the milk begins to separate.
BEAN FRESHNESS
Breville recommends quality 100% Arabica beans with a ‘Roasted On’ date stamped on the bag, not a ‘Best Before’ or ‘Use By’ date.
Coffee beans are best consumed between 5-20 days after the ‘Roasted On’ date.
Store coffee beans in an airtight container. Vacuum seal if possible. Grind immediately before brewing as ground coffee quickly loses its flavour and aroma.
Care & Cleaning
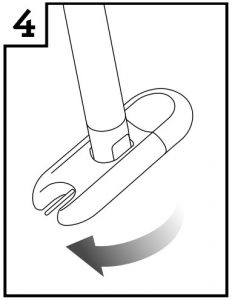
INSTALLING/REPLACING THE FILTER IN THE WATER TANK
- Soak the water filter for 5 minutes
- Rinse the filter
- Assemble
- Set date 2 months ahead
- Install filter in water tank
- Insert & lock water tank
The water filter provided helps to prevent scale build up which over time can affect the performance of your machine, potentially causing blockages and heating problems.
Replacing the water filter every two months will reduce the mineral build up in the machine.
If you live in a hard water area, we recommend you change the water filter more frequently.
Replacing The Water Filter
- Remove the filter from the plastic bag, and soak in a cup of water for 5 minutes.
- Rinse the filter under cold running water for 5 seconds.
- Set the date dial 2 months ahead.
- To install, push down to lock into place.
The water filter can be removed from the water tank during operation if not required.
PORTAFILTER CLEANING
Periodically run water through the machine with the portafilter in place, but without any ground coffee, to rinse out any residual coffee particles.
![]() NOTE
NOTE
For replacement water filters contact BrevilleCustomer Service Centre on 1300 139 798(Australia) or 0800 273 845 (New Zealand)
MACHINE CLEANING
After regular use, residual grinds and oil build up in the machine can affect coffeeextraction. We recommend performing a cleaning cycle every 2-3 months using the cleaning tablet provided.
To perform a cleaning cycle:
- Insert the silicon disk into the portafilter.
- Place the cleaning tablet on the silicon disk (position in the centre).
- Insert the portafilter into the group head and rotate to right to lock in position.
- Ensure Power On/Off button is on.
- Turn the dial to the ‘Espresso’ position for 20 seconds.
- Turn the dial back to the ‘Standby’ position.
- Repeat steps 5-6 three times or until the cleaning tablet is dissolved.
DESCALING
Even when correctly using the water filter provided, we recommend a descale procedure when there is a scale build-up in the water tank.
![]() NOTEEnsure that the water filter is removed from the water tank before adding the descaling powder when descaling the machine.
NOTEEnsure that the water filter is removed from the water tank before adding the descaling powder when descaling the machine.
Visit Breville® webpage to purchase “the Descaler
- Ensure the Control Dial is in the ‘Standby’ position, the machine is switched off.
- Remove the filter holder.
- Empty one sachet (25g) into 1 litre of warm water, stir to dissolve. Pour solution into the water tank.
- Press the POWER button to switch the machine on.
- Place a large container under both the Group Head and the Steam Wand.
- Set the Control Dial to the ‘Espresso’ position and let half the descale solution run through the Group Head.
- Set the Control Dial to the ‘Steam’ position and allow the remaining solution to run through the Steam Wand. When the liquid stops flowing, set the Control Dial back to the ‘Standby’ position.
- After descaling, remove the water tank and rinse thoroughly then refill with fresh cold water. To rinse the machine, repeat steps 5-8.
AUTO OFF MODE
The machine automatically switches to AUTO OFF mode after 20 minutes.
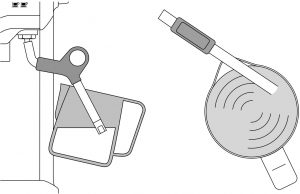
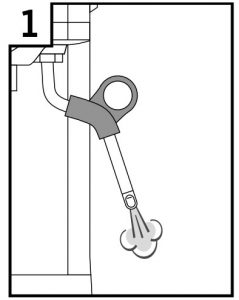
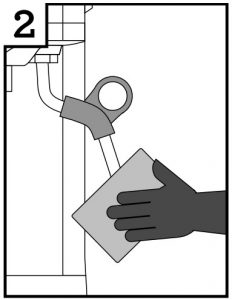
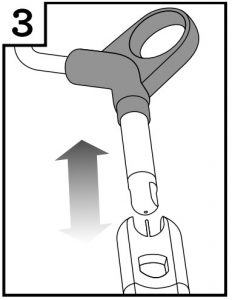
CLEANING THE STEAM WAND
- Run steam to clear milk from wand after texturing
- Wipe steam wand after each use
- Clean hole with pin
- Remove tip
- Soak tip overnight then re-attach
Cleaning filter baskets
Should the fine holes in the filters become blocked follow the steps below:
- Place the filter into the portafilter. Run water through the machine with the filter and portafilter, without any ground coffee, in place.
- A pin can be used to clear the filter basket holes.
- For a thorough clean of the filters, dissolve a cleaning tablet in hot water and soak filters overnight.
Cleaning the outer housing / cup warming plate
The outer housing and cup warming plate can be cleaned with a soft, damp cloth.Then polish with a soft, dry cloth.
Do not use abrasive cleansers, pads or cloths which can scratch the surface.
Cleaning the drip tray
The drip tray should be removed, emptied and cleaned at regular intervals.
Wash the drip tray with warm soapy water, using a non-abrasive washing liquid, rinse and dry thoroughly. The drip tray base and cover are dishwasher safe.
Cleaning the storage tray
The storage tray can be removed after the drip tray is removed then cleaned with a soft, damp cloth (do not use abrasive cleansers, pads or cloths which can scratch the surface).
Storing your machine
Before storing, press the POWER button to off, turn the Control Dial to ‘Standby’ and unplug.Insert all accessories into position or into the storage tray.Store upright. Do not place anything on top.
![]() WARNING
WARNING
Do not immerse power cord, power plug or appliance in water or any other liquid.The water tank should never be removed or completely emptied during decalcifying.
Troubleshooting
| PROBLEM | POSSIBLE CAUSES | EASY SOLUTION |
| Coffee does not run through | Machine is not turned On | Ensure the machine is plugged in, switched On at the power outlet and the POWER button is pressed. |
| Water tank is empty | Refer to ‘Filling The Water Tank’, page 9 | |
| The Control Dial not in ‘Espresso’ position | Turn the Control Dial to the ‘Espresso’ position
|
|
| Coffee grind is too fine | Ensure you use a suitable espresso grind. Refer to ‘The Grind’, page 13.
|
|
| Too much coffee in the filter basket | Refer to ‘Coffee Dose and Tamping’, page 13. | |
| Coffee tamped too firmly | Refer to ‘Coffee Dose and Tamping’, page 13
|
|
| The filter is blocked | Use a pin to clear the holes. Please refer to ‘Cleaning Filter’, page 18. | |
| Coffee runs out too quickly | The coffee grind is too coarse | Ensure you use a suitable espresso grind. Refer to ‘The Grind’, page 13.
|
| Not enough coffee in the filter | Refer to ‘Coffee Dose and Tamping’, page 13. | |
| Coffee not tamped firmly enough | Refer to ‘Coffee Dose and Tamping’, page 13. | |
| Coffee is too cold | Cups not preheated | Preheat cups. Refer to ‘Pre-heating Cup or Glass’, page 12.
|
| When the base of the jug becomes too hot to touch this is when milk is heated at the correct temperature. Refer to ‘Texturing Milk’, page 10. | ||
| No crema | Coffee is not tamped firmly enough | Refer to ‘Coffee Dose and, Tamping’, page 13. |
| Coffee grind is too coarse | Ensure you use a suitable espresso grind. Refer to ‘The Grind’, page 13. | |
| Ground coffee is not fresh | Change to freshly roasted beans. Refer to ‘Bean Freshness’, page 15. | |
| Filter holes are blocked | Use the fine pin on the cleaning tool to clear the holes. Refer to ‘Cleaning The Steam Wand’ on page 25. | |
| Machine is making pulsing/pumping sound while extracting coffee or steaming milk | The machine is carrying out the normal operation of the 15 bar Italian pump | No action required as this is the normal operation of the machine. |
| Coffee runs out around the edge of the portafilter | Portafilter is not inserted into the group head properly | Insert portafilter into the group head and align with ‘LOCK’ on the group head collar, until resistance is felt. Refer to ‘Inserting The Portafilter’, page 20 |
| There are coffee grounds around the filter basket rim | Clean any excess ground coffee from the rim of the filter basket to ensure a proper fit into the group head.
|
|
| Too much ground coffee in the filter basket | Refer to ‘Coffee Dose & Tamping’, page 18. | |
| Ground coffee has been tamped too firmly | Refer to ‘Coffee Dose & Tamping’, page 18. | |
| Incorrect filter for amount of ground coffee used | Ensure you use the 1 CUP filter for 1 cup of coffee and the 2 CUP filter for 2 cups of coffee. | |
| Coffee drips from the portafilter spouts | The water tank is empty or low | Refer to ‘Filling The Water Tank’, page 9 |
| Coffee grind is too fine | Ensure you use a suitable espresso grind. Refer to ‘The Grind’, page 13. | |
| Too much coffee in basket | Refer to ‘Coffee Dose and Tamping’, page 13. | |
| Machine is blocked by mineral deposits | Descale the machine. Refer to ‘Descaling’, page 17. | |
| Machine is making a loud and continuous pumping noise | Water tank is empty | Refer to ‘Filling The Water Tank’, page 9. |
| Water tank is not securely in place | Refer to ‘Filling The Water Tank’, page 9. | |
| No steam is generated | Machine is not turned on | Ensure the machine is plugged in, switched On at the power outlet and the POWER button is pressed. |
| Water tank is empty | Refer to ‘Filling the Water Tank’, page 9. | |
| Control Dial not in ‘Steam’ position | Turn the Control Dial to the ‘Steam’ position. Use the ‘SELECT’ button to toggle to ‘Steam’.Ensure the ‘Steam’ LED is illuminated for steam and the ‘Hot Water’ LED is illuminated for hot water. | |
| Steam Wand is blocked. | Use the pin on the cleaning tool to clear the opening. If the steam wand continues to be blocked remove the tip of the steam wand using the spanner in the middle of the cleaning tool. Refer to ‘Care and Cleaning’, page 16. | |
| No hot water | Empty tank | Fill tank |
| Steam Wand is blocked | Use the pin on the cleaning tool to clear the opening. If the steam wand continues to be blocked remove the tip of the steam wand using the spanner in the middle of the cleaning tool. Refer to ‘Cleaning the Steam Wand’, page 18.
|
|
| Milk is not smooth after texturing | Not enough steam | Steam wand may be blocked. Refer to ‘Cleaning the Steam Wand’, page 18. |
| Milk is not cold enough | Use cold fresh milk, refer to ‘Texturing Milk’, page 10. | |
| Machine is not working |
/ |
The safety thermal cut out may have activated due to the pump overheating. Turn the machine off and allow to cool for about 30-60 minutes |
Coffees to try
CAPPUCCINO
A single shot of espresso with textured milk, garnished with drinking chocolate.

ESPRESSO
Intense and aromatic, it is also known as an espresso or short black and is served in a small cup or glass

LATTÉ
A latté consists of a single espresso with textured milk and approx. 10mm of foam.

MACCHIATO
Traditionally served short, the macchiato is also poured as a long black with a dash of milk or a dollop of textured milk.

LONG BLACK
Add hot water first, then a shot of espresso (single or double) so that crema is maintained.

RISTRETTO
A ristretto is an extremely short espresso of approximately 15ml, distinguished by its intense flavour and aftertaste.

Breville Customer Service Centre
Australian CustomersPhone: 1300 139 798Web: www.breville.com
New Zealand CustomersPhone: 0800 273 845Web: www.breville.com

Breville, the Breville logo, Bambino, ThermoJet, Breville Assist and Master Every Moment are trademarks of Breville Pty Ltd (“Breville”).A.B.N. 98 000 092 928. Copyright Breville Pty. Ltd. 2021.
Due to continued product improvement, the products illustrated/photographed in this booklet may vary slightly from the actual product.
References
[xyz-ips snippet=”download-snippet”]