Breville BMF600 The Milk Cafe Instructions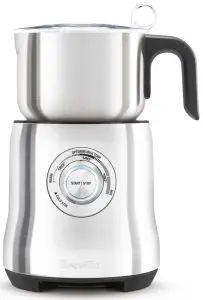
BREVILLE RECOMMENDS SAFETY FIRST
At Breville we are very safety conscious. We design and manufacture consumer products with the safety of you, our valued customer, foremost in mind. In addition we ask that you exercise a degree of care when using any electrical appliance and adhere to the following precautions.
IMPORTANT SAFEGUARDS
READ ALL INSTRUCTIONS BEFORE USE AND SAVE FOR FUTURE REFERENCE
- Carefully read all instructions before operation and save for future reference.
- Remove and safely discard any packaging material and promotional labels before using the Breville Milk Café™ for the first time.
- To eliminate a choking hazard for young children, remove and safely discard the protective cover fitted to the power plug of this appliance.
- Do not place the Breville Milk Café™ near the edge of a bench or table during operation.
- Do not place the appliance on or near a hot gas burner, electric element or where it could touch a heated oven.
- Do not operate the appliance on a sink drain board.
- Ensure that the surface is level, clean and free of water.
- The Breville Milk Café™ is not intended to be operated by means of an external timer or separate remote control system.
- To protect against electric shock, do not immerse the power base, power cord or power plug in water or allow moisture to come in contact with these parts.
- Always switch the Breville Milk Café™ off at the power outlet and unplug if appliance is to be left unattended, if not in use, before cleaning, before attempting to move the appliance, disassembling, assembling and when storing the appliance.
- The Breville Milk Café™ is not intended for use by young children or infirm persons unless they have been adequately supervised by a responsible person to ensure they can use the appliance safely.
- The Breville Milk Café™ has been designed specifically for the purpose of foaming milk and other dairy milk alternatives and is not intended to thicken or heat other food substances eg. cream, custards, soups, gravies.
- The Breville Milk Café™ is not designed to mix a large quantity of dry ingredients or melt large food pieces eg. cubed chocolate, ground nuts, whole spices, fresh herbs.
- The underside of the jug must always be dry before placing onto power base before use.
- The jug must only be used with the power base provided. Do not use attachments other than those provided with the Breville Milk Café™.
- Attach the jug lid securely to the jug before operation. Do not open the jug lid during operation.
- Use caution when operating unit as heating metal jug surface is liable to get hot during use.
- Use caution when pouring foamed milk from the jug after heating as hot milk may scald at high temperatures.
- Do not operate the appliance without liquid. Always fill to at least the ‘MIN’ marking and no more than the ‘MAX’ marking inside the jug.
- Do not put metal or similar items into the jug as this may damage or affect the operation of the unit.
- Keep the appliance and accessories clean. Follow the Care and Cleaning instructions provided on Page 16.
IMPORTANT SAFEGUARDS FOR ALL ELECTRICAL APPLIANCES
Fully unwind the power cord before use.
- Do not let the power cord hang over the edge of a bench or table, touch hot surfaces or become knotted.
- To protect against electric shock do not immerse the power cord, power plug or appliance in water or any other liquid.
- The appliance is not intended for use by persons (including children) with reduced physical, sensory or mental capabilities, or lack of experience and knowledge, unless they have been given supervision or instruction concerning use of the appliance by a person responsible for their safety.
- Children should be supervised to ensure that they do not play with the appliance.
- It is recommended to regularly inspect the appliance. To avoid a hazard do not use the appliance if power cord, power plug or appliance becomes damaged in any way. Return the entire appliance to the nearest authorised Breville Service Centre for examination and/or repair.
- If the supply cord is damaged, it must be replaced by the manufacturer, its service agent or similarly qualified persons in order to avoid a hazard.
- Any maintenance other than cleaning should be performed at an authorised Breville Service Centre.
- This appliance is for household use only. Do not use this appliance for anything other than its intended use. Do not use in moving vehicles or boats. Do not use outdoors. Misuse may cause injury.
- The installation of a residual current device (safety switch is recommended to provide additional safety protection when using electrical appliances. It is advisable that a safety switch with a rated residual operating current not exceeding 30mA be installed in the electrical circuit supplying the appliance. See your electrician for professional advice.
- Appliances can be used by persons with reduced physical, sensory or mental capabilities or lack of experience and knowledge if they have been given supervision or instruction concerning use of the appliance in a safe way and understand the hazards involved.
WARNING
- Always ensure frothing disc is inserted firmly into jug before use.
- Frothing disc is a choking hazard. Children must always be supervised and never left unattended with appliance.
- Never immerse the power base, power cord or power plug in water or allow moisture to come into contact with these parts.
BREVILLE ASSIST™ PLUG
- Your Breville appliance comes with a unique Assist™ Plug, conveniently designed with a finger hole in the power plug for easy and safe removal from the wall outlet. For safety reasons it is recommended you plug your Breville appliance directly into its own electrical outlet on a dedicated circuit separate from other appliances. If the electrical circuit is overloaded with other appliances, your appliance may not function properly. Using in conjunction with a power strip or extension cord is not recommended
KNOW YOUR BREVILLE PRODUCT
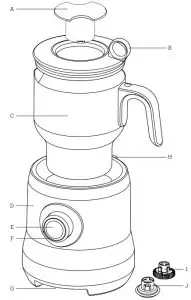
- Measuring CapFor measuring and adding ingredients once mixing has started.
- Jug LidWith Breville Assist™ Ring-Pull Removal.
- Dishwasher Safe JugStainless steel jug with inner measurement markings and pouring spout.
- Power BaseInduction Heating Technology provides gentle, even heat distribution.
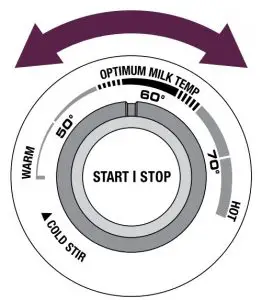
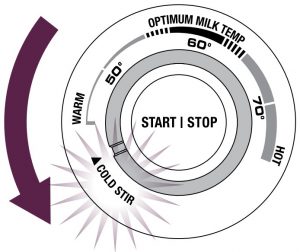
- START | STOP Push-DialPress the centre of the dial to start or stop operation. Turn the dial to adjust the temperature. ‘COLD STIR’ setting stirs without heating.
- LED IndicatorButton surround illuminates when power is on; flashes when the frothing cycle is activated; or will cease to illuminate in standby mode.
- Cord Wrap
- On Board’ Disc Storage
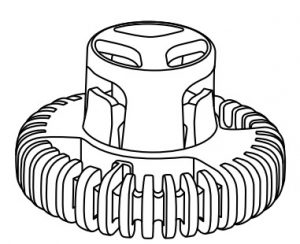
- ‘Cappuccino’ Frothing DiscFor thick and creamy froth.
- ‘Latte’ Frothing DiscFor smooth and silky milk.
OPERATING YOUR BREVILLE PRODUCT
BEFORE FIRST USE
Before first use, remove and safely discard all promotional labels and packing materials attached to the Breville Milk Café™.
Wash the jug, lid and measuring cap in warm soapy water and dry thoroughly. Wipe exterior of appliance with a soft damp cloth and dry thoroughly
FROTHING HOT MILK
- Place appliance on a flat level surface and plug power cord into 230-240V outlet and turn power On.The START|STOP button surround will illuminate to indicate the appliance is in Standby mode.

- Select the ‘Capp’ or ‘Latté’ frothing disc. Choose ‘Capp’ disc for thick and creamy froth or the ‘Latté’ disc for smooth and silky milk.CAPPLATTÉWIDER DISC END FACES DOWN
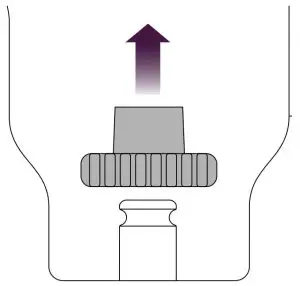
- Insert the frothing disc onto the shaft at the base of the milk jug. Ensure the disc is inserted the correct way with the wider part of the disc at the bottom of the jug. The disc should ‘click’ securely onto the shaft.NOTEAlways ensure frothing disc is inserted correctly before adding liquid.If the disc is not inserted correctly it may dislodge during operation.WARNINGFrothing disc is a choking hazard.Children must always be supervised and never left unattended with appliance.
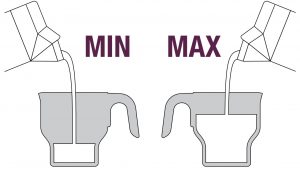
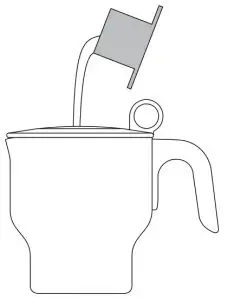
- Pour the required amount of cold fresh milk into the jug and cover with jug lid. Always use cold milk and fill the jug between the MIN and MAX level markings.NOTENever operate without the minimum level of liquid in the milk jug. The milk frother will automatically turn off if the milk jug is empty. If this occurs, you will need to wait for the milk fro therto cool down before re-use.NOTEFor optimum frothing results, do not exceed the CAPP/LATTE MAX (500ml) marking inside the jug.
- Place the jug correctly onto the power base, ensuring the jug is dry and clean.
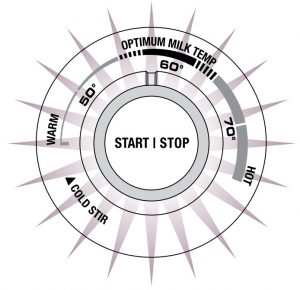
- Turn the START | STOP dial to the desired temperature. When frothing milk for a cappuccino or latte, we recommend staying within the ‘OPTIMUM MILK TEMP’ range, however this is up to your personal preference.If temperature setting is changed whilst in operation, the appliance will stop at the new temperature selected.Press the START | STOP button once to commence frothing the button surround will start flashing to indicate the frothing cycle has commenced.NOTEDo not remove jug during operation. To stop operation at any time, press the START | STOP button once.
- When liquid has reached set temperature, the appliance will stop automatically. This will take anywhere between 2 -7 minutes depending on the quantity of milk used. Carefully remove the jug from the power base as the jug and contents will be hot. Always remove the jug using the jug handle. Be careful not to place the jug on a table, plastic surface or heat sensitive surface which may scorch or melt. Remove the jug lid and pour the frothed milk.
- Clean the milk jug and frothing disc after use. Allow the milk jug and disc to cool completely before disassembling.
 LATTÉ
LATTÉ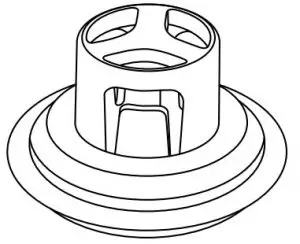 WIDER DISC END FACES DOWN
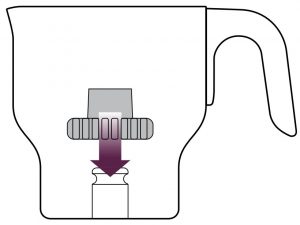
 Press the START | STOP button once to commence frothing the button surround will start flashing to indicate the frothing cycle has commenced.
WARNINGSurface of the jug will be hot during and after operation. Do not place hot jug on heat sensitive surfaces.
WARNINGDo not place hot jug onto power cord.
ADDING INGREDIENTSAlways allow the milk frother to start for a few seconds before using the measuring cap to gradually add ingredients. If using one of the heated settings, this will allow the milk to warm up and help dissolve the additional ingredients.
Always add ingredients slowly and in small quantities. Adding ingredients too quickly may cause the frothing disc to dislodge or stop spinning.
Frothing results differ depending on the ingredients used. For example, adding dense ingredients like thick syrups, heavy powders and large flakes can significantly reduce the amount of foam.
NOTEThe milk frother is not designed to mix a large quantity of dry ingredients or melt large food pieces eg. cubed chocolate, ground nuts, whole spices or fresh herbs.The milk frother has been designed specifically for the purpose of foaming milk and other dairy milk alternatives and is not intended towhip, thicken or heat other food substances eg. cream, custard, soup, gravy etc.
USING THE ‘COLD STIR’ SETTINGThe COLD STIR setting allows you to froth cold milk or hot milk without additional heat. The COLD STIR setting can be used to froth milk for cold beverages such as iced cappuccino; to blend in syrups and flavourings for iced chocolate; or to stir in instant drinking powders into milk.The COLD STIR setting will operate for 60 seconds before automatically stopping
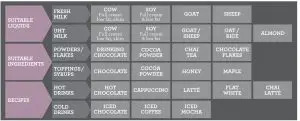
PREPARATION GUIDE
The chart below provides suggested milks, ingredients and uses for the milk frother.
SAFETY FEATURES
StandbyAfter 30 seconds of non use the milk frother will enter standby mode and the button surround will cease to illuminate.To re-activate the milk frother out of standby mode, press the START | STOP button.
Boil Dry Protection
The milk frother will automatically cease to operate if the jug overheats. This can be caused if the jug is empty, if liquid is below the MIN measurement marking, or after consecutive uses. If this occurs, 3 alerts will sound. Unplug the power cord from the power outlet, wait approximately 5 minutes for the milk frother to cool down or fill the milk jug with water for faster cooling. Once adequately cooled, you will be able to reactive the milk frother and re-activate frothing
Thermal Fuse Protection
This feature protects the milk frother in case of major fault.
If this occurs, the milk frother will automatically turn off and will not reactivate. Immediately cease use and remove from the power outlet.
For assistance contact Breville CustomerService on:Ph: 1300 139 798 (Australia) orPh: 0800 273 845 (New Zealand)
CARE & CLEANING
The milk jug, frothing disc and heating chamber should be cleaned after each use to minimise milk residue build up.
- Unplug the power cord from the power outlet before cleaning.
- The jug and the frothing disc will be hot after use. Wait for jug and disc to cool before rinsing in tap water.
- Remove stainless steel jug from base.
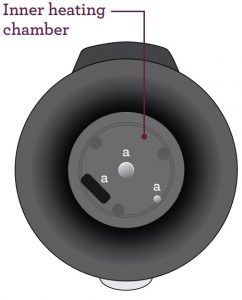
- Thoroughly clean the inner heating chamber with a damp cloth removing any milk residue. Inner heating chamber.NOTEEnsure there is no milk residue or spillage on the key sensor componentsin the heating chamber (a).
- Remove milk frother attachment from the milk jug base. Clean the milk frother attachment and the milk jug thoroughly in warm soapy water (If using an alternative cleaning solution, please follow the manufacturer’s instructions accordingly)
- Thoroughly clean the base of the milk jug and ensure there is no milk residue or any foreign object in the hole (centre of the jug) as this will interrupt the normal frothing operation

NOTE
- Do not use alkaline or abrasive cleaning agents, steel wool or scouring pads as these can damage the surface.
- Never immerse the power basein water or any other liquid. The underside of the jug must always be dry before placing on power base prior to use.
- The milk jug, jug lid, measuring cap and frothing discs can be washed in the dishwasher (top shelf only).
- However, to extend the life of the frothing discs, re recommend they are washed by hand.
HINTS & TIPS
HINTS & TIPS
- Always use cold, fresh (or freshly opened) milk.
- Some milks produce more froth than others. Experiment with different milk options and frothing discs to achieve the desired result.
- For optimum frothing results, do not exceed the CAPP/LATTE MAX (500ml) marking inside the jug.
- For best results, always start cycle and warm milk first before adding ingredients.
- Remove excess air bubbles from frothed milk by gently tapping jug on a bench.
- Swirl frothed milk in a circular motion before pouring milk into a cup or glass.
- Pour frothed milk promptly to avoid the milk from separating. Frothed milk that is not used immediately should not be reheated.
- Ensure jug and frothing disc are clean before use.
TROUBLESHOOTING
| PROBLEM | POSSIBLE CAUSE | WHAT TO DO |
| Milk is not foaming? | Milk is warm or too hot to foam. |
|
| Milk is
not heating? |
|
|
| Frothing disc is not moving or is dislodged? |
|
|
| Ingredients are not melting? |
|
|
| Milk is too cold/ too hot? |
|
|
| Emergency stop |
|
RECIPES
![]() HOT CHOCOLATE
HOT CHOCOLATE
A heated beverage of shaved chocolate, melted chocolate or cocoa powder blended with heated and foamed milk or water and sugar.
![]() CAPPUCCINO
CAPPUCCINO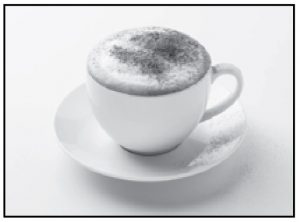 Cappuccino is served very light and luke warm with 1 ⁄3 espresso to 1 ⁄3 heated milk and a generous final third of creamy froth. For added finesse, dust with powdered chocolate.
![]() CHAI LATTÉ
CHAI LATTÉ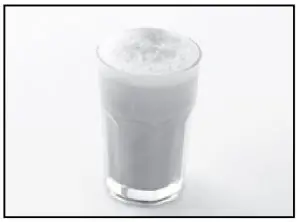 A chai latté is ¾ heated and foamed milk flavoured with spiced tea concentrate including sugar and spices and topped with ground nutmeg or cinnamon.
![]() FLAT WHITE
FLAT WHITE A single dose of espresso in a cup topped with heated and foamed milk, 1 ⁄3 coffee and 1 ⁄3 milk.
![]() LATTÉ
LATTÉ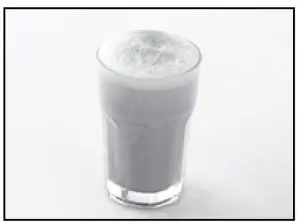 Latté is a blend of 1 ⁄3 espresso to 2 ⁄3 milk is made with a single shot of espresso. Top with heated and foamed milk, poured down the inside rim of the glass to give a creamy consistency and perfect layer of froth.
![]() ICED COFFEE/ICED CHOCOLATE
ICED COFFEE/ICED CHOCOLATE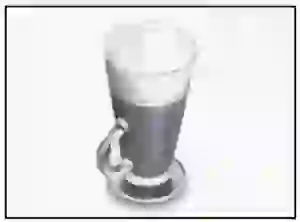 A cold beverage of cold, foamed milk mixed with coffee and topped with ice cream, whipped cream and chocolate shavings*. * Substitute coffee with chocolate powder or topping to make iced chocolate.
Breville Customer Service Centre
Australian CustomersMail: Locked Bag 2000Botany NSW 1455AUSTRALIAPhone: 1300 139 798Fax: (02) 9700 1342Email: Customer Service:[email protected]
New Zealand CustomersMail: Private Bag 94411Botany Manukau 2163Auckland NEW ZEALANDPhone: 0800 273 845Fax: 0800 288 513Email: Customer Service:[email protected]

References
[xyz-ips snippet=”download-snippet”]