
![]()
the Toast Select™ LuxeINSTRUCTION BOOK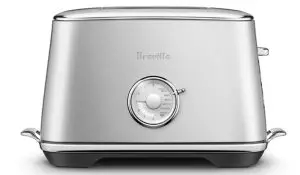
BREVILLE RECOMMENDS SAFETY FIRST
At Breville, we are very safety conscious. We design and manufacture consumer products with the safety of you, our valued customer, foremost in mind. In addition, we ask that you exercise a degree of care when using any electrical appliance and adhere to the following precautions.
 IMPORTANT SAFEGUARDS
 IMPORTANT SAFEGUARDS
READ ALL INSTRUCTIONS BEFORE USE AND SAVE THEM FOR FUTURE REFERENCE
- Carefully read all instructions before operating for the first time and save for future reference.
- Remove and safely discard any packaging materials and promotional labels before using the toaster for the first time.
- To eliminate a choking hazard for young children, remove and safely discard the protective cover fitted to the power plug of this appliance.
- Do not place the toaster near the edge of a bench or table during operation. Ensure the surface is level, clean, and free of water.
- Always operate the toaster on a stable, heat-resistant surface. Do not use on a cloth-covered surface, near curtains, or other flammable materials.
- A fire may occur if the toaster is covered or touching flammable materials, including curtains, draperies, walls, and the like, when in operation.
- Curtains and other flammable items can catch fire if they are near or above the toaster.
- Do not allow hot surfaces of the toaster to come in contact with countertops or tables.
- Do not place the toaster on or near a hot gas or electric burner, or where it could touch any other source of heat.
- When operating the toaster, keep a minimum distance of 4″ (10cm) of space from the surrounding sides and 8″ (20cm) above.
- Breville does not recommend placing the toaster in enclosed areas.
- Do not use the toaster on a sink drainboard.
- Do not move toaster while in operation.
- Avoid contact with moving parts.
- Ensure that bread to be toasted is the correct size for the toaster and does not protrude above the toasting slots. Ensure the bread is not too thick or long that it will jam or wedge the bread carriage.
- Do not place toast directly on top of toasting slots to warm toast as this may prevent correct air circulation and damage the appliance.
- Do not touch hot surfaces. Toaster surfaces are hot during and after the operation. To prevent burns or personal injury, always use protective hot pads or insulated oven mitts, or use handles or knobs where available.
- Metal utensils such as a knife, should not be inserted into the toaster to remove jammed toast, bagels or any other items from the toaster. This can damage the heating elements as well as lead to electrocution.
- Do not attempt to dislodge food when the toaster is plugged in.
- Oversized foods, metal foil packages, or utensils must not be inserted into the toaster as they may cause a fire or risk of electric shock.
- When Heating toaster pastries, always use the lightest toast color setting.
- Do not use the toaster without the slide-out crumb tray in place. Do not allow crumbs to build up in the crumb tray. Failure to clean the crumb tray regularly may result in a fire hazard. To turn the toaster off, remove the power plug from the power outlet.
- Always remove the power plug from the power outlet if the toaster is not in use, before attempting to move, before cleaning, and when storing. Allow cooling before putting on or taking off parts.
- Do not use harsh abrasive, caustic cleaners or oven cleaners when cleaning the toaster.
- Do not clean with metal scouring pads. Pieces can break off and touch electrical parts, creating a shock hazard.
- Strictly follow the care and cleaning instructions described in this book.
- The use of attachments not sold or recommended by Breville may cause fire, electric shock, or injury.
IMPORTANT SAFEGUARDS FOR ALL ELECTRICAL APPLIANCES
- To protect against electric shock, do not immerse the cord, plug, or appliance in water or any other liquid.
- Do not let the cord hang over the edge of a bench or table, touch hot surfaces, or become knotted.
- Do not leave the appliance unattended when in use.
- This appliance is not intended for use by persons (including children) with reduced physical, sensory or mental capabilities, or lack of experience or knowledge unless they have been given supervision or instruction concerning the use of the appliance by a person responsible for their safety.
- Children should be supervised to ensure they do not play with the appliance.
- This appliance is recommended for household use only. Do not use this appliance for anything other than its intended use. Do not use in moving vehicles or boats. Do not use outdoors.
- It is recommended to regularly inspect the appliance. Do not use the appliance if the power cord, power plug, or appliance becomes damaged in any way. Immediately cease use and call Breville Consumer Support for examination, repair or adjustment.
- This appliance is equipped with a power cord having a grounding wire with a grounding plug. The appliance must be grounded using a 3-hole properly grounded outlet. In the event of an electrical short circuit, grounding reduces the risk of electrical shock.
- If the appliance is of the grounded type, the extension cord should be a grounding 3-wire cord.
- If the power outlet is a standard 2-prong outlet, it is your personal responsibility and obligation to have it replaced with a properly grounded 3-prong power outlet.
- Do not, under any circumstances, cut or remove the third (ground) prong from the power cord or use an adapter.
- Consult a qualified electrician if the grounding instructions are not completely understood, or if doubt exists as to whether the appliance is properly grounded.
 NOTEThis toaster is electronically controlled and will not operate until the toaster is plugged into a 110/120-volt power outlet.
SHORT CORD INSTRUCTIONS
Your Breville appliance is fitted with a short power supply cord as a safety precaution to prevent personal injury or property damage resulting from pulling, tripping, or becoming entangled with a longer cord. Do not allow children to use or be near this appliance without close adult supervision.Longer detachable power-supply cords or extension cords are not recommended but may be used if care is exercised. If an extension cord is used, (1) the marked electrical rating of the cord set or the extension cord should be at least as great as the electrical rating of the appliance, (2) the cord should be arranged so that it will not drape over the countertop or tabletop where it can be pulled on by children or tripped over unintentionally and (3) the extension cord must include a 3-prong grounding plug.
BREVILLE ASSIST ® PLUG
Your Breville appliance comes with a unique Assist™ Plug, conveniently designed with a finger hole in the power plug for easy and safe removal from the wall outlet. For safety reasons it is recommended you plug your Breville appliance directly into its own electrical outlet on a dedicated circuit separate from other appliances. If the electric circuit is overloaded with other appliances, your appliance may not function properly. Use in conjunction with a power strip or extension cord is not recommended.
 IMPORTANTNever operate the toaster on its side. Never add any food substance to the bread, bagel, or any other item prior to toasting (such as butter, jelly, or marmalade). This may cause a fire as well as lead to electrocution. This toaster is for toasting bread, bagels, English muffins, and toaster pastries only. Placing other food items in the toaster can cause a fire as well as lead to electrocution.FOR HOUSEHOLD USE ONLY SAVE THESE INSTRUCTIONS
Components
 Components
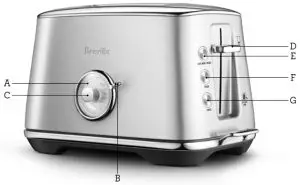
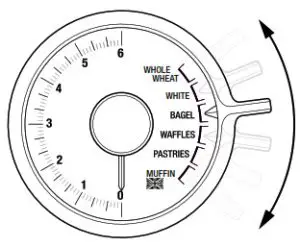
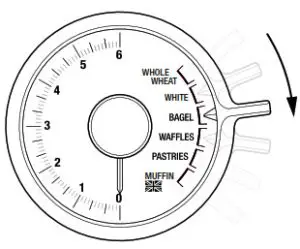
A. Brownness IndicatorsLEDs to indicate the brownness setting and progress of your toasting.B. Bread Selection RingSelect your bread type to ensure comparable brownness across all bread types without guesswork.The time taken to toast your bread depends on the bread type. Select from Whole Wheat, White, Bagel, Waffles, Pastries, or English Muffins to ensure you get the same brownness level every time.C. Brownness Selection DialSelect how brown you like your toast, setting ‘0’ (lightest) to ‘6’ (darkest).D. ‘LIFT & LOOK™’ / High lift leverUse the lever during the toasting cycle to raise and lower the carriage so you can check the toasting progress without interrupting the toasting cycle. The high lift feature makes it easier to remove small items such as bagels or English muffins.E. ‘A BIT MORE®’If your toast comes up too light, one press adds a little extra toasting time.REHEAT buttonIf your toast has popped up and gone cold, Press ‘reheat’ to warm it up again.F. FROZEN buttonActivates additional toasting time required to toast frozen bread.G. CANCEL buttonCancels the toasting cycle.NOT SHOWNBreville Assist™ PlugRating Information120 V~ 60 Hz 1000 W
Functions
 Functions
NOTEThis toaster is electronically controlled and will not operate until the toaster is plugged into a 110 or 120V power outlet. Before first use, remove any packaging material or promotional labels attached to your toaster.
- Insert the power plug into a 110 or 120V power outlet. The Brownness Indicators will illuminate from ‘0’ to ‘6’, and then align to the selected browning setting (indicated by the position of the Brownness Dial and Brownness Indicators). The toaster will revert to standby mode (BrownnessIndicators will dim) after a few minutes if a button is not pressed or the dial is not adjusted. NOTEWhen using the toaster for the first time, we suggest toasting on the maximum setting without bread. The toaster may emit a thin smoke or distinct odor on initial use. This is normal and not detrimental to the performance of the toaster.
- Place bread, bagels, etc into each of the toasting slots. Ensure items for toasting are not too large or too thick to fit in the toasting slots.
- Select the bread type in the toasting slot using the Bread Selection Ring. NOTEVarious types of bread may require a different browning setting. For example, white light-textured bread requires less toasting time, while heavier textured whole wheat bread may require more toasting time. Changing the Bread Selection Ring accommodates for these changes without changing the Brownness Selection Dial so you always have the same browning no matter what the bread type.
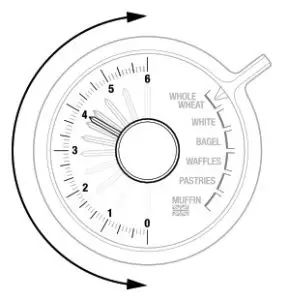
- When using the Brownness Selection Dial, align the needle with the desired browning setting ‘0’ (lightest) to ‘6’ (darkest). Indicators will illuminate and align to the selected browning setting. The Brownness setting is relative to each Bread Type so there’s no need to keep adjusting the setting for different bread types if you have the same brownness requirements. NOTEWhen toasting bread for the first time, it is suggested to toast on browning setting ‘3’ (9 LED Indicators).
- To start the toasting process, press thelever down until it locks into place. The Brownness Indicators will begin flashing at “0” then start to gradually count up indicating the level of brownness until it reaches the selected browning setting.
- Once the toasting cycle is complete the carriage will move to the raised position. Remove the toast. The brownness indicator will re-illuminate to the previously selected browning setting for a few minutes before entering standby mode.
NOTETo re-activate the toaster from standby mode, press any button or adjust the Brownness Dial. The Brownness Indicators will re-illuminate.WARNINGDo not leave the toaster unattended when in use as toast may jam. In the unlikely event that bread, bagels, English muffins or toaster pastries become jammed in the toasting slots, all the buttons and the LED toasting indicators will flash and the elements will turn off.Remove the power plug from the power outlet and allow the toaster to cool completely before carefully easing the bread out of the slots. Take care not to damage the heating elements. Do not use metal utensils.BREAD TYPE SELECTION The bread selection feature changes the total toasting time for each bread type, so you can achieve the same brownness setting across different bread types. To toast different bread types
- Place the bread into the toasting slots.
- Adjust the Bread Selection Ring to bread type in the toaster.
- Select the desired browning setting by adjusting the Brownness Selection Dial. Brownness settings range from ‘0’ (lightest)to ‘6’ (darkest).
- To start the toasting process, press the lever down until it locks into place.
- The toasting cycle can be stopped at any time by pressing the Cancel button.
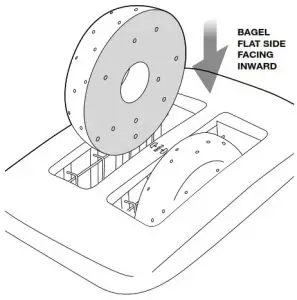
BAGEL OR ENGLISH MUFFIN SELECTIONSelecting the bagel or English muffin bread type will adjust the total toasting time and also activate additional heat to the middle heating elements to perfectly toast the insides of your bagels or muffins without burning the outsides.To toast bagels:
- Place the bagel into the toasting slots with the inside of the bagel facing inwards as per the bagel markings on the top surface of the toaster.
- Adjust the Bread Selection Ring to BAGEL.
- Select the desired browning setting by adjusting the Brownness Selection Dial. Brownness settings range from ‘0’ (lightest) to ‘6’ (darkest).
- To start the toasting process, press the lever down until it locks into place.
TO TOAST ENGLISH MUFFINS:
- Place the English muffin into the toasting slots with the inside of the muffin facing inwards.
- Adjust the Bread Selection Ring to MUFFIN.
- Select the desired browning setting by adjusting the Brownness Selection Dial.
- Press the lever down until it locks into place.
NOTEIt is normal for the outside heating elements to appear off or on a lower power during the BAGEL OR ENGLISH MUFFIN setting. This ensures the inside toasts without burning the outside.
A BIT MORE® / REHEAT BUTTONIf your toast comes up too light, this button adds a little extra toasting time. This feature can be selected before, during or after the toasting cycle and can be used with all Bread Types and FROZEN functions.To use this feature during the toasting cycle:Press the A BIT MORE® / Reheat button. The button surround will illuminate white when selected. The toasting time will automatically increase but will not illuminate more Brownness Indicators. The A BIT MORE®/ Reheat function can be canceled by pressing the A BIT MORE®/ Reheat button again and the original toasting cycle will continue.To use this feature before or after the toasting cycle:Press the A BIT MORE®/ Reheat button. The button surround will illuminate white when selected. Press down the lever until it locks into place. The Brownness Indicators will automatically align with the lowest browning setting then flash and count down for the additional browning time.FROZEN BUTTON This feature activates the additional toasting time required to toast frozen bread. To toast frozen bread:
- Place the bread into the toasting slots.
- Adjust the Bread Selection Ring to the bread type that has been inserted in the toasting slots.
- Select the desired browning setting by adjusting the Brownness Selection Dial. Ranging from ‘0’ (lightest) to ‘6’ (darkest).
- Press the FROZEN button and the button surround will illuminate white.
- To start the toasting process, press the lever down until it locks into place. The toasting time will automatically increase.
- After the cycle has finished, the FROZEN button will turn off.
NOTEThe FROZEN function can be canceled by pressing the FROZEN button again and the original toasting cycle will continue.LIFT & LOOK™ LEVERThis feature allows you to raise and lower the carriage so you can check the toasting progress without interrupting the toasting cycle. During the toasting cycle, simply lift the lever to view the toasting progress. Lower the lever to continue the cycle or press the CANCEL button to stop the cycle at any time.HIGH LIFT LEVERThe lever can be lifted approximately 2cm above the starting position. This raises the carriage making it easier to remove smaller items such as English muffins or bagels.
Care & Cleaning
- Remove the power plug from the power outlet. Allow the toaster to cool completely before cleaning.
- To clean any crumbs from the toaster, remove the crumb tray (located under the left-hand side handle) by pulling it outwards. Empty and replace the crumb tray before using the toaster again. Replace the crumb tray by sliding it inwards until it locks into position.
- To remove any additional crumbs caught inside, turn the toaster upside down over a bin and shake gently to free the crumbs. DO NOT bang the toaster, this may damage the elements or carriage mechanism.
- Wipe the outside of the toaster with a slightly dampened soft cloth and then dry it with a soft dry cloth to dry completely.
NOTEDo not clean with metal scouring pads. Pieces can break off the pad and touch electrical parts creating an electric shock hazard and damaging the finish of the toaster.STORAGERemove the power plug from the power outlet. Allow the toaster to cool completely before storing. Follow the directions for cleaning and store in an upright position on a flat surface on a benchtop or in an accessible cupboard. Do not store anything on top of the toaster. WARNINGDo not use the toaster without the slide-out crumb tray in position. Do not allow crumbs to build up in the crumb tray. Failure to clean the crumb tray regularly may result in a fire hazard.
Breville Consumer SupportUSAMail: Breville USA19400 S. Western Ave, Torrance CA90501-1119Phone: 1-866-273-84551-866-BREVILLEWeb: breville.com/us/supportCanadaMail: Breville Canada9800 Boulevard Cavendish,Suite 250, Saint-LaurentQuébec, H4M 2V9Phone: 1-855-683-3535Web: breville.ca/support
![]()
Breville is a registered trademark of Breville Pty. Ltd. A.B.N. 98 000 092 928.Copyright Breville Pty. Ltd. 2021.Due to continued product improvement, the products illustrated/photographed in this brochure may vary slightly from the actual product.BTA735 SeriesUSCM – C21
References
[xyz-ips snippet=”download-snippet”]