Breville BTS200 Original 2 Slice

BREVILLE RECOMMENDS SAFETY FIRST
At Breville we are very safety conscious. We design and manufacture consumer products with the safety of you, our valued customer, foremost in mind. In addition we ask that you exercise a degree of care when using any electrical appliance and adhere to the following precautions.
IMPORTANT SAFEGUARDS
READ ALL INSTRUCTIONS BEFORE USE AND SAVE FOR FUTURE REFERENCE
- Carefully read all instructions before operating the Original™ for the first time and save for future reference.
- Remove and safely discard any packaging material and promotional labels before using the toastie maker for the first time.
- To eliminate a choking hazard for young children, remove and safely discard the protective cover fitted to the power plug of this appliance.
- Do not place the toastie maker near the edge of a bench or table during operation. Ensure the surface is level, clean and free of water and other substances.
- Do not use the toastie maker on a sink drain board.
- Do not place the toastie maker on or near a hot gas or electric burner, or where it could touch a heated oven.
- Position the toastie maker at a minimum distance of 20cm away from walls, curtains, cloths and other heat sensitive materials.
- Always operate the toastie maker on a stable and heat resistant surface. Do not use on a cloth-covered surface, near curtains or other flammable materials.
- Always ensure the toastie maker is properly assembled before use. Follow the instructions provided in this book.
- The appliance is not intended to be operated by means of an external timer or separate remote control system.
- The lid and the outer surface will be hot when the appliance is operating.
- The temperature of accessible surfaces will be high when the appliance is operating and for some time after use.
- Do not place anything on top of the toastie maker when the lid is closed, when in use and when stored.
- Always switch the toastie maker off at the power outlet, then unplug the power cord and cool completely, if appliance is not in use, before cleaning, before attempting to move the appliance, disassembling, assembling and when storing the appliance.
- Keep the toastie maker clean. Follow the cleaning instructions provided in this book.
- The appliance must be operated on a table, do not operate on the floor.
 CAUTIONThis appliance is marked with a hot surface symbol, the lid and the outer surface will be hot when the appliance is operating and for some time after use. WARNINGFully unwind power cord from cord storage facility before use.
IMPORTANT SAFEGUARDS FOR ALL ELECTRICAL APPLIANCES
- Fully unwind the power cord before use.
- Do not let the power cord hang over the edge of a bench or table, touch hot surfaces or become knotted.
- To protect against electric shock do not immerse the power cord, power plug or appliance in water or any other liquid.
- The appliance is not intended for use by persons (including children) with reduced physical, sensory or mental capabilities, or lack of experience and knowledge, unless they have been given supervision or instruction concerning use of the appliance by a person responsible for their safety.
- Children should be supervised to ensure that they do not play with the appliance.
- It is recommended to regularly inspect the appliance. To avoid a hazard do not use the appliance if power cord, power plug or appliance becomes damaged in any way. Return the entire appliance to the nearest authorised Breville Service Centre for examination and/or repair.
- Any maintenance other than cleaning should be performed at an authorised Breville Service Centre.
- This appliance is for household use only. Do not use this appliance for anything other than its intended use. Do not use in moving vehicles or boats. Do not use outdoors. Misuse may cause injury.
- The installation of a residual current device (safety switch) is recommended to provide additional safety protection when using electrical appliances. It is advisable that a safety switch with a rated residual operating current not exceeding 30mA be installed in the electrical circuit supplying the appliance. See your electrician for professional advice.
FOR HOUSEHOLD USE ONLYSAVE THESE INSTRUCTIONS
Components

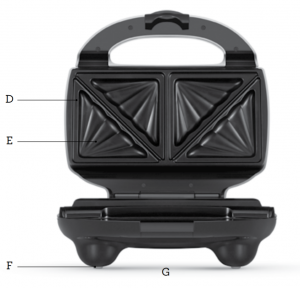
A. Cooltouch, easy grip handle with locking latch.B. Indicator power `on’ and `ready’ lightsC. Vertically stands up for convenient storageD. Jumbo scissor action cooking plates automatically seals and cuts supersized or regular bread.E. Patented easy clean design non-stick cooking plates with no gaps or food traps.F. Non slip feetG. Cord wrap
Functions
BEFORE FIRST USE
Check that cooking plates are clean and free of dust. If necessary, wipe over with a damp cloth. Place the toastie maker on a flat, level surface with the lid in the closed position.
- Insert the power plug into a 230/240v power point and turn the power on. The red power `ON’ light will illuminate.
- Allow toastie maker to preheat (with the lid closed) until the green `READY’ light illuminates.
- During this time, prepare the toasties by buttering up to four slices of bread and preparing filling.
- Place up to two slices of bread on the plates, buttered sides down. Place filling on top of bread.
- Place remaining bread on filling, buttered side up.
- Carefully close the lid and clip handles together. Do not force the lid to close. NOTEThe green `READY’ light will cycle on and off during the toasting process indicating that the correct temperature is being maintained.
- Toasting should take approximately three minutes. Exact toasting time will be a matter of taste. It will also depend on the type of bread and type of filling used.
- When the toastie is cooked, remove it with the help of a plastic or wooden spatula. Never use metal tongs or a knife as these can cause damage to the non-stick coating.
- To maintain heat, keep the lid closed until you are ready to toast the next sandwich. NOTEAt all times the lid must be closed when cooking. When using the toastie maker for the first time you may notice a fine smoke haze. This is caused by the heating of some of the components. There is no need for concern.WARNINGSteam will be ejected from between the cooking plates when the lid is closed. Be careful not to make contact with the steam as it may cause burns. Fully unwind power cord from cord storage facility before use.
Hints & Tips
BREAD
The toastie maker is designed for use with supersized and regular-sized bread. With extra large cooking plates, it seals and cooks the toastie. Most types of bread can be used; white, wholemeal, kibbled wheat, wholegrain, raisin loaf and so on. When using raisin bread, brioche or other sweet breads which contain high sugar content, remember they will brown faster.
FILLINGS
Try to use canned or pre-cooked fruit as fresh fruit may give off excessive juices when heated.Be careful when biting into toasties containing fillings such as cheese and tomato or jam as they retain heat and can burn if eaten too quickly.One quarter cup of filling for each toastie is sufficient. Do not overfill your toasties.
BUTTER OR MARGARINE
For best results we recommend to butter the outside of the bread i.e. place filling between the unbuttered sides of bread.If you are on a low fat diet or kilojoule counting, the outside of the bread may be left unbuttered. Season the plates occasionally to prevent sticking and to make cleaning easier. To season, brush the cooking plates with a little vegetable oil and rub off the excess with absorbent paper. Do this after preheating the unit.Do not use spray or non-stick coatings as this will affect the performance of the non-stick surface on the cooking plates.For sweet snacks, a light sprinkling of caster sugar over the outer buttered sides of the bread will make them extra delicious.For extra flavour use herb or garlic butter for spreading on bread.
REHEATING
If the toastie is not being eaten immediately, place it on a paper napkin to absorb condensation. To keep for longer, place on a rack in an oven-proof dish to keep warm in a low oven, about 100°C. The toastie will keep hot for up to 20 minutes this way, but will then begin to dry out.
Care & Cleaning
![]() IMPORTANT
IMPORTANT
Do not immerse any part of the toastie maker in water or any liquid.Before cleaning, turn the power off at the power outlet and then remove the power plug. Allow your toastie maker to cool, lightly. The toastie maker is easier to clean when slightly warm. Always clean your toastie maker after each use to prevent a build up of baked-on foods. Wipe cooking plates with a soft cloth. If cooked on food is not removed by this method, brush with a little oil or melted butter. Allow to stand for five minutes then wipe with a damp cloth.![]() NOTEThe cooking plates are coated with a non-stick surface, do not use abrasives.
NOTEThe cooking plates are coated with a non-stick surface, do not use abrasives.
Recipes
PANTRY FAVOURITES
The following fillings are all made from basic ingredients often found in a well stocked pantry. All recipes make 2 toasties unless otherwise stated. Simply double or triple recipe depending on quantity of toasties required.
Corn and Bacon
- 2 rashers bacon
- 1 small onion, peeled
- ½ x 440g can creamed corn
- Remove rind from the bacon. Chop the bacon and onion finely. Combine with the corn. Use as required.
Asparagus Cheese
- 310g can asparagus spears, drained
- ½ cup tasty cheese, grated
- Freshly ground black pepper
- Salt
- Lay asparagus on bread. Sprinkle with cheese, season with pepper and salt. Try using the herbed butter for extra flavour. Top with remaining bread.
- Toast until well browned.
Tuna
- 410g can tuna, drained
- ½ cup tasty cheese, grated
- 1 tomato, chopped
- 1 onion, finely chopped
- Salt and pepper
- Combine all ingredients, gently mix well. Use as required.
Spaghetti or Baked Bean
- Use approximately ¼ cup spaghetti or baked beans per toastie.
Mexican Beans
- 440g can red kidney beans, drained
- 1 onion, finely chopped
- 2 tablespoons tomato paste
- 1 small tomato, chopped few drops Tabasco sauce
- Combine all ingredients mix until well combined.Use as required.
Peach Surprise
- 425g can peaches, drained well
- 1 teaspoon mixed spice
- 1 teaspoon sugar
- 2 tablespoons sour cream
- Combine all ingredients mix until well combined. Use as required.
Philly Cheese Steak
![]() Makes 2 sandwiches
Makes 2 sandwiches
- 4 slices Texas toast
- ½ onion, sliced
- ½ cup (114ml) green peppers, diced
- ½ cup (114ml) mushrooms, sliced
- 2 slices provolone
- 2 slices roast beef
- 1 teaspoon olive oil
- Pinch salt
- Pre heat sandwich maker
- Place a medium sauté pan on low medium heat.Add olive oil and onions. Caramelize onions for 10 minutes until nice and golden then add peppers and mushrooms until soft. Remove and let cool.
- Place one slice of toast on each side of sandwich maker. Place a slice roast beef, onion, mushroom, green pepper and provolone on each slice of toast and cover with another slice of toast. Cover lid and lock handle. Cook for 56 minutes until nice and golden. Remove and enjoy.
Chicken, Basil and Almond Sandwich
![]() Makes 4 sandwiches
Makes 4 sandwiches
- 2 cups cooked chicken, shredded
- ¼ cup (20g) whole blanched almonds, chopped
- ¼ cup chopped fresh basil
- ¼ cup (57ml) aioli
- Salt and freshly ground black pepper
- Softened butter
- 8 slices wholemeal bread
- Combined chicken, almonds, basil and aioli and season with salt and pepper.
- Preheat sandwich maker until green light switches on.
- Butter one side of each slice and placebread, buttered side down. Spread chicken mixture evenly over 4 slices and cover with remaining bread, making sure the buttered side is facing up. Place 2 sandwiches into sandwich maker; close lid and cook 3 minutes or until bread is golden and crisp. Repeat with remaining sandwiches. Serve hot with an extra dollop of aioli.
Pizza Pocket
![]() Makes 2 sandwiches
Makes 2 sandwiches
- 4 slices White bread
- (396g) 14oz can diced tomatoes
- 1 tablespoon onion powder
- 2 teaspoons garlic powder
- 2 teaspoons dried basil
- ¼ cup (57ml) mozzarella, shredded
- 4 slices pepperoni
- Pinch salt
- Pre heat sandwich maker.
- Place diced tomatoes, onion powder, garlicpowder, dried basil and salt into blender and blend until smooth.
- Place sauce in medium sauce pan on medium heat and simmer for 510 minutes. Set aside and let cool.
- Place one slice of bread on each side of sandwich maker. Place a tablespoon of sauce one ounce of cheese and 2 slices of pepperoni and cover with another slice of bread. Cover lid and lock handle.
- Cook for 4 minutes. Remove and enjoy!
Reuben Sandwiches With Fherkin
![]() Makes 4 sandwiches
Makes 4 sandwiches
- ¼ cup (57ml) Thousand Island dressing
- Softened butter
- 8 slices light rye bread
- 4-6 slices (300g) corned beef, finely sliced
- ¼ cup (250g) good quality sauerkraut, drained of excess liquid
- 4 slices (200g) gruyere
- Preheat sandwich maker until green light switches on.
- Combine aioli and mustard and mix well.
- Butter one side of each slice and place bread,buttered side down. Spread aioli evenly over 4 slices and top with corned beef, sauerkraut and gruyere. Cover with remaining bread, making sure the buttered side is facing up.
- Place into sandwich maker; close lid and cook 3 minutes or until bread is golden and crisp. Repeat with remaining sandwiches.
- Serve hot with fries and baby cornichons.
Bacon Butty Sandwich
![]() Makes 4 sandwiches
Makes 4 sandwiches
- 8 rashers bacon, rind removed
- ¼ cup (57ml) aioli
- 2 teaspoons harissa
- Softened butter
- 8 slices wholemeal bread
- 2 tomatoes, sliced
- ½ cup (80g) baby arugula, trimmed
- Cook bacon in a large frying pan for 5 minutes or until crisp and golden remove and set aside. Mix aioli and harissa together.
- Preheat sandwich maker until green light switches on.
- Butter one side of each slice and place bread, buttered side down. Spread aioli mixture evenly over 4 slices and top with bacon, tomato and arugula. Cover with remaining bread, buttered side up. Place into sandwich maker; close lid and cook 3 minutes or until bread is golden and crisp.
- Repeat with remaining sandwiches.
Garlic Mushrooms, Taleggio Cheese and Prosciutto
![]() Makes 4 sandwiches
Makes 4 sandwiches
- 2 tablespoons (40g) butter
- 1 cup (250g) mushrooms, finely sliced
- 2 cloves garlic, crushed
- Salt and freshly ground black pepper
- Softened butter
- 8 thick slices white bread
- 4 slices (200g) telaggio cheese, sliced
- 8 thin slices prosciutto
- Heat butter in a frying pan and cook mushrooms and garlic for 5 minutes. Season with salt and pepper. Remove and drain off any excess juices; cool.
- Preheat sandwich maker until green light switches on.
- Butter one side of each slice and place bread, buttered side down. Spread mushroom evenly over 4 slices. Top with taleggio and prosciutto and cover with remaining bread, buttered side up.
- Place into sandwich maker; close lid and cook 3 minutes or until bread is crisp and golden. Repeat with remaining sandwiches.
Tomato Meatball and Parmesan Sandwich
![]() Makes 4 sandwiches
Makes 4 sandwiches
Meatballs
- 400g beef mince
- 1 teaspoon garlic salt
- ½ teaspoon Italian mixed herbs
Tomato sauce
- 2 tablespoons olive oil
- 1 small onion, finely chopped
- 1 clove garlic, crushed
- ½ teaspoon oregano
- 1 teaspoon sugar
- 1 cup tomato passata
- Salt and freshly ground black pepper
- 2 tablespoons chopped fresh basil
- Softened butter
- 8 slices sourdough
- 1 cup (100g) parmesan cheese, grated
- Combined meatball ingredients and roll into teaspoon size balls. Heat half the oil in a frying pan & cook meatballs until browned but not cooked through. Remove and set aside.
- To the same pan, add remaining oil and cook onion & garlic for 2 minutes. Add oregano, passata, sugar and season with salt and pepper; simmer for 10 minutes. Add meatballs and cook 5 minutes or until sauce is thick. Stir through basil and set aside to cool.
- Preheat sandwich maker until green light switches on.
- Butter one side of each slice and place bread, buttered side down. Spoon meatball mixture evenly over 4 slices and top with parmesan and remaining bread, buttered side up.
- Place into sandwich maker; close lid & cook 3 minutes or until bread is golden and crisp. Repeat with remaining sandwiches.
Smoked Salmon with Dill Cream Cheese
![]() Makes 2 sandwiches
Makes 2 sandwiches
- 4 slices sourdough bread
- (226g) 8 oz cream cheese, room temp
- ½ bunch dill, minced
- 2 slices smoked salmon Pinch salt
- Pre heat sandwich maker.
- Place cream cheese and dill into a large mixingbowl and whip until nice and fluffy.
- Place one slice of sourdough on each side of sandwich maker. Place a slice salmon and one tablespoon of creamcheese on each slice and cover with another slice of toast. Cover lid and lock handle.
- Cook for 45 minutes. Remove and enjoy!
Hot Chocolate Custard Croissant Sandwich
![]() Makes 4 sandwiches
Makes 4 sandwiches
- 1 cup (228ml) Vanilla pudding or Pastry cream
- 1/3cup (85ml) Nutella®
- 4 large croissants, spilt lengthways
- Preheat sandwich maker until green light switches on.
- Mix pudding and chocolate hazelnut spread together.
- Place two croissant bases into sandwich maker and spoon half the mixture evenly between each croissant and top with croissant lid. Close lid and cook 2-3 minutes or until croissant is golden and crisp.
- Repeat with remaining ingredients and serve immediately with extra shavings of dark chocolate.
Banana Bread with Banana And Honey Ricotta Cream
![]() Makes 4 sandwiches
Makes 4 sandwiches
- 2 tablespoons honey
- ½ cup (114ml) ricotta
- 2 medium ripe bananas
- 8 thick slices day old banana bread
- Stir honey into ricotta. Mash bananas with a fork and add to honey ricotta.
- Preheat sandwich maker until green light switches on.
- Spread the banana ricotta honey cream over the 4 slices and top with remaining banana bread. Place 2 into sandwich maker; close lid and cook 2 minutes or until golden and hot.
- Repeat with remaining banana bread and banana ricotta honey cream. Serve immediately.
Chocolate and Hazelnut Fondant Sandwich
![]() Makes 4 sandwiches
Makes 4 sandwiches
- (200g) 7oz dark chocolate
- (100ml) 7oz cream
- 2 tablespoons chopped roasted hazelnuts
- Softened butter
- 8 thick slices brioche
- Cut chocolate into small pieces and place into a deep bowl; set aside. Warm cream until almost boiling and pour over chocolate. Stir until chocolate mixture is smooth. Stir through hazelnuts and cool until it forms a thick paste.
- Preheat sandwich maker until green light switches on.
- Butter one side of each slice and place brioche, buttered side down. Spread chocolate evenly over slices. Cover with remaining brioche, buttered side up.
- Place into sandwich maker; close lid and cook 3 minutes or until brioche is golden and crisp. Repeat with remaining sandwiches.
Pine-Mango Empanada
![]() Makes 2 sandwiches
Makes 2 sandwiches
- 1 package pie crust dough (premade, refrigerated)
- 1 large mango (ripe)
- (226g) 8oz can crushed pineapple (with juice)
- ½ teaspoon pure vanilla extract
- ¼ teaspoon nutmeg, ground
- ¼ cup (25g) powdered sugar
- 2 tablespoons brown sugar (packed)
- Pre heat sandwich maker.
- Remove peel and seed form mango. Cut into ¼” cubes. Place mango, pineapple (with juice), vanilla extract, nutmeg, powdered sugar and brown sugar into medium sauce pan on med-high heat. Simmer for 45min until fruit starts to break apart. Remove and let cool.
- Unroll pie crust on lightly floured surface. Cut sheets into 4 equal squares.
- Place one square on the bottom of the sandwich maker and fill with 12 tablespoons of filling (be sure to fill corners). Place another square on top of the filling and close sandwich maker. Hinge lock onto handle.
- Cook for 910 minutes. Remove and let cool a bit. Enjoy!
Breville Customer Service Centre
Australian Customers
Mail: Locked Bag 2000 Botany NSW 1455 AUSTRALIAPhone: 1300 139 798Fax: (02) 9700 1342Email: Customer Service: [email protected]Web: www.breville.com.au
New Zealand Customers
Mail: Private Bag 94411 Botany Manukau 2163 Auckland NEW ZEALANDPhone: 0800 273 845Fax: 0800 288 513Email: Customer Service: www.breville.com.auWeb: www.breville.co.nz
 Breville is a registered trademark of Breville Pty. Ltd. A.B.N. 98 000 092 928. Copyright Breville Pty. Ltd. 2016.Due to continued product improvement, the products illustrated/photographed in this brochure may vary slightly from the actual product.
BTS200 ANZ E16
References
[xyz-ips snippet=”download-snippet”]