Beeville LAF500 Air Fryer Chef

IMPORTANT SAFEGUARDS
READ ALL INSTRUCTIONS BEFORE USE AND SAVE FOR FUTURE REFERENCE
- Remove and safely discard any packaging material and promotional labels before using the air fryer for the first time.
- To eliminate a choking hazard for young children, remove and safely discard the protective cover fitted to the power plug of this air fryer.
- Do not place the air fryer near the edge of a bench or table during operation. Ensure the surface is level, clean and free of water and other substances.
- Do not operate the air fryer on a sink drain board.
- Do not place the air fryer on or near a hot gas or electric burner, or where it could touch a heated oven.
- Do not operate the air fryer on an inclined surface. Do not move the air fryer while it is switched on.
- Do not cover the air inlet and the air outlet openings while the air fryer is operating
BREVILLE RECOMMENDS SAFETY FIRST
At Beeville we are very safety conscious. We design and manufacture consumer products with the safety of you, our valued customer, foremost in mind. In addition, we ask that you exercise a degree of care when using any electrical appliance and adhere to the following precautions.
- Do not fill the pan with oil or any other liquid as the air fryer works on hot air.
- Never use the pan without the basket inside.
- Never touch the inside of the air fryer while it is operating.
- Position the air fryer at a minimum distance of 50cm away from walls, curtains, cloths and other heat sensitive materials when in use.
- Always operate the air fryer on a stable and heat resistant surface. Do not use on a cloth covered surface, near curtains or other flammable materials.
- Always put the ingredients to be cooked in the basket and prevent the ingredients from coming into contact with the heating elements.
- Never fill the basket with the ingredients beyond the MAX indication.
- Do not place cardboard, plastic, paper or other flammable materials into the air fryer.
- Do not cover any external part of the air fryer with metal foil. This will cause overheating of the air fryer.
- Do not touch the pan or basket for some time after use as it is very hot. Only hold the pan by the handle.
- Always use extreme caution when removing the pan or disposing of hot grease or other hot liquids that may have accumulated in the pan during cooking.
- Do not press the basket release button while shaking. Always place the pan on a heat resistant flat surface. Hold the pan by the handle and press the basket release button to remove the basket from the pan.
- Do not turn the basket upside down with the pan still attached to it as any excess oil that has collected on the bottom of the pan will leak onto the ingredients.
- Be careful of hot steam and air when you remove the pan from the air fryer. The pan and the ingredients are hot after operation. Depending on the type of ingredients in the air fryer, steam may escape from the pan.
- Extreme caution must be used when the air fryer contains hot food and liquids. Do not move the air fryer during cooking.
- Always ensure that the basket and the pan are thoroughly dried after cleaning and are reinserted into position before operating the air fryer.
- When using the air fryer, provide sufficient clearance (minimum 50mm) above and on all sides for air circulation.
- This air fryer is not intended to be operated by means of an external timer or separate remote-control system.
- Hot steam is released through the air outlet openings on the rear side of the air fryer during operation. Always keep your hands and face at a safe distance from the steam and from the air outlet openings.
- The temperature of accessible surfaces will be high when the air fryer is operating and for some time after use.
- If dark smoke emits from the air fryer during operation, immediately turn the air fryer off by pressing the power button once and switch off at the power outlet. Wait for the smoke emission to stop and for the air fryer to cool down before removing the pan from the air fryer.
- Do not touch hot surfaces; use insulated oven mitts.
- Always wear protective, insulated oven mitts when inserting, removing or handling items from the air fryer.
- Allow the air fryer to cool before handling.
- Do not place hands inside the air fryer during operation.
- Do not insert over-sized foods into the air fryer as they create risk of fire or electric shock.
- Do not use metal kitchen utensils or abrasive cleaning materials to clean the pan and the basket as this may damage the non-stick coating on the pan and the basket.
- Do not clean the interior of the air fryer with metal scouring pads as pieces can break off the pad and touch electrical parts, creating risk of electric shock.
- Do not attempt to operate the air fryer by any method other than those described in this book.
- Always ensure the air fryer is properly assembled before use. Follow the instructions provided in this book.
- Do not place anything on top of the air fryer when in use and when stored other than those described in this book.
- The air fryer should not be left unattended at any time when in use.
- Always ensure the air fryer has cooled, the air fryer is OFF, is switched off at the power outlet and the cord is unplugged from the power outlet before attempting to move the air fryer when not in use, if left unattended and before disassembling, cleaning or storing.
- Do not place the air fryer in direct sunlight. Colour fading and discoloration may occur when the air fryer is consistently exposed to UV light.
- Keep the air fryer clean. Follow the cleaning instructions provided in this book.
IMPORTANT SAFEGUARDS FOR ALL ELECTRICAL APPLIANCES
- Fully unwind the power cord before use.
- Connect only to a 230V or 240V power outlet .
- The appliance must be used on a properly grounded outlet. If it is not sure, please consult a qualified electrician.
- Do not, under any circumstances, modify the power plug or use a power plug adapter.
- Do not place this appliance on or near a heat source, such as hot plate, oven or heaters.
- Position the appliance at a minimum distance of 20cm away from walls, curtains and other heat or steam sensitive materials and provide adequate space above and on all sides for air circulation.
- Do not let the power cord hang over the edge of a bench or table, touch hot surfaces or become knotted.
- This appliance is for household use only. Do not use this appliance for anything other than its intended use. Do not use in moving vehicles or boats. Do not use outdoors. Misuse may cause injury
- The appliance is not intended for use by persons (including children) with reduced physical, sensory or mental capabilities, or lack of experience and knowledge, unless they have been given supervision or instruction concerning use of the appliance by a person responsible for their safety.
- Children should be supervised to ensure that they do not play with the appliance.
- Always turn the appliance to the OFF position, switch off at the power outlet and unplug at the power outlet when the appliance is not in use.
- Before cleaning, always turn the appliance to the OFF position, switch off at the power outlet, unplug at the power outlet and remove the power cord, if detachable, from the appliance and allow all parts to cool.
- To protect against electric shock, do not immerse the power cord, power plug or appliance in water or any other liquid or allow moisture to come in contact with the parts, unless it is recommended in the cleaning instructions.
- Any maintenance other than cleaning should be performed at an authorized Beeville Service Centre.
- It is recommended to regularly inspect the appliance. To avoid a hazard, do not use the appliance if power cord, power plug or appliance becomes damaged in any way. Return the entire appliance to the nearest authorized Beeville Service Centre for examination and/or repair.
- The installation of a residual current device (safety switch) is recommended to provide additional safety protection when using electrical appliances. It is advisable that a safety switch with a rated residual operating current not exceeding 30mA be installed in the electrical circuit supplying the appliance. See a qualified electrician for professional advice.
- During electrical storms, the appliance should be disconnected from the power source at the wall socket to prevent any electrical surges that may arise during the storm and which may inadvertently cause damage to the appliance and its electronic componentry.
FOR HOUSEHOLD USE ONLY SAVE THESE INSTRUCTIONS
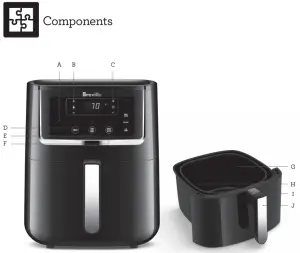
A. Touch screen control panelB. Variable temperature increase (+) and decrease (-) buttons up to 200°CC. Auto-off timer increase (+) and decrease (-) buttonsD. Menu selection buttonE. Power ON/OFF buttonF. Start/Pause buttonG. 5L cooking basketH. Air frying pan (holds the basket)I. Basket release button with safety coverJ. Basket handle
Not shown
- Air outlet opening at rear
- Cord wrap at rear
 Functions
 Functions
BEFORE FIRST USE
Remove all packaging materials and any promotional labels from your air fryer. Thoroughly clean the basket and pan with warm soapy water and a non-abrasive, soft scouring pad, rinse and dry thoroughly. Wipe the outside of the air fryer with a damp cloth.
![]() NOTE
NOTE
When turned on for the first time, the air fryer may give off vapors for up to 20 minutes. This is due to the protective substances on the heating element. It is safe, not detrimental to the performance of the air fryer and will dissipate with use.
![]() WARNING
WARNING
Hot steam is released through the air outlet openings on the rear side of the air fryer during operation. Always keep your hands and face at a safe distance from the steam and from the air outlet openings. Place the air fryer on a dry, flat, level surface. Ensure the air fryer is not too close to the edge of the bench top.
OPERATING YOUR BREVILLE AIR CHEF PROTM
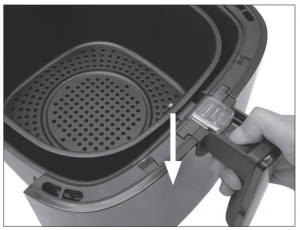
- Place the air fry basket into the pan and lock into place, then slide the basket release safety cover over the basket release button. (See Fig. 1).
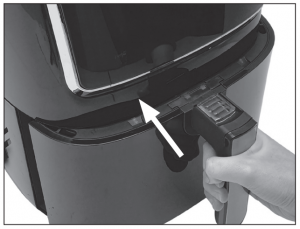
- Place food in the basket and slide the pan into the air fryer until you hear a “click” sound. (See Fig. 2).
- Plug the power cord into a 230/240 volt power outlet. Ensure cord is fully extended. Switch on at power outlet and the air fryer will beep once; the power ON/OFF button will flash on the display panel
- Press the MENU button to select from 11 different pre-set cooking menus. To set the required cooking time and temperature, press the power ON/OFF button once, press the MENU button once, then set the temperature and time by using the corresponding temperature and timer increase/decrease (+/-) buttons
- After selecting a pre-set cooking function or setting a cooking temperature and time, press the START/PAUSE button to commence cooking. Time and Temperature will alternately illuminate on the screen.
TIPPress and hold the increase (+) or decrease (-) button to increase or decrease the temperature more quickly. Alternatively choose one of the pre-set cooking functions by pressing the MENU button to toggle through the options. The MENU button allows you to select from 11 different pre-set cooking menus.
COOKING FUNCTION
PRE-SET TIME TIME RANGE PRE-SET TEMP (°C) TEMP RANGE SHAKE/TURN FOOD REMINDER
Fresh chips 25 mins 1min-1hr 200 100-200 YES Frozen chips 20 mins 1min-1hr 200 100-200 YES Fry 15 min 1min-1hr 200 100-200 YES Roast 1 hour 10mins–3hrs 180 100-180 YES Grill 5 mins 1min-30mins 200 100-200 NO Bake 45 mins 1min-3hrs 160 100-180 NO Frozen snacks 12 mins 1min-1hr 190 100-200 YES Chicken 18 mins 1min-1hr 190 100-200 NO Vegetables 25 mins 1min-1hr 190 100-200 YES Seafood 10 mins 1min-1hr 190 100-200 NO Dehydrate 2 hours 1min-12hrs 70 60-90 YES SHAKE/TURN FOOD REMINDERSome food may require shaking or turning throughout the cooking cycle to ensure even results. As a helpful reminder, the air fryer will sound 2 small beeps periodically during the cooking cycle. The air fryer will continue cooking during and after shake/turn beeping reminder. If the basket is removed, then the air fryer will pause cooking. The time and temperature will alternately illuminate on the screen when the pan is removed. Once the basket is returned to the air fryer, the cooking will resume automatically
CAUTIONAlways place the pan on a heat-resistant flat surface. Hold the pan by the handle and press the basket release button to remove the basket from the pan. Be careful of hot steam and air when you remove the pan from the air fryer. The pan and food are hot, depending on the type of food in the air fryer oven, steam may escape from the pan. Do not touch the pan after use as it is very hot. Only hold the pan by the handle. - To shake or turn the food in basket, it is recommended to first remove the basket from the pan. After shaking or turning food in the pan, place the basket back into the pan and lock into place, then slide the basket release safety cover over the basket release button. After sliding the pan back to the air fryer, the air fryer will resume cooking automatically
TIPHeavier food items filled to the ‘MAX’ line may not have enough room to shift effectively by shaking. It may be helpful to also turn the food with a heat resistant utensil at least once during the cooking process for more even results. Heating and Timer will suspend and the Time and Temperature will alternately illuminate on the screen when the pan is removed. Slide the pan back into the air fryer, and recommence cookingNOTEUse insulated oven mitts when touching hot surfaces. The MENU button allows you to select from 11 different pre-set cooking menus
- When the cooking time has elapsed, the air fryer will beep 5 times and ‘END’ will display on the screen. The fan will continue to run for 30 seconds after the cooking has ended in order to cool down the air fryer. The air fryer will then go into standby mode after about 5 minutes and ‘- – -‘ will display on the screen. Pull the pan out of the air fryer and place it on a heat-resistant flat surface. Check if the food is ready. If not, slide the pan back into the air fryer and add more time using the +10 minute button or manually set.
- Slide the safety cover inwards and press the basket safety release button. Lift the basket out of the pan before removing contents. (See Fig. 3)NOTEIf food is not entirely cooked, slide the pan back into the air fryer and repeat from step 4or press the +10 minutes button to add more cooking time.
CAUTIONSAlways place the pan on a heat-resistant flat surface. Hold the pan by the handle and press the basket release button to remove the basket from the pan. Be careful of hot steam and air when you remove the pan from the air fryer. The pan and food are hot after operation, depending on the type of food in the air fryer, steam may escape from the pan. Do not touch the pan after use as it is very hot. Only hold the pan by the handle.
- Remove food from the basket and empty the pan of excess cooking residue once cool.

![]() NOTE
NOTE
- Excess residue such as fats, oils and juices from cooking food will be collected at the bottom of the pan. Do not turn the basket upside down with the pan still attached tooit, as any excess oil that has collected on the bottom of the pan will leak onto food.
- An 18-20cm round baking tin (not included) can be used for baking cakes, quiche, reheating food and more. The baking tin should still leave some space on either side when you place it in the basket to ensure the airflow can pass around it.
![]() WARNINGNever place baking tins or other ovenproof dishes or moulds directly in the pan. Always place the baking dish in the air frying basket. Always wear oven mitts when you handle the baking tin or other oven-proof dishes or moulds
WARNINGNever place baking tins or other ovenproof dishes or moulds directly in the pan. Always place the baking dish in the air frying basket. Always wear oven mitts when you handle the baking tin or other oven-proof dishes or moulds
COOKING TABLE
The following table provides basic cooking guidelines for popular, convenience and frozen foods. Please note that due to the variations in thickness, size and the moisture content of the foods being cooked, cooking temperature and time should be adjusted to suit. Always ensure that the food is thoroughly cooked to food-safe temperature throughout, before consuming.
|
FOOD |
QUANTITY APPROX. | COOKING TIME APPROX. | TEMP (°C) |
NOTES |
|
POTATOES & CHIPS |
||||
| Fresh Chips* | 200g-1kg | 25 mins | 200 | |
| Frozen Chips* | 200g-1kg | 20 mins | 200 | |
|
FRY |
||||
| Chicken Schnitze | 100g-800g | 15 mins | 200 | |
|
ROAST |
||||
| Whole Chicken** | 200g-1.5kg** | 1 hour | 180 | |
| Beef | 500g-2kg | 1 hour | 180 | |
| GRILL | ||||
| Chicken Breast | 100g-1kg | 5 mins | 200 | |
|
BAKE |
||||
| Round Cake | 18-20cm round cake tin | 55 mins | 160 | |
| Muffins | 6 muffins | 15mins-30mins | 170 | |
| Quiche | 20cm round tin | 60 mins | 160 | |
|
FROZEN SNACKS |
||||
| Spring Rolls | 100g-500g | 12 mins | 190 | |
| Sausage Rolls* | 12 pieces | 15 mins | 190 | |
| Chicken Nuggets* | 400g-800g | 15 mins | 160 | |
|
CHICKEN |
||||
| Chicken Wings/ Drumsticks | 100g-800g | 15 min | 190 | |
|
VEGETABLES |
||||
| Root Vegetables | 100g-800g | 25 min | Cut into 3-5cm pieces | |
|
SEAFOOD |
||||
| Fish (fillet) | 100g-600g | 15 min | 180 | |
| Prawns (fresh) | 500g-1kg | 5min-15min | 180 | |
|
DEHYRDRATE |
||||
| Fresh Fruits*** | 100g-500g | 2 ½ hours | 70 | Remove any blemishes, seeds, pips and stone and slice |
| FreshVegetable*** | 100g-500g | 3 hours | 70 | Peeled, thinly sliced |
| FreshMeat*** | 100g-500g | 3 hours | 75 |
![]() CAUTION
CAUTION
- Never fill the basket with the ingredients beyond the MAX line marking. Ensure that the food inserted into the basket fits well allowing good heat flow. Do not overfill or cram food into the basket. * Cooking results may vary depending on the brand used. **If the cooking time takes more than 60 minutes, increase the timer to the remaining cooking time required immediately before cooking time elapses. *** When dehydrating, produce drying times can vary. Drying times are affected by the size of the load, thickness of the sliced produce and the moisture content of the food itself. (Therefore, broad drying times have been given in the table above). **** Do not dry lighter foods like kale, parsley, herbs as the force of the fan may blow them into the fan and heating element, which could become a hazard.
- Always wear protective, insulated oven mitts when inserting, removing or handling items from the air fryer.
![]() WARNING
WARNING
When removing cooked food items with a weight greater than 1.5kg, securely hold the pan by the handle and pull the pan out of the air fryer, placing the pan on a heat-resistant flat surface. Do not slide the safety cover inwards, do not press the basket safety release button and do not lift the basket out of the pan. Both pan and basket must remain intact. Remove heavy food items from the basket using appropriate kitchen utensils.
REHEAT FUNCTION
The reheat function is designed for reheating pre-cooked foods. To use the REHEAT function, repeatedly press the MENU button until the REHEAT function illuminates, then adjust the reheating temperature as required. Press START/PAUSE button to start reheating
| PRESET TIME | TIME RANGE | PRESET TEMP (°C) |
TEMP RANGE (°C |
|
|
REHEAT |
15 mins | 1min2hrs | 165 |
60-180 |
Time and Temperature will alternately illuminate on the screen. When the reheat time has elapsed the air fryer will beep 5 times and ‘END’ will display on the screen. The fan will continue to run for 30 seconds after reheating has ended to cool down the air fryer.
+10MINS FUNCTION
Allows you to conveniently add 10 minutes more cooking time at just the touch of a button. Press the +10 MINS button during cooking operation, the air fryer will automatically add 10 minutes cooking time to the present time. After completing any of the cooking functions, the air fryer will beep 5 times and ‘END’ will display on the screen for 5 minutes. During the 5 minutes period, press the +10 MINS button to recommence cooking for another 10 minutes.
PAUSE FUNCTION
The PAUSE function allows you to add additional ingredients and to check the temperature for doneness when cooking foods such as meat or fish. Press START/PAUSE button anytime throughout the cooking cycle to pause the air fryer operation. Once paused, the air fryer will beep twice every 30 seconds as a reminder that the air fryer has been paused. The fan will continue to run for 60 seconds to cool down the air fryer. Press START/PAUSE button again to recommence the air fryer operation. If the START/PAUSE button is not pressed after 10 minutes, the air fryer will go into standby mode and ‘- – -‘ will display on the screen.
Hints & Tips
 Hints & Tips
CHANGING TO ANOTHER PRESET DURING COOKING OR TO CANCEL COOKING
- To change to another pre-set menu during the cooking process or cancel the cooking process, press and hold the power ON/OFF button for about 3 seconds until the air fryer beeps once. The air fryer will then go into standby mode and ‘- – -‘ will display on the screen.
- Shaking or turning ingredients two to three times during longer cooking times, but at least once during cooking, optimises the result and can help prevent uneven cooking.
- Add oil to fresh potatoes before placing in basket for a crispier result.
- If baking ingredients that contain rising agents, the baking tin (not included)should not be filled more than ¾ full.
- Do not cook overly greasy foods that may spit fat into the heating element and fan such as bacon in the air fryer.
- Most snacks that can be cooked in an oven can also be cooked in the air fryer.
- Using a heat-resistant utensil such as tongs to stir food instead of shaking may be easier to turn some food types.
- The maximum size tin the air frying oven basket can fit: rectangle 12cm x 17cm or round 20cm diameter (baking tin not included).
- For baking, small baking tins that fit the air frying oven basket can be purchased from most homecare stores. below examples (See Fig.4).
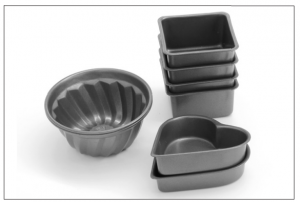
DIMENSIONS
- Square: 7.5cmx7.5cm
- Heart: 10cmx10cm
- Bundt: 11cm diameter
Care & Cleaning
 Care & Cleaning
Clean the air fryer after every use
![]() NOTE
NOTE
Do not use metal kitchen utensils or abrasive cleaning materials to clean the pan and basket as this may damage the non-stick coating on the pan and basket.
- Before cleaning, ensure the air fryer is turned OFF and switched off at the power outlet then unplugged from the power outlet. Allow the air fryer to cool completely.
- Remove the pan to allow the air fryer to cool faster. Soak the pan and basket in hot soapy water for approximately 10 minutes before cleaning so it is easier to wash. Clean the pan and basket with hot soapy water and a non-abrasive, soft scouring pad or sponge.
- Do not place any part of the air fryer in the dishwasher.
- Wipe the inside and outside of the air fryer with a soft damp cloth.
- Dry thoroughly before use
![]() NOTE
NOTE
Exposure to cooking oils and cleaning chemicals may cause colour fading and discoloration to the air fryer. If the air fryer is exposed to oils or chemicals, turn off and unplug the appliance and use a damp cloth to clean the surface of the air fryer.
STORAGE
When storing the air fryer, switch off and then remove the power supply plug from the power outlet. Ensure the appliance is completely cool, clean and dry. Place the basket into the pan and lock into place. Slide the pan back into the air fryer until you hear a “click” sound. Do not place heavy objects on top. Store the appliance standing on its support legs.
![]() CAUTION
CAUTION
To prevent damage to the appliance, do not use alkaline cleaning agents when cleaning, use a soft cloth and a mild detergent
Troubleshooting
 Troubleshooting
|
POSSIBLE PROBLEM |
POSSIBLE REASON |
EASY SOLUTION |
| The air fryer does not work |
|
|
| Food is not cooking properly |
|
|
| Food is not evenly cooked |
|
|
| I cannot slide the pan into the air fryer properly. |
|
|
| White smoke comes out of the air fryer |
|
|
| E2 appears on the screen |
|
|
| E4 appears on the screen |
|
|
| Homemade fries are fried unevenly. |
|
|
| Homemade fries are not crispy when they come out of the air frying oven. |
|
|
| Packaged fries are not coming out crisp and brown. |
|
|

References
[xyz-ips snippet=”download-snippet”]