![]() the EggspertTM4 UpInstruction Book – LEG400
the EggspertTM4 UpInstruction Book – LEG400 BREVILLE RECOMMENDS SAFETY FIRST
At Breville, we are very safety conscious. We design and manufacture consumer products with the safety of you, our valued customer, foremost in mind. In addition, we ask that you exercise a degree of care when using any electrical appliance and adhere to the following precautions.
IMPORTANT SAFEGUARDS
READ ALL INSTRUCTIONS BEFORE USE AND SAVE THEM FOR FUTURE REFERENCE
- Carefully read all instructions before operating the Breville Egg Cooker for the first time and save for future reference.
- Remove and safely discard any packaging material and promotional labels before using the egg cooker for the first time.
- To eliminate a choking hazard for young children, remove and safely discard the protective cover fitted to the power plug of this egg cooker.
- When unpacking the egg cooker, check to see you have received all the items listed in the parts list, before discarding the packaging.
- Do not place the egg cooker near the edge of a bench or table during operation. Ensure that the surface is level, clean, and free of water and other substances.
- Always operate the egg cooker on a stable and heat-resistant surface.
- Do not operate the egg cooker on a sink drainboard.
- Always ensure the egg cooker is properly assembled before use. Follow the instructions provided in this book.
- Use the removable egg rack/tray and other egg cooking accessories supplied with the egg cooker. Do not use any other egg rack/tray or egg cooking accessories inside the egg cooker heating vessel.
- Do not use a damaged egg rack/tray. If damaged, replaced the egg rack/tray before using.
- Only use clean tap water in the egg cooker’s heating vessel.
- Ensure the removable egg cooker rack/tray is correctly positioned in the egg cooker heating vessel before you commence cooking.
- Never plugin or switch on the egg cooker without having the water, egg rack/ tray, and lid placed in the egg cooker heating vessel. Operating without water will cause overheat and may permanently damage the egg cooker.
- Always take care when lifting and removing the lid and egg rack/tray as escaping steam and hot water can cause burns.
- Do not place anything, other than the lid and egg cooker rack/tray, on top of the egg cooker when assembled, when in use, and when stored.
- Do not place food or liquid other than water, and eggs inserted in the egg rack/tray in the heating vessel. Only the egg rack/tray is designed to contain egg. This egg cooker is for cooking eggs only.
- Do not touch hot surfaces; use oven mitts to remove the lid and egg rack/tray.
- Do not place your face or any other body part over the egg cooker whilst in use as the steam can cause serious burns.
- Do not move the egg cooker when in operation.
- The temperature of accessible surfaces will be high when the egg cooker is operating.
- Care should be taken when handling the egg cooker after use, ensuring that the egg cooker body and parts are not touched as these may still be hot due to residual heat.
- Avoid unnecessary removal of the lid and egg rack/tray during cooking, as steam surrounding the egg will escape.
- Do not leave the egg cooker unattended when in use.
- Do not use chemicals, steel wool, metal scouring pad or abrasive cleaners to clean the outside of the egg cooker housing, lid, or egg rack/tray as these can damage the egg cooker heating vessel or the egg rack/tray.
- Do not place the egg cooker on or near a hot gas or electric burner, or where it could touch a heated oven.
- Always turn the power off at the power outlet and then remove the plug before attempting to move the egg cooker, when the egg cooker is not in use, before cleaning, and when storing.
- Do not immerse the egg cooker, cord or plug in water or any other liquid.
- The egg cooker must not be immersed in water or other liquids or held under running water as this could give you an electric shock. Wipe the egg cooker with a damp cloth.
- Do not place the egg cooker in direct sunlight. Color fading and discoloration may occur when the egg cooker is consistently exposed to sunlight.
- To prevent damage to the egg cooker and its accessories do not use alkaline cleaning agents when cleaning, use a soft cloth and mild detergent.
- Keep the egg cooker clean. Follow the cleaning instructions provided in this book.
![]() WARNING
WARNING
Fully unwind the power cord before use.
IMPORTANT SAFEGUARDS FOR ALL ELECTRICAL APPLIANCES
- Fully unwind the power cord before use.
- Connect only to a 230V or 240V power outlet.
- The appliance must be used on a properly grounded outlet. If it is not sure, please consult a qualified electrician.
- Do not, under any circumstances, modify the power plug or use a power plug adapter.
- Do not place this appliance on or near a heat source, such as a hot plate, oven, or heater.
- Position the appliance at a minimum distance of 20cm away from walls, curtains, and other heat or steam sensitive materials and provide adequate space above and on allsides for air circulation.
- Do not let the power cord hang over the edge of a bench or table, touch hot surfaces or become knotted.
- This appliance is for household use only. Do not use this appliance for anything other than its intended use. Do not use it in moving vehicles or boats. Do not use outdoors. Misuse may cause injury.
- The appliance is not intended for use by persons (including children) with reduced physical, sensory or mental capabilities, or lack of experience and knowledge unless they have been given supervision or instruction concerning the use of the appliance by a person responsible for their safety.
- Children should be supervised to ensure that they do not play with the appliance.
- Always turn the appliance to the OFF position, switch off at the power outlet and unplug at the power outlet when the appliance is not in use.
- Before cleaning, always turn the appliance to the OFF position, switch off at the power outlet, unplug at the power outlet and remove the power cord, if detachable, from the appliance and allow all parts to cool.
- To protect against electric shock, do not immerse the power cord, power plug or appliance in water or any other liquid or allow moisture to come in contact with the parts,unless it is recommended in the cleaning instructions.
- Any maintenance other than cleaning should be performed at an authorized Breville Service Centre.
- It is recommended to regularly inspect the appliance. To avoid a hazard, do not use the appliance if the power cord, power plug, or appliance becomes damaged in any way. Return the entire appliance to the nearest authorized Breville Service Centre for examination and/or repair.
- The installation of a residual current device (safety switch) is recommended to provide additional safety protection when using electrical appliances. It is advisable that asafety switch with a rated residual operating current not exceeding 30mA be installed in the electrical circuit supplying the appliance. See a qualified electrician for professional advice.
- During electrical storms, the appliance should be disconnected from the power source at the wall socket to prevent any electrical surges that may arise during the storm andwhich may inadvertently cause damage to the appliance and its electronic componentry.
FOR HOUSEHOLD USE ONLY SAVE THESE INSTRUCTIONS
 Components
 Components
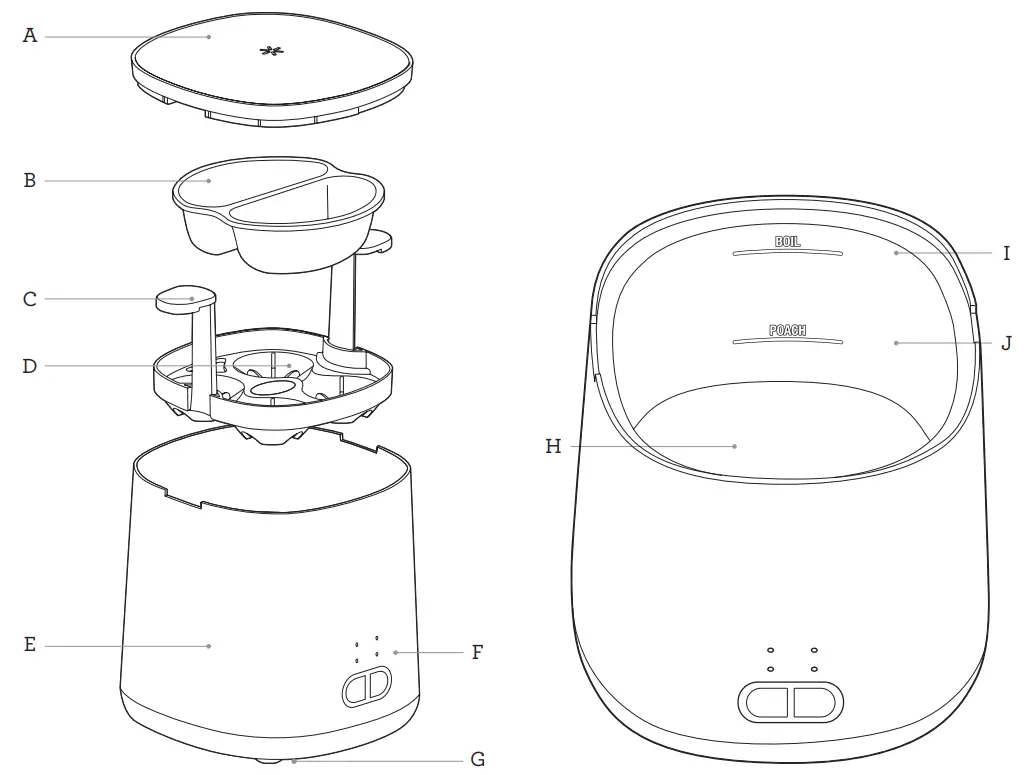
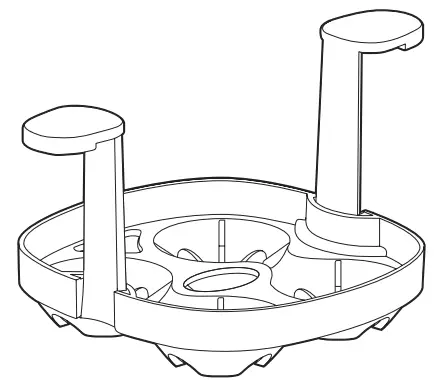
| A. Lid with steam vent | F. Control panel with LED indicator lights |
| B. Poaching tray with 2 egg wells | G. Non-slip feet |
| C. Egg rack handlesTo remove boiled eggs with ease | H. Egg cooker heating vesselIncluding internal water level markings |
| D. Egg rack for up to 4 eggs | I. Boil lineWater indicator line for the boil function |
| E. Egg cooker housingCompact and lightweight design | J. Poach lineWater indicator line for the poach function |
Not Shown
- Power cord connection point
- Detachable power cord
Control Panel
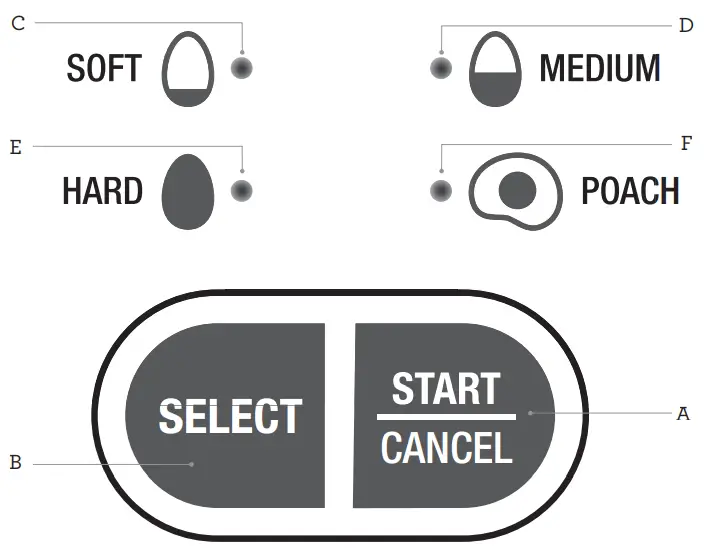
| A. START/CANCEL buttonTo start or cancel the chosen function | D. MEDIUMTo boil up to 4 medium-boiled eggs |
| B. SELECT buttonTo select the desired function | E. HARDTo boil up to 4 hard-boiled eggs |
| C. SOFT indicator lightTo boil up to 4 soft-boiled eggs | F. POACHTo poach up to 2 eggs |
![]() NOTE
NOTE
The egg cooker has safe dry start protection. If the water vessel is empty and is accidentally switched on, the indicator light corresponding with the function being used will flash and the cooker will beep twice continuously in a warning for about 1 minute before switching to standby mode. To reset, turn the egg cooker off, unplug, then wait until the egg cooker has cooled. Remove rack and tray and slowly pour water out of the water vessel and replace with fresh water. Reassemble the egg cooker and restart.
Functions
 Functions
BEFORE FIRST USERemove all promotional labels and any packaging materials from the egg cooker. Ensure that you have all parts and accessories listed in the components list before discardingthe packaging.
- Place the egg cooker on a dry, flat, heat-resistant surface.
- Remove the lid, egg rack, and poaching tray. Wash and dry before and after each use. Follow the instructions found in the Care, Cleaning & Storage section in this book.
![]() IMPORTANT
IMPORTANT
When boiling eggs, always add the egg rack with eggs inserted into the heating vessel first, then the water. For poaching, add the water first, then the egg rack/tray.
![]() WARNINGOnly use clean tap water in the egg cooker’s heating vessel.
WARNINGOnly use clean tap water in the egg cooker’s heating vessel.
BOILING EGGS
- Place the eggs to be boiled in the egg rack.NOTEUp to 4 eggs can be boiled at one time. For each egg, the suggested maximum size is 70 grams. Position the eggs with the narrow end facing down for better cooking results. Eggshells do not need to be pierced for cooking.
- Position the egg rack above the egg cooker, ensuring the egg rack handles are aligned with the recess on the egg cooker housing rim.
- Lower the egg rack into the egg cooker using the egg rack handles provided.
- Slowly pour water into the heating vessel and fill to the BOIL line marking and replace the lid on top. NOTEWhen boiling, always add the eggs to the vessel before adding the water to ensure correct water levels.
- Connect the power cord to the power cord connection point found on the back of the egg cooker. Connect the power plug into a 230V or 240V power outlet and switchit on at the power outlet. The egg cooker will beep to indicate it is in standby mode. All lights on the unit will illuminate for a few seconds before the light for HARDilluminates only. NOTEFor first use, the light beside HARD will illuminate. Each subsequent use will have the corresponding light illuminate with the last function used.
- Press the SELECT button to cycle through the available functions. The light corresponding with the chosen function will illuminate to indicate the selection.
- Press START/CANCEL to begin the function. The light will begin to flash slowly to indicate that the egg cooker has begun to heat. Refer to the Approximate CookingTimes table in this book for cooking times. WARNINGAvoid unnecessary removal of the lid and egg rack/tray during cooking, as heat surrounding the egg will escape.
- To turn the egg cooker off at any time during cooking, press the START/CANCEL button.
- When cooking is finished, the buzzer will sound for one minute to indicate that the function is complete and the unit will switch automatically to stand-by mode. Beforeopening the lid, switch off at the power outlet.
- Use oven mitts to carefully lift and remove the lid from the egg cooker. Tilt the lid away from the body to help safely redirect any escaping steam. WARNINGAlways take care when lifting and removing the lid and egg rack/tray as escaping steam and hot water can cause burns. WARNINGDo not touch hot surfaces; use the handle for lifting and carrying the egg rack/tray and use oven mitts to remove the lid and egg rack/tray.11. Remove the egg rack from the egg cooker using oven mitts and the egg rack handles.12. Use oven mitts to gently remove the boiled eggs from the egg rack. TIPAlways store uncooked eggs on their narrow end to keep the yolk centered and the air sac intact. This helps the eggs stay fresh for longer.
APPROXIMATE COOKING TIMES
| Result | Approx cooking time | Water Level Marking | Add Water to Vessel |
| SOFT | 11 Minutes | BOIL | After Eggs |
| MEDIUM | 14 Minutes | BOIL | After Eggs |
| HARD | 18 Minutes | BOIL | After Eggs |
| POACH | 11 Minutes | POACH | Before Eggs |
^Actual times may vary depending on the temperature of initial water and eggs and also the number of eggs cooked.
![]() NOTEFor a firmer result, leave the eggs sitting in the water in the heating vessel for an additional 1-2 minutes after the initial cooking time has elapsed.
NOTEFor a firmer result, leave the eggs sitting in the water in the heating vessel for an additional 1-2 minutes after the initial cooking time has elapsed.
POACHING EGGS
- Slowly fill with water into the heating vessel up to the poach line (190ml). IMPORTANTFor poaching, always add the water to the heating vessel first before lowering the egg rack/tray.
- Lightly grease the poaching tray with baking spray, butter, or oil. Gently break eggs into the cooking wells in the poaching tray, ensuring the yolk remains intact.
- Gently place the poaching tray on the egg rack, ensuring the grooves on either end of the poaching tray fit on the inside of the egg rack handles.
- Position the egg rack/tray assembly above the cooker and ensure the egg rack handles are aligned with the recesses on the egg cooker housing rim.
- Lower the egg rack/tray assembly into the egg cooker using the egg rack handles provided. Ensure the egg rack handles are fitted into the recesses on the egg cooker housing and replace the lid on top.
- Connect the power cord to the power cord connection point found on the back of the egg cooker. Connect the power plug into a 230V or 240V power outlet and switchit on at the power outlet. The egg cooker will beep to indicate it is on standby mode and all lights on the unit will illuminate, before the light for HARD illuminates only. NOTEFor first use, the light beside HARD will illuminate. Each subsequent use will have the corresponding light illuminates with the last function used.
- Press the SELECT button to cycle through the available functions until the light corresponding with POACH is illuminated.
- Press START/CANCEL to begin the function. The light will begin to flash slowly, indicating that the egg cooker has begun to heat. Refer to the Approximate CookingTimes table in this book for cooking times. WARNINGAvoid unnecessary removal of the lid and egg rack/tray during cooking, as heat surrounding the egg will escape.
- To turn the egg cooker off at any time during cooking, press START/CANCEL.
- Once finished, the buzzer will sound for one minute to indicate that the function is complete. Before opening the lid, switch off at the power outlet.
- Use oven mitts to carefully remove the lid from the egg cooker. Tilt the lid away from the body to help safely redirect any escaping steam. WARNINGAlways take care when lifting and removing the lid and egg rack/tray as escaping steam and hot water can cause burns. WARNINGDo not touch hot surfaces; use oven mitts to remove the lid and egg rack/tray.
- Remove the egg rack, with the poaching tray still assembled, from the egg cooker using oven mitts and the egg rack handles.
- Gently remove the poached eggs from the poaching tray wells using a spoon or heat-proof spatula.
Care, Cleaning & Storage
 Care, Cleaning & Storage
Before cleaning, ensure the egg cooker is off, then switch the egg cooker off at the power outlet. Remove the power plug from the power outlet and allow the egg cookerand all accessories to cool completely before disassembling and cleaning.
- Wash the lid, egg rack, and poaching tray in warm, soapy water. Rinse and dry thoroughly. NOTEThe egg rack, poaching tray, and lid can also be washed on the top shelf of the dishwasher. If equipped, DO NOT use the “HEATED RINSE” setting when washing in the dishwasher. “HEATED RINSE” cycle temperatures could damage these parts. WARNINGDo not use chemicals, steel wool, metal scouring pad, or abrasive cleaners to clean the outside of the egg cooker housing, lid or egg rack/tray as these can damage the housing or the egg rack/tray.
- Wipe the internal egg cooker heating vessel with a soft, damp cloth and dry thoroughly.
- Any water scale build-up on the heating vessel can be removed by immersing a cloth in white vinegar and placing it on the cold heating plate/water vessel surface for10 minutes. Remove, then wipe with a clean, damp cloth and dry thoroughly.
 report this ad
STORAGE
- Assemble the egg rack into the egg cooker. Layer the poaching tray over the egg rack and place the lid into position. Remove the detachable power cord and wrap it around the egg cooker. Store upright in a cool, dry place.
Troubleshooting
 Troubleshooting
| PROBLEM | POSSIBLE REASON | EASY SOLUTION |
| No indicator light | • Egg cooker is not connected to a power source | • Ensure the power cord is connectedcorrectly and the PowerPoint is switched on. |
| The indicator light corresponding with the functionbeing used flashes and the cooker will beep twicecontinuously before the egg cooker turns offautomatically | • No water in the water vessel | • The egg cooker has overheated. Turn theegg cooker off and unplug. Wait untilthe egg cooker has cooled. Remove rackand tray and slowly pour water out of thewater vessel and replace with fresh water.Reassemble and retry. |
| The egg cooker is operating, but the water tankdoes not heat up after 30 minutes.A beep will sound | • Thermal link issue | • Turn the egg cooker off and contact Breville Customer Service. |
| Egg has not cooked well enough | • Egg size may be too large or small |
• If the egg is underdone, leave the egg/sinside the egg cooker for an extra minuteto achieve desired results. Do not turnthe egg cooker on. The heated water in the vessel will continue to cook the egg/s.Do not leave for longer than 2 minutes. |
| • The lid is not fitted properly | • Ensure the handles are aligned with therecess and the lid is on correctly. | |
| The egg cooker cannot be turned off by theSTART/CANCEL button | • Unit issue |
• Turn the unit off at the power outlet andunplug. Contact the Breville CustomerService Centre. |
Breville Customer Service CentreAustralian CustomersPhone: 1300 139 798Web: www.breville.com
New Zealand CustomersPhone: 0800 273 845Web: www.breville.com
Breville, the Breville logo, Eggspert and Master Every Moment are trademarks of Breville Pty. Ltd. A.B.N. 98 000 092 928. Copyright Breville Pty. Ltd. 2020.Due to continued product improvement, the products illustrated/photographed in this booklet may vary slightly from the actual product.LEG400 ANZ A20
References
[xyz-ips snippet=”download-snippet”]