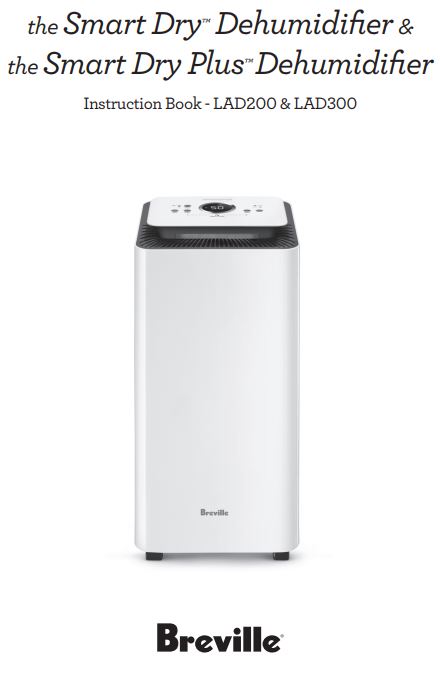
Breville Smart Dry Dehumidifier & Dry Plus
BREVILLE RECOMMENDS SAFETY FIRSTAt Breville, we are very safety conscious. We design and manufacture consumer products with the safety of you, our valued customer, foremost in mind. In addition, we ask that you exercise a degree of care and adhere to the following precautions.
IMPORTANT SAFEGUARDSREAD ALL INSTRUCTIONS BEFORE USE AND SAVE THEM FOR FUTURE REFERENCE
- Carefully read all instructions before operation and save them for future reference.
- Remove and safely discard any packaging material and promotional labels before using the oven for the first time.
- To eliminate a choking hazard for young children, remove and safely discard the protective cover fitted to the power plug of this dehumidifier.
- When unpacking the dehumidifier, check to see you have received all the items listed in the parts list before discarding the packaging.
- The dehumidifier is intended for household use only and not for commercial or industrial use. Do not use outdoors.
- Always ensure the dehumidifier is properly assembled before use. Follow the instructions provided in this book.
- Do not place the dehumidifier near the edge of a bench or table during operation. Ensure the surface is level, clean, and free of water.
- Do not run the power cord under carpeting or cover the cord with rugs, runners, or the like. Arrange the cord away from traffic areas and where it will not be tripped over.
- Do not route the power cord under furniture or appliances.
- To protect against electrical hazards, do not immerse any part of the dehumidifier in water or other liquids. Do not use the dehumidifier in the immediate surroundings of a bath, shower, or swimming pool.
- Water in the water tank is not suitable for drinking. Do not drink this water, and do not serve to animals or use it to water plants. When you empty the water tank, pour the water in the water tank down a drain.
- Always turn off and unplug the dehumidifier before moving, removing the water tank, changing filters, cleaning, or whenever the dehumidifier is not in use.
- Do not unplug the dehumidifier by pulling on the cord.
- Never insert fingers, pencils, or any other objects through the guards whenever the power plug is connected, and in particular, when the dehumidifier is switched on.
- Do not operate the dehumidifier with a damaged cord or plug, or if the dehumidifier has been dropped or damaged in any manner. Return the dehumidifier to your nearest Breville service center for examination, electrical or mechanical adjustment, or repair.
- Do not use the dehumidifier with an external timer, programmer, or any other device that switches the dehumidifier on automatically since a fire risk may exist if the dehumidifier is covered or positioned incorrectly.
- Do not place anything on top of the dehumidifier when assembled, when in use, and when stored.
- Never block the air openings, grilles, and outlets, or place on a soft surface such as a bed or sofa as this could cause the unit to tip over, blocking the air inlet or outlet.
- Do not attempt to repair or adjust any electrical or mechanical functions on this unit. Doing so will void your warranty. The inside of the unit contains no user-serviceable parts. All servicing should be performed by qualified personnel only.
- If the dehumidifier ever tips or falls over when the water reservoir is full, immediately unplug the power cord. Ensure the unit is dried thoroughly before resuming operation.
- Keep the dehumidifier and dust filters clean. Follow the cleaning instructions provided in this book.

IMPORTANT SAFEGUARDS FOR ALL ELECTRICAL APPLIANCES
- Fully unwind the power cord before use.
- · Connect only to a 230V or 240V power outlet.
- Do not let the power cord hang over the edge of a bench or table, touch hot surfaces or become knotted.
- To protect against electric shock, do not immerse the power cord, power plug, or appliance in water or any other liquid or allow moisture to come in contact with the part unless it is recommended in the cleaning instructions.
- The appliance is not intended for use by persons (including children) with reduced physical, sensory or mental capabilities, or lack of experience and knowledge unless they have been given supervision or instruction concerning the use of the appliance by a person responsible for their safety.
- Children should be supervised to ensure that they do not play with the appliance.
- It is recommended to regularly inspect the appliance. To avoid a hazard, do not use the appliance if the power cord, power plug, or appliance becomes damaged in any way. Return the entire appliance to the nearest authorized Breville Service Centre for examination and/or repair.
- Any maintenance other than cleaning should be performed at an authorized Breville Service Centre.
- This appliance is for household use only. Do not use this appliance for anything other than its intended use. Do not use it in moving vehicles or boats. Do not use outdoors. Misuse may cause injury.
- The installation of a residual current device (safety switch) is recommended to provide additional safety protection when using electrical appliances. It is advisable that a safety switch with a rated residual operating current not exceeding 30mA be installed in the electrical circuit supplying the appliance.
- See your electrician for professional advice.
- During electrical storms, the appliance should be disconnected from the power source at the wall socket to prevent any electrical surges that may arise during the storm and which may inadvertently cause damage to the appliance and its electronic componentry.
- Always turn the appliance to the OFF position, switch off at the power outlet and unplug at the power outlet when the appliance is not in use.
- Before cleaning, always turn the appliance to the OFF position, switch off at the power outlet, unplug at the power outlet and remove the power cord, if detachable, from the appliance and allow all parts to cool.
- Do not place this appliance on or near a heat source, such as a hot plate, oven, or heaters.
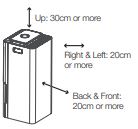
- Position the appliance at a minimum distance of 20cm away from walls, curtains, and other heat or steam sensitive materials and provide adequate space above and on all sides for air circulation.
![]() WARNING To avoid electric shock, do not connect the plug to the power outlet when hands are wet.
WARNING To avoid electric shock, do not connect the plug to the power outlet when hands are wet.
FOR HOUSEHOLD USE ONLY SAVE THESE INSTRUCTIONS
 Components
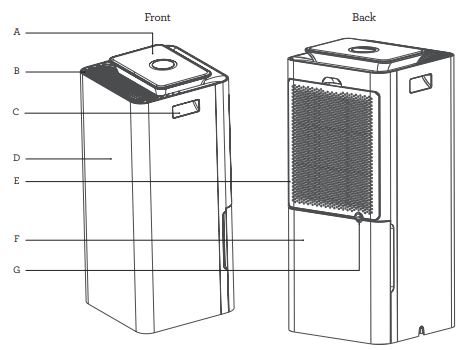
A. Control PanelB. Air OutletC. Carry HandlesD. Housing BodyE. Air Inlet and FilterF. Water TankG. Continuous Drainage OutletNot picturedPower CordDrainage Hose (gravity-fed)WheelsCarbon FilterWater Level IndicatorWater Tank Lid (LAD300 only)
Control Panel
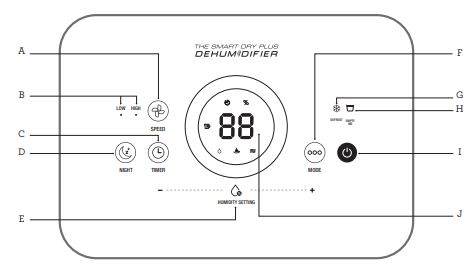
A. Fan SpeedB. Low & High Fan LightC. TimerD. Night ModeE. Humidity SettingF. ModeG. Defrost LightH. Empty Me LightI. Power On/OffJ. Display Screen![]()
Features
 Features
WHAT IS A DEHUMIDIFIER?Your Breville dehumidifier is designed to reduce and maintain the level of humidity in the air, as well as to prevent condensation and mildew on the ceilings and walls.
HOW DOES A DEHUMIDIFIER WORK?Your Breville dehumidifier regulates the relative humidity of your home by drawing moist, humid air from the surrounding area and passing it over cooled evaporator coils causing the moisture to condense into water. The water is dispensed into the water tank or drainage hose, while the now non-humid air is rewarmed and passed back into the room.
WHAT IS RELATIVE HUMIDITY?The relative humidity is the amount of water vapor in the air and it is commonly expressed as a percentage of the maximum amount of water vapor that the air can hold at a given temperature. A comfortable %RH level is commonly considered to be between 40-60%RH.
Assembly
BEFORE FIRST USE
- Before using your dehumidifier for the first time, remove all packaging material and promotional labels.
- Check for any missing or damaged parts as per the components list.
- Clean all parts according to the Care, Cleaning & Storage section of this book.
- Use the carry handles and wheels to move the dehumidifier.
- Position the dehumidifier away from walls, furniture, and other appliances as per the illustration below.
- Ensure that the filter, water tank, and drainage hose (if applicable), are correctly installed before use.
- Connect the power plug to a 230V or 240V outlet and switch the outlet on.
Functions
 Functions
USING YOUR BREVILLE DEHUMIDIFIER
- To operate the dehumidifier, press the POWER button.
- The icon for the last mode used will illuminate on the display screen or another mode can be selected.
- If in Auto mode, adjust the humidity level if desired (see Humidity Setting).
- The unit will start to operate within 5 seconds.
- Press the POWER button again to turn it off.
![]() NOTEThe dehumidifier cannot operate if the water tank is full or is not installed correctly.
NOTEThe dehumidifier cannot operate if the water tank is full or is not installed correctly.
SENSAIRTM LIVE HUMIDITY CONTROL
- Your Breville Smart DryTM and Smart Dry PlusTM Dehumidifier have a built-in sensor to detect changes in the humidity level in the air.
- The SensAir TM live humidity indicator light will change color according to the relevant humidity (%).
- The LED screen provides a real-time indication of the relative humidity in the air.
TO SELECT ONE OF THE FOUR OPERATING MODES:
Press the ΟΟΟ MODE button on the control panel until the corresponding icon flashes on the display screen.
![]() AUTO MODEThe dehumidifier will operate to reach, then maintain, the humidity setting.
AUTO MODEThe dehumidifier will operate to reach, then maintain, the humidity setting.
![]() CONTINUOUS MODEThe dehumidifier will operate on Low speed until it is manually turned off.
CONTINUOUS MODEThe dehumidifier will operate on Low speed until it is manually turned off.
![]() VENTILATION MODECirculates ambient air without dehumidification.
VENTILATION MODECirculates ambient air without dehumidification.
![]() LAUNDRY MODEThe laundry mode operates at a High speed and a low humidity setting. This assists with drying wet clothes faster when hanging indoors. It is also useful in drying wet carpets or rugs.The chosen model will start within 5 seconds of selection.
LAUNDRY MODEThe laundry mode operates at a High speed and a low humidity setting. This assists with drying wet clothes faster when hanging indoors. It is also useful in drying wet carpets or rugs.The chosen model will start within 5 seconds of selection.
![]() NOTE This dehumidifier produces heat during operation which may cause room temperatures to rise by 1°C to 4°C, especially if used in an enclosed space.
NOTE This dehumidifier produces heat during operation which may cause room temperatures to rise by 1°C to 4°C, especially if used in an enclosed space.
![]() HUMIDITY SETTINGWhen the dehumidifier is turned on, the current humidity level (%) will show on the display screen and the % icon will illuminate. This number will adjust as the dehumidifier operates.The Humidity Setting allows you to manually set the relative humidity (%RH) between 30% – 80% (in 5% increments) when the unit is operating in Auto mode only.
HUMIDITY SETTINGWhen the dehumidifier is turned on, the current humidity level (%) will show on the display screen and the % icon will illuminate. This number will adjust as the dehumidifier operates.The Humidity Setting allows you to manually set the relative humidity (%RH) between 30% – 80% (in 5% increments) when the unit is operating in Auto mode only.
1. To manually adjust the humidity level, scroll your finger left or right on the Humidity Setting bar until the desired level flashes, then illuminate on the display screen.
![]()
![]() FAN SPEEDIn both Auto and Ventilation modes, the Fan Speed can be manually selected.1. Press the
FAN SPEEDIn both Auto and Ventilation modes, the Fan Speed can be manually selected.1. Press the ![]() FAN SPEED button to select between Low or High. The light will illuminate under the selected speed.
FAN SPEED button to select between Low or High. The light will illuminate under the selected speed.
![]() NOTEThe fan will only operate on Low speed in Continuous mode and on High speed in Laundry mode.
NOTEThe fan will only operate on Low speed in Continuous mode and on High speed in Laundry mode.
![]() NIGHT MODEThe night mode will automatically turn off all lights on the control panel (except the Night button light) and operate in the last setting.
NIGHT MODEThe night mode will automatically turn off all lights on the control panel (except the Night button light) and operate in the last setting.
- Press the NIGHT button on the control panel.
- Within 5 seconds, the lights on the control panel will turn off, except the NIGHT button light.
- Press once to view the current humidity level.
- Press the NIGHT button twice to exit Night mode.
![]() TIMERThe Timer operates in two ways.• Auto-Off, where the timer determines when to turn the unit OFF, can be set when the dehumidifier is turned on.• Delayed Start, where the timer determines when to turn the unit ON, can be set when the dehumidifier is turned off.
TIMERThe Timer operates in two ways.• Auto-Off, where the timer determines when to turn the unit OFF, can be set when the dehumidifier is turned on.• Delayed Start, where the timer determines when to turn the unit ON, can be set when the dehumidifier is turned off.
- Press the TIMER button.
- The display screen will flash `00′ and the icon will illuminate.
- Press the TIMER button to increase the time in one-hour increments, up to 24 hours.
- The time will countdown each hour, automatically turning the dehumidifier ON or OFF when it reaches `00′.
- To cancel Auto-Off or Delayed Start, press the POWER button or continue to press the TIMER button until it reaches ’00’.
![]() WARNINGAs a safety feature, the dehumidifier will automatically turn off if the water tank is full, even if the countdown timer has not reached `00′. The dehumidifier will not turn on in Delayed Start if the water tank is full.
WARNINGAs a safety feature, the dehumidifier will automatically turn off if the water tank is full, even if the countdown timer has not reached `00′. The dehumidifier will not turn on in Delayed Start if the water tank is full.
WATER DRAINAGEDuring the process of dehumidification, water is created and needs to be expelled from the dehumidifier. This dehumidifier offers two options to drain this water.
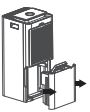
REMOVABLE WATER TANK (with Empty Me warning)The removable water tank will collect water until it reaches the water level indicator when the tank is full. Once full, the EMPTY ME light on the control panel will illuminate red and the dehumidifier will cease dehumidification until the water tank is emptied.1. Remove the water tank as per the water tankcleaning instructions in the Care, Cleaning & Storage section of this book.
![]() NOTEThe dehumidifier will not operate if the tank is not installed correctly, even if the drainage hose is in use.
NOTEThe dehumidifier will not operate if the tank is not installed correctly, even if the drainage hose is in use.
![]() WARNINGWater from the dehumidifier is not suitable for drinking. Do not drink this water and do not serve it to animals or use it to water plants.
WARNINGWater from the dehumidifier is not suitable for drinking. Do not drink this water and do not serve it to animals or use it to water plants.
CONTINUOUS DRAINAGE (hose drainage using gravity)The continuous drainage outlet allows water to drain without having to monitor and empty the water tank. Ensure the hose (included) is properly inserted before starting the dehumidifier.
- Remove the water tank to access the hose connection outlet located at the back of the unit.
- Insert the hose into the connection outlet, ensuring that the hose is slid right to the back of the connection outlet.
- As the drainage is dependent on gravity, for the dehumidifier to drain correctly, no part of the hose should sit higher than the hose connection outlet.
- Place the other end of the hose into a water drain, being careful that it cannot inadvertently come loose when water starts to drain.
- Carefully replace the water tank with the hose situated into the hose groove.
- The dehumidifier will drain through the hose while installed.
![]() WARNINGEnsure the hose is secure in both the hose connection and the drainage outlet.
WARNINGEnsure the hose is secure in both the hose connection and the drainage outlet.
![]() DEFROSTThis dehumidifier is equipped with an automatic to defrost. The evaporator may start auto-defrosting if operating at a room temperature that is less than 23°C.1. If the
DEFROSTThis dehumidifier is equipped with an automatic to defrost. The evaporator may start auto-defrosting if operating at a room temperature that is less than 23°C.1. If the ![]() DEFROST light turns on, defrosting has automatically started. The fan will operate on HIGH during defrosting and dehumidification will stop.2. Automatic defrost will operate for up to 5 minutes.
DEFROST light turns on, defrosting has automatically started. The fan will operate on HIGH during defrosting and dehumidification will stop.2. Automatic defrost will operate for up to 5 minutes.
![]() WARNINGDo not disconnect the power or turn off the unit during defrosting.
WARNINGDo not disconnect the power or turn off the unit during defrosting.
Care, Cleaning & Storage
 Care, Cleaning & Storage
![]() WARNINGBefore cleaning or maintenance the dehumidifier, ensure the power is switched off at the outlet and the plug is removed.
WARNINGBefore cleaning or maintenance the dehumidifier, ensure the power is switched off at the outlet and the plug is removed.
CLEANING YOUR DEHUMIDIFIER
- Keep the unit upright when cleaning.
- Wipe the dehumidifier housing, control panel, and air inlet and outlet grilles with a soft, dry cloth.
- To remove dirt that may have built upon the housing body and air inlet grille, wipe with a damp cloth only. Do not use it on the control panel.
![]() WARNINGDo not clean the control panel with a damp cloth. Do not clean the unit with gasoline, thinner, or liquid detergent as chemical substances may damage the humidifier screen or change the color of the dehumidifier.
WARNINGDo not clean the control panel with a damp cloth. Do not clean the unit with gasoline, thinner, or liquid detergent as chemical substances may damage the humidifier screen or change the color of the dehumidifier.![]() NOTEUsing a brush may scratch the dehumidifier. Do not use any objects that may scratch the unit.
NOTEUsing a brush may scratch the dehumidifier. Do not use any objects that may scratch the unit.
WATER TANK CLEANINGNOTE The dehumidifier cannot operate if the tank is full or is not installed correctly. Clean the water tank once a week if used regularly.
- Remove the water tank from the back of the dehumidifier by holding the sides and pulling outwards.
- For the Smart Dry PlusTM Dehumidifier only (LAD300) remove the lid before cleaning. Place the tank on a dry, level surface. Flip the handle on the water tank cover until the grooves in the handle match the grooves in the candle holders. Pull outwards on both sides of the handle to disengage. Once the handle has been removed, carefully pull upwards on the tank lid to remove it.
- Tip any excess water from the water tank into a sink or drain, then rinse the inside of the tank with clean water.
- Wipe any water on the outside of the tank with a dry cloth and replace the water tank lid and handle back onto the water tank (LAD300 only).
- Replace the water tank back into the dehumidifier.
![]() WARNINGWater in the water tank is not suitable for drinking. Do not drink this water, and do not serve to animals or use it to water plants.
WARNINGWater in the water tank is not suitable for drinking. Do not drink this water, and do not serve to animals or use it to water plants.
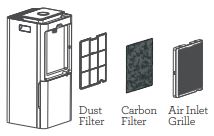
FILTER CLEANINGThe air inlet grille at the back of the dehumidifier also acts as the filter holder. The filter includes a mesh dust filter to capture larger airborne particles, and a black carbon filter for finer debris and to help reduce odors and smoke.![]() WARNINGIt is important to keep the filter clean as a dirty filter may cause a reduction in the performance of the dehumidifier.
WARNINGIt is important to keep the filter clean as a dirty filter may cause a reduction in the performance of the dehumidifier.![]() NOTEClean the filter at least monthly, or more often if infrequent use.
NOTEClean the filter at least monthly, or more often if infrequent use.
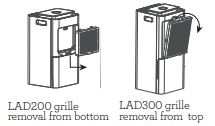
FILTER FREQUENT CLEANING1. Remove the air inlet grille from the back of the dehumidifier as per the illustration below.
2. With the dust filter and carbon filter still attached to the air inlet grille, use a handtool on a vacuum cleaner (such as a brush or upholstery tool) to clean both sides. Alternatively, lightly tap the grille over a garbage receptacle to loosen the dust.3. Replace the air inlet grille with the dehumidifier. Ensure the grille clicks into place correctly before using the dehumidifier.
FILTER HEAVY-DUTY CLEANINGIf dirt and dust have built up, and a simple clean (as instructed above) does not remove all the debris, it is recommended that the filters be separated for cleaning.
- Remove the air inlet grille from the back of the dehumidifier.
- To separate the mesh dust filter from the grille, pull outwards using the tab in the middle of the filter to disengage from the clips on the grille.
- The black carbon filter sits between the dust filter and the air inlet grille as per the above illustration.
- Use a hand tool on a vacuum cleaner (such as a brush or upholstery tool) to clean the dust from both filters, or tap the filters lightly over a garbage receptacle to loosen the dust from the filter.
- If the dirt and dust have built upon the mesh dust filter, hand wash in warm, soapy water, then rinse well and dry before replacing.WARNINGNever wet the carbon filter. This filter can be cleaned by simply tapping over a garbage receptacle.
- Place the carbon filter back into the air inlet grille, then place the dust filter over the carbon filter by pressing firmly downwards to clip into the grille.
- Replace the air inlet grille back onto the dehumidifier.
STORAGE
- Disconnect the dehumidifier from the power outlet.
- Ensure the water tank is empty and cleaned as per instruction.
- Clean the dehumidifier as per instructions.
- Store the dehumidifier upright and avoid standing in direct sunlight if leaving for long periods.
- Never store anything on top of the dehumidifier.
Troubleshooting
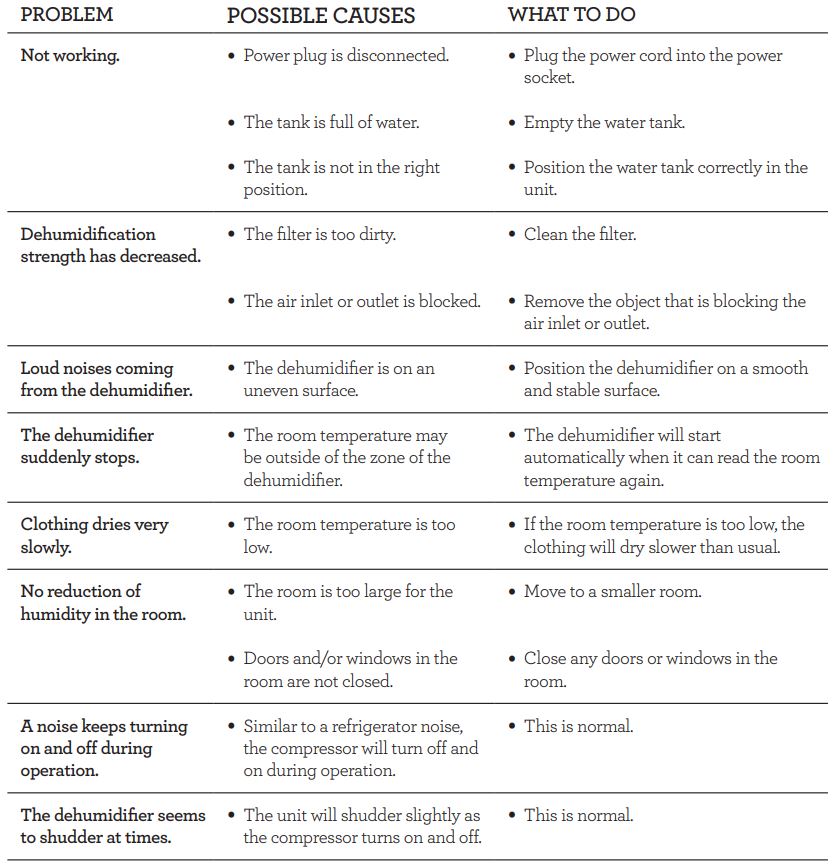
TROUBLESHOOTING GUIDEBefore carrying out any of the following service checks, unplug the unit from the power outlet.
ERROR CODES
Breville Customer Service Centre
Australian CustomersPhone: 1300 139 798Web: www.breville.com
New Zealand CustomersPhone: 0800 273 845Web: www.breville.com
![]() Breville, the Breville logo, Master Every Moment, Smart Dry, Smart Dry Plus, and Sinclair are trademarks of Breville Pty. Ltd. A.B.N. 98 000 092 928.Copyright Breville Pty. Ltd. 2019.Due to continued product improvement, the products illustrated/photographed in this booklet may vary slightly from the actual product.LAD200/300 ANZ B19
Breville, the Breville logo, Master Every Moment, Smart Dry, Smart Dry Plus, and Sinclair are trademarks of Breville Pty. Ltd. A.B.N. 98 000 092 928.Copyright Breville Pty. Ltd. 2019.Due to continued product improvement, the products illustrated/photographed in this booklet may vary slightly from the actual product.LAD200/300 ANZ B19
References
[xyz-ips snippet=”download-snippet”]