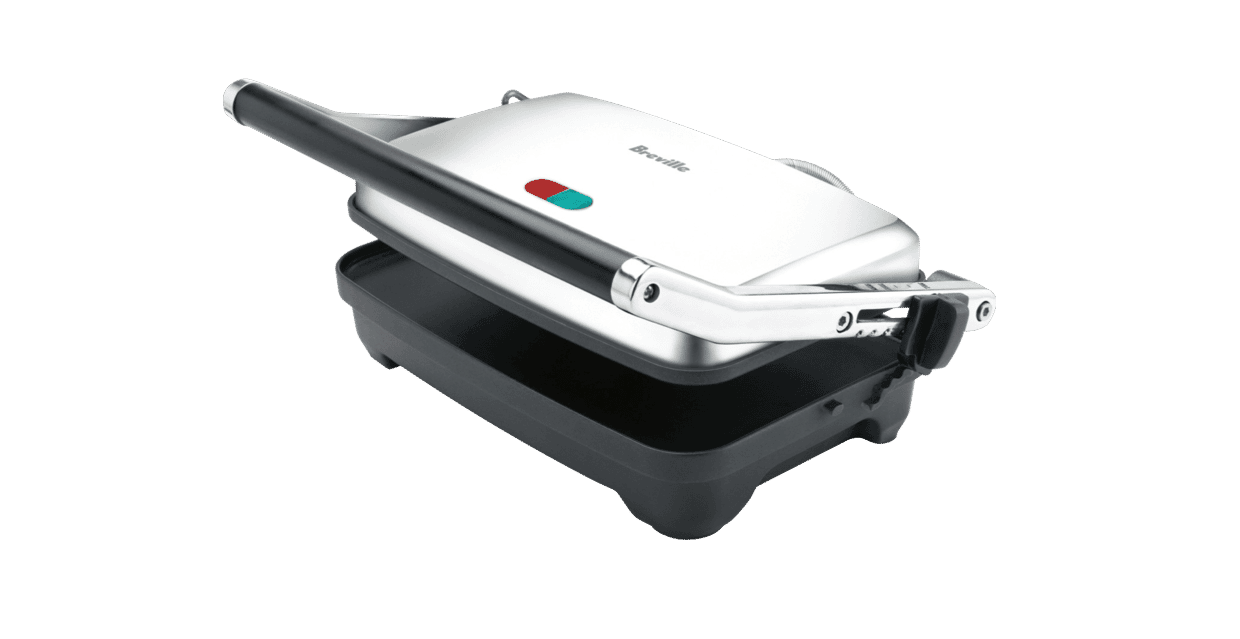
Breville the Toast & Melt Sandwich Press BSG220 Instructions
BREVILLE RECOMMENDS SAFETY FIRST
At Breville we are very safety conscious. We design and manufacture consumer products with the safety of you, our valued customer, foremost in mind. In addition we ask that you exercise a degree of care when using any electrical appliance and adhere to the following precautions.
IMPORTANT SAFEGUARDS
READ ALL INSTRUCTIONS BEFORE USE AND SAVE FOR FUTURE REFERENCE
- Carefully read all instructions before operating the sandwich press for the first time and save for future reference.
- Remove and safely discard any packaging material and promotional stickers before using the sandwich press for the first time.
- To eliminate a choking hazard for young children, remove and safely discard the protective cover fitted to the power plug of this appliance.
- Do not place the sandwich press near the edge of a bench or table during operation.Ensure that the surface is level, clean and free of water.
- Keep the sandwich press clear of walls, curtains and other heat or steam sensitive materials.
- The sandwich press must be used on a properly grounded outlet. If you are not sure if the power outlets are properly grounded, please consult your electricians.
- Do not, under any circumstances, modify the power plug or use an adapter.
- Do not place the sandwich press on or near a hot gas or electric burner, or where it could touch a heated oven. Use the sandwich press well away from walls.
- Provide adequate space above and on all sides for air circulation around the sandwich press.
- Do not place the sandwich press on any surface that may be affected by heat. The use of a heat resistant matt is recommended on these surfaces.
- Do not use on a sink drain board.
- Always use the sandwich press on a dry, level surface.
- Do not touch hot surfaces. Use the handles to lift and open the top plate. Take care when using the Adjustable Grilling Height Control.
- Do not leave the sandwich press unattended when in use.
- The outer housing of the sandwich press may be hot during and after use. Please do not touch hot surfaces.Always keep the power cord of this products, and those of other appliances nearby, clear from the housing.
- The sandwich press is not suitable to be used in a small appliance enclosure. Ensure to leave adequate space all around the sandwich press.Minimum space of 10cm is recommended.
- Do not place anything on top of the sandwich press when the lid is closed, when in use and when stored.
- Always switch the sandwich press off at the power outlet, then unplug the power cord and to allow to cool, if appliance is not in use, before cleaning, before attempting to move the appliance, disassembling, assembling and when storing the appliance.
- Do not use harsh abrasives, caustic cleaners or oven cleaners when cleaning the sandwich press.
- Keep the exterior housing and the non-stick cooking plates clean. Follow the cleaning instructions provided in this book. Refer to Care, Cleaning and Storage (Page 9).
- This appliance is not intended to be operated by means of an external timer or separate remote control system.
IMPORTANT SAFEGUARDS FOR AL ELECTRICAL APPLIANCES
- Fully unwind the power cord before use.
- Connect only to a 230V or 240V power outlet.
- Do not let the power cord hang over the edge of a bench or table, touch hot surfaces or become knotted.
- To protect against electric shock, do not immerse the power cord, power plug or appliance in water or any other liquid or allow moisture to come in contact with the part, unless it is recommended in the cleaning instructions.
- The appliance is not intended for use by persons (including children) with reduced physical, sensory or mental capabilities, or lack of experience and knowledge, unless they have been given supervision or instruction concerning use of the appliance by a person responsible for their safety.
- Children should be supervised to ensure that they do not play with the appliance.
- It is recommended to regularly inspect the appliance. To avoid a hazard do not use the appliance if power cord, power plug or appliance becomes damaged in any way.Return the entire appliance to the nearest authorised Breville Service Centre for examination and/or repair.
- Any maintenance other than cleaning should be performed at an authorised Breville Service Centre.
- This appliance is for household use only. Do not use this appliance for anything other than its intended use. Do not use in moving vehicles or boats.Do not use outdoors. Misuse may cause injury.IMPORTANTFully unwind the power cord from the cord storage facility before use.
- The installation of a residual current device (safety switch) is recommended to provide additional safety protection when using electrical appliances. It is advisable that a safety switch with a rated residual operating current not exceeding 30mA be installed in the electrical circuit supplying the appliance. See your electrician for professional advice.
- During electrical storms, the appliance should be disconnected from the power source at the wall socket to prevent any electrical surges that may arise during the storm and which may inadvertently cause damage to the appliance and its electronic componentry.
- Always turn the appliance to the off position, switch off at the power outlet and unplug at the power outlet when the appliance is not in use.
- Before cleaning, always turn the appliance to the off position, switch off at the power outlet, unplug at the power outlet and remove the power cord, if detachable, from the appliance and allow all parts to cool.
- Do not place this appliance on or near a heat source, such as hot plate, oven or heaters.
- Position the appliance at a minimum distance of 20cm way from walls, curtains and other heat or steam sensitive materials and provide\ adequate space above and on all sides for air circulation.
FOR HOUSEHOLD USE ONLY SAVE THESE INSTRUCTIONS
Components
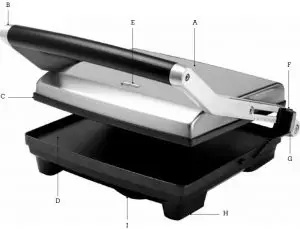
- A. 2000W of powerFor fast heat up and quick toasting.
- B Heavy duty die-cast armsFor durability and strength.
- C Floating top plateAutomatically adjusts to thick or thin sandwiches.
- D Flat non-stick cooking platesFor extra crispy toasted results.
- E ‘Power’ and ‘Ready’ lightsIndicate when the sandwich press is heating or ready to use.
- F. Adjustable height control clipWith 4 settings for making open sandwich melts, toasted sandwiches and everything in between.
- G. Safety locking storage clipTo lock plates closed for upright storage.
- H. Non-slip feet
- I. Convenient cord wrap in base
Functions
BEFORE FIRST USE
Remove any promotional materials and packaging materials before use. Check that the cooking plates are clean and free of dust.If necessary, wipe over with a damp cloth.When using the sandwich press for the first time you may notice a fine smoke haze.This is caused by the heating of some of the components. There is no need for concern.
TOASTED SANDWICH
- Insert the power plug into a 230V or 240V power outlet and then turn the power ON.The red ‘POWER’ light will illuminate.
- Allow the sandwich press to pre-heat with the top cooking plate in the closed position until the green ‘READY’ light illuminates.
- During this time, prepare the sandwich.When the sandwich press has pre-heated, place the sandwich onto the bottom cooking plate. Always place sandwiches towards the rear of the bottom cooking plate.
- Close the top cooking plate. The top cooking plate has a floating hinge that is designed to evenly press down on the sandwich (see Fig 1).

- Toasting should take approximately 5–8 minutes. Exact toasting time will be a matter of taste. It will also depend on the type of bread and type of filling used.
- When the sandwich is cooked, use the handle to open the sandwich press and raise the top cooking plate. Remove sandwich with the help of a plastic or wooden spatula.Never use metal tongs or a knife as these can cause damage to the non-stick coating.

![]() NOTE
NOTE
- Always allow the sandwich press to pre-heat until the green ‘READY’ light illuminates.
- The safety locking storage clip should not be used to clamp down the top cooking plate when the sandwiches are in the sandwich press. The weight of the top cooking plate will gradually press down the sandwich during the cooking process.
- When using the sandwich press for the first time you may notice a fine smoke haze.This is caused by the heating of some of the components. There is no need for concern.
 CAUTION
HOT SURFACE – The temperature of accessible surfaces may be high when the appliance is operating and for some time after use.
Fully unwind the cord from the cord storage facility before use.
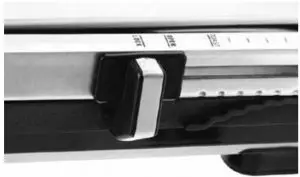
Your sandwich press features an Adjustable Height Control feature which allows you to fix the top plate to a range of positions above the bottom plate. This allows your sandwich press to be used as an open toaster ideal for toasting open sandwich melts. It can also be used for toasting sandwiches where you don’t need to apply the weight of the top plate.
OPEN SANDWICH MELTS
- Allow the sandwich press to pre-heat until the green ‘READY’ light illuminates.
- Place sandwich to be melted on bottom plate.
- Move the Adjustable Height Control clip on the right hand side of the sandwich press to the desired height (see Fig 2).
- Slowly lower the top plate until it rests on the Adjustable Height Control clip.
- The top plate will radiate the desired heat to melt ingredients such as cheese.
- Toasting melts should take approximately 3–4 minutes. However exact toasting time will be a matter of taste. It will also depend on the height of the top plate.
 Adjustable Height ControlToasts or melts any bread thickness in minutes.


![]() NOTE
NOTE
The Adjustable Height Control can be moved to accommodate thick or thin melts by sliding the clip forwards or backwards along the arm.
![]() Tips
Tips
BREAD
Most types of bread can be used; white, wholemeal, kibbled wheat, wholegrain, raisin loaf and so on. The sandwich press is ideal for toasting foccacia, Turkish bread, baguettes as well as bread rolls. Raisin bread, brioche or other sweet breads which contain a high sugar content will tend to brown quicker.
FILLINGS
Try to use canned or pre-cooked fruit as fresh fruit may give off excessive juices when heated. Be careful when biting into sandwiches containing fillings such as cheese and tomato or jam as they retain heat and can burn if eaten too quickly.
TOASTING BREAD
The unique flat plate design makes the sandwich press ideal for toasting plain breads, and Turkish bread, without any fillings or spreads. Try toasting Turkish Bread with jams for a great alternative to standard breads at breakfast.
FAT FREE SNACKS
Due to the non-stick flat plate design, it is not necessary to use any butter or margarine on the outside of your toasted snacks.
Care & Cleaning
Before cleaning, switch the power off at the power outlet and then remove the power plug.Allow your sandwich press to cool before cleaning. The appliance is easier to clean when slightly warm.
Always clean your sandwich press after each use to prevent a build up of baked-on foods.
Wipe cooking plates with a soft cloth. If cooked on food is not removed by this method reheat the unit for 1–2 minutes, then brush with a little oil or melted butter. Allow to stand for five minutes then wipe with a damp cloth.
![]() NOTE
NOTE
- The cooking plates are coated with a non-stick surface, do not use abrasives.
- Do not use spray-on non-stick coatings as this will affect the performance of the non-stick surface on the cooking plates.
STORAGE
To store your sandwich press:
- Switch off at power outlet and unplug power cord from the wall.
- Allow the sandwich press to fully cool.
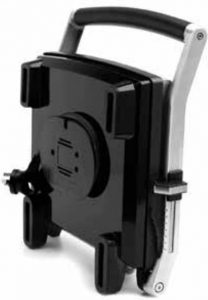
- Slide the Adjustable Height Control towards the front handle to the ‘LOCK’ position so that the top and bottom cooking plates are locked together (see Fig 4)
- Wrap the power cord in the cord storage area below the appliance (see Fig 5).
- Store on a flat, dry, level surface.
![]() NOTE
NOTE
The storage clip should not be used to clamp down the top plate when sandwiches are in the sandwich press.
![]() WARNING
WARNING
Do not immerse any part of the sandwich press in water or any other liquid.
Breville Customer Service Centre
Australian Customers
Phone: 1300 139 798Web: www.breville.com
New Zealand Customers
Phone: 0800 273 845Web: www.breville.com
Breville, the Breville logo, Master Every Moment and the Toast & Melt are registered trademarks of Breville Pty. Ltd. A.B.N. 98 000 092 928. Copyright Breville Pty. Ltd. 2019.Due to continued product improvement, the products illustrated/photographed in this brochure may vary slightly from the actual product.

References
[xyz-ips snippet=”download-snippet”]