
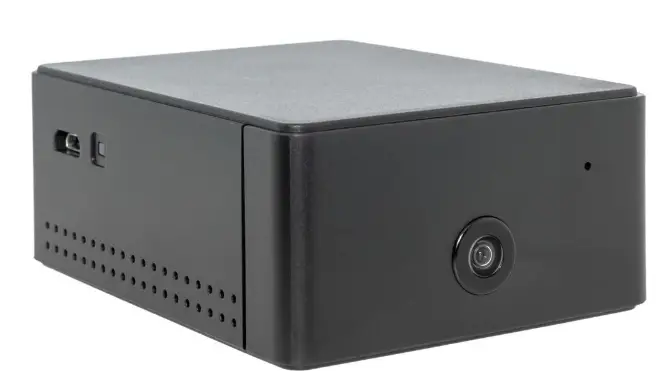
LED Status Indicators
Charging LED: Located next to the microUSB power port, this LED serves a number of functions.When charging, the LED will glow solid orange and will shut offwhen charging is complete.When connecting to PC or MAC, this LED will glow solid orangewhen connecting and solid green when connected.Status LED: Located next to the power button, this LED also serves multiple functions.When connecting via AP Mode (Direct Connect), this LED will glow solid orange when waiting on a smartphone connection and flashing orange when the smartphone connection is establishedWhen establishing a wireless P2P connection, the LED will glow solid green when connecting to your router and flash green when a connection is established.
When your device battery is low, this LED will flash red.When your device is unable to read an SD Card or the SD card is fullor needs reformatting, this LED will glow solid red.
Getting Started
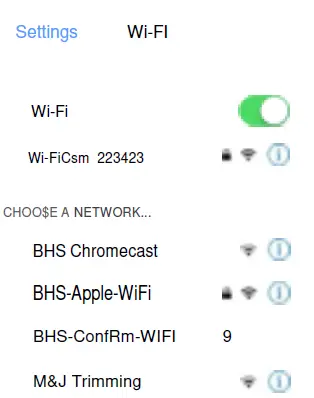
To begin, connect the Camscura WiFi to the USB port of a PC or theincluded 5V DC adapter. We recommend charging the battery for 4 hours before use. Insert the micro SD card with gold contacts facing upwards.Next, go to Play Store (on Android) or the Apple App Store, search for“Camscura WiFi” and install the application. When installation is complete, the “Camscura WiFi” icon will create a shortcut to your smartphone’s menu.You will then access your WiFi Settings -> Enable Wi-Fi to connect to Wi- FiCam_xxxxxx. Once you are connected to the Camscura WiFi camera you will open the Camscura WiFi application.
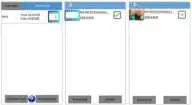
Once in the Camscura WiFi Application you will select “Add new cam”; the camera’s ID will appear automatically. You are in the AP mode. APMode stands for Direct connection to the device.
From here you may select OK to view live video in the AP (direct connect) mode.Note: In this mode you can only view video locally, within 150ft open range.
Connecting to Your Home or Business NetworkYou can continue to add the device to your home or business network, enabling you to view live or recorded video remotely from any location.In the Cam Name field enter an identifying name for your camera (example:BHS). The User Name will be “admin” and the Default Password is “888888”.You will then choose your WiFi network SSID and enter the SSID password; then click Ok.The camera will then reboot; within 2 minutes it will come online.Note: If a wrong password is entered, or if the device failed to connect to the router, we recommend you reset the Camscura WiFi to AP Mode (Access Point Mode: a direct connection between your phone and the camera). To do this, press and hold the MODE key (located on the back of the device) until the orange status LED is solid. Delete the camera from the application and repeat the installation process again.Now that your camera is online you will be able to view live video and customize your camera settings. To view live video, simply select the camera name; while in Live View you would be able to manually select Record Video, take a Photo or rotate the video to a 180-degree angle.

Downloading Saved Files to Your Mobile Device from Application
To view stored video select “Video Files” to enter the Download menu. Allvideo are date and time stamped. To download video, check the square next to the file and then the Download tab on the lower navigation bar.Downloaded video files will be saved to your smartphone’s storage“Camscura WiFi” directory.Note: If your video file size exceeds more than 5MB, download via WiFi connection.
Transferring Videos to Your PC
To view and download video to your PC or Mac you will need to connect the device to your computer via USB. Go to your start menu and open the Computer directory; the device will appear as a removable disk; double click your device. All video stored to your SD card will appear in the DCIM folder. Create a new folder on your computer desktop then drag stored video from the DCIM Folder into saved folder on your desktop. We recommended VLC Media Player or Quicktime Player for viewing video.
Creating Sub AccountsIn order to grant access so another user can login to your account, they will need to have the Camera ID, Username and password of your Camscura WiFi.Steps to follow: The user will have to download the “CamscuraWiFi” application to a smartphone.The user will have to open the “Camscura WiFi” app, then select “Sub Account”, enter the Camera’s ID, username and password information.They will need to assign a name to the Cam name field.
- ID DGKHB9PNWUSRD4GD11JA Cam name
- Username
- User p$s*word
- BHS98D
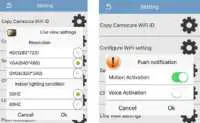
Customizing Your Camscura WiFi Settings
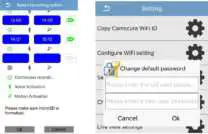
To access the menu, click the gear icon next to the camera’sname; selections include the following:

Copy Camscura WiFi ID: This field stores your camera ID so that you can share with other users, provide a user with the Cam ID, username and password.

Configure WiFi setting: When the camera is in AP Mode, from this selection you can choose your wireless home or business network. Simply select your wireless router and enter the SSID password.
Select Recording Option: Select Schedule for Continuous, Voice Activated, or Motion Activated recording. Select Ok to save settings before exiting.Change Default Password: Your default password is 888888. We recommend that you change the password to protect your privacy. Passwords are case-sensitive.
Live View Settings: Here you can change the video resolution and indoor lighting condition. The default resolution is VGA (640*480) and 50Hz. If yourvideo appears grainy in your room’s lighting conditions, adjust the Hz level.Push Notifications: Turn on Push Notifications to receive an alert to your smartphone when activity is detected.
Note: For iOS, you will receive a pop-up notification on your device screen when activity is detected. For Android, the Camscura WiFi will need stay running on the smartphone to get an actual alert.Firmware Upgrades: This selection will show you if any update is available. If there are updates, simply follow the onscreen instructions.Delete Camera: Delete your camera from your network by selecting the cog wheel next to the Delete Camera option. To restore your camera to factory settings, use a paper clip to press the AP Mode button on the back of the camera. Your device will default back to AP Mode.
- inseit a microSD card into the cam
- Connect the cam to your computer using the included usB cable S. Download the firmware upgrade file from http://help.brickftousesecurity.com 4. Unzip the WiFicam_firrnware.zip file and sava the sofMare to tha microSD s. swly remove the cam from the computer by clicking the “Safely Remove Hardware”
- Connect fW cam to the power adapter 7. Turn 1he Camera on & Green LED will be solid, In 60 seoonds Orange LED will also be solid
- Remove me micro SD from the cam
- Reset the cam by using a pin or paper clip to qress the RELP•T button for 1 second Upgrade Completed

Troubleshooting and FAQs
Q: Camscura WiFi is not appearing in my WiFi Menu.A: Check the LED status of the device.If GREEN: Indicator light should be ORANGE not green. If the device is not in Direct connection mode with the (indicator light ORANGE) it will not connect to the device’s WiFi or you won’t see the camscura wifi on your smartphone’s wifi list.To fix:Press and hold the mode button on the back of the device for at least 1 minute. After that, you should see the ORANGE LED status. Then check the wifi listthe camscura wifi should appear on your smartphone’s wifi list.If the MODE button does not change the indicator light to ORANGE, Press theRESET and then MODE button. This will allow the device’s wifi to appear on your smartphone’s wifi list.If ORANGE: The device is ready and you should see the device on your wifi list.Q: My Camscura WiFi is not responding.A: Hold down both the Power button and Reset button on the back ofthe device for 4 seconds; the Camscura WiFi will reboot.Q: Camscura WiFi is not appearing in my WiFi Menu.A: If the Charging indicator light is solid orange the wireless signal is not transmitting from the device. Please turn the camera off and then on, enable your WiFi from your smartphone settings menu. You will then follow the steps on getting the device connected to the mobile app.If the LED is solid green or flashing green and you are still unable to connect, please check your router and make sure your network is active. You also may have entered the wrong WiFi password. Additionally, if your internet speedis lower than 10Mbp or has restrictions you may be blocked from streaming video or may need to change the Live view resolution to QVGA, which uses less bandwidth (see the Live View Settings section).
Note: Please do not use special characters such as “#” in the router SSID name and password. It is also recommended to turn off WPA or WPA2 encryption on your router.You can reset the device to Factory default by holding the mode button until the Orange LED is solid, then connect the camera through AP Mode.If the Indicator light is flashing Red: The Camscura WiFi is low on battery. Charge the device using the included charging cables. You may also want to exit out of the application entirely to refresh the Camscura WiFi application; it is also recommended to clear the cache from your smartphone.Q: Can more than one person connect to the device at the same time? A: Yes, although video will appear slightly choppy. You may want to change the resolution to QVGA to get a smoother video feed.Q: How far is the wireless range?A: In AP Mode we recommend 100ft of unimpeded line of sight from your smartphone to the camera. When connected to your WiFi Router the device should be no further than 150ft line of sight.Q: What is the recorded file format and size?A: Video format: MP4. Size: HD (1280x720p). Approximately 1GB/hour. Image format: JPG Size: HD (1280x720p). Approximately 250KB/file.Q: I am not receiving a Push Notification to my smartphone.A: Make sure the Push notifications were enabled in your settings,and recording option was saved.Note: iPhone/iPad: Push notifications will only trigger when the smartphone has internet connection. On Android, push notifications will trigger if the app is running in the background.Q: Camscura WiFi did not record any video.A: Make sure the micro SD card was inserted properly with goldcontacts facing upwards. You may also need to format the SD card on your PC. For more Information, please see below.Formatting Your SD Card: The device can record in the FAT32 format. Ifyou aren’t sure how to format an SD card, you can find instructions here.The Camscura WiFi is compatible with micro SD cards up to 128GB capacity. Special software is required to format a 64GB and 128GB Micro SD cards before use. You can download the software from this link: http://l.bhs.net/sd-64-software.
 report this ad
Q: Why is the LED Indicator always red?A: If the camera is not in range of the router the connection will timeout. Move the device near the router and reconnect the device through AP Mode, and then to a wireless connection.Q: Why does my Camscura WiFi device automatically switch back to AP Mode? A: If the Camscura WiFi is in range of your smartphone and it has lost connection to the router it will maintain connection by switching to strongest connection available.Q: How many cameras are supported on the mobile application?A: 3Q: My PC is unable to read the SD card directly from the device.A: Make sure the device is powered off before connecting to the PC in order for the PC to read the drive.Q: Will I be able to access live videos via an app on a phone orcomputer, even when I’m away from home?A: Yes, as long as the camera is connected to your WiFi router, youcan remotely view it from anywhere using the free app on your smartphone.Q: What app can I download for live viewing?A: Please download the free Camscura WiFi app here. It is compatible with Android and iOS devicesQ: Do I still need an SD card if viewing live?A: An SD card would be needed to record video for later viewing, but it is not needed for live playback.Q: How long do I need to charge it?A: Before first use, we suggest charging the device for 4 hours. The LED indicator will glow solid orange while charging and will turn off when the battery is full.Q: How long will the battery last?A: The built-in rechargeable battery can operate up to 8 hours on a single charge.Q: Is it battery operated? If so, how long does it last in motion detecting mode?A: Yes, the camera is battery operated and has a recording time of 8 hours with a fully charged battery. The camera can also be plugged into electrical power for short term use.Q: What are the video outputs and formats?A: The video format is MP4. There are no video outputs on this camera except for USB. The USB allows you to connect the camera to your computer to access and view local recordings saved to the SD card (compatible with up to 128GB, not included).Q: What is the maximum size of the SD card that this camera can support?A: This device supports up to a 128GB micro SD card.Q: How do I format my SD card?A: We have tutorial videos available on our help site.Q: Will I be able to access live videos via the app on my phone, evenwhen I’m away from home?A: Yes, as long as the camera is configured to your WiFi router, you can remotely view it from anywhere using the free app on your smartphone.Q: Do I still need an SD card if I’m viewing the footage live?A: An SD card would be needed to record video for later viewing, but it is not needed for live playback.Q: Can this camera record audio?A: Due to federal regulations, this camera does not record audio. Learn more about why hidden cameras do not record audio.Q: Is this camera battery-operated? If so, how long does the battery last in motion detecting mode?A: Yes, the camera is battery-operated and has a recording time of 8 hours with a fully charged battery. The camera can also be plugged into electrical power for short term use.Q: What is the viewing angle of this camera?A: With the telephoto lens, the viewing angle is as follows: Horizontal viewing angle 29°–9°20′; diagonal viewing angle 34°–11°20′; vertical viewing angle 19°30′ 6°20′Q: How long is each recording?A: Each recording is a single 3-minute file.Q: Is it possible for me to save the recordings to my phone through the app?A: Using an Android device, you can save an Android Video File to your device in a storage folder labeled “Camscura.” Using an iPhone, a video cannot be saved directly to your device but can be downloaded from the app and played back from the “File” section o the Camscura WiFi App.
References
[xyz-ips snippet=”download-snippet”]