 creative camera kitBAC 2000Quick GuideCopyright ©2020 Brinno All Rights Reserved
Brinno
![]() creative camera kit BAC 2000
creative camera kit BAC 2000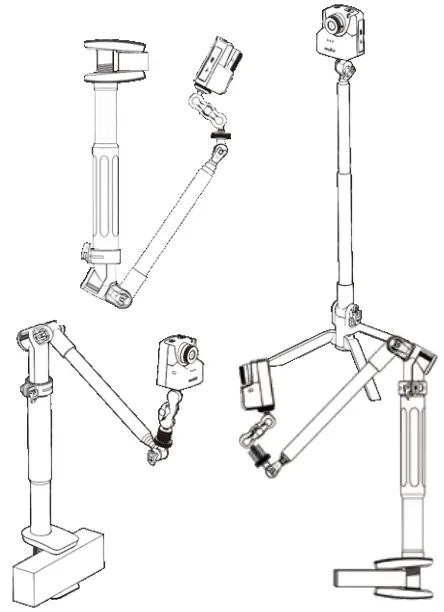 Creative Camera Kit
The Creative Camera Kit is versatile and compact making it the ideal companion for any time-lapse video project. The kit is also compatible with a wide range of time-lapse cameras so that you can find the perfect time-lapse solution to meet your needs.
![]() Note: For indoor use only.
Note: For indoor use only.
For detailed user manuals, visit
For detailed user manuals, visit https://www.brinno.com/support/downloadwww.brinno.com/support/support-center
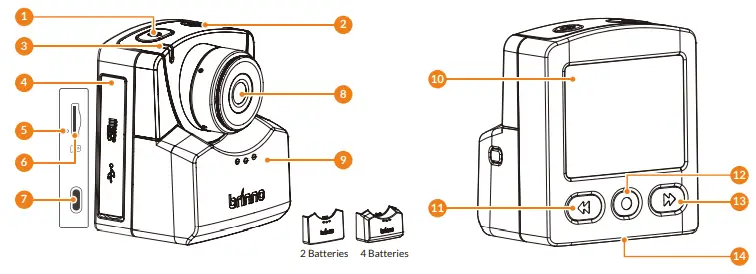
Parts of Device
 |
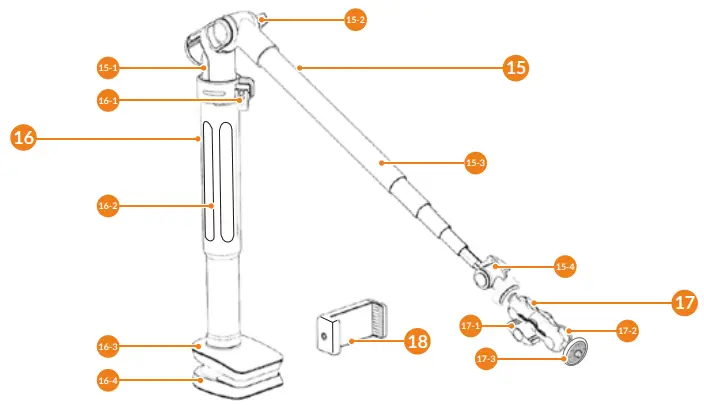 |
| 1. | Power Button | 15. | Creative Monopod |
| 2. | Shutter/ Back to Preview Button | 15-1. | Tripod legs |
| 3. | LED Status Indicator | 15-2. | Flip-lock |
| 4. | Memory Card Door | 15-3. | Extension Pole Arm |
| 5. | Camera Reset Button | 15-4. | Rotating Hinge |
| 6. | microSD Card Slot | 16. | Creative Clamp |
| 7. | USB-C Socket | 16-1. | Flip Lock |
| 8. | Special Adjustable Lens | 16-2. | Grasper |
| 9. | Battery Door | 16-3. | Top Clamp |
| 10. | LCD Screen | 16-4. | Bottom Clamp |
| 11. | Previous Button | 17. | Double Ballhead Swivel Mount |
| 12. | OK Button | 17-1. | Lock Knob |
| 13. | Next Button | 17-2. | Double Ballhead Swivel Base |
| 14. | Tripod Mount (size: ¼”) | 17-3. | Mounting Platform |
| 18. | Smartphone Clamp |
Install microSD card & batteries
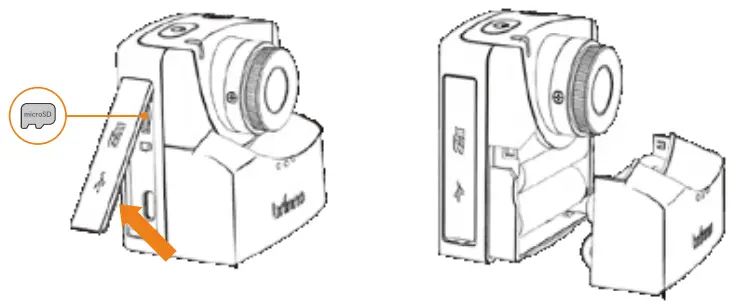 Install microSD card & batteries
- Insert microSD card.
- Open the battery door. Then install 4 AA batteries.* Support up to 128GB microSD card. For 64 or 128 GB microSD cards, follow instructions on the LCD screen to format the card before using it the first time.* Please refer to the User Manual for more details about operating the Time Lapse Camera.
Power ON / OFF
 Power ON / OFF
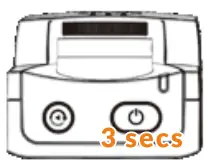
- Power on: hold “Power Button” for 3 secs.
- Power off: hold “Power Button” for 3 secs.

Install theDouble Ballhead Swivel Mount
Install the Double Ballhead Swivel Mount
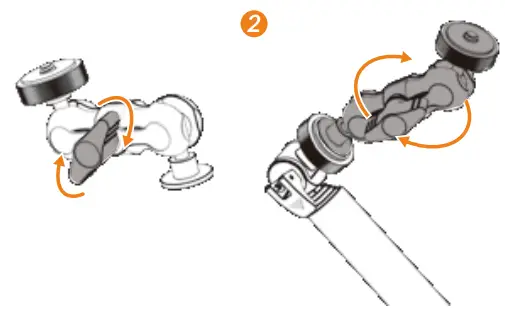
- Tighten the knob.
- Install the double ball-head swivel mount to the monopod until it’s securely in place.
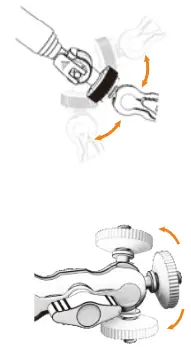
Install the Creative Clamp
Install the Creative Clamp
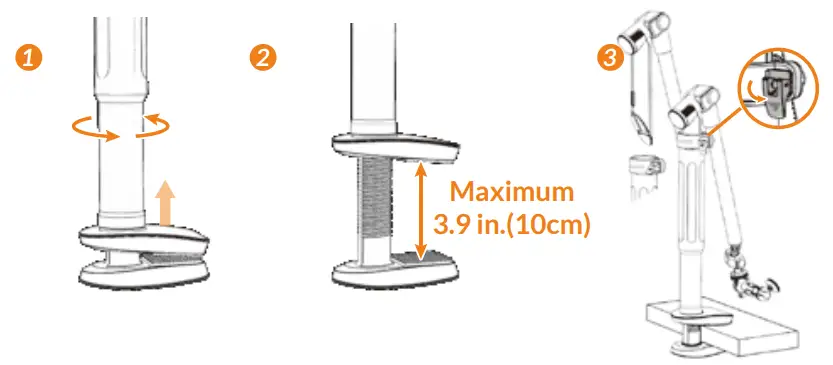
- Loosen the grasper.
- Adjust the top clamp to your desired range.
- Insert the creative monopod into the grasper and lock.
* Clamping range of creative clamp is 3.9 in (10cm)
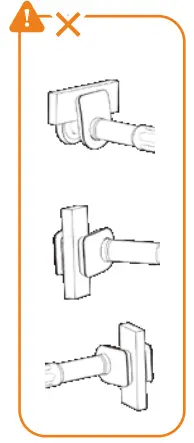
Creative Monopod capacity
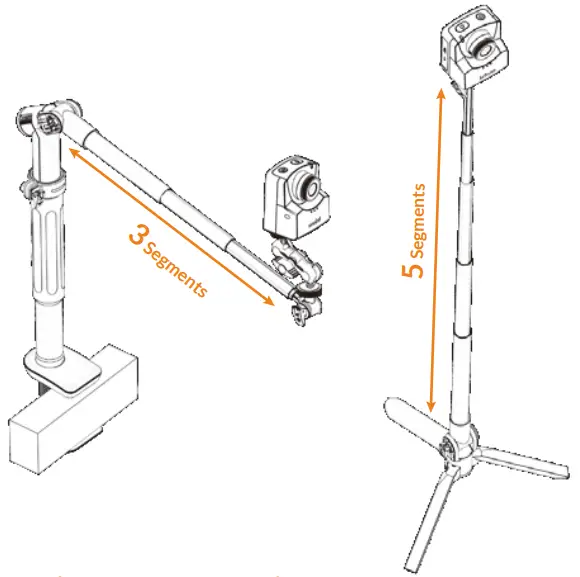
Creative Monopod CapacityTo ensure your camera is supported do not extend all the segments of the extension pole. Make sure to only use the following:
Stand Alone Monopod: 5 segmentsWith the clamp on the horizontal: 3 segments
Flexible and Universal
 |
 |
Flexible and Universal
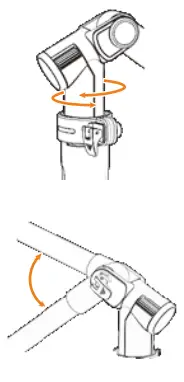
You can find the best recording position by adjusting these hinges.![]() To avoid damaging your clamp, make sure the hinge lock is loosened before removing or adjusting the monopod.
To avoid damaging your clamp, make sure the hinge lock is loosened before removing or adjusting the monopod.
Use it Up and Down
Creative Monopod
|
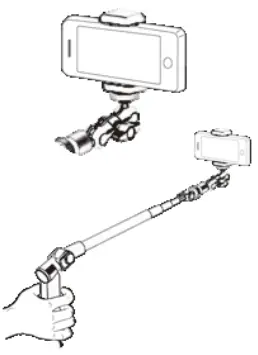 |
Creative Monopod
The Creative Monopod can stand using its tripod legs. When the legs are closed and the universal smartphone clamp is attached it turns into a selfie stick.
Special Adjustable Lens

 report this ad
Special Adjustable LensRotate the lens to adjust the focal length. There are four different focal length options.
301-MU0006-00 UN_A2
References
[xyz-ips snippet=”download-snippet”]