
Cajun Injector®Electric Fryer – Boiler – Steamer22174.01932Owner’s ManualAssembly, Care, Safety Instructions, and Recipes
Bruce Foods CorporationP.O. Drawer 1030New Iberia, LA 70562-1030 U.S.Awww.cajuninjector.com1-800-987-6474
Important SafeguardsWhen using electrical appliances, basic safety precautions should always be followed, including the following:
- Read all Instructions.
- Do not touch hot surfaces. Use handles or knobs.
- To protect against electric shock do not immerse cord, plugs, or removable heating element in water or other liquid.
- Close supervision is necessary when any appliance is used by or near children.
- Unplug from outlet when no in use and before cleaning. Allow to cool before putting on or taking off parts, and before cleaning the appliance.
- Do not operate any appliance with a damaged cord or plug or after the appliance malfunctions, or has been damaged in any manner. Return appliance to the nearest authorized service facility for examination, repair or adjustment.
- The use of accessory attachments not recommended by the appliance manufacturer may cause injuries.
- Do not let cord hang over edge of table or counter, or touch hot surfaces.
- Do not place on or near a hot gas or electric burner, or in a heated oven.
- Extreme caution must be used when moving an appliance containing hot oil or other hot liquids.
- Always attach plug to appliance first, then plug cord in the wall outlet. To disconnect, turn any control to “off,” then remove plug from wall outlet.
- Do not use appliance for other than intended use.
- “Extreme caution must be used when moving fryer containing hot oil.”
- SAVE THESE INSTRUCTIONS.
- Notice, a short electrical cord is provided to prevent the possibility of anyone or anything from being entangled or tripping over during use. This could occur when using a longer extension cord; and, hence, we recommend your use of the shorter cord when using this product.
- Do not leave this appliance unattended while it is in use.
- The cord should always be secured in order to prevent the chances of an accident. Note: a breakaway cord is provided for safety.
- If oil begins to smoke, immediately turn appliance off, as oil may be too hot. Check temperature, it should not exceed 400°F. Oil may also be old and in need of replacement prior to frying new product.
- Never overfill cooking pot. Never exceed the kettle’s maximum fill line. When in doubt, fill the pot to the max fill line with cold water, then immerse product to be cooked to be sure that overflowing or spillage is not a concern.
- The recommended minimum oil level for cooking is 10cm (3.9 inches) up from the bottom of the Electric Turkey Fryer inner pot.
- Open lid with caution to prevent being burned by the escaping steam.
- Never place face or body parts in a position to be burned by steam when opening the fryer lid.
SAVE THESE INSTRUCTIONS
RECOMMENDED: DO NOT USE AN EXTENSION CORD WITH THIS PRODUCTThe use of an extension cord increases the risk of entanglement or tripping.The use of an extension cord can cause loss of energy and the appliance may not heat properly.
Specifications:input power: 1650wamps: 13.75ampHertz: 60Hz
PARTS LIST
For assembly assistance, or to report missing ordamaged parts first contact retailer. For additionalassistance, Phone:
Bruce Foods Corporation Customer Service at1-800-987-6474
Assembly Instructions
Step 1
Attach digital control panel and element to outer shell mounting bracket by sliding controller rails down into rail channels on bracket mounted on outer pot. Controller must be correctly attached for appliance to operate. A built in safety switch on the control panel will prevent this unit from heating if not mounted properly prior to turning on electric current to this product.
Step 2Place aluminum fryer basket inside metal inner pot.
Step 3Place glass lid on last after assembly of all other parts. Align the notch on the lid with the metal heating element coils.
Note: Glass lid may not fit tightly when basket is in use during cooking process.
Step 4Connect the power cord to the connector hanging from under the control panel.
Drain Valve Operation
- The drain valve, located near the bottom rim of the inner pot, allows you to safely and easily drain water/oil from the pot.
- BE SURE THAT ANY LIQUID INSIDE OF THE POT IS BELOW 100°F BEFORE DRAINING.
- Liquid should be drained into a sturdy container before disposal. Rotate the drain spout out away from the pot.
- Place your desired container directly under the drain valve nozzle; be sure that both the container and the fryer are secure and not easily tilted or moved.
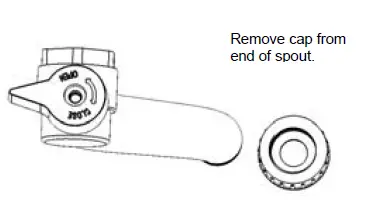
- Remove the black cap from the end of the spout.
- Turn the black knob on top of the drain valve spout 90° or until a steady stream of liquid isflowing from the spout into the container.
- Close the valve by turning the knob to its original position once all of the liquid hasdrained.
- Some frying oils can be reused within a few days; many people find the drain valve a useful mechanism to direct their frying oil back into its original container to be used at a later date.
Quick Drain System
- Locate the two hooks on the inside of the pot close to the upper rim of the inner pot; these are the Quick Drain Hooks.
- Two oval shaped holes can be found on the basket: One is labeled “turkey” and the other is labeled “seafood”.
- The basket is designed to hang from the hooks by slotting the Quick Drain Hooks through either one of the two oval shaped holes in the basket.
- When cooking time has elapsed, excess liquid can be drained from the food still in the basket. While wearing protective gloves, use the included metal lifting hook to lift the basket by hooking it onto the basket lifting bail. Carefully lift the basket out and hang it on the Quick Drain Hooks by inserting the hooks into either the “turkey” slot or the “seafood” slot, depending on the type of food being cooked.
- Allow the food to drain for at least a few minutes or until the excess liquid has fallen back into the pot. NEVER remove basket from fryer pot without first allowing the food to drain.
- The Quick Drain System can also be used to steam food. Place about 6 inches of water at the bottom of the pot, hang the basket with the food to be steamed from the Quick Drain Hook labeled “Seafood,” and cover with lid. Cooking times will vary depending on the type of food being steamed.
Starter TipsFor best results, read the following Starter tips before using this product.
- Please keep in mind, this is an electric fryer. It has different heating characteristics than a gas fryer.
- For safety: the heating element will only heat when it is properly attached to the mounting bracket (see assembly instructions). This is a powerful heating element and may cause household circuit breaker to trip. Operating any additional appliances on a separate circuit should minimize such occurrences. Tripping of the circuit breaker will not damage either the unit or any household electrical systems.
- Pre-heating oil or water may take thirty minutes or more depending on initial oil temperature and ambient conditions. Take advantage of this time to prepare foods for cooking. For best results, completely pre-heat unit to cooking temperature before frying or boiling foods.
- Reduce heating time and keep temperature more consistent by keeping the lid on the pot during the pre-heating and cooking processes.
- For cooking a turkey, when the desired temperature is attained and the turkey is placed in the oil, the temperature of the oil will naturally be reduced because of the lower temperature of the turkey. The LCD readout will display the temperature throughout this process. Temperature is displayed when the turkey is placed in oil and while the oil returns to desired cooking temperature.
- “Recovery time” is the amount of time required to bring the oil back to frying temperature once the items being boiled or fried are immersed in the liquid medium. This time can be best controlled by bringing foods to ambient temperature and limiting the amount of foods placed in the fryer basket for immersion at any one time. With larger pieces such as a 14-pound turkey, we recommend allowing oil to reach 375°F to 400°F prior to immersing the bird.
- When the desired heating temperature for cooking is attained, the heating element will automatically turn off. When the temperature drops 5°F below the setpoint, the heating element will automatically turn on again until the desired cooking temperature is reached. This automatic process will repeat and display on the LCD, as “Heating” or “Ready”.
- To illuminate the Backlighting of the LCD display, press the “UP” arrow or the“DOWN” arrow.
- The red power light illuminates only to indicate that the power cord is plugged into an electrical outlet. This product will not start heating until the “START” button is pushed.
- The timer on this product is completely separate from and does not control the heating element. The Heating Element will not turn off automatically when the timer beeps. The temperature controller must be manually turned off.
- If the LCD readout reads “ERR,” no buttons will function except On/Off. Turn the unit off immediately, wait 15 minutes and then turn fryer back on.
Operating Instructions
Step 1
Mount control panel with heating element into bracket on outer shell of the unit.
Step 2
Plug power cord into an outlet (refer to “User Precautions and Important Safety Tips” section of manual). Power light will illuminate indicating the unit is plugged in, and the heating element is mounted correctly; and controller on unit is ready to be activated.
Step 3
Note: The Temperature Controller must be set prior to setting the timerfunction.
To set temperature:
- Press ON button.
- Press TEMP MODE button once; the LCD display will blink.
- Use UP and DOWN arrow buttons to set temperature.
- Press START button, this will turn the heating element ON.
To set timer:
- Press TIME MODE button once; LCD display will blink.
- Use UP and DOWN buttons to set TIME in MINUTES.
- Maximum Time is 90 minutes.
- Timer will automatically start after you have selected Time.
Step 4
When cooking time has elapsed and food is done, press and hold ON/OFF button to turn off heating element and unplug power cord.
When lifting food out of cooking liquid, allow excess oil or water to drain from the fryer basket by hooking the basket on side of pot. Remove the drained basket shortly thereafter.
When using the quick drain system, make sure that the basket is firmly in place on Quick Drain Clips before releasing handle so basket will not fall back into hot oil or water causing injury.
Do not use appliance without water or oil in pot. It can be severely damaged and dangerous to the user if heated while empty.
Always place unit on a level, very stable surface to prevent tipping over.
Do not mix different types of oil at the same time. Purchase a commercial blended oil if so desired. Never melt or use shortening, solid fats or lard in this appliance.
RESET FUNCTIONThis device uses a safety feature that will automatically shut off the appliance if it overheats.
- To reset, remove plug from outlet.
- Insert a small sharp object into the small hole on back of the control panel.
CLEANING INSTRUCTIONS
- Bruce Foods recommends cleaning unit before every use.
- Clean lid, pot, and basket with a moist sponge or rag using a mild detergent. Rinse and dry thoroughly. These parts are dishwasher safe.
- Clean outer shell, cord, control panel and element with a moist sponge or rag using a mild detergent. Dry thoroughly. DO NOT put these parts in a dishwasher.
- Do not submerge or run water over control panel or cord while unit is plugged in; doing so may cause electrocution.
PRESERVATION & STORAGE
- Disconnect electric cord from outlet prior to cleaning, servicing, and/or removing heating element. Electric shock may cause personal injury or death.
- Turn appliance off, unplug and let cool for 2 hours if using water, 5 hours if using oil before cleaning or storing.
- Never pour used oil in sink; instead, drain it back into a sturdy oil container.
HOW TO STEAM USING APPLIANCE
Add water until it reaches bottom of the basket. Do not allow water to evaporate. This will cause the element to overheat and can damage the unit.
QUESTIONSWhy can’t I turn my turkey fryer on?The Control Panel includes a “Safety Switch” positioned in the mounting rails. The rails must be aligned and seated in the bracket on the back side of the outer pot correctly for element to power on.How much oil do I need to use?Frying with this appliance will require approximately 1.5 gallons (5.7L) to 2 gallons (7.6L) of oil. The fill line marks the maximum amount of liquid that the appliance can safely contain. The max fill line provides for ample liquid to cook any meal in this appliance.What type of oil should I use?Cottonseed oil is recommended because of the great taste and higher smoke point, but any common cooking oil may be used.How hot will the oil become?After about 55 minutes, oil will typically reach 400°F (204°C). This time is dependent on starting temperature of the oil and ambient conditions. When turkey is placed in fryer, oil temperature will drop to around 275°F (135°C); this is a suitable temperature for frying a turkey. As turkey is cooking, temperature will slowly recover but may not reach original setpoint before cooking time is reached. This is normal.Should the lid stay on during use?Yes, the lid helps to retain heat and keeps splashes inside the unit.What size turkey can I deep fry in this appliance?Any turkey up to 16lbs. (7.26kgs) can be fried in this unit.Can I use an extension cord with this appliance?No, an extension cord will weaken electrical current which will increase cooking time and lessen performance. The risk of tripping or knocking over this unit is increased with the use of extension cords.Which way should the turkey face when frying?Turkey and turkey breasts should be placed as close to horizontal in the basket with the breast side facing up as possible.I followed the instructions and the turkey wasn’t fully cooked. What went wrong?Cooking conditions may vary; the turkey may have been excessively cold. Always bring the turkey to room temperature before frying and make sure it is completely thawed out. Occasionally, a cold spot in a joint or deep in the turkey breast does not allow that section to cook properly.Can the Electric Turkey Fryer be used outdoors?Yes but if you do not want to use this appliance in your house, use in a garage or covered patio to prevent the Electric Turkey Fryer from being exposed to precipitation.
Troubleshooting Guide
If symptom is not listed, please contact Bruce Foods Corporation at 1-800-987-6474
Do not place frozen poultry in oil. Use extreme caution when cooking frozen foods. Do not fill oil past fill line or exceed maximum amount of food in basket. Spillover can cause serious injury. Slowly lower basket into hot oil and cover with lid. Always wear protective gloves or mitts. Always pat dry moisture off the food pieces prior to frying. When using the quick drain system, make sure that basket is firmly in place on rim of pot before releasing handle so basket will not fall back into hot oil or water.
Techniques for Successful Preparation of Fried Foods at Homes
Often when someone mentions frying foods at home, they are greeted with a chorus of negative comments ranging from messy, greasy, and dangerous to unhealthy. Utilizing the proper equipment and learning the correct methods and procedures, frying can overcome virtually all of these comments. No doubt, breading or battering foods and frying “in oil,” does add caloric content to foods. But, a sensible respect for portion sizes consumed and utilization of non-hydrogenated oil with zero trans fats greatly reduces the concern of “unhealthy” often expressed. Education in the proper procedures and techniques that should be employed when frying, greatly reduces the amount of oil absorbed by fried foods.
Frying Techniques and Temperature Control of the Cooking Oil
All forms of frying involve the cooking of food in oils or fats. Frying techniques vary depending on the frying vessel utilized (such as a wok utilized in stir-frying, a frying pan, or a deep fat fryer); the amount of fats or oils required (from sautéing or stir frying to pan frying to deep fat frying); cooking temperature; and preparation methods employed with foods for frying. For the purposes of this pamphlet, we’ll concentrate on pan frying, deep fat frying, and mention a baking misnomer, oven frying, which is actually a form of baking.
Frying is classified as a form of dry-heat cooking since water is not utilized to transfer heat to the food being cooked. Instead, the heat in the oil is transferred to the water in the food so that the moisture in the food turns to steam to cook the food from the inside out. Whatever form of frying employed balances the realities of time, temperature, and the surface area of food in contact with the oil, plus the food’s structure and moisture. Often this means assuring that the food is fully cooked in the interior before being burned on the exterior. As an example experts recommend pan-frying nothing thicker than 1-inch as the exterior is likely to burn before the inside is fully cooked.
Maintaining proper oil temperature is crucial to all forms of fried foods. Recommended nominal oil temperature ranges from 350°F – 375°F. And virtually all frying tips seek to assist you in maintaining correct oil temperature. Hot oil causes the food’s internal moisture to turn into steam that keeps the oil out while the hot oil also keeps the moisture in (especially when a batter or breading barrier is used around the surface area of the food forming a crunchy, brown crust). If the oil is too hot, the steam reduces the moisture content and overcooks the food. On the other hand, if the oil temperature is too low, a lack of steam allows the oil to penetrate deep into the crust producing oily, unappetizing fried food. The oil must be hot enough to quickly seal the surface of the food, but not too hot to burn the outside before the inside is completely cooked. Done correctly at a proper temperature, only a minimal amount of oil is absorbed into the food.
Pan FryingThis form of frying is characterized by the use of significantly less hot oil where food is semi-submerged in hot oil in an electric skillet or in a fry pan over an open flame. When pan-frying, the oil’s depth should be no more than 1/2 the thickness of the food. Pan frying differs from deep frying since the food touches the bottom of the pan and the exposed top side of the food allows some loss of moisture in the food as it cooks.
The advantage of pan frying is the use of less oil, this is also a disadvantage as it is more difficult to maintain temperature of the oil. The moisture loss and faster browning of pan fried foods can be advantageous or detrimental depending on the choice of foods to be pan fried. The best candidates for pan frying include fish, shellfish, tender meats and vegetables. Foods to be pan fried are generally covered with a batter or breading and have a rich texture that contrasts with the crispy, crunchy outside.
When pan-frying use an electric skillet with a thermostat to control oil temperature if possible. Otherwise, some experimentation may be required to control oil temperature. When oil temperature is reached, add the food to the pan; and fry on one side until brown. Using tongs or a spatula (never a fork) turn and brown the second side realizing that the second side generally takes less time (it’s hotter when turned over than the first side was) to cook. As with all forms of frying, never crowd the pan as this can dramatically reduce oil temperature. Recovery time is the duration of time necessary to return the oil to the desired cooking temperature. When cooked too long, food will likely be greasy without the seared crunchy exterior most people desire from fried foods.
Oven FryingOven frying produces a result that is healthier (usually less oil yet similar to fried foods even though it isn’t a real frying process. Generally food is baked in a hot oven and basted once with a small quantity of fat or cooking spray. As with deep-fried foods, most foods are breaded or battered prior to being baked to seal in the juices and produce a crunchy, crispy crust. Food normally does not require turning and cooks quickly using this high heat (450° – 500°F) method. This works especially well with fish fillets, chicken pieces and pork chops. Generally bread crumbs or corn flake crumbs are utilized to produce a crispy crust when oven-frying.
The Basics of Frying:
- Recommended Products : A quality candy or deep-frying thermometer. A deep fat frying thermometer, preferably with a clip that allows the thermometer to be affixed to the side of the frying vessel is essential, since accurate control of the temperature of the frying oil is essential to successfully fried foods.
- An Electric Skillet is preferred for pan frying; otherwise, choose a pan with a thick heavy bottom that is larger in circumference than the heat source (this will prevent oil from dripping down the exterior of the pan into an open flame that might cause a fire.) Use a heavy skillet or frying pan that is wider than it is deep and has a heavy bottom to help regulate uniform heat from the bottom of the pan. This is absolutely essential when pan frying with limited amounts of oil.
- A Cajun Injector Electric Fryer for deep fat frying with digital timer and thermometer, basket, clear cover, and petcock drain spout specifically designed for high heat frying of large items such as turkey as well other deep fried foods.
Deep FryingFoods to be deep-fried should be of a size and shape that permits individual pieces to float freely in the fat. The fat should surround the food and begin cooking it on all sides at once. The food is usually battered or breaded to protect the food’s surface moisture from coming into contact with the hot oil creating an exterior layer or crust sealing food flavors and juices inside. We suggest the following tips:
- Use a pan wider than it is deep, and that is wider than the heat source (so oil won’t come in contact with direct heat.) Always use clean, fresh oil or previously used oil, properly filtered and refreshed by frying a raw potato or handful of parsley for about five minutes prior to frying food for dinner. Delicate foods should not be fried in oil previously used to fry strongly flavored foods.
- Much of fried food odors can be absorbed by placing a small cup of bleach nearby. Be sure to mark as “Bleach” and keep children away from the cup as well as from the hot oil.
- Never fill your fryer more than half full of oil. You will need a minimum of three inches between the oil surface and the top of the pot.
- Constantly monitor temperature of the oil. Never crowd the frying oil, fry in small batches. The oil should freely bubble around each piece of food at correct temperature.
- Use proper tools when removing fried foods and draining oils to a plate with several layers of paper towels. To add more absorbency, place a brown paper bag below the paper towels on the plate.
- Keep deep-fried foods warm by placing in a single layer on fresh paper towels (after initial draining step above is finished) in a 250°F oven while you complete frying.
Choice of Oil or Fat as a Frying Medium:
- Your choice of Oil or Fat often depends on the frying technique to be utilized and the projected frying temperature. As an example, when sautéing, oil choice often depends on the flavor to be imparted as butter or bacon grease are often employed. Olive oil is also a good choice if temperatures not over 300°F are to be employed in sautéing or pan-frying.
- Health Concerns can determine your choice. We recommend non-hydrogenated oils with zero trans fats and zero cholesterol. This eliminates the use of animal fats.
- Smoke point is a stage at which fat or oil begins to smoke. Utilize oils with a high smoking point (above 400°F). and high stability. Most vegetable oils have smoking points over 400°F and can be used in all cooking methods.
- High heat, water, and burned food particles break the oil down over time. Filter the oil after use. Allow the oil to cool after use and filter to remove all food particles that could burn during reuse.
- Replace your old oil if you notice the following symptoms: Excessive smoking at normal temperatures; strong oil discoloration; rancid odor.
Choice of Coating Mix, Breading Mix, or Batter Mix:A breaded item is any food that is coated with bread crumbs, cracker meal, corn meal, or other dry meal to protect it during cooking. Breaded foods can be seasoned, marinated, or rubbed prior to breading, or seasonings may be added to the flour, crumbs, or meal, before the coatings are applied. Coating batters are liquid or semiliquid mixtures, utilizing flour, milk, and eggs, used in cooking.
- When breading meats, chefs call a three-step process “the standard breading procedure.” First, pat the food dry (always reduce moisture as much as possible to reduce splattering and oil degradation) and then dredge in seasoned flour. The flour adds seasoning and allows egg wash to adhere. Next dip the floured food in an egg wash (egg wash should contain whole eggs whisked together with approximately one tablespoon of milk or water per egg.) Egg wash will cause the breading to coat the item and form a tight seal when food is cooked. Lastly, coat the food with crumbs or seasoned meal, shake off the excess and place in a container in a single layer.
- Battering. Prepare the batter according to directions. Pat the food dry, dredge in seasoned flour, if desired. Dip the item in the batter and generally cook immediately. There are some chefs that recommend chilling the batter with ice or refrigeration to obtain a great sear and those who recommend battering by placing in a single layer and refrigerating for up to 30 minutes to dry the batter. When using these methods, be sure to cook very small batches so as to maintain oil temperature.
For Gulf Coast Style Seafood Boil
5 lbs. Shrimp * 8 Medium Crabs * 4 lbs. Crawfish * Vegetables
- Wash Shrimp or seafood in cold water. Confirm crabs and crawfish are alive prior to boiling (crabs and crawfish should be alive at time of cooking). Purge Crawfish in salted water.
- Place products to be boiled inside the basket. Be sure that water displacement does not exceed the capacity of the boiling pot. This can be checked by placing all the ingredients in the pot and placing the basket in the cold water (prior to heating) to be sure that the boiler will not overflow the pot. Place products to be boiled inside the basket. Be sure that water displacement does not exceed the capacity of the boiling pot. This can be checked by placing all the ingredients in the pot and placing the basket in the cold water (prior to heating) to be sure that the boiler will not overflow the pot.
- Measure out water (not to exceed 3-gallons) following the instructions on your favorite seafood boil package. For a spicier boil, add 1 12-oz. bottle of The “Original” Louisiana Brand Hot Sauce per package of spice mix used. Bring to a boil. Add boil mix contents, for mildly seasoned, non-messy food or for spicy, hot cooked seafood or vegetables, reserve 2 Tbsp. spice mix per package for sprinkling over seafood or vegetables (after draining and prior to eating).
- First add favorite selected vegetables (optional step) such as small white or red potatoes, mushrooms, corn, garlic pods, lemon slices and small onions to the boiling mixture. Hard simmer in boiling solution for 10 minutes or until vegetables are cooked. Cut heat and allow to soak in mixture for 10 minutes. Remove vegetables. Return solution to a boil. Add Seafood; return to boil, timing shrimp 3-minutes; Crabs or Crawfish 8-10 minutes depending on size.
- Remove from heat. Add ice to stop cook (being sure not to overflow the boiling pot) and allow to soak for 10-15 minutes prior to draining and pouring out of container. Sprinkle reserved spicy boil mix over boiled seafood prior to eating.
- To double the amount being boiled: Add an additional 1-1/2 gallons Water (Total 3-Gallons) along with an additional 1/3 cup of Salt; 1/2 cup of Red Cayenne Pepper, and an additional 12-oz. bottle “Original” Louisiana Brand Hot Sauce to the directions given above.
Chesapeake Style Steamed Crabs or Seafood
Crabs * Crawfish * Fish * Vegetables
- Utilize a boiling pot with a raised rack a minimum of 2-3 inches above the bottom of the boiling pot. Add equal amounts of water and vinegar to a water level just below the rack. Optional: Add a bottle of 12-oz. “Original” Louisiana Brand Hot Sauce to the water-vinegar mixture.
- Layer Crabs or other foods to be steamed. Sprinkle your favorite spice mix lightly, or until partially covered, and steam in covered pot until crabs turn red, or other foods are fully steam cooked.
Injectable Marinade Concepts and Utilization Techniques
Injectable marinades and brines possess the same characteristics as their counterparts except that they do not require product soaking in order to impart flavor; moisturize, and tenderize. Unlike marinade soaking methodologies that only penetrate about a 1/4 inch into meat surfaces, require long soak times, and contaminate expensive marinades, flavor injection infuses blended flavors deep inside the meat. Conceptually the flavor injection concept makes good sense: instant flavor, yet no waiting, no waste as marinade is injected, and no fats are required in the marinades to protect the meat surface during soaking time. Rubs, seasonings, and sauces are used to flavor the surface of the meat.
As with many culinary skills, proper technique when “flavor injecting” will result in superior results. The flavoring should be spread uniformly throughout the meat with as few punctures of the meat as possible. The flavor injector is a syringe with a needle attached to a plunger which allows the user to inject the flavoring deep into the meat.
Injecting Tips for poultry start with limiting the puncture holes and when possible separating the skin from the meat and puncturing directly into the geometric center of the meat. Carefully and slowly inject along the grain of the meat aiming the injector into the middle of the meat and reduce plunger pressure on liquid as the needle comes nearer the surface of the meat (so meat can close up behind the needle.) Do not pull the needle completely out of the puncture hole unless to reload with liquid. Use the same hole to angle into the other areas of the meat, slowing infusing flavor as the needle moves back toward the meat surface. Remember the object is to spread your injection pattern so as to get small amounts of flavor in as many places as possible. Occasionally, some of the liquid is likely to spurt out on the meat surface. Rub the flavoring over the surface of the meat and then rub and season the surface of the meat as desired.
Injecting Techniques
1. Attach injector needle by turning clock-wise until snug. Do not over tighten. Hint: Be sure rubber plunger is lightly coated with oil prior to using. Determine amount of marinade required (1.5 to 2 ounces per pound of meat) and measure out contents into a clean container to prevent contamination of unused marinade.
2. Pull plunger to draw marinade into injector. Hint: Both slots in needle should be immersed in liquid to prevent air from entering injector chamber.
3. For best results, a geometrically centered injection point should include one deep and straight needle track as well as two additional tracks at approximately 45 degree angles branching out from the original injection point.
4. Once inserted deep into meat, press plunger down while slowly pulling injector needle out of meat to ensure even distribution of marinade. Follow same procedure with each needle track at each insertion point.
5. See illustration at right for suggested insertion points for turkey.
Cajun Injector® Deep Fried TurkeyPrep Time: 20 minutesCook Time: 35-45 MinutesYield: 8 servings
Ingredients:1 Cajun Injector® Propane Fryer3 Gallons Cajun Injector® Cottonseed Oil1 10 – 12 Pound Whole Turkey2 16 oz. jars Cajun Injector® Creole Butter Recipe Marinade1 8 oz. canister Cajun Injector® Quick Shake® Cajun Shake®
Method:Place the outdoor gas burner on level dirt or grassy area. Never fry a turkey indoors, in a garage, or in any structure attached to a building. Do not fry on wood decks, which could catch fire, or concrete, which could be stained by the oil, (have a fire extinguisher nearby for added safety). Add oil to a 7 to 10 gallon pot with a basket. At medium-high setting, heat the oil to 350°F (depending on the amount of oil, outside temperature and wind conditions, this should take about 20 to 40 minutes). Remove the giblets and neck from the turkey. Cut off the wing tips and plump little tail as they may get caught in the fryer basket. Rinse the turkey well with cold water, and pat dry thoroughly with paper towels. Take care to dry inside the cavity. Place in a large pan and inject with 2 ounce per pound of Cajun Injector Creole Butter Recipe Marinade. Season liberally inside and out with Cajun Injector Quick Shake Cajun Shake. To allow for good oil circulation through the cavity, do not truss or tie legs together. Place the turkey in basket, neck down. When the deep-fry thermometer reaches 350°F slowly lower the turkey into the hot oil. The level of the oil will rise due to the frothing caused by the moisture from the turkey but will stabilize in about 1 minute, (to prevent burns from the splattering oil wear oven mitts/gloves, long sleeves, heavy shoes, and even glasses. It is wise to have 2 people lowering and raising the turkey). Immediately check the oil temperature, and increase the flame so the oil temperature is maintained at 350°F. If the temperature drops to 340°F or below, oil will begin to seep into turkey. Fry about 3-1/2 minutes per pound, or about 35 to 45 minutes for a 10 to 12 pound turkey. Stay with the cooker at all times, as the heat must be regulated. When cooked to 170°F in the breast or 180°F in the thigh, carefully remove the turkey for the hot oil. Allow the turkey to drain for a few minutes. Remove the turkey to a cutting board and cover with foil. Let it rest for 20 minutes. Slice the turkey and serve hot.
Original Louisiana Habanero Fried ChickenPrep time: 20 minutesMarinate time: 4 hoursCook time: 30 minutesYield: 8 servings
Ingredients:Cajun Injector® Cottonseed oil, for deep-frying1 Quart Buttermilk, Plus 2 Cups2 tbsps. Cajun Injector® Quick Shake® Cajun Shake® seasoning2 tbsps. Louisiana Brand Hot Sauce2 tsps. Louisiana Brand Habanero Sauce2 Chicken (3 to 4 pounds each), Each Cut Up Into 8 Pieces4 cups All-Purpose Flour1 tbsp. Garlic Powder1 tbsp. Onion Powder1 tbsp. Sweet Paprika2 tsps. Cayenne Pepper
Method:In a large bowl or baking dish, whisk together 1 quart of the buttermilk, Cajun Injector® Quick Shake® Cajun Shake® seasoning, and 2 Tablespoons Louisiana Brand Hot Sauce. Add the chicken pieces, turn to coat, cover, and refrigerate for at least 4 hours or overnight. Preheat oil to 400°F in electric fryer, or 350°F in propane fryer. Place the remaining 2 cups of buttermilk and 2 teaspoons Louisiana Brand $ Hot Sauce in a bowl. Stir together the flour, garlic and onion powders, paprika, and 2 teaspoons cayenne pepper in a large bowl. Divide flour mixture among 2 shallow platters and season generously Cajun Injector Quick Shake Cajun Shake. Drain the chicken in a colander and pat it dry. Dredge the pieces a few at a time in the flour mixture and pat off excess, then dip in the buttermilk and allow excess to drain off. Dredge in the second plate of flour, and pat off the excess. Put the chicken pieces on a piece of waxed paper, or on a clean platter while you heat the oil. Working in batches, add the chicken pieces to the hot oil, 4 or 8 at a time and fry, turning the pieces occasionally, until evenly golden brown and cooked through, about 20 minutes. Remove from the oil with a slotted spoon and transfer to a rack to drain. Repeat to cook the remaining pieces. Serve hot.
Beer Batter ShrimpPrep time: 10 minutesCook time: 5 minutesYield: N/A
Ingredients:3 Eggs3 cups Flour1 tsp. Baking Powder12 oz. Favorite BeerCajun Injector® Quick Shake® Cajun Shake®
Method:Preheat oil for deep frying to 350°F. In mixing bowl beat eggs gently. Add flour and beer gradually until batter is a little thicker than pancake batter. Mix in baking powder. Dredge shrimp, fish, orvegetables through batter. Shake off excess, and fry at 350°F until golden brown.
Cajun Injector® Fried CatfishPrep time: 10-15 minutesCook time: 3-5 minutesYield: 3-4 lbs. of fish
Ingredients:Cajun Injector® Cottonseed Oil1 package Cajun Injector® Seasoned Fish Fry Mix
Method:Preheat oil to 350°F. Dip Fish into a bowl of cold water. Shake off excess water. Roll Fish in 10 ounces of the Cajun Injector Seasoned Fish Fry Mix. Deep fry at 350°F until golden brown.
Cajun Injector® HushpuppiesPrep time: 10-15 minutesCook time: 3-5 minutesYield: 16-18 hushpuppies
Ingredients:Cajun Injector® Cottonseed Oil1 package Cajun Injector® Hushpuppy Cornbread Mix1 egg1/4 cup of milk
Method:Preheat oil to 350°F. Combine 8 ounces of the Cajun Injector Hushpuppy Cornbread Mix, 1 egg and 1/4 cup of milk in bowl. Mix until smooth. Let batter stand for 30 minutes to thicken. Drop batter by tablespoon or scoop into hot oil. Deep fry at 350°F until golden brown.
Chicken Fried Venison SteakPrep Time: 10 minutesCook Time: 15 MinutesMarinade Time: 1-2 hoursYield: 4 servings
Ingredients:Cajun Injector® Cottonseed Oil1 – 10 oz. Packet of Cajun Injector® Chicken Fry Mix4 – 4 oz. Venison Cubed Steaks
Method:Preheat oil to 400°F in electric fryer, or 350°F in propane fryer. Heat enough oil for deep frying to 350°F. Mix 6 tablespoons of Cajun Injector Chicken Fry Mix with 3/4 cup of water and mix until smooth. Dip steaks into batter then roll in remaining dry chicken mix until coated. Deep fry the coated steaks at 350°F until golden brown.
Louisiana Wildly Wicked Buffalo Catfish WrapPrep Time: 10 minutesCook Time: 7 minutesYield: 5 wraps
Ingredients:1 lb. Catfish Fillets (USA raised)1 (8 oz.) bag Cajun Injector® Chicken Fry Mix1 Diced Tomato1/2 cup Louisiana Brand Wildly Wicked Wing Sauce1 Package (8 inch) Flour Tortillas1 lb. Cole Slaw (recipe follows)2 cups Cottonseed Oil, for Frying
Method:Preheat oil to 400°F in electric fryer, or 350°F in propane fryer. Cut catfish fillets chicken into strips about 1/2”- 3/4” wide and batter according to the directions on the chicken fry bag. Fry until golden brown, remove, and drain on paper towels. Toss catfish strip in wing sauce to coat evenly. Heat tortillas in an oven or microwave until warm and pliable. Assemble the wrap by adding coleslaw, catfish strips, and diced tomatoes.
Cole SlawPrep Time: 10 minutesCook Time: N/A
Ingredients:8 oz. Mayonnaise4 oz. Sour Cream2 oz. Sugar1 oz. Apple Cider Vinegar1 Clove Minced Garlic1 lb. Cole Slaw Mix
Method:Mix mayo, sour cream, sugar, vinegar, and garlic together in mixing bowl, add the mixture to the slaw and mix well.
Louisiana Wildly Wicked Turkey TendersPrep Time: 10 minutesCook Time: 10 MinutesYield: 4-6 servings
Ingredients:1 10 oz. packet of Cajun Injector® Chicken Fry Mix2 Turkey Breast Boneless Skinless Cut into Strips1/2 cup Louisiana Brand Wildly Wicked Wing Sauce1/4 cup Melted butter2 tbsps. Original Louisiana Brand Hot SauceCajun Injector® Cottonseed Oil
Method:Preheat oil to 400°F in electric fryer, or 350°F in propane fryer. Heat enough oil for deep frying to 350°F. Mix 6 tablespoons of Fry mix with 3/4 cup of water and mix until smooth. Dip turkey strips into batter then roll in remaining dry chicken mix until coated. Deep fry the coated tenders at 350°F until golden brown. While turkey is cooking melt butter and mix with wing sauce. When turkey is cooked remove from oil place in bowl and cover with wing sauce and butter mixture, toss to coat well.
Bruce’s® Tempura Battered Smoked Soft-shell CrabPrep time: 10 minutesCook time: 35 minutesYield: 6 crabs
Ingredients:6 Soft-shell Crabs2 Packages Bruce’s® Sweet Potato Pancake Mix1 cup Seltzer WaterCajun Injector® Quick Shake® Cajun Shake®1 qt. Cottonseed Oil for Frying
Method:Smoke the softshell crab for 30 minutes at 165°F degrees with pecan wood pelletes. In a mixing bowl, combine pancake mix and seltzer water to make a batter. Carefully dip the crab into the batter and fry at 350°F or until golden brown. Drain on paper towels and serve with Cajun cole slaw.
Cajun King® Country Fried QuailPrep Time: 10 minutesCook Time: 15 MinutesYield: 4 servings
Ingredients:Cajun Injector® Cottonseed Oil3 Large Eggs1/4 cup Milk1 tbsp. “Original” Louisiana Brand Hot Sauce1 bag Cajun Injector® Chicken Fry Mix2 tbsp. Cajun King® Blended Spice Mix4 Quail, cleaned and cut in half
Method:Preheat oil to 400°F in electric fryer, or 350°F in propane fryer. Heat enough cottonseed oil for deep frying to 350°F. Beat eggs and milk together, and add hot sauce. Combine fry mix and blended spice mix. Dredge the quail in the egg mixture then in the fry mix, knock off excess coating and deep fry until golden brown.
Cajun Injector® Chicken Fried Caribou SteakPrep Time: 10 minutesCook Time: 15 MinutesMarinade Time: 1-2 hoursYield: 4 servings
Ingredients:4 (4 oz.) Caribou Cubed Steaks1 (16 oz.) jar Cajun Injector® Creole Butter Recipe Marinade1 (10 oz.) packet of Cajun Injector® Chicken Fry Mix1 tbsp. Cajun Injector® Quick Shake® Cajun Shake®2 tbsps. “Original” Louisiana Brand Hot SauceCajun Injector® Cottonseed Oil
Method:Preheat oil to 400°F in electric fryer, or 350°F in propane fryer. Heat enough oil for deep frying to 350° F. Mix 6 tablespoons of Fry mix with 3/4 cup of water and mix until smooth. Dip steaks into batter then roll in remaining dry chicken mix until coated. Deep fry the coated steaks at 350° F until golden brown.
Incredible Corn DogsPrep Time: 15 minutesCook Time: 3 minutesYield: 16 servings
Ingredients:Cajun Injector® Cottonseed Oil1-1/2 cups Cornmeal1 cup All-purpose flour1/2 cup Sugar2 tsps. Baking powder1-1/2 tsps. Salt3/4 tsps. Black pepper2 Large eggs1/4 cup Cajun Injector® Creole Butter Recipe Marinade3/4 cup Half-and-half2 (12 oz.) Package hot dogs (regular size)16 (10 oz.) wooden skewersCreole mustard for dipping
Method:Preheat oil to 400°F in electric fryer, or 350°F in propane fryer. Combine cornmeal, flour, sugar, baking powder, salt, and pepper; stir well with a whisk. In another bowl combine eggs, marinade, and half-and-half. Stir well. Combine cornmeal mixture and egg mixture. Mix until dry ingredients are moistened. Pat hot dogs dry with paper towels. Secure hot dogs onto wooden skewers. Dip into batter, coating all sides well. Fry a few hot dogs at a time for 3 minutes or until golden. Remove from hot oil and drain on paper towels. Serve warm with Creole mustard.Copyright © 2003 The Ultimate Turkey Fryer Cookbook, Meredith Books
Fried Cornish HensPrep time: 15 minutesCook time: 16-20 minutesYield: 4 servings
Ingredients:Cajun Injector® Cottonseed Oil2 Whole Cornish Hens6 oz. Cajun Injector® Creole Butter Recipe MarinadeCajun Injector® Quick Shake® Cajun Shake® seasoning
Method:Preheat oil to 400°F in electric fryer, or 350°F in propane fryer. Prepare Cornish hens while oil is heating. Remove giblets and rinse Cornish hens with warm water. Drain cavity completely. While oil is heating, inject Cornish hens using 1/2 ounce of marinade in each breast, 1/4 ounce into each leg and thigh.* Rub Cajun Injector Quick Shake Cajun Shake seasoning on the outside and inside of Cornish hens. Place Cornish hens in basket and lower slowly into oil. Fry for 10 minutes per pound of meat. Remove basket and place in a pan to drain excess oil.
Bite Size Crab CakesPrep Time: 20 minutesCook Time: 3-5 minutesYield: 24 1 inch patties
Ingredients:Cajun Injector® Cottonseed Oil1 lb. Fresh lump crab meat1/2 cup Breadcrumbs1 tbsp. Minced parsley1/2 tsp. Salt1/2 tsp. Pepper1/4 cup Mayonnaise1 cup Egg, lightly beaten2 tsps. Worcestershire Sauce1 tsp. Prepared mustard
Method:Preheat oil to 400°F in electric fryer, or 350°F in propane fryer. Remove any shell pieces from crab meat. Lightly squeeze to drain excess moisture, transfer to dish, cover and chill until needed. Combine breadcrumbs, parsley, salt, and pepper; stir well with a whisk. Add mayonnaise, egg, Worcestershire sauce and mustard; stir well. Gently stir in crab meat. Shape mixture into 24 (1-inch) patties. Fry in 2 batches for 2 minutes or until golden. Remove from hot oil and drain on paper towels. Serve with cocktail sauce if desired.Copyright © 2003 The Ultimate Turkey Fryer Cookbook, Meredith Books
Louisiana Cocktail SaucePrep time: 15 minutesCook time: n/aYield: 2 cups
Ingredients:1 cup Tomato sauce1/4 cup Ketchup2 tbsps. Red wine vinegar3 tbsps. Worcestershire sauce1 tbsp. Horseradish1/4 cup Chopped bell pepper1/4 cup Chopped celery1 tbsp. Diced garlicSalt (to taste)“Original” Louisiana Brand Hot Sauce to taste
Method:In a large ceramic bowl, combine tomato sauce, ketchup, vinegar, Worcestershire sauce and horseradish. Using a wire whisk, blend until all ingredients are well incorporated. Add bell pepper, celery and garlic, and season to taste with salt and hot sauce. Continue to blend until all seasonings are evenly mixed throughout the sauce. Adjust seasonings to your taste should more sweetness or tartness be desired. Cover and refrigerate overnight for flavors to develop.
Stuffed Jalapeno PeppersPrep Time: 30 minutesCook Time: 3-4 minutesYield: 24 stuffed jalapenos
Ingredients:Cajun Injector® Cottonseed Oil24 Fresh whole jalapeño peppers or 2 (12 ounce) jars whole jalapeno pepper, drained4 oz. Monterey Jack or cheddar cheese, cut into 24 (1-1/2 inch long) strips1/2 cup All-purpose flour1 tbsp. Cajun Injector® Quick Shake® Cajun Shake® seasoning3/4 cup Buttermilk, Ranch-style dressing for dipping
Method:Preheat oil to 400°F in electric fryer, or 350°F in propane fryer. Cut peppers length-wise down one side, leaving the other side intact. Remove seeds and membrane. Stuff each pepper with a piece of cheese. Combine flour and Cajun Injector Quick Shake Cajun Shake seasoning. Stir will with a whisk. Slowly pour buttermilk into flour mixture while stirring. Stir until smooth. Dip stuffed peppers in batter, coating all sides well. Fry 6 to 8 peppers at a time for 2 minutes or untilgolden. Remove from hot oil and drain on paper towels. Serve warm with ranch-style dressing.Copyright © 2003 The Ultimate Turkey Fryer Cookbook, Meredith Books
Fried Corn on the CobPrep Time: 10-15 minutesCook Time: 4 minutesYield: 12 servings
Ingredients:Cajun Injector® Cottonseed Oil1 package (12 half ears) frozen corn on the cob, thawedCajun Injector® Quick Shake® Cajun Shake® seasoning to taste
Method:Preheat oil to 400°F in electric fryer, or 350°F in propane fryer. Fry corn in hot oil for 4 minutes, turning once. Remove and drain on paper towels. Sprinkle corn with Cajun Injector Quick Shake Cajun Shake seasoning.
Fried Potato SaladPrep time: 30 minutesCook time: 5-10 minutesYield: 12 servings
Ingredients:Cajun Injector® Cottonseed Oil6 Large eggs1 lb. Bacon4 lbs. Red potatoesCajun Injector® Quick Shake® Cajun Shake® seasoning to taste1-1/2 cups Mayonnaise1/2 cup Dill pickle relish
Method:Cover eggs with 1 inch cold water in a large pot. Place over medium-high heat. Bring to a boil. Cover and remove from heat. Let stand 15 to 17 minutes. Drain water. Run cold water over eggs until completely cool. Peel and chop eggs; set aside. Preheat oil to 400°F in electric fryer or 350°F in propane fryer. Separate bacon strips. Carefully lower each piece of bacon into hot oil; fry for 1 minute or until crisp. Remove from hot oil and drain on paper towels. Crumble; set aside. Scrub potatoes, and rinse with cold water. Cut into 1-inch cubes. Fry potatoes in batches for 5 minutes, or until tender and golden. Remove from hot oil and drain on paper towels. Place warm potatoes in a large bowl. Sprinkle with Cajun Injector Quick Shake Cajun Shake seasoning to taste and toss well. Add crumbled bacon, chopped eggs, mayonnaise, and relish; toss until potatoes are well coated.Copyright © 2003 The Ultimate Turkey Fryer Cookbook, Meredith Books
Popcorn ShrimpPrep Time: 20 minutesCook Time: 3-5 minutesYield: 6-8 servings
Ingredients:Cajun Injector® Cottonseed Oil1 lb. Cleaned crawfish tails or shrimp1 tsp. Fresh thyme, chopped1 tsp. Fresh basil, choppedSalt and black pepper (to taste)1 Egg1 cup Water1 cup Milk3 tsps. “Original” Louisiana Brand Hot Sauce, divided1 cup Cajun King® Cajun Fry Mix
Method:Preheat oil to 400°F in electric fryer, or 350°F in propane fryer. Season crawfish or shrimp using thyme, basil, salt, black pepper, and 1 teaspoon of hot sauce. In a bowl, prepare an eggwash by combining egg, milk, water, and 2 teaspoons of hot sauce. Season eggwash to taste with salt and pepper. Place Cajun King Cajun Fry in a second bowl. Dip crawfish or shrimp in eggwash, then in Cajun Fry Mix. Deep fry until golden brown.
Chicken Fried Venison SteakPrep Time: 10 minutesCook Time: 15 MinutesMarinade Time: 1-2 hoursYield: 4 servings
Ingredients:Cajun Injector® Cottonseed Oil1 10 oz. Packet of Cajun Injector® Chicken Fry Mix4 4 oz. Venison Cubed Steaks
Method:Preheat oil to 400°F in electric fryer, or 350°F in propane fryer. Heat enough oil for deep frying to 350° F. Mix 6 tablespoons of Cajun Injector Chicken Fry Mix with 3/4 cup of water and mix until smooth. Dip steaks into batter then roll in remaining dry chicken mix until coated. Deep fry the coated steaks at 350° F until golden brown.
Boiled CrabsPrep time: 15 minutesCook time: 40 minutesServings: 12 crabs
Ingredients:1 Dozen Live Blue Crabs3 tbsps. Cayenne Pepper1/4 cup Table Salt1/4 cup “Original” Louisiana Brand Hot Sauce2 Lemons, Quartered1 Onion, Halved3/4 lb. Small Potatoes (about 2 inches in diameter)1 Head of Garlic (not separated into cloves)3 Ears of Corn, Shucked
Method:Put 4 gallons of water in Cajun Injector® Fryer and set temperature to 400°F. While water is coming to a boil, in a deep sink, rinse crabs in 2 or 3 changes of water. Place crabs in fryer basket and set aside. Add cayenne, salt, hot sauce, lemons, and onions and boil 5 minutes. Add potatoes and garlic and boil until tender, about 15 minutes. Transfer potatoes and garlic with a large sieve to a platter and keep warm, covered with foil. Add corn to boiling water and cook until tender, about 5 minutes. Transfer corn with tongs to platter and keep warm, covered with foil. Return water to a boil. Add crabs. Return water to a boil and cook crabs until just cooked through, about 10 minutes. (To determine doneness, remove a claw and crack it with the handle of a dinner knife. Use knife to extract meat from claw). Remove basket from water, and hang on clip and let drain a few minutes. Serve.
Boiled ShrimpPrep time: 15 minutesCook time: 30 minutesServings: 10 lbs. shrimp
Ingredients:10 lbs. Fresh Shrimp Head on3 tbsps. Cayenne Pepper1/4 cup Table Salt1/4 cup “Original” Louisiana Brand Hot Sauce2 Lemons, Quartered1 Onion ,Halved3/4 lb. Small Potatoes (about 2 inches in diameter)1 Head of Garlic (not separated into cloves)3 Ears of Corn, Shucked
Method:Put 4 gallons of water in Cajun Injector® Fryer and set temperature to 400°F. While water is boiling, rinse shrimp with cold water and place in fryer basket. When water is boiling add cayenne, salt, hot sauce, lemons, and onions and boil 5 minutes. Add potatoes and garlic, boil until tender, about 15 minutes. Transfer potatoes and garlic with a large sieve to a large platter and keep warm, covered with foil. Add corn to boiling water and cook until tender, about 5 minutes. Transfer corn with tongs to platter and keep warm, covered with foil. Return water to a boil. Place baskets with shrimp slowly into water return to a boil and cook shrimp until just cooked through, about 7 minutes or until pink. Remove basket from water and hang on clip and let drain a few minutes. Serve with favorite cocktail sauce.
Boiled VegetablesPrep time: 15 minutesCook time: 20 minutesServings: N/A
Ingredients:3 tbsps. Cayenne Pepper1/4 cup Table Salt1/4 cup “Original” Louisiana Brand Hot Sauce2 Lemons, Quartered4 Onions ,Halved1 lb. Small Potatoes (about 2 inches in diameter)1 Head of Garlic (not separated into cloves)6 Ears of Corn, Shucked
Method:Put 4 gallons of water in Cajun Injector® Fryer and set temperature to 400°F. While water is boiling, clean vegetables. When water is boiling add cayenne, salt, hot sauce, and onions. Boil for 5 minutes. Add potatoes and garlic; boil until tender, about 15 minutes. Transfer potatoes and garlic with a large sieve to a large platter and keep warm, cover with foil. Add corn to boiling water and cook until tender, about 5 minutes. Remove with tongs and serve with the rest of the vegetables.
Cajun Injector Electric Fryer/Boiler/Steamer Instruction Manual –
report this adCajun Injector Electric Fryer/Boiler/Steamer Instruction Manual –
[xyz-ips snippet=”download-snippet”]