BRYSTON BDA-3.14 Streamer DAC
Important Safety Instructions
![]() The lightning flash with arrowhead symbol within an equilateral triangle, is intended to alert the user to the presence of un-insulated “dangerous voltage “ within the product’s enclosure that may be of sufficient magnitude to constitute a risk of electric shock to persons.
The lightning flash with arrowhead symbol within an equilateral triangle, is intended to alert the user to the presence of un-insulated “dangerous voltage “ within the product’s enclosure that may be of sufficient magnitude to constitute a risk of electric shock to persons.
 The exclamation point within an equilateral triangle is intended to alert the user to the presence of important operating and maintenance (servicing) instructions in the literature accompanying the product.
- Read these instructions.
- Keep these instructions.
- Heed all warnings.
- Follow all instructions.
- Do not use this apparatus near water.
- Clean only with dry cloth.
- Do not block any ventilation openings. Install in accordance with the manufacturer’s instructions.
- Do not install near any heat sources such as radiators, heat registers, stoves, or other apparatus (including amplifiers) that produce heat.
- Do not defeat the safety purpose of the polarized or grounding-type plug. A polarized plug has two blades with one wider than the other. A grounding type plug has two blades and a third grounding prong. The wide blade or the third prong are provided for your safety. If the provided plug does not fit into your outlet, consult an electrician for replacement of the obsolete outlet.
- Protect the power cord from being walked on or pinched particularly at plugs, convenience receptacles, and the point where they exit from the apparatus.
- Only use attachments/accessories specified by the manufacturer.
- Use only with the cart, stand, tripod, bracket, or table specified by the manufacturer, or sold with the apparatus. When a cart is used use caution when moving the cart/apparatus combination to avoid injury from tip-over.

- Unplug this apparatus during lightning storms or when unused for long periods of time.
- Refer all servicing to qualified service personnel. Servicing is required when the apparatus has been damaged in any way, such as power-supply cord or plug is damaged, liquid has been spilled or objects have fallen into the apparatus, the apparatus has been exposed to rain or moisture, does not operate normally, or has been dropped.

WARNING: TO REDUCE THE RISK OF FIRE OR ELECTRIC SHOCK, DO NOT EXPOSE THIS APPARATUS TO RAIN OR MOISTURE.DO NOT EXPOSE THIS EQUIPMENT TO DRIPPING OR SPLASHING AND ENSURE THAT NO OBJECTS FILLED WITH LIQUIDS, SUCH AS VASES, ARE PLACED ON THE EQUIPMENT.TO COMPLETELY DISCONNECT THIS EQUIPMENT FROM THE AC MAINS, DISCONNECT THE POWER SUPPLY CORD PLUG FROM THE AC RECEPTACLE.THE MAINS PLUG OF THE POWER SUPPLY CORD SHALL REMAIN READILY OPERABLE.
BRYSTON LIMITED WARRANTY
Bryston analog audio products are warranted to be free from manufacturing defects for twenty (20) years from the original date of manufacture. The warranty includes parts and labour.Bryston digital products and cables are warranted for five years from the original date of manufacture. The warranty includes parts and labour.Bryston products having motorized moving parts, excluding motorized volume controls, are warranted for three years from the original date of manufacture. The warranty includes parts and labour.Bryston will remedy the problem by repair or replacement, as we deem necessary, to restore the product to full performance. Bryston will pay return shipping only for the full length of the specific product’s warranty.In the event of a defect or malfunction, contact Bryston’s repair centers for return authorization. Products must be returned using original packaging material only. Packing material may be purchased from Bryston if necessary. This warranty is considered void if the defect, malfunction or failure of the product or any component part was caused by damage (not resulting from a defect or malfunction) or abuse while in the possession of the customer. Tampering by persons other than factory authorized service personnel or failure to fully comply with Bryston operating instructions voids the warranty. This warranty gives you specific legal rights and you may also have other rights which may vary from province to province and country to country.As of 2006-02-22 Bryston will only warranty Bryston products purchased through authorized Bryston dealers. Bryston products with a date code of 0608 or higher (date code format is “yyww”, where “yy” is the two least significant digits of the year and “ww” is the week of the year) must be accompanied by a copy of the bill-of-sale from a Bryston authorized dealer to qualify for warranty service. The warranty is transferable from the original owner to a subsequent owner as long as a copy of the bill-of-sale from the original authorized Bryston dealer accompanies the re-sale. The copy of the bill of sale to any subsequent owner need ONLY include the Name of the Bryston Authorized Dealer and the Model and Serial number of the Bryston product The warranty will only be honored in the country of the original purchase unless otherwise pre-authorized by Bryston.
BRYSTON SERVICE in CANADA:
Postal address: P.O. BOX 2170, Stn. Main PETERBOROUGH, ONTARIO CANADA K9J 7Y4Courier address: 677 NEAL DRIVE PETERBOROUGH, ONTARIO CANADA K9J 6X7PHONE: 705-742-5325FAX: 705-742-0882E-mail: [email protected]
BRYSTON SERVICE in the USA:
Bryston Service The Gray Building, Classroom 4 168 N Main St Northfield VT 05663PH: 802-334-1201FAX: 802-334-6658E-mail:
BRYSTON SERVICE outside Canada and the USA:
contact your local distributor or
CHECK OUR WEB SITE: www.bryston.comE-MAIL BRYSTON DIRECTLY: [email protected]FAX BRYSTON DIRECTLY: 01-705-742-0882PHONE BRYSTON DIRECTLY: 01-705-742-5325
General
Welcome
Thank you for your purchase of a Bryston BDA3.14 Streamer / DAC! Decades of ongoing research and development have merged our expertise in streaming with our top level DAC. With this model, Bryston sought to achieve maximum compatibility with a wide range of digital source components yet preserve state-of-the-art audio quality while including our highly sought after digital playback technology. Our customers are a tremendous resource to whom we look for a measure of success. Please feel welcome to contact us with feedback and suggestions.
Description
The BDA-3.14 is a state of the art stereo digital to analog converter plus high resolution streamer that accepts digital input from up to 10 source components and connects to an analog line-level preamplifier. Both DSD and PCM audio data are supported. Advanced engineering and application of technological advancements mean that even previously highly regarded digital source components may have dramatically improved sound quality when connected to the BDA-3.14.
Features
Bryston BDA-3.14 includes the following features:
- 10 different digital inputs plus a built in high resolution streaming system
- Digital preamp capability
- Analog audio out via single ended RCA or balanced XLR connections
- PCM Audio up to 384 kHz sampling rate and 32 bit word lengths supported
- DSD Audio up to DSD256 (quad rate)
- Asynchronous USB Class 2.0 Audio inputs
- Stereo HDMI Audio with video passthrough
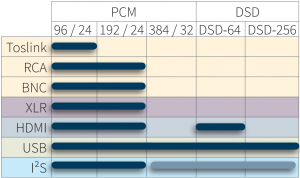
- Traditional digital inputs: S/PDIF via BNC, RCA, or Toslink. AES/EBU via balanced XLR
- Remote control via ethernet, USB, RS232, or IR
- Video passthrough (HDMI audio out)
- User selectable upsampling
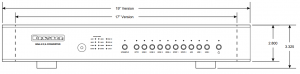
- Available in either 17 inch or 19 inch wide C-Series dress panel in silver-toned (clear anodized) or black anodized aluminum.
Shipping Box and Packing Material
Please keep the original shipping box and all packing material. This will ensure the BDA-3.14 is protected in future transport. In the unlikely event you have a problem and must return it for service, you must use the proper packing material. Ship the BDA-3.14 only in the original packing material as the unit is not insurable by carriers otherwise. Replacement packing materials consisting of a shipping carton with plastic foam inserts is available from Bryston for a small fee.
Installation
Ventilation
The BDA-3.14 is a cool-running line level component. It generates far less heat than amplifiers and many other components. It can be safely placed inside furniture or an equipment rack.However, it should not be tightly enclosed. Some airflow is desired.
Connecting to A/C Power
Please check the Data Plate on the right rear of the amplifier to verify power requirements agree with your location. Plug the IEC-320 C14 end of the power cord into the BDA-3.14, then plug the other end into an approved and grounded A/C receptacle.
Audio Connections
Connecting Source Components
The BDA-3.14 can accept DSD or PCM coded digital audio from up to 10 sources. Any source component capable of producing raw PCM, DSD, or DoP (DSD over PCM) audio is supported. Audio formats such as Dolby Digital, DTS, and other surround sound audio formats are unsupported.
Each of the available inputs can decode a subset of all available input formats. Further, a source component may have multiple interconnect options that can be used with the BDA-3.14. Choose first by compatibility with desired audio formats, then by order of sound quality. Source component permitting, multiple digital connections can be made between the source component and BDA3.14.
 Source audio greater than 192kHz PCM or all DSD is automatically down sampled to 192kHz / 24 bit when played through internal streamer.
The question of which available input offers the best sound quality is not easily answered since it also depends on the quality of outputs on the source unit. Among S/PDIF inputs, BNC is favored for highest sound quality followed by RCA, then Toslink.AES/EBU (XLR) input is often superior to S/PDIF due to its balanced (therefore noise rejecting) topology.USB offers the most comprehensive compatibility with various audio formats and can offer most excellent sound quality. HDMI is ubiquitous on televisions and cable and satellite boxes as well as DVD and Blu-ray disc players among other media servers. It also has the unique feature of offering digital transmission of SACD audio from select players. When choosing from many available inputs, there is no substitute for listening!
USB Audio
Unlike traditional digital audio interfaces, USB is a 2-way multi-purpose interface originally developed for computer peripherals. Bryston’s advanced implementation is fully USB Audio Class 2.0 compliant. Additionally, we use a highly advanced asynchronous protocol whereby digital audio jitter is virtually eradicated by slaving the attached audio player (computer or dedicated music player) to the ultra-precise master clock in the BDA-3.14. Modern Macintosh and Linux computers do not need extra device drivers installed. To use the BDA-3.14 with Microsoft Windows computers, please install the driver according to the instructions in ”Windows Driver Installation” on page 14. Note that when switching between the two USB inputs, a few seconds delay in playback is normal. The BDA-3.14 can only maintain one active USB handshake at a time. Some digital USB sources such as Bryston BDPs will require you to reinitialize the USB audio device when switching between USB inputs.
HDMI Audio
The BDA-3.14 can receive both PCM and DSD audio over the HDMI, but cannot receive encoded digital audio such as Dolby Digital or DTS. The BDA-3.14 will request 2-channel un-encoded audio from your source component.
The BDA-3.14 uses EDID to obtain the correctly formatted audio signal from the source. As a 2-channel only component, the BDA-3.14 will attempt to only retrieve the stereo program material from a disc and will ignore any Dolby or DTS program.
Connecting to a Stereo
The BDA-3.14 can be used with or without a separate preamplifier. The BDA-3.14 is factory configured to start with the volume control set to approximately 60dB below full output in order to prevent bursts of energy from damaging downstream equipment. If you use the BDA-3.14 with an external preamplifier, you will want to set the default volume to 100% (0dB). From the webUI, go to Audio Devices, Startup Volume, and define your desired value.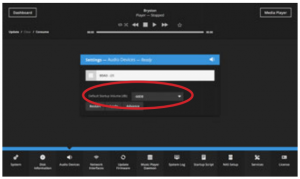 Note that the maximum output from the BDA3.14 RCA jacks is 2.0V and 4.0V on XLR balanced. An amplifier with a gain of 29dB can generate 100 watts with only 1 volt input.
Analog output is provided via left & right stereo pairs of XLR balanced outputs and RCA single-ended outputs. Balanced output is usually preferred when available on the partnering amplifier or preamplifier especially when long runs (greater than 3 meters) of interconnect cable are required. Connect the Left and Right outputs to the respective inputs on the amplifier or preamplifier. Note that the BDA-3.14 has a default volume level of -60dB at turn on. When connecting to an analog preamplifier, set the BDA-3.14 volume to max 0dB for bit perfect operation.
HDMI Passthrough
Incoming digital video may be passed through to another receiver such as a surround sound processor or display using the HDMI output. The HDMI output can only pass HDMI audio when a non-HDMI input is actively selected. See PTHD command in “Serial Protocol” on page 16. The digital audio outputs mirror the inputs. No sample rate conversion or any other processing is applied to the output.
HDMI inputs are 1.4a compliant and can pass 4K video at up to 30fps. HDMI input 4 is HDCP 2.2 compliant. Video is passed through to a connected monitor at the native resolution with no processing or conversion.
Integrated Digital Player
Connection to Network
The BDA-3.14 features an integrated digital player capable of playing back music files stored locally and through select digital streaming services available online. Unlike Bryston BDP series products which feature a front panel display and menu navigation system, The BDA-3.14 internal streaming system must be operated by its web based graphical user interface. As such, the BDA-3.14 needs to be connected to the network via ethernet or with an optional wireless adapter available separately from Bryston or authorized dealer.
The BDA-3.14 has two ethernet jacks on the back.Connect the one labeled “ETHERNET” to your network router. The LEDs on the jack should light up and flash occasionally indicating activity.
Connection to Wireless Network
When a wired connection is not practical, a wireless adapter can be used by inserting it into one of the 4 “USB ACCESSORY” ports.
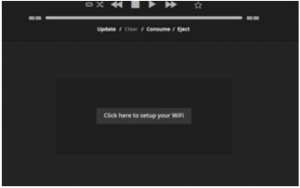
Upon first boot with the wireless adapter connected, the BDA-3.14 will create its own wireless network called Bryston Digital Player.
- Connect your controller (laptop, smartphone, tablet) to this network using the password ‘bryston1’.
- Point your web browser to http://192.168.57.1 if not automatically redirected. The Dashboard section of the webUI will appear.
- Click or tap the button “Click here to set up your wifi”
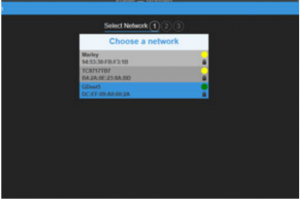
- Select your WiFi network and click Continue.
- Choose the correct security type for your network. Continue and enter your network password.
- Click Save. Unit will reboot and connect to your network. Bryston Digital Player network will no longer be available and your control device (phone, tablet, etc.) will most likely automatically reconnect to your home network.
Software Introduction
At the time of writing, the current firmware on your BDA-3.14 is a version we call Manic Moose. Manic Moose describes the Bryston engineered firmware including our user interface. Unlike many other products, the BDP can be operated entirely within the web browser of a portable controller such as an iPhone, iPad, Android device, desktop or laptop computer. As such, there is no need to download an app. On all devices, simply open the web browser on your device and enter the following address: http://my.bryston.comThen click the link that corresponds to your BDA-3.14. It will be called BDA3PI. You will see the “Dashboard” for your player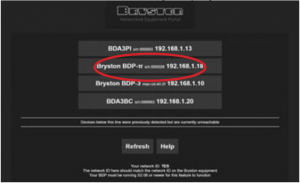
The Dashboard provides access to a variety of settings, BDA3.14 input selection, technical player information, system notifications, and most importantly, media. Media Player is used to access your personal music library stored on an NAS or USB attached drive. bRadio is an internet radio directory, and Applications allows access to Tidal online streaming service.
Within the scope of this brief introduction, we shall explore Media Player.
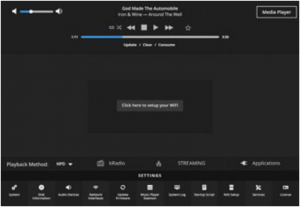
Media Player
Clicking or tapping Media Player from the Dashboard takes you to the Media Player where you will spend the most time enjoying your music.Note that our web application is fully responsive and re-orients itself depending on landscape or portrait orientation of your device. For brevity, illustrations below are for landscape orientation.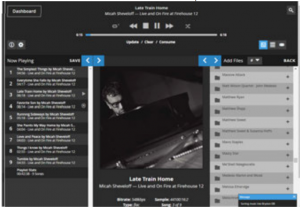 The Media Player can be understood by recognizing four distinct areas: Transport Control (the horizontal header), and the three vertical columns beneath it.Left to right, they are the Now Playing area which is your current queue, Current Track which shows album art, artist, song title, album name, and resolution for the currently playing song, and Add Files which provides hierarchical access to your music library
Now Playing
To play music, add music from your library to the queue. You can browse your music sorted into folders just like it is organized on your drive, or by select metadata tags such as artist name or album name.
You can add entire artist collections, single albums, single tracks or a combination thereof to the cue to form a playlist. Simply click or tap the + icon beside any field, folder, or track name to add that item and all music contained beneath it to the queue. The illustration above shows 9 tracks from an album in the queue.
Once tracks are placed into the Now Playing queue, they can be reordered or removed from the queue entirely. Click or tap-and-hold the track number then drag it into the desired position in the queue to reorder or onto the Now Playing area to remove. To clear the entire playlist, click or tap the Clear instruction beneath the track timeline in the Transport Control area.
Stored Playlists
Store any Now Playing queue for future recall by clicking SAVE in the Now Playing area. Title the playlist and click Save.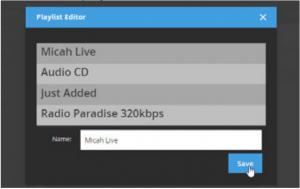 Recall saved playlists by clicking Playlists in the Add Files area.
Alternate Views
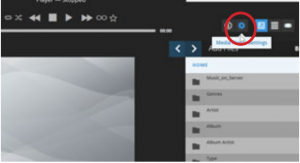
Clicking ![]() brings up the Song View which displays a table of information for songs in the current queue.
brings up the Song View which displays a table of information for songs in the current queue.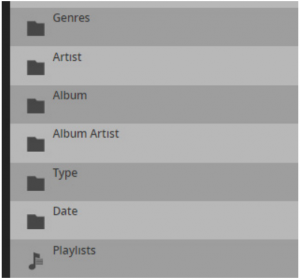
Clicking ![]() brings up the Artist View which lists artists down the narrow left column. Clicking on any artist displays albums by that artist.
brings up the Artist View which lists artists down the narrow left column. Clicking on any artist displays albums by that artist.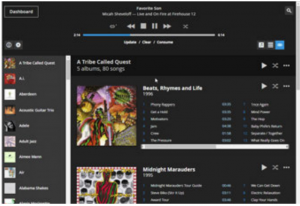
Configuring Music Library
The BDA-3.14 integrated player can access music from an unusually broad variety of sources including USB disk and Network Attached Storage. Streaming services Tidal and Qobuz are supported (within regions in which these services are available). Internet Radio including a lossless stream from Radio Paradise, Roon, Shareport-Sync (an Airplay emulator) and other services are also supported.
USB Disk
USB thumb drives, portable and self powered hard drives, and SSDs are all compatible. Plug your drive into one of the USB Accessory ports. Note that the maximum current draw from these ports is limited. It is probably better to consolidate your library to a single drive rather than across mulitple drives. This becomes especially important if you are using a wifi dongle. When using a wifi dongle, using network attached storage or a desktop model hard drive with its own power supply is considered mandatory in order to adequately power the wifi dongle..
Simply connect your drive and the BDA-3.14 will automatically scan the drive for all compatible audio files.
Network Attached Storage
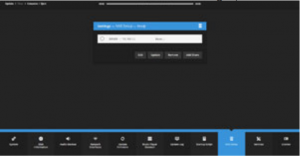
SMB or AFP shares available on the network can be connected by using the NAS Setup menu located at the bottom of the Dashboard.
- Click the Add Share button to bring up the menu.
- Select the correct device found on your network that contains your music. The fields will automatically populate based on your selection. Add user name and password for your network share if required then click Next.
- Choose the desired available shared folder on your selected device using the drop down menu.Click Next, and the BDP will return to the NAS Setup menu start page and the BDA-3.14 will begin indexing the music in the share.
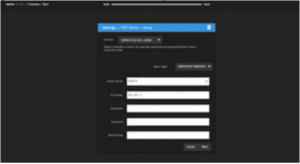
Tidal / Qobuz Login
- Enter the Media Player area of the web UI by clicking Media Player in the top right corner.
- Click the Media Player Settings icon.
- Expand the Tidal and/or Qobuz menu. Enter your login and password for the respective service and choose the sound quality level that corresponds with your subscription. Click Save.
Internet Radio
Internet Radio is accessible through Radio in Default View. Stations are sorted by genre and subgenre.Each station’s streaming bitrate is indicated so you can gauge sound quality. Radio Paradise is a listener supported popular eclectic station which is available in lossless FLAC streaming. This station is accessible through Radio as well with a special link.
You may use any one, all, or any combination of these elements in your music library. They are all accessible from the Media Player Default View. In fact, you can add music to your Now Playing queue from any of these sources at once so that, for example, your playlist may contain songs from your local library, Tidal, Qobuz, and perhaps finish with an internet radio station to keep music going after your specially selected playlist is exhausted.
Front Panel
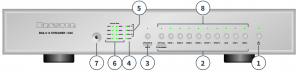
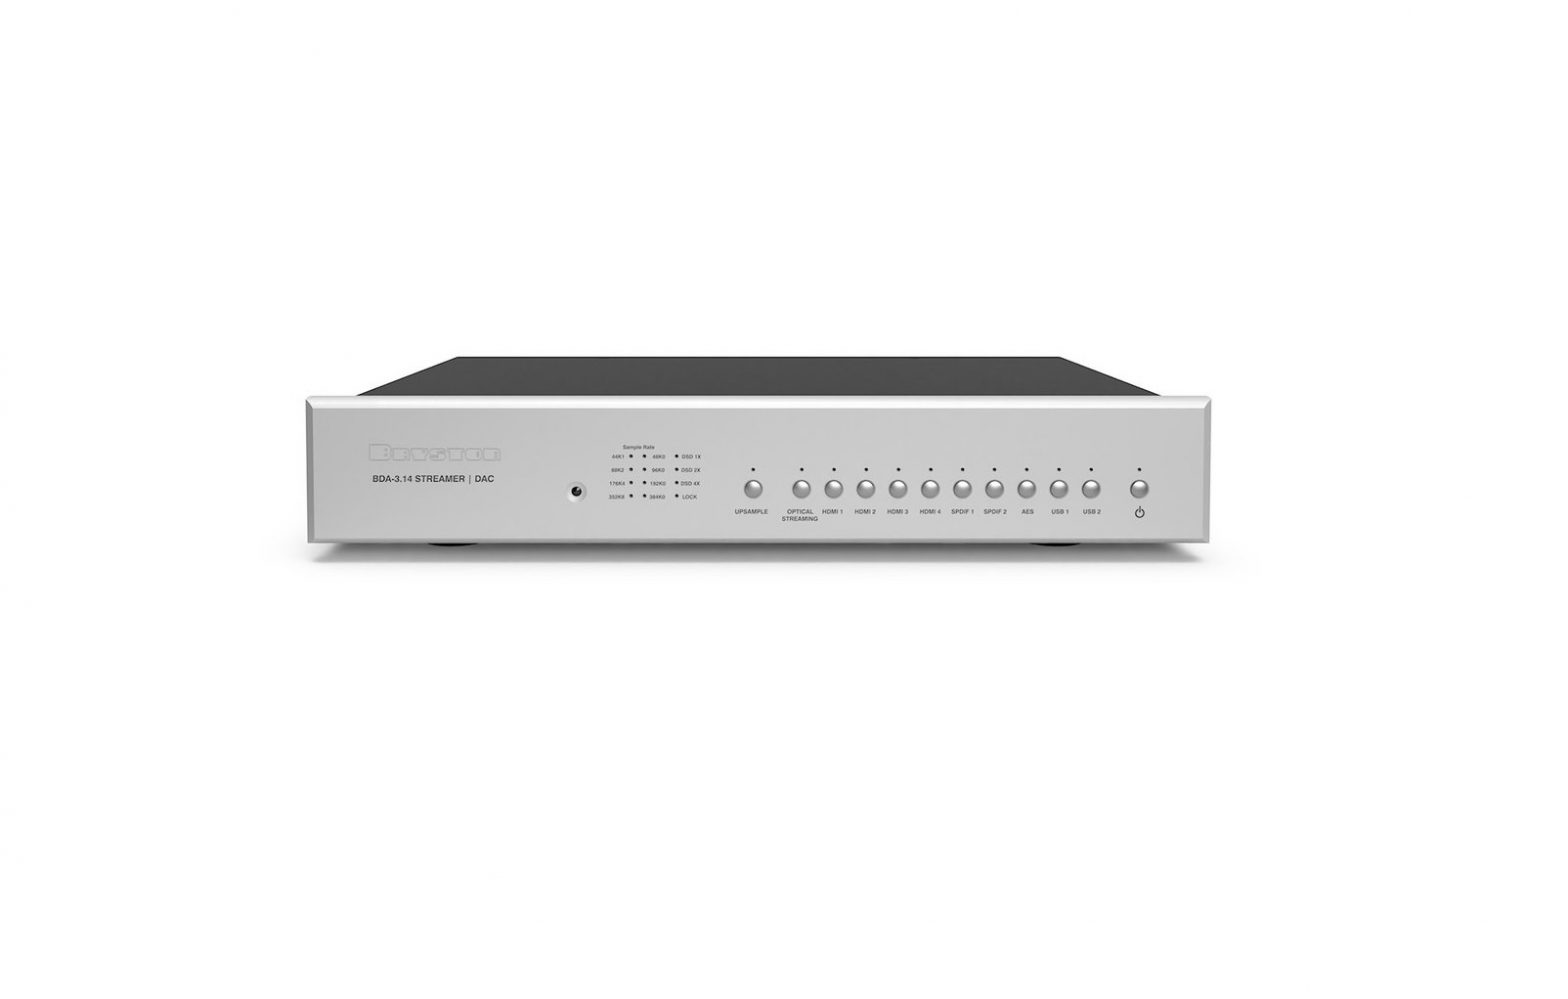
1. Power / StandbyPress this button to toggle the BDA-3.14 on or into standby mode.Unlit: BDA-3.14 is not receiving power. Plug unit into AC mains power.Red Plugged into AC Mains but in standby mode.Green: BDA-3.14 is on and operational.Blinking: Secondary power supply failure. ContactRed: Bryston technical support.2. Input SelectorTen input select buttons each have corresponding LEDs above them. Each button is labeled with a name corresponding to an input on the back panel. Pressing an input button activates that input and the BDA-3.14 receives digital audio from the source component connected to that input. The input’s LED will light green when active and receiving audio and will light red when active but no audio is present on that input. Only one input can be active at a time. Input 1 (Optical / Streaming) can be toggled between the optical input on the rear or the internal streamer. When lit yellow, the streamer is selected.3. Upsample / MutePress to toggle an optional upsampling mode. When engaged, the internal sample rate converter upsamples incoming 44.1kHz and 88.2kHz digital audio to 176.4kHz. In this mode, the upsample LED lights amber. All 48kHz and 96kHz digital audio upsamples to 192kHz and the LED lights green. When disengaged, the LED is not lit. The Upsample feature does not affect the internal streamer, HDMI or USB. When upsample is lit RED, it indicates the unit is muted.4. Lock IndicatorCheck that the BDA-3.14 is properly synchronized with the digital source component selected by observing the Lock LED. If lit green, the DAC and selected source are properly synchronized, therefore the BDA-3.14 is properly receiving audio and should therefore be producing analog output. If it is unlit, check that the source component is playing and is properly connected to the selected input. When blinking red, it indicates that the internal streamer is booting up and not yet ready.5. DSD Input IndicatorWhen the BDA-3.14 is receiving DSD audio from the selected source, the incoming data rate is indicated by a lit LED. DSD x1, DSD x2 and DSD x4 are interchangeably referred to as DSD-64, DSD-128, and DSD-256 respectively. When the incoming format is native DSD, the LED lights amber. When the incoming format is DSD over PCM, the LED lights green.6. PCM Input IndicatorWhen the BDA-3.14 is receiving PCM audio from the selected source, the incoming data rate is indicated by a green lit LED. 44k1 indicates 44,100 samples per second, 48k0 indicates 48,000 samples per second, etc.7. Infrared ReceiverThe BDA-3.14 can be controlled by an IR remote control such as models provided by Bryston or third-party manufacturers. Refer to “Remote Control” on page 16 for a table of available commands.8. Input LED IndicatorsWhile these normally indicate which input is selected (Green when signal is present, Red when no signal is present), the 10 input LEDs can also act as a volume control scale while the volume is being adjusted. The BDA-3.14 is calibrated so that the top 30dB of the volume range is represented by the scale. While the volume is being adjusted up the LEDs will begin progressively lightning yellow from left to right to indicate that the volume is rising. The opposite is true while volume is actively being decreased.
Rear Panel
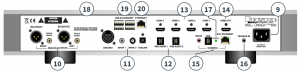
9. A/C InputAn IEC-320 C14 power inlet provides for connection of an IEC-320 C13 equipped power cord. Before connecting the power cord, check that the voltage rating on the data plate conforms with your locality. Upon applying power, the BDA-3.14 will enter standby mode. See “Connecting to A/C Power” on Check above.10. Analog OutputsBalanced and single ended analog output are provided via respective left/right pairs of XLR and RCA jacks. When using a separate preamplifier, be sure to set the default volume to 100%. When using the BDA-3.14 connected directly to an amplifier, note that the default startup volume is -60dB but can be changed in the webUI Audio Devices settings menu.11. Digital Audio InputsFour traditional digital inputs are provided to receive audio from source components. Each corresponds to a matching source selector button on the front panel.AES/EBU: 110Ω Balanced XLRS/PDIF 1: 75Ω Coaxial RCAS/PDIF 2: 75Ω Coaxial BNCToslink: Toslink Fiber Optic12. USB Audio InputsTwo “Type B” USB Class 2.0 Audio inputs are available to receive audio from computers, media servers or other compatible source components. See “USB Audio” on Check above.13. HDMI InputsFour HDMI inputs are available. 1 through 3 are each version 1.4a and HDCP version 2.0. Input 4 is HDCP 2.2 compliant. They may receive PCM or DSD audio, but not surround formats. See “HDMI Audio” Check above.14. HDMI OutputWhen an HDMI input is selected, the output will pass video signals along to the next connected HDMI receiver such as a television or surround processor. See “HDMI Passthrough” Check above.15. Control InterfacesThree two-way control interfaces are available to enable BDA-3.14 control by home automation systems. See “Remote Control” on Check down below for connection diagrams and protocol details.16. Trigger InputPower/Standby can be toggled from a master component such as a preamp using this input. The connector is a standard 3.5mm tip sleeve commonly referred to as a “mono mini plug”.Signal should be AC or DC between 3 and 12 volts. When voltage is present at the tip, the BDA-3.14 will remain powered on. The BDA-3.14 powers off when voltage is removed.17. Status LEDLED lights to indicate the following status:Red: Standby Green: OnAmber: Starting up Blinking Amber: Updating firmwareBlue: Self programing. Do not power of18. Data PlateThe data plate indicates hardware version, serial number, and A/C mains voltage of your unit.19. USB AccessoryThese 4 USB inputs can be used to attach drives for the internal media player, a wireless adapter, or a BOT optical drive. Note that the maximum combined current draw from all available accessories is 2A. If you use a portable hard drive (one without a separate power supply), we advise you do not use any other unpowered accessories attached. Consequently, if you need to use a wireless adapter, we advise you use either a self powered drive or NAS for your music storage.20. EthernetThis is the primary network connection for the BDA-3.14. When connected to the network, you can control all aspects of the built in media player, change inputs, control volume, and apply firmware updates
Firmware Update
As with all Bryston products, the BDA-3.14 may receive occasional firmware updates to ensure reliable operation and add new features. You will be alerted of new firmware available by a message on the Dashboard of the webUI
To update the firmware: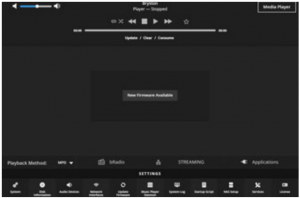
- Click the Update Firmware button at the bottom of the page beneath Settings.
- If you wish, you can review the release notes to see what has changed. Then click “Update” to proceed. The BDA-3.14 will download and install the update, then reboot itself automatically.

SVC Ethernet WebUI
A simple webUI is provided when the SVC Ethernet jack is plugged into your local area network that provides the user with access to volume, source selection, BCON side firmware updates, ability to rename inputs and a command terminal. Access this webUI by using your web browser to visit http://my.bryston.com Click the link called BDA3BC. Click (or tap) and hold any input to rename that input. For example, maybe you want HDMI 1 to read SACD instead. Simply click and tap on an input to change to that input. Volume can be adjusted by either tapping the buttons on either side of the slider, or by grabbing the slider itself.
Windows Driver Installation
When using a Windows based external media player connected to the USB Audio inputs, you will need to install a USB Audio Driver on the media player.Unlike Macintosh and Linux systems which include device drivers which automatically recognize high resolution audio devices, using the BDA-3.14 at the highest possible resolutions with Windows based computers and music servers requires installation of the Bryston USB driver. The provided driver is compatible with Windows 7 or later versions.
Bryston provides this driver on our website at http://www.bryston.com/drivers.
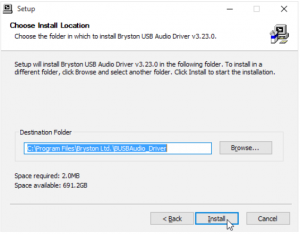
To install the driver follow these instructions:
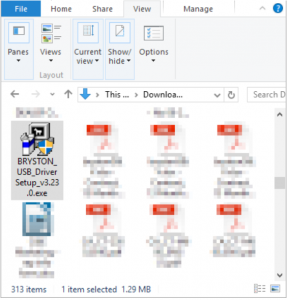
- Download the driver to a memorable folder such as Downloads or your desktop.
- Using File Explorer, navigate to that folder and double click the file titled BRYSTON_USB_DriverSetup_v (obtained version number).exe
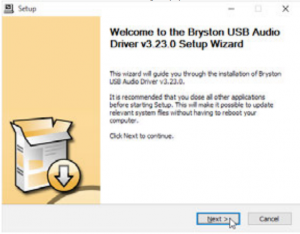
- User Account Control will ask you “Do you want to allow this application to make changes to your PC?” Click YES.
- The installation process will initialize. Read the instructions as they appear and click NEXT.
- You will then be asked to confirm or change the installation directory for the driver. Click Next once done.
- Installation will continue during which time you will be able to monitor progress. Click NEXT to continue when prompted.
- Upon successful installation, you will be asked to disconnect and reconnect your BDA-3.14 unless you have not already connected it. Connect the DAC and click NO to detect the BDA3.

Configuring Playback Software
Now that your driver is installed, you will need to configure your playback software to address the BDA-3.14 as the sound output device. Unless your goal is for the BDA-3.14 to play all audio from the computer, you will most likely want to configure your audio playback software to take exclusive control over the BDA-3.14 for the best possible sound quality. You should refer to the help files associated with the software for specific setup instructions, but the basics for JRiver Media Center and Foobar 2000 are included below.
JRiver Media Center: Windows
- Open Jriver Media Center.
- Press Ctrl+O or go to ‘Tools’ then ‘Options’
- In the left column, choose the ‘Audio’ category of options, then click ‘Audio Device’
- Select Bryston BDA-3.14 (ASIO) from the drop down menu. Do not choose BDA-3.14 (Direct Sound) since that engages the system audio mixer which defeats the bit-perfect nature of playback and is detrimental to sound quality.
- Click ‘Device settings’ and check the ‘Maximize Device Volume During Playback’ box.
- JRiver audio playback should now be routed through the connected USB input.
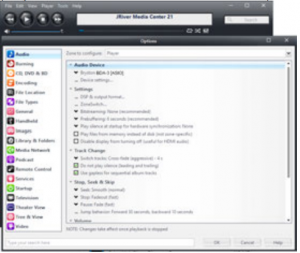
Note that the WASAPI driver will not pass native DSD, only DSD over PCM (DoP).
JRiver Media Center: OSX
- Select Audio Device BDA3 Audio 2.0 [CoreAudio].
- In Device Settings, check the boxes indicating that the device should be opened with Exclusive Access and Integer Mode should be used.
- Set Bitstreaming to Yes (DSD) presuming you wish to also play DSD program material.
- In DSP Studio, enable Output Format. Output Encoding should be none. For all sample rates 384,000 and below, Output should be No Change
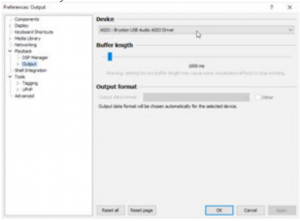
Foobar 2000
In order for Foobar 2000 to best address the BDA3.14, you will need to install the ASIO support plugin available on the Foobar 2000 website.
- Open Foobar 2000.
- Press Ctrl+P or go to ‘File’ then ‘Preferences’.
- In the left column, select the ‘Playback’ settings category, then click ‘Output’.
- From the ‘Device’ dropdown menu, select ASIO : Bryston USB Audio ASIO Driver.
Remote Control
The BDA-3.14 can be controlled and monitored through a variety of mechanisms including TCP/ IP when connected to your local area network, USB, RS232, DC trigger, and IR. When using TCP/ IP, connect the SVC Ethernet port to the network as well as the standard port. SVC Ethernet interface IP address should be used to issue commands.
Serial Protocol
The BDA-3.14 can receive commands and can send responses to each command. It can also (optionally) broadcast automatic responses to certain system events such as front panel button presses. Commands can be sent over RS232, RS485 (with an RS232 to RS485 interface) and TCP/IP using HTTPcmd.cg.
The RS232 input is a 3.5mm mini-jack configured as:
Tip Ring SleeveTransmit Receive Ground
Command Format

![]() The command format always begins with a command start character.
The command format always begins with a command start character.![]() The next two digits are the Device ID. The first of which is always “3” for BDA-3.14s, and the second will be “0” except when using RS232/RS485 in a multi-drop configuration.
The next two digits are the Device ID. The first of which is always “3” for BDA-3.14s, and the second will be “0” except when using RS232/RS485 in a multi-drop configuration.![]() Next are C1 through C4 which comprise the command name. These are typically uppercase ASCII letters.
Next are C1 through C4 which comprise the command name. These are typically uppercase ASCII letters.![]() Following the command name are the arguments or parameters for that command. These are two or more ASCII characters.
Following the command name are the arguments or parameters for that command. These are two or more ASCII characters.![]() The command is always terminated with a
The command is always terminated with a
| Example of power up command in RS232: #30MPWR01<CR>Example of power up command in TCP/IP: %2330MPWR01. |
carriage return character. For RS232, this is ASCII code 13. TCP/IP commands are terminated with a period (.) Responses are returned in the same format as commands. Note that responses may contain up to 320 characters. All characters preceding the # or %23 and following or . are ignored. Do not insert #, spaces, , or other non-ASCII characters inside the command string. The following are selected commands most useful for setup and everyday operation. Find complete documentation by accessing the BDA-3.14 over your local area network or by contacting Bryston.
| Comm. | Param. | Description |
| MMUT | Muting of audio | |
| 00 | Mute Off | |
| 01 | Mute On | |
| 02 | Mute Toggle | |
| QS | Query Status | |
| MPWR | Switch between On and Standby | |
| 00 | Off (standby) | |
| 01 | On | |
| 02 | Toggle On/Standby | |
| QS | Query Status | |
| MSRC | Select Input Source | |
| 00 | Opto (TOSLINK) | |
| 01-04 | HDMI 1 through HDMI 4 | |
| 05-06 | SPDIF 1, SPDIF 2 | |
| 07 | AES/EBU | |
| 08-09 | USB 1, USB 2 | |
| QS | Returns the currently selected
source. |
|
| PTHD | Pass through AV of HDMI Source while listening to non-HDMI
input. |
|
| 01-04 | HDMI 1 through HDMI 4 | |
| MVOL | Adjusts volume up or down. | |
| UP | Volume up in 0.5dB increments | |
| DN | Vol down in 0.5dB increments | |
| xxx | Set to any value between 095
(-80dB) and 255 (0dB) |
|
| QS | Query status |
Network Access
You may connect your BDA-3.14 SVC Ethernet port to your local area network using CAT5 or better cable to facilitate use of the built in web-based user interface or to control and monitor the unit using an automation system. Once connected to the network, you may access the web user interface with a web browser by entering the IP address into the address bar. For web browsers that do not support zeroconf networking (Android phones, etc.), you may identify the numerical IP address of your player by using the LEDs above each of the 10 input buttons. Opto represents numeral 0 and USB2 represents numeral 9.
- Press an unused input button (except USB2) 5 times. The first digit in your IP address will light amber.
- Press USB2 to see subsequent digits. The decimals in an IP address result in no LEDs lit.
- Press the power button to return the front panel to normal operation.
Example: the IP address 192.168.3.4 will show amber LEDs above the following inputs one at a time in order:HDMI 1, USB 2, HDMI 2, (blank), HDMI 1, SPDIF 2, USB 1, (blank), HDMI3, (blank), HDMI4
IR Control
You may control the BDA-3.14 with the included remote control.
To use a Bryston BR2 with the BDA-3.14, press the D/A button. You can use the BR2 to select the inputs SPDIF 1 and 2, TOSLINK, AES/EBU, and USB1. You can also set upsampling on or off. The BR2 will not let you select the HDMI inputs or USB2.
To program a universal remote, use the following codes:
| 015 | Select HDMI 1 | 031 | Power ON |
| 016 | Select HDMI 2 | 032 | Power OFF (STBY) |
| 017 | Select HDMI 3 | 030 | Toggle Upsample |
| 018 | Select HDMI 4 | 033 | Upsample ON |
| 028 | Select USB 1 | 034 | Upsample OFF |
| 014 | Select USB 2 | 035 | HDMI1 Pass through |
| 021 | Select Opto | 036 | HDMI2 Pass through |
| 023 | Select SPDIF 1 | 037 | HDMI3 Pass through |
| 024 | Select SPDIF 2 | 034 | HDMI4 Pass through |
| 027 | Select AES/EBU | 241 | Enable ext. trigger |
| 029 | Toggle Power | 242 | Disable ext. trigger |
Specifications and Dimensions
| Output Voltage | Balanced: 4.0VSingle Ended: 2.0V |
| Frequency Response | 20Hz – 20kHz: ± 0.1dB |
| Noise | Balanced Out: -140dBSingle Ended Out: |
| IMD | ≤0.0003% |
| THD + Noise | 20Hz-20kHz: ≤0.002% |
| Weight | 4kg | 8.75lbs |
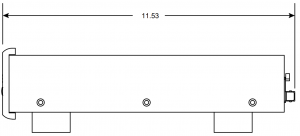
| Dimensions (See Diagram) | Inches: 17 or 19 W x 3.325 H x 11.53 DCm: 43. or 48.3 W x 8.5 H x 29.3 D |
Bryston Limited | 677 Neal Drive | Peterborough, Ontario K9J 6X7Canada | Phone: 705-742-5325 | www.bryston.com
References
[xyz-ips snippet=”download-snippet”]