HYBRIDLASER/GPS RANGEFINDER
 Model # 201835
Care and MaintenanceTo help ensure reliable operation, the following care and maintenance guidelines are recommended :
- Avoid exposing the unit to extreme environmental conditions for a prolonged period of time. The unit is IPX4 rated and resistant against water splashes from any direction, but is not fully waterproof and should not be submerged in water at any depth, or exposed to heavy rain or other strong streams of water.
- Avoid severe impacts on the unit.
- You may clean the unit occasionally with a soft, damp cloth.
- DO NOT expose the unit to strong chemicals such as gasoline and alcohol, as they will damage the unit.
- Store the unit in a dry place when it is not in use.
WARNINGDo not attempt to open the Hybrid.Risk of explosion if the battery is replaced with an incorrect type.
- Do not attempt to open, disassemble or service the internal battery. The battery must be replaced by a qualified technician.
- Do not crush, puncture or short the battery’s external contacts. Do not expose to temperatures above 140°F (60ºC).
- Properly recycle or dispose of the battery. Do not dispose of it in fire or water.
Legal DisclaimerBy using this product, you agree that Bushnell Outdoor Products will not be held legally responsible for any injury or damage to you or any person or property caused by the user’s improper operation and/or poor judgment while using this product. Note: See Limited Warranty for other limitations to our liability.Additional InformationThe Global Positioning System (GPS), a network of 32 satellites orbiting Earth, is operated and maintained by the U.S. government. This GPS device requires at least 3 satellites to be acquired to accurately determine your position. Any change made to the system by the government could affect the accuracy and performance of this product.Bushnell Golf Websitewww.bushnellgolf.com is the best online resource for all our Golf GPS and laser rangefinder product owners, including product support, FAQs, etc. It also serves as a portal to access iGolf.com GPS course files to use with the Bushnell GPS products. Registering your Hybrid via www.bushnell.igolf.com is not required, but will ensure you have access to the latest updated GPS course data.

| 1. GOLF Button/GPS Power2. MENU Button3. UP Button4. DOWN Button5. SELECT Button6. GPS Display | 7. Laser Monocular8. FIRE Button/Laser Power9. Laser Display Diopter Adjustment10. Laser Eyepiece11. Battery Compartment Cap (Laser Battery)12. USB Port (GPS Battery Charging) |
ABOUT THE BUSHNELL HYBRID
Your HYBRID is Bushnell’s newest addition to its line of rangefinders for today’s golfer. It combines the tournament-proven Bushnell laser technology with the latest golf course GPS database access in a single compact, convenient unit-truly the best of both worlds. View the distances to the front and back of a hole automatically, at the same time as you verify distance to the flag (or anything else) with 1-yard “Pinseeker” accuracy. Check the distance to nearby hazards, preview the stats for the next hole, even “walk-off” your shot distance quickly and easily. The Hybrid not only gives you the choice of laser or GPS rangefinding, it lets you experience the synergy of using both at the same time.NOTE: the Laser and GPS rangefinder sections of the Hybrid each have their own independent battery, due to the high current requirements of the infrared laser circuitry. The laser is powered by a non-rechargeable, replaceable 3V lithium CR2 battery (provided and installed). The GPS section is powered by an internal rechargeable lithium-ion battery, which must be charged prior to using the GPS functions, using the provided USB charger.
USING THE LASER RANGEFINDER
INTRODUCTIONYour HYBRID features PinSeeker™ technology with JOLT™, allowing the golfer to easily and quickly “zero” in on the flag without acquiring background targets. The HYBRID weighs a mere 6 ounces and is made to fit into the palm of your hand. HYBRID also features an adjustable eyepiece, 5X magnification, and is capable of providing range measurements from 5 to 1300 yards (300 yds to a golf flag) with incredible one-yard accuracy! Like other Bushnell laser rangefinders, the HYBRID is not dependent upon reflectors and will provide distances to trees, bunkers, and virtually any object on any golf course in the world.Note: You will get both longer and shorter maximum distances depending on the reflective properties of the particular target and the environmental conditions at the time the distance of an object is being measured. The color, surface finish, size, and shape of the target all affect reflectivity and range. The brighter the color, the longer the range. Red is highly reflective, for example, and allows longer ranges than the color black, which is the least reflective color. A shiny finish provides more range than a dull one. A small target is more difficult to range than a larger target. The angle to the target also has an effect. Shooting to a target at a 90-degree angle (where the target surface is perpendicular to the flight path of the emitted energy pulses) provides good range while a steep angle, on the other hand, provides limited ranging. In addition, lighting conditions (e.g. the amount of sunlight) will affect the ranging capabilities of the unit. The less light (e.g. overcast skies) the farther the unit’s maximum range will be. Conversely, very sunny days will decrease the unit’s maximum range.
HOW OUR DIGITAL TECHNOLOGY WORKS
The HYBRID emits invisible, eye-safe, infrared energy pulses. The HYBRID’s Advanced Digital microprocessor and ASIC chip (Application-Specific Integrated Circuit) results in instantaneous and accurate readings every time. Sophisticated digital technology instantaneously calculates distances by measuring the time it takes for each pulse to travel from the rangefinder to the target, and back.OPTICAL DESIGNThe HYBRID monocular features 5x magnification and multi-coated optics. A liquid crystal display (LCD) is mounted within the optical system and when activated, displays a reticle for targeting, yards/meters, and Pinseeker (flag icon) indicators. Inherent in the manufacturing process are small black spots that may appear in the laser optical system. These are natural characteristics of the LCD and cannot be fully eliminated in the manufacturing process. They do not affect the ranging performance of the unit.BATTERY REPLACEMENTYour HYBRID comes with a battery already installed, but you need to remove a red plastic disc (contact protector) before it will work. To do this, remove the battery compartment cap (11) by lifting the battery cap tab and then rotating counterclockwise. Remove and discard the red plastic disc, then replace the battery cap. When the battery needs replacement, insert a CR2 3-volt lithium battery into the compartment negative end first, then replace the battery cap.NOTE: It is recommended that the battery be replaced at least once every 12 months.Low Battery Indicator: When one bar is shown on the battery icon in the laser display (to the left of the central aiming circle), the battery is low Full Charge and should be replaced. If the battery goes below the safe operating level (affecting the accuracy of readings), the battery icon will flash and the unit will not range. Note: the “BATTERY” item in the GPS system menu only indicates the state of charge for the internal rechargeable battery that powers the GPS circuitry, and has no connection to the CR2 battery that powers the laser section of the Hybrid.![]()
 ADJUSTING THE EYEPIECEYour HYBRID includes an adjustable diopter control that allows you to focus the LCD display for your eyesight, relative to the image. Simply rotate the diopter adjustment dial (9) located above/behind the eyepiece (10) until the reticle and object distanced to are both in focus to your eye.OPERATIONAL SUMMARY
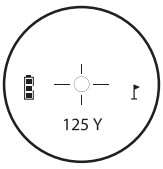 While looking through the eyepiece, depress the Power/FIRE button (8) once to activate the in-view Liquid Crystal Display (LCD). Place the aiming circle (located in the center of the field of view) upon a target at least 5 yards away, depress, and hold the FIRE button down until the range reading is displayed near the bottom of the in-view display. Crosshairs surrounding the aiming circle indicate that the laser is being transmitted. Once a range has been acquired, you can release the FIRE button. The crosshairs surrounding the aiming circle will disappear once the FIRE button has been released (i.e. the laser is no longer being transmitted). Once activated, the LCD will remain active and display the last distance measurement for 10 seconds. You can depress the power button again at any time to distance yourself to a new target. As with any laser device, it is not recommended to directly view the emissions for long periods of time with magnifying lenses. The maximum time the laser is transmitted (fired) is 10 seconds. To re-fire, press the FIRE button down again.
ACTIVE LASERCrosshairs surrounding the aiming circle indicate that the laser is being transmitted. Once a range has been acquired, you can release the POWER/FIRE button.The crosshairs surrounding the circle will disappear once the FIRE button has been released (i.e. the laser is no longer being transmitted).UNIT OF MEASURE (YARDS/METERS)Distances in the laser rangefinder are displayed in yards or meters (indicated by Y or M next to the distance readout). To select your preferred units, start with the unit powered off. Press and hold down the Power/FIRE button until you feel the “Jolt” vibration (about 7 seconds)-the “Y” (Yards) will blink. Continue to hold the FIRE button until you see the units switch to “M” (meters), then release it. Note: you can also use the YDS/MTR option under the SETUP menu in the GPS display, which also sets the units shown in the Laser display. Please see “Using the GPS Rangefinder” in this manual for more details..FRONT/BACK OF HOLE DISTANCES (VIA GPS DATA)In addition to the main distance to the flag at the center of the hole (or any other object you want to check with the laser rangefinder), distances to the FRONT and BACK of the current hole are also indicated at the top of the display, provided the GPS section of the Hybrid has been activated (internal battery charged, GOLF power switch pressed, satellite signal lock achieved, and a course selected). Please see “GPS Status/Data in the Laser Display” in this manual for more details.ABOUT JOLTThe Hybrid’s JOLT feature provides a vibration signal (similar to setting a cell phone to “vibrate”) that will be felt when the Pinseeker technology indicates the flag has been detected and the distance to it is displayed in the LCD.CLEANING THE LASER OPTICSGently blow away any dust or debris on the monocular objective (7) and eyepiece (10) lenses (or use a soft lens brush). To remove dirt or fingerprints, clean with soft cotton or microfiber cloth, rubbing in a circular motion. Use of coarse cloth or unnecessary rubbing may scratch the lens surface and eventually cause permanent damage. For a more thorough cleaning, photographic lens tissue and photographic-type lens cleaning fluid or isopropyl alcohol may be used. Always apply the fluid to the cleaning cloth – never directly on the lens.LASER RANGEFINDER SPECIFICATIONS:Ranging Accuracy: +/- 1 yardMinimum Range: 5 Yards/4.6 MetersMaximum Range: 1300 Yards/1189 Meters (to a highly reflective object)Range to Golf Flag: 300 Yards/274 MetersMagnification: 5xObjective Diameter: 20 mmOptical Coatings: Multi-Coated
USING THE GPS RANGEFINDER
CHARGING THE BATTERYThe internal lithium-ion battery must be charged prior to using the GPS rangefinder for the first time, or when the battery charge level is low. To charge the battery, pull the rubber cover-up from the USB port on the back of the unit (12). Connect the provided USB cable. Connect the other end of the cable to any standard smartphone charger and plug it into an AC outlet (110-120 volt). You can also charge the Hybrid GPS via an open USB port on your computer, a powered USB hub (these methods will charge the battery more slowly than smartphone chargers). A scrolling battery icon on the BATTERY level display screen (selected from the PLAY GOLF or SET UP menu) will indicate that your HYBRID is charging. The GPS display indicates “Charging Complete” in approx. 3 hrs ( using a phone charger).The rechargeable battery of the HYBRID GPS section is long-lasting and provides up to 3 rounds of golf (based upon an average of 4 hours per round). However, battery life may be reduced due to a variety of factors (external temperature, etc). All rechargeable batteries lose their effective charge length over time. Charging your Hybrid’s GPS battery before the charge level drops below 20% will guarantee that you will be able to make it through the entire next round. To check your remaining battery life at any time, press the MENU button (2) and select BATTERY (press the DOWN button to highlight it, then press SELECT).GETTING STARTED AND USING THE MENU SYSTEM
- First, be sure the battery has a full charge (see the previous section). If you are using it for the first time, it should be charged until full. Next, make sure you are outdoors, in a location with a clear view of the sky overhead, to ensure good reception of GPS satellite signals. Now, you’re ready to power up and use your Hybrid GPS features.
- Press and hold the GOLF button (1) on the side of the unit until it powers on. Press and hold the GOLF button again to turn off the power.
- The GPS display (6) will show the Main Menu, with three items listed: PLAY GOLF, BLUETOOTH, and SET UP.
- To navigate through the display menu system, use UP/DOWN buttons (3/4) to highlight the desired menu item, then press SELECT (5). Highlight the desired option or preference using UP/DOWN, then press SELECT to confirm/activate the new setting.
USING PLAY GOLF MODEAs you might expect, you will spend most of your time in “PLAY GOLF” mode when using the Hybrid’s GPS rangefinder section.
- Make sure you are outdoors, with an unobstructed view of the sky. Press and hold the GOLF button (1) until the GPS display powers on.
- With PLAY GOLF highlighted on the display (6), press the SELECT button (5). The GPS display will show ”SEARCHING” as the Hybrid looks for multiple available GPS satellite signals and locks onto them. Once locked (note that this can take several minutes the first time you use the Hybrid, but will be faster when used in the same general area in the future), you’ll see a list of course names.
- Use the UP/DOWN buttons to select (highlight) the course you want to play from the list of nearby courses (closest course at top of list), then press SELECT.
- The display then shows Current hole # (at upper left), Par for the hole (upper right), and distances to the center (large number at top center), front (lower left) and back (lower right) of green. Press UP or DOWN buttons to manually advance to the next hole (useful for “shotgun” starts), or go back to the previous hole.
- From this main PLAY GOLF screen, press SELECT again to view distances to up to 4 Hazard callouts per hole (varies depending on the number of significant hazards located near the currently selected hole on this course). See “Hazard Glossary” for a list of all abbreviations used to designate various hazards.
- From the Hazards screen, press the SELECT button to display the ROUND INFO screen. Here you can view the elapsed TIME OF PLAY or DISTANCE.
- Press SELECT once again to return to the main PLAY GOLF screen.
- To use the SHOT DISTANCE feature, press the GOLF (power) button (1) while at the tee (this is your start “point A”)-then as you walk towards your ball, the display will update to indicate distance from point A to your current location. This is useful to measure the length of your shot. Press SHOT again to set a new starting point (reset distance to “0”).
USING THE PLAY GOLF MENU
- From the main PLAY GOLF screen, press the MENU button (2) to view the PLAY GOLF MENU.
- Select an item from the menu (as listed below) using the UP or DOWN button to highlight it, then press the SELECT button.
- If multiple options are available for a setting, use UP/DOWN to highlight your choice, then press SELECT.
PLAY GOLF MENU ITEMS
- RESUME: from any screen, returns to the main PLAY GOLF screen, showing the current hole and distances based on your current position on the course.
- BATTERY*: view battery condition (charge %). (*also provided in the SETUP menu-see “Using The Set-Up Menu”)
- NEW COURSE: This allows you to select another golf course from the list.
- EXIT ROUND stops GPS course tracking, ends the current game.
BLUETOOTHThe Hybrid can connect to the BUSHNELL GOLF smartphone app via Bluetooth. Once connected the app can be used to configure the Hybrid and wirelessly update the Hybrid’s internal golf course database. The BUSHNELL GOLF app can be obtained from the Apple Store and Google Play store for iPhone and Android devices, respectively. Download and install the app on your mobile device. Go to the mobile devices’ settings page to turn on Bluetooth, then launch the BUSHNELL GOLF app. To connect your Hybrid to the smartphone app follow the steps below:
- On your smartphone, make sure you have Bluetooth turned on.
- On your Hybrid, use the UP/DOWN buttons to highlight BLUETOOTH from the Main Menu display, then press SELECT.
- Select “ON” to turn Bluetooth on (use UP/DOWN buttons to highlight “ON”, then press SELECT).
- Your Hybrid will then give you a code. Enter that code into the smartphone app when requested.
- Once paired correctly, your smartphone app will display a confirmation. The Hybrid is now paired with your smartphone.
USING THE SETUP MENU
- Highlight SET UP from the Main Menu screen (if you are in PLAY GOLF mode, press MENU and select EXIT ROUND to go to the Main Menu) and press SELECT.
- Select an item from the SETUP menu using the UP or DOWN button to highlight it, then press the SELECT button.
- If multiple options are available for a setting, use UP/DOWN to highlight your choice, then press SELECT.
- A solid checkbox to the left of a setting indicates the current setting (to change it, highlight a different setting, and press SELECT).
- Press the MENU button (2) to return to the SETUP menu screen.
SET UP MENU ITEMS
- YDS/MTR: press SELECT. The solid (filled in) checkbox indicates the current setting (default=YDS). To change how distances are displayed, highlight YARDS or METERS, press SELECT. This sets the unit display preference for both GPS and Laser sections of the Hybrid.
- AUTO-OFF: press SELECT. A solid checkbox indicates the current setting. Use the UP/DOWN buttons and press SELECT to change the setting. DISABLED (default setting)=unit will stay powered on until the user manually powers off by holding the PWR button. 1.5 HOUR to 9 HOUR=unit will automatically power off after the selected time period if no buttons have been pressed (or if the unit has not auto advanced to the next hole as you walk the course).NOTE: selecting an AUTO OFF time such as “8 HOUR” can help avoid running down the battery charge if you forget to power off after a round-but there is the possibility of losing GPS satellite contact, along with all data generated since your start of play if you select a time shorter than it takes to play your round.
- BACKLIGHT: Select ON to turn on the display backlight. The display will remain backlit for about 10 seconds, then go out until any button is pressed.
- BATTERY*: press the SELECT button to see battery condition (charge %). (*also provided in the PLAY GOLF menu)
- LANGUAGE: The Hybrid GPS display features 5 menu language settings (ENGLISH, SPANISH, GERMAN, FRENCH, ITALIAN). By default, the GPS menus are inEnglish. Press SELECT, use UP/DOWN to scroll between options on the Language menu, then press the SELECT button to confirm and set all menus to your preferred (highlighted) language.
- GPS STATUS: diagnostic use only, displays #, position, and signal strength of each satellite after GPS signal lock.
- ABOUT: press SELECT to display your unit’s firmware version, date of manufacture and other internal info.
- RESET DEVICE: to restore the unit to all of its original settings, press SELECT, then select DEFAULT SETTINGS and confirm you want to do this. The other twooptions under RESET DEVICE (CHECK UPDATE and REFORMAT) should only be used by qualified service technicians.
iGOLF HAZARD GLOSSARYHazards provided by the iGolf database for a course are shown as abbreviations. The HYBRID will provide up to 4 hazard callouts per hole. The abbreviations used to identify common hazards are as follows:
| 1. LFB- Left Fairway Bunker2. MFB- Middle Fairway Bunker3. RFB- Right Fairway Bunker4. LFW- Left Fairway Water Layup5. LFWC- Left Fairway Water Carry6. MFW- Middle Fairway Water Layup7. MFWC- Middle Fairway Water Carry8. RFW- Right Fairway Water Layup9. RFWC- Right Fairway Water Carry10. FGB- Front Green Bunker11. RGB- Right Green Bunker | 12. LGB- Left-Green Bunker13. BGB-Back Green Bunker14. RGW- Right Green Water15. FGWC- Front Green Water Carry16. FGW- Front Green Water Layup17. LGW- Left-Green Water18. BGW- Back Green Water19. CRK- Creek Layup20. CRKC- Creek Carry21. EOF- End of Fairway |
GPS STATUS/DATA IN THE LASER DISPLAY
At the top of the Laser Rangefinder display (as viewed in the eyepiece), data provided by the GPS section of the Hybrid can be seen. This is the key “synergy” advantage of the Hybrid. Here is a guide to what will be seen at the top of the display, based on the current status of the GPS system:
- GPS Powered Off: nothing will be shown at the top of the display (no dashes, distances, or hole#). The laser rangefinder will continue to work normally when the GPS is powered off.
- GPS Powered On, not searching for GPS signal (Fig. 1): Front and Back distances and hole # data shown as “static” dashed lines (motionless). Laser functions normally.

- GPS Powered On, searching for GPS signal: After the user selects “PLAY GOLF”, dashed lines for Front and Back distances start scrolling. Laser functions normally.
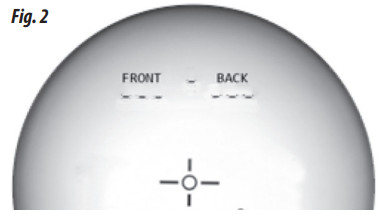
- GPS Powered On, GPS signal locked, course not selected or too distant (Fig. 2): Until user selects a valid course, labels “FRONT” and “BACK” are visible, with distances and hole # shown as static dashes. After selecting a course, Front and Back distances read “999” if the current location is too far from the course. Laser functions normally.
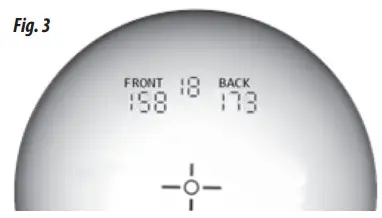
- GPS Powered On, GPS signal locked, course selected, a user on the selected course (Fig. 3): The top of the laser display now shows all valid GPS information, indicating the current hole# and your distance to the front and back of the hole (based on GPS course data and your location). The laser rangefinder is still used to determine and display (below the aiming circle) the distance to the center (flag) or other objects of interest.

GENERAL SPECIFICATIONS:Dimensions: 4.1 x 2.8 x 1.6 inches/ 105 x 72 x 41 mmWeight (inc CR2 battery): 6.1 oz/173gFor a list of applicable patents for this product, go to: http://patents.vistaoutdoor.com.
TROUBLESHOOTING
LASER RANGEFINDER SECTIONIf the laser does not turn on – the LCD display in the eyepiece does not activate:
- Depress the FIRE button.
- Check and if necessary, replace the battery.
- If the unit does not respond to keypresses, replace the battery with a new CR2 3-volt lithium battery.If unit powers down (display goes blank when attempting to power the laser):
- The battery is either weak or low quality. Replace the battery with a new CR2 3-volt lithium battery.
If target range cannot be obtained:
- Make sure LCD is illuminated.
- Make sure that the FIRE button is being depressed.
- Make sure that nothing, such as your hand or finger, is blocking the laser transmit/receive lenses (front of the unit, below monocular objective lens) that emit and receive the laser pulses.
- Make sure the unit is held steady while depressing the FIRE button.NOTE: The last range reading does not need to be cleared before ranging another target. Simply aim at the new target using the LCD’s reticle, depress the FIRE button, and hold until new range reading is displayed.
GPS RANGEFINDER SECTIONIf the unit does not receive a GPS signal/does not lock onto GPS satellites:
- Make sure you are using the Hybrid outdoors, with no overhanging roofs, trees, or other obstructions that might be blocking a clear view of the sky.
- The laser rangefinder will continue to function (assuming its battery is good). See “GPS Status/Data in the Laser Display” for a a detailed description of how the current GPS status is indicated in the laser rangefinder’s display.
If GPS display shows “999” for all distances:
- The GPS rangefinder makes its calculations of distance based on your real-time location. If you are 1000 yards or more from the golf course you have chosen, then the device will display ‘999’.
If the internal lithium-ion battery charges slowly or will not charge:
- Use the supplied AC charger or your smartphone’s charger. Charging via connection to a computer’s USB port or a USB hub is possible, but will charge the battery more slowly than using a dedicated charging device that plugs into an AC outlet.
- Under the vast majority of circumstances, the battery used in your Hybrid will provide years of trouble-free use, and will not need to be changed. The warranty on the Hybrid will be void if the consumer tries to change the battery. If you feel that your battery is going bad, please contact Bushnell Customer Service at [email protected].
If the unit shuts off before you are finished playing around:
- “Auto Off” may be set to a time period that is too short. In the GPS main menu, select “SET UP”, then scroll down to “AUTO OFF” and press SELECT. Highlight a time period that is somewhat longer than the time you expect to play golf (then press SELECT), or select “DISABLED” if you prefer to manually power off the Hybrid when you are done with the round.
If the unit does not auto-advance when moving to the next hole:
- This is usually caused by an inaccurate map of the course being stored in the device. Downloading the latest version of the course map should fix this problem. Or, you can press the “Up” button to manually advance the hole if this happens.
TWO-YEAR LIMITED WARRANTY
Your Bushnell golf rangefinder product is warranted to be free of defects in materials and workmanship for two years after the date of purchase. In the event of a defect under this warranty, we will, at our option, repair or replace the product, provided that you return the product postage prepaid. This warranty does not cover damages caused by misuse, improper handling, installation, or maintenance provided by someone other than a Bushnell Authorized Service Department.Any return made under this warranty must be accompanied by the items listed below:
- A check/money order in the amount of $10.00 to cover the cost of postage and handling.
- Name, address, and daytime phone # for product return.
- An explanation of the defect.
- Copy of your dated proof of purchase.
Do not send in accessories (batteries, case, etc.), only the product for repair.The product should be well packed in a sturdy outside shipping carton to prevent damage in transit, and shipped to the address listed below:
IN U.S.A. Send To:Bushnell Outdoor ProductsAttn.: Repairs9200 CodyOverland Park, Kansas 66214
IN CANADA Send To:Bushnell Outdoor ProductsAttn.: Repairs140 Great Gulf Drive, Unit BVaughan, Ontario L4K 5W1For products purchased outside the United States or Canada please contact your local dealer for applicable warranty information.In Europe, you may also contact Bushnell at:
Bushnell Germany GmbHEuropean Service CentreMathias-Brüggen-Str. 80D-50827 KölnGERMANYTel: +49 221 995568-0Fax: +49 221 995568-20
This warranty gives you specific legal rights.You may have other rights which vary from country to country.©2018 Bushnell Outdoor Products
Industry Canada Statement :This device complies with ISED’s license-exempt RSS. Operation is subject to the following two conditions: (1) This device may not cause harmful interference, and (2) this device must accept any interference received, including interference that may cause undesired operation.Radiation Exposure Statement / Déclaration d’exposition aux radiations :This device complies with the Industry Canada portable RF exposure limit set forth for an uncontrolled environment and is safe for the intended operation as described in thismanual. Further RF exposure reduction can be achieved if the product can be kept as far as possible from the user’s body or if the device is set to a lower output power if suchthe function is available.Android and Google Play are registered trademarks of Google Inc. in the United States and other countries.iPhone and Apple Store are trademarks of Apple Inc., registered in the U.S. and other countries.Other names may be trademarks of their respective owners.Specifications, instructions, and the operation of this product are subject to change without notice.
FCC StatementThis device complies with Part 15 of the FCC interference limits for Class B digital devices FOR HOME OR OFFICE USE. These limits are designed to provide reasonable protection against harmful interference in a residential installation and are more stringent than “outdoor” requirements.Operation of this device is subject to the following conditions; (1) This device may not cause harmful interference, and (2) this device must accept any interference received, including interference that may cause undesired operation.This equipment generates, uses, and can radiate radio frequency energy and, if not installed and used in accordance with the instructions, may cause harmful interference to radio communications. However, there is no guarantee that interference will not occur in a particular installation. If this equipment does cause harmful interference to radio or television reception, which can be determined by turning the equipment off and on, the user is encouraged to try to correct the interference by one or more of the following measures:
- Reorient or relocate the receiving antenna.
- Increase the separation between the equipment and receiver.
- Connect the equipment into an outlet on a circuit different from that to which the receiver is connected.
- Consult the dealer or an experienced radio/TV technician for help.
The device does not contain any user-serviceable parts. Repairs should only be made by an Authorized Bushnell repair center. Unauthorized repairs or modifications could result in permanent damage to the equipment, and will void your warranty and your authority to operate this device under Part 15 regulations.The shielded interface cable which is provided must be used with the equipment in order to comply with the limits for a digital device pursuant to Subpart B of Part 15 of FCC Rules.FCC RF Radiation Exposure Statement
- This Transmitter must not be co-located or operating in conjunction with any other antenna or transmitter.
- For body-worn operation, this device has been tested and meets FCC RF exposure guidelines. When used with an accessory that contains metal may not ensure compliance with FCC RF exposure guidelines.
 FCC ID: 2ABQG-1835IC: 5830A-1835
FDA SAFETYClass 1 laser product in accordance with IEC 60825-1:2007.Complies with 21 CFR 1040.10 and 1040.11 for laser products except for deviations pursuant to Laser Notice No. 50, dated June 24, 2007.Caution: There are no user controls, adjustments or procedures. Performance of procedures other than those specified herein may result in access to invisible laser light.Disposal of Electric and Electronic Equipment(Applicable in the EU and other European countries with separate collection systems) This equipment contains electric and/or electronic parts and must therefore not be disposed of as normal household waste. Instead, it should be disposed of at the respective collection points for recycling provided by the communities. For you, this is free of charge.If the equipment contains exchangeable (rechargeable) batteries, these too must be removed before and, if necessary, in turn, be disposed of according to the relevant regulations (see also the respective comments in this unit’s instructions).Further information about the subject is available at your community administration, your local waste collection company, or in the store where you purchased this equipment.
Customer Service: (800) 423-3537www.bushnellgolf.com©2018 Bushnell Outdoor Products
References
[xyz-ips snippet=”download-snippet”]