
Bushnell neo X GPS Rangefinder Watch

Care and Maintenance
The Neo X watch is durable and waterproof. To help ensure reliable operation, the following care and maintenance guidelines are recommended :
- Avoid exposing the watch to extreme environmental conditions for a prolonged period of time.
- Avoid severe impacts on the watch.
- You may clean the watch occasionally with a soft, damp cloth.
- Brush the clip contacts at the bottom of the watch regularly. Dirt build-up on the surface of the contact points may affect normal charging and data transfer. (*Note: Use a soft-bristled brush. Hard bristles or wire brushes may leave scratches on the watch).
- DO NOT expose the watch to strong chemicals such as gasoline and alcohol, as they will damage the watch.
- Store the watch in a dry place when it is not in use.
WARNINGDo not attempt to open the Neo X watch.Risk of explosion if battery is replaced with incorrect type.
- Do not attempt to open, disassemble or service the internal battery. The battery must be replaced by a qualified technician.
- Do not crush, puncture or short the battery’s external contacts. Do not expose to temperatures above 140o F (60o C).
- Properly recycle or dispose of the battery. Do not dispose in fire or water.
Legal DisclaimerBy using this product, you agree that Bushnell Outdoor Products will not be held legally responsible for any injury or damage to you or any person or property caused by the user’s improper operation and/or poor judgment while using this product.Note: See Limited Warranty for other limitations to our liability.
Additional InformationThe Global Positioning System (GPS), a network of 32 satellites orbiting Earth, is operated and maintained by the U.S. government. This GPS device requires at least 3 satellites to be acquired to accurately determine your position. Any change made to the system by the government could affect the accuracy and performance of this product.
Bushnell Golf GPS Websitewww.bushnellgolf.com is the best online resource for all our Golf GPS product owners, including product support, FAQs, etc. It also serves as a portal to access iGolf.com GPS course files to use with these Bushnell products. Registering your Neo X Watch via www.bushnell.igolf.com is not required, but will ensure you have access to the latest updated GPS course data.
Charging the Battery
The rechargeable battery of the Neo X Watch is long lasting and provides up to 15 hours of golf, or two years of use as an everyday (time only) watch. However, battery life may be reduced due to a variety of factors (external temperature, etc). All rechargeable batteries lose their effective charge length over time.
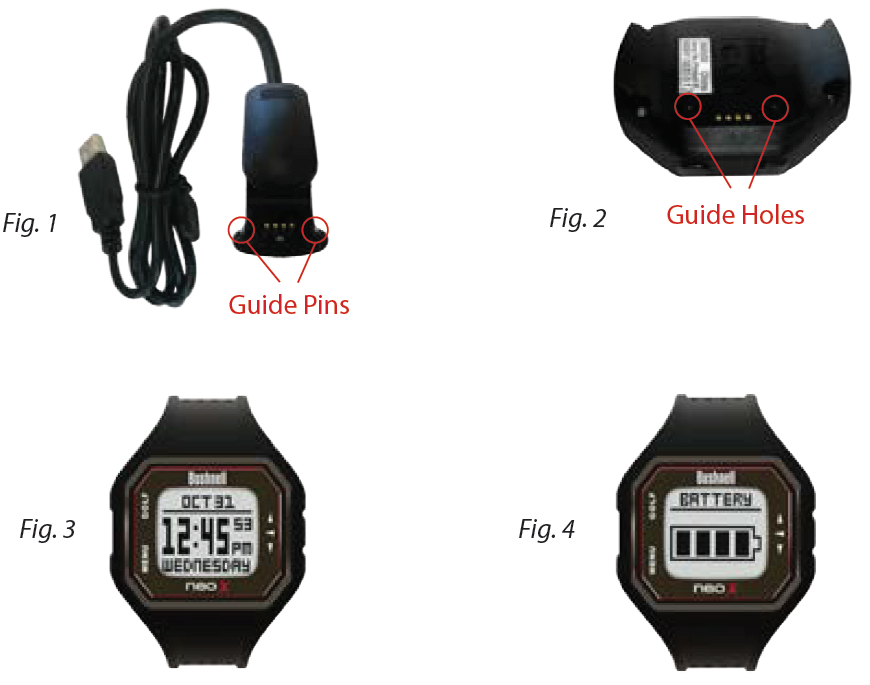
To check your remaining battery life, press the Menu button and select Battery. To recharge the battery, align the 2 guide pins (Fig.1) on the included USB clip with the guide holes on the back of the watch (Fig.2); this will auto-align the charging pins with the receptacles. Then, connect the clip to any USB port (computer, A/C charger, etc.). Look for the scrolling battery icon to indicate that your Neo X watch is charging (make sure to connect from either the Home (Time) screen or from the Battery screen.
Package Contents
- 1 – Bushnell Neo X GPS Rangefinder Watch
- 1 – USB/Charging Cable
- 1 – Quick Start Guide
Computer RequirementsUSB (1.1 or 2.0) PortOS: Windows (XP/Vista/7/8), Mac OS X 10.4 or newerBrowser (Course Downloads): Windows: Internet Explorer (32-Bit), Mac: Safari (32-Bit)
Firmware/Software UpdatesPlease check www.bushnellgolf.com periodically for the latest firmware and software releases.
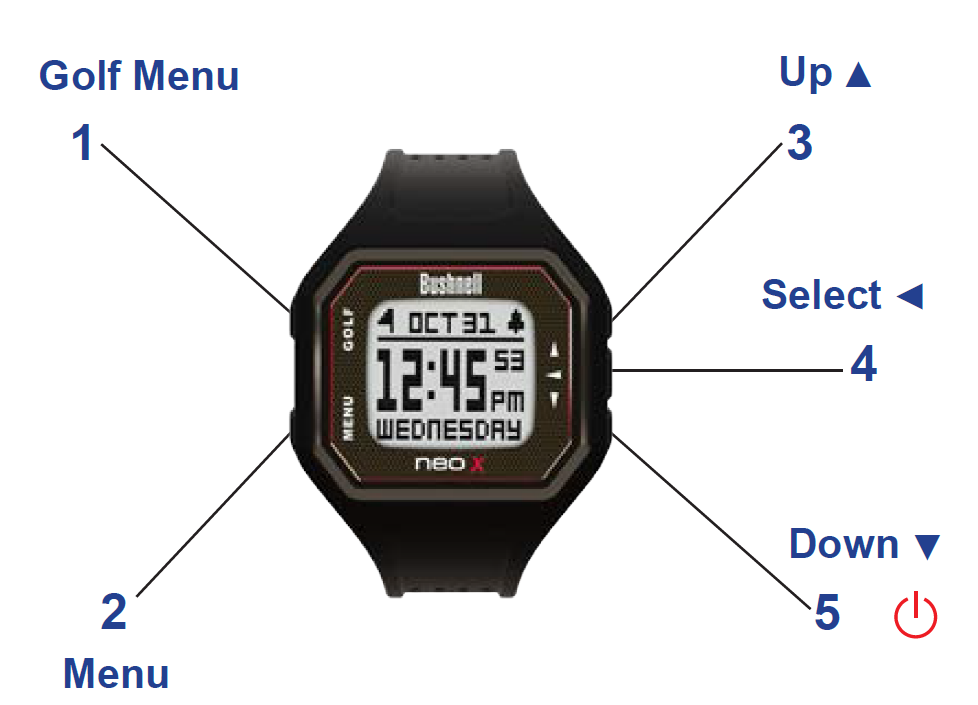
- Golf Menu Button: Takes you to the Golf Menu (See pgs. 6-9 for overview of the Golf Menu & Play Golf mode functionality)
- MENU Button: View Main Menu Options.
- ▲UP Button: Scrolls up through Menu items.
- SELECT ◄ Button: Selects from menu items.
- DOWN ▼ Button: Scrolls down through menu items. Press & hold (2 sec.) to power on/off.
*Note: Backlight is activated with any button push. The backlight will remain lit for 10 seconds after last button push. Backlight is disabled in Play Golf Mode.
Power On and Basic Operation
Ready to start using your Neo X Watch?
First, be sure the battery has a full charge. If you are using it for the first time, it should be charged until full (takes around 2.5 hours for a full charge). Next, make sure you are outdoors, in a location with a clear view of the sky overhead, to ensure good reception of GPS satellite signals. Now, you’re ready to power up and use your Neo X Watch.
- Press and hold the DOWN button (5) to power on the Neo X Watch.
- Press the GOLF MENU button (1).
- Scroll through the menu options by pressing the DOWN ▼ (5) and UP (3) buttons.
- Select the desired feature by pressing button
The Golf Menu is displayed as followsGOLF MENU: Play Golf*, Tee Time*, Setup*GPS feature- using these features requires a satellite signal. To ensure reception, make sure you are outdoors away from tall buildings and trees, with a clear view of the sky.
Using Play Golf Mode
- Press the GOLF MENU button (1) and select “Play Golf” at the top of GOLF MENU by pressing the SELECT button ◄ (4). The Neo X Watch will search for GPS satellite signal. Once satellite lock has been acquired, the Neo X Watch will display a list of up to 10 of the closest local courses.
- Scroll the course list with the DOWN button (3) ▼ and UP button ▲- (5), and select your course by pressing the SELECT button (4)◄ . You are now in “Play Golf” Mode. After selecting play golf mode, the AUTO OFF feature will start it’s countdown, if set (pg. 9).
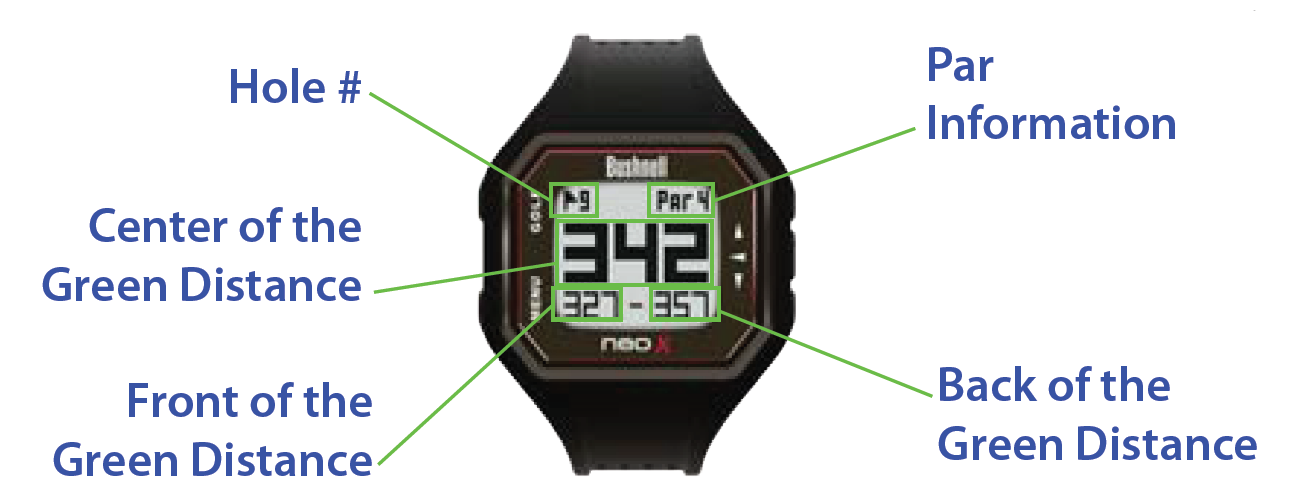
- After you’ve selected a course, the main screen will display Front, Center, and Back of the Green distances for Hole 1, as well as par information. NOTE: The maximum distance displays is 999 yds/m.
Button Functions in Play Golf Mode (Bottom Image)
Track Shot Distance: This feature allows you to easily check the distance between any two points and would normally be used to measure the length of your shot. Press the SHOT button (1) to set Point A (where you are standing) to “0”. After walking to your ball (Point B), the Neo X Watch will display the distance between Point A and Point B in a straight line.View Golf Menu Options: Press the MENU button (2) to view the Golf Menu options (Battery, New Course, or Exit Game). Press MENU again to return to your game.Manual Hole Advance: Press NEXT HOLE (3) to manually advance to the next hole, or press PREVIOUS HOLE (5) to manually advance to the previous hole. *Note: the Neo X does feature auto-advance; this one button advance feature is very useful for shotgun starts.
View Hazards/Round Information: Pressing the SELECT Butt ◄on (4) will toggle between Hazards, Round Info, and the FCB (Front, Center, Back) pages. Hazard and Round Info screens will automatically return to FCB after 7 seconds if no other button is pushed. Round Info is a Golf Odometer that tracks total round time and distance travelled.

TEE TIME
Tee Time is a useful feature that allows you to set a tee time up to 1 week (6 days, 23 hours, 59 minutes) in advance. When a Tee Time is set, the Neo X watch will automatically enter Play Golf mode, and search for local courses 7 minutes prior to the set time. Simply select your course from the list, and enjoy your round of golf!
To set a Tee Time, select Tee Time from the Golf Menu (Fig.1). From the set Tee Time screen, press the SELECT Butt ◄on (4) to activate the Hours field. Use the UP Button ▲ (3) and the DOWN Button ▼ (5) to toggle the time up and down. Press the SELECT Butt ◄on (4) after each field is set to toggle to the next field. After the Day field has been set, the Tee Time feature has been activated, and will show ON. A Flag Icon will also appear in the upper left-hand corner of the Home (Time) screen indicating that a Tee Time is set (Fig. 2).
*Note: The Tee Time feature is a one-time setting, meaning once the Tee Time has performed it’s function, it will not reactivate. To set another Tee Time, follow the steps above. If you play golf at the same time on the same day each week, you can simply select Tee Time from the Golf Menu, then press the UP Button (3) ▲ to turn the Tee Time ON again (pressing the UP Button ▲ (3) toggles Tee Time ON/OFF based upon the current Time/Day settings).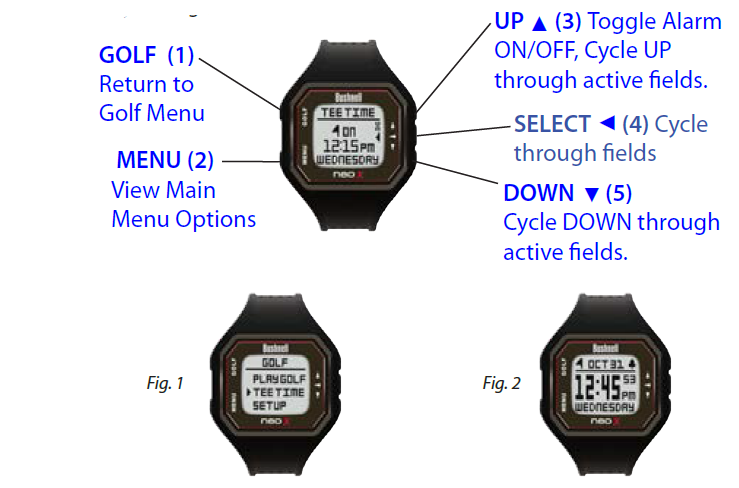
SETUP
The Setup menu allows you to set your preferences for units of measurement in Play Golf mode (Yards or Meters), set the Auto-Off time, or view Battery life. To access the Setup Menu, select Setup from the Golf Menu. Use the UP Butt ▲on (3) and the Down Butt ▼on (5) to scroll between options. Use the Select Butt ◄on (4) to select the desired option.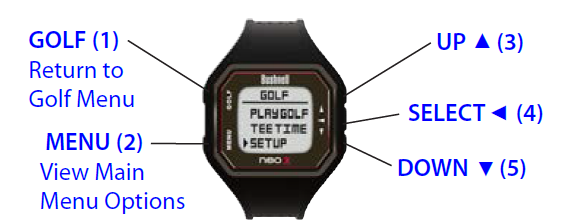
YDS/M
Select YDS/M to set your preference for unit of measurement in Play Golf Mode. Use the UP Butt ▲on (3) and the Down Butt ▼on (5) to scroll between options (Fig 1). Use the Select Butt ◄on (4) to select the desired option.
AUTO-OFF
The Auto-Off feature is designed to automatically exit Play Golf mode when the preset time has expired. When in Play Golf mode, after the preset time has expired, an Auto-Off message will appear on the watch (fig. 1). Select Resume to return to the round; the Auto-Off message will appear again after 1.5 hour. Select Exit Game to immediately exit the round and return to the Home (Time) screen. If no selection is made for 10 minutes, the Neo X will automatically exit the round and return to the Home (Time) screen, and power down the GPS module to preserve battery.To set the Auto-Off time, select Auto-Off from the Golf Setup Menu (Fig. 2). From the set Auto-Off screen, use the UP Butt ▲on (3) and the DOWN Butt ▲on (5) to toggle the time up and down. Auto-Off is always set to whatever current time is showing on the set Auto-Off page. Time can be set between 1.5 and 9 hours, or select Disable to turn the feature off. 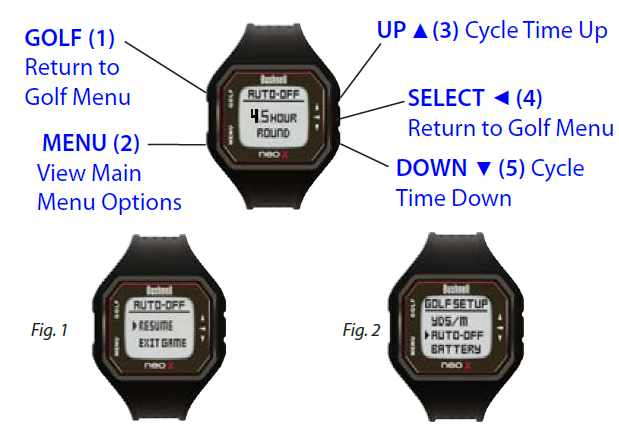
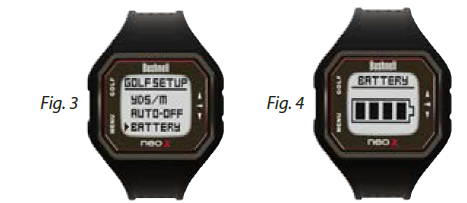
BATTERY
Select Battery (Fig. 3) to view remaining Battery Life (Fig. 4).
Registering and Updating Golf Course Data
Setting up a free account and registering your Neo X at www.bushnell.igolf.com is not required. However, doing so will allow you to update the preloaded GPS course data, and load any new courses. Registration is free and takes only a few minutes. Completing the registration will give you access to the latest GPS data for use on your device.
- Go to www.bushnell.igolf.com and fill in your info to register your Neo X Watch and create an account. The serial # (Product ID) of your Watch can be found on the back of the unit. Click “Next” at the end of Step 1 to go to Step 2 and complete your registration. *Important Note: you will be prompted to install and run an add-on from L1 Technologies. In order to download courses and course updates, you will need to allow this.
- In Step 3, you will download and run an installer for the USB driver that allows your computer to recognize your Watch. The installer is compatible with Windows XP, Vista, 7, and 8, and Mac OS X 10.4 or newer. For best results, we recommend using Microsoft Internet Explorer (32-bit) as your browser on Windows, and Safari (32-bit) on Mac.
- After the driver installation is complete, click Next.
- Step 4 (optional) provides access to a pdf document with detailed instructions for updating the internal operating software of the Neo X Watch. A button (web link) is included in the pdf that will take you to the Software Wizard that downloads the update. Updating your Watch software is recommended to ensure that you have the latest features and operating improvements.
- Once you’ve registered your Neo X Watch and installed the USB driver, you’ll be on the webpage that allows you to search for a golf course. Enter all or part of the course’s name and click “Search”. You’ll be taken to the course info on the iGolf.com site, and can click “Download GPS Course File” to get the latest updated data for the course.
iGolf Hazard Glossary
Hazards within the iGolf application are shown as abbreviations. These abbreviations are defined as follows:
- LFB- Left Fairway Bunker
- MFB- Middle Fairway Bunker
- RFB- Right Fairway Bunker
- LFW- Left Fairway Water Layup
- LFWC- Left Fairway Water Carry
- MFW- Middle Fairway Water Layup
- MFWC- Middle Fairway Water Carry
- RFW- Right Fairway Water Layup
- RFWC- Right Fairway Water Carry
- FGB- Front Green Bunker
- RGB- Right Green Bunker
- LGB- Left Green Bunker
- BGB-Back Green Bunker
- RGW- Right Green Water
- FGWC- Front Green Water Carry
- FGW- Front Green Water Layup
- LGW- Left Green Water
- BGW- Back Green Water
- CRK- Creek Layup
- CRKC- Creek Carry
- EOF- End of Fairway
To access the Main Menu (Fig. 1), select the MENU Button (2). There are 6 Menu options on 2 menu pages: Battery, Odometer, Alarm, Stopwatch, Timer, and Settings. 
BATTERY
Selec t Batter y (Fig. 1) to view remaining Batter y Life (Fig. 2).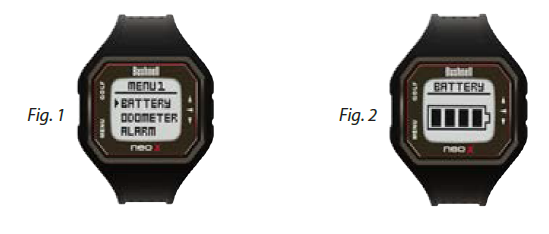
ODOMETER
The Odometer is a GPS function that tracks speed, distance travelled, and activity time. To access the Odometer, select Odometer from Menu 1 (fig. 1). The Neo X will search for satellite signal, and will access the Odometer page upon GPS Lock. The Odometer timer will automatically begin counting, and the speed and distance fields will yield results as you move along. Press the SELECT Button (4) to pause/start the Odometer. Press the UP Button (3) to reset the Odometer when it is paused. Press the MENU Button (2) to exit the Odometer (GPS module will power off and Odometer will shut down).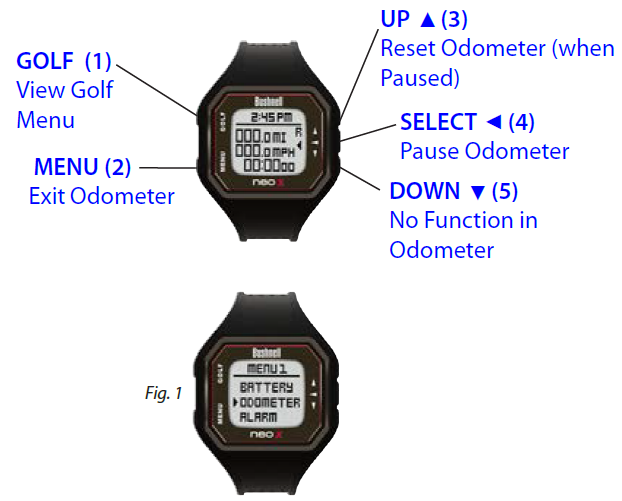
ALARM
The Neo X is equipped with a standard Alarm feature. To access the Alarm, select Alarm from Menu 1 (Fig. 1). To set the Alarm, press the SELECT Button (4) to activate the Hours field. Use the UP Button (3) and the DOWN Button (5) to toggle the time up and down. Press the SELECT Button (4) to move to the next field after each field is set. After AM/PM has been set, pressing the SELECT Button (4) will set the Alarm. When and Alarm is set, use the UP Button (3) to toggle it ON/OFF. The Home (Time) screen will show a Bell Icon (Fig. 2) in the upper right-hand corner when an Alarm is set.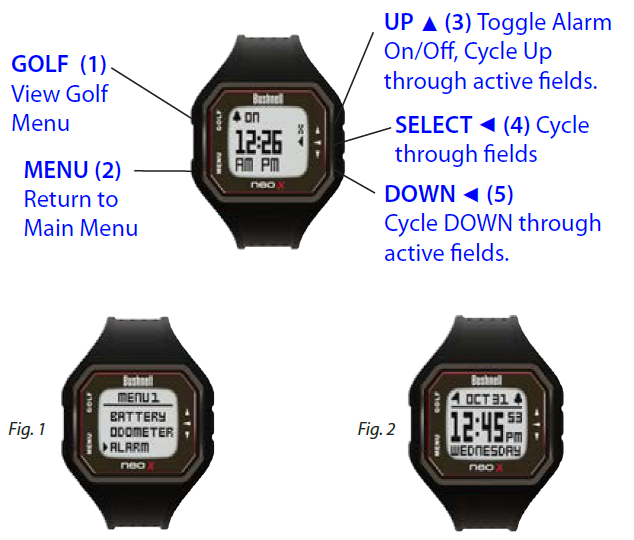
STOPWATCH
The Neo X features a useful Stopwatch function. To access the Stopwatch, select Stopwatch from Menu 2 (Fig. 1). Press the SELECT Button (4) to start/pause the Stopwatch. When the Stopwatch is paused, use the UP Button (3) to reset the Stopwatch. Use the DOWN Button (5) to view the current Lap Time (the Stopwatch will pause on the Lap Time, allowing you to record it, but will keep counting in the background; press the DOWN Button (5) again to return to the current count).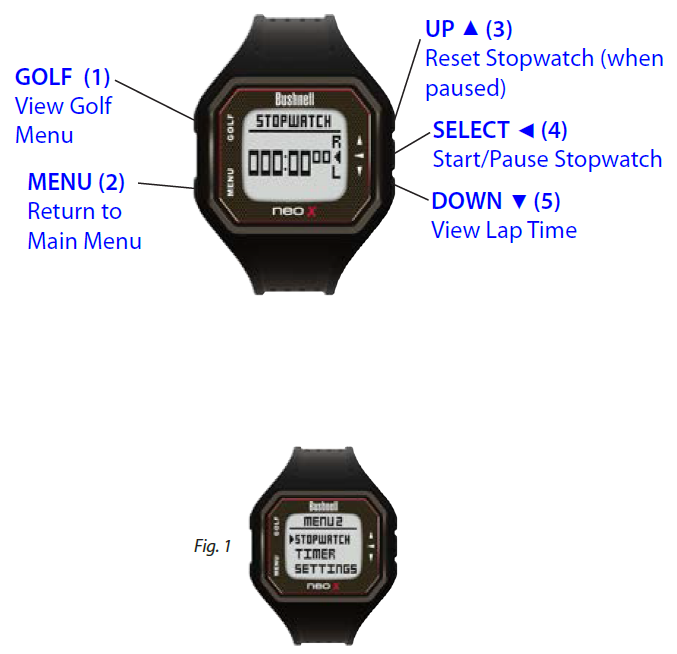
TIMER
The Neo X also comes with a Timer feature. To access the Timer, select Timer from Menu 2 (Fig. 1). To set the Timer, press the SELECT Button (4) to activate the Hours field. Minutes will automatically be set to 5, however can be adjusted. Use the UP Button (3) and the DOWN Button (5) to toggle the time up and down. Press the SELECT Button (4) to move to the next field after each field is set. After Minutes have been set, pressing the SELECT Button (4) will start the Timer. Press the SELECT Button (4) to pause/start the Timer. When running, press the UP Button (3) to restart the Timer from the original setting. When paused, press the UP Button (3) to reset the Timer to the original setting; pressing the SELECT Button (4) will then cycle through the fields normally.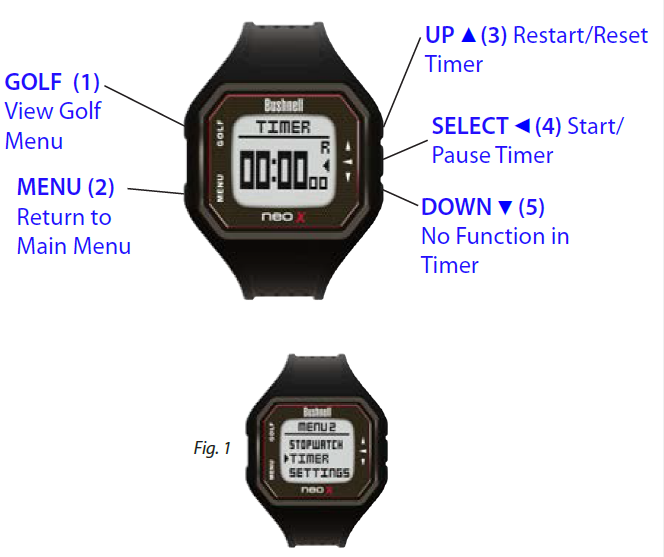
SETTINGS
The Settings Menu allows you to set the Time, as well as preferences for Time, the Odometer, and Sounds. You can also view your latitude/longitude coordinates, the current firmware version, or reset the default settings. To access the Settings Menu, select Settings from Menu 2 (Fig. 1).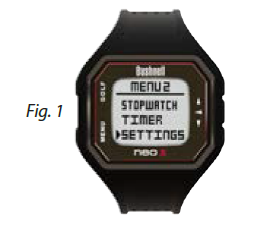
SETTINGS MENU Options: TIME OPTIONS
The Time Options allow you to set time by GPS, set time manually, turn daylight savings time ON/OFF, and set your time format preference (12 hour or 24 hour format). To access the Time Options, select Time from the Settings 1 Menu (Fig. 2). 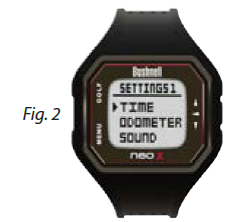
SET TIME BY GPS
This is the easiest way to set the time. From the Time Options Menu, select Set Time (Fig. 1), then select By GPS from the Set Time Menu (Fig. 2). The Neo X will acquire GPS signal, and upon GPS Lock, will return to the Home (Time) screen, where the time and the date will be set via your longitude position. When the selection arrow is pointing at By GPS (Fig 2.), other GPS features (Play Golf, Odometer, GPS Status) will update your time via your longitude position as well, which is convenient for the travelling golfer. *Note: In rare instances, time zone boundaries may conflict. In these cases, it may be necessary to manually adjust the time as detailed in the Set Time Manually section.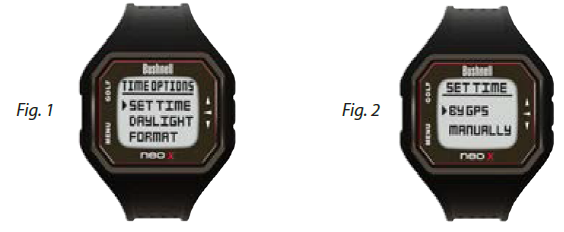
SET TIME MANUALLYTo set the time manually, select Manually from the Set Time Menu (Fig. 2). Use the SELECT Button (4) to cycle between fields. Use the UP Button – (3) and DOWN Button (5) to cycle fields Up and Down. After the year, time and date have been set accordingly you can select MENU Button (2) to return to the Time Options Menu. 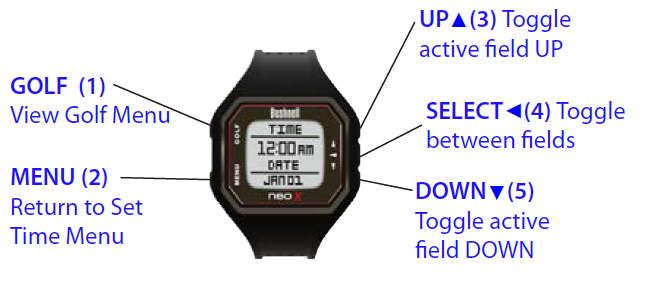
DAYLIGHT
The Daylight time option is a quick and easy way to adjust the time between daylight savings time and standard time (fall through spring). The default setting for Daylight is ON (+1), which would be the correct setting for the spring, summer, and early-mid autumn seasons, and sets the time one hour ahead. When daylight savings time ends for late autumn and the winter season, simply turn the daylight setting to OFF (-1), and the Neo X will automatically adjust the time one hour back. To access Daylight Savings Time, select Daylight from the Time Options Menu (Fig. 1), and select the appropriate setting (Fig. 2).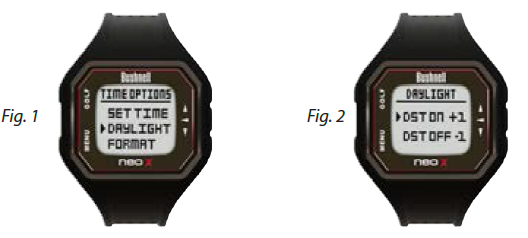
FORMATThe Format time option allows you to set your preference between 12 hour format (standard) and 24 hour format (Military time). To access format, select Format from the Time Options menu (Fig. 3), then from the time Format Menu select the appropriate setting (Fig. 4).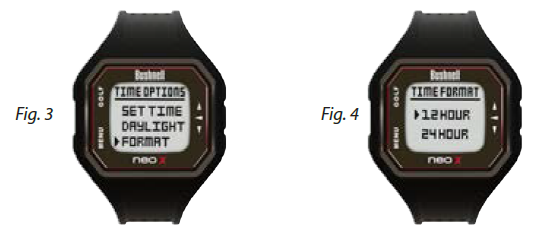
ODOMETER
The Odometer Setting allows you to set your unit of measurement preference for the Odometer (miles or kilometers). This setting affects the normal Odometer, as well as the Round Info Odometer in Play Golf mode. To access the Odometer Setting, select Odometer from the Settings 1 Menu (Fig. 1), then select the appropriate setting (Fig. 2).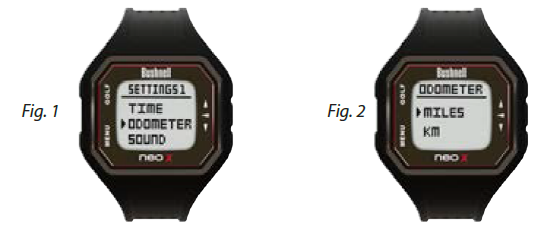
SOUNDThe Sound Setting allows you to turn sounds ON/OFF. This settings affects button sounds only; the Alarm sound will still be active, as will the GPS Lock alert. To access the Sound Setting, select Sound from the Settings 1 Menu (Fig. 3), then select the appropriate setting (Fig. 4).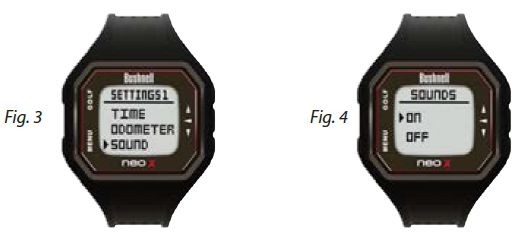
GPS STATUS
The GPS Status setting is a GPS function that allows you to view the quality of the GPS Signal by showing the number of satellites, as well as the HDOP (Horizontal Dilution of Precision; the lower the number, the better the signal). This feature also shows your location by providing latitude and longitude coordinates. To access GPS Status, Select GPS Status from the Settings 2 Menu (Fig. 1). The Neo X will then search for satellite signal, and upon GPS Lock will display the GPS Status screen (Fig. 2). 
ABOUTThe About screen shows the version of the firmware that is installed on the Neo X watch. To access the About screen, select About from the Settings 2 Menu (Fig. 3). The watch will then show the About screen (Fig. 4).
ONE YEAR LIMITED WARRANTY
Your Bushnell® product is warranted to be free of defects in materials and workmanship for one year after the date of purchase. In the event of a defect under this warranty, we will, at our option, repair or replace the product, provided that you return the product postage prepaid. This warranty does not cover damages caused by misuse, improper handling, installation, or maintenance provided by someone other than a Bushnell Authorized Service Department. Any return made under this warranty must be accompanied by the items listed below: A check/money order in the amount of $10.00 to cover the cost of postage and handling
- Name and address for product return
- An explanation of the defect
- Proof of Date Purchased
- Product should be well packed in a sturdy outside shipping carton, to prevent damage in transit, with return postage prepaid to the address listed below:
IN U.S.A. Send To:Bushnell Outdoor Products Attn.: Repairs9200 CodyOverland Park, Kansas 66214
IN CANADA Send To:Bushnell Outdoor Products Attn.: Repairs25A East Pearce Street, Unit 1Richmond Hill, Ontario L4B
For products purchased outside the United States or Canada please contact your local dealer for applicable warranty information. In Europe you may also contact Bushnell at:Bushnell Germany GmbHEuropean Service CentreMathias-Brüggen-Str. 80
D-50827 Köln GERMANYTel: +49 221 995568-0Fax: +49 221 995568-20
This warranty gives you specific legal rights. You may have other rights which vary from country to country. ©2012 Bushnell Outdoor Products
FCC Statement
This device complies with Part 15 of the FCC interference limits for Class B digital devices FOR HOME OR OFFICE USE. These limits are designed to provide reasonable protection against harmful interference in a residential installation, and are more stringent than “outdoor” requirements. Operation of this device is subject to the following conditions; (1) This device may not cause harmful interference, and (2) this device must accept any interference received, including interference that may cause undesired operation. This equipment generates, uses and can radiate radio frequency energy and, if not installed and used in accordance with the instructions, may cause harmful interference to radio communications. However, there is no guarantee that interference will not occur in a particular installation. If this equipment does cause harmful interference to radio or television reception, which can be determined by turning the equipment off and on, the user is encouraged to try to correct the interference by one or more of the following measures:
- Reorient or relocate the receiving antenna.
- Increase the separation between the equipment and receiver.
- Connect the equipment into an outlet on a circuit different from that to which the receiver is connected.
- Consult the dealer or an experienced radio/TV technician for help.
The device does not contain any user-serviceable parts. Repairs should only be made by an Authorized Bushnell repair center. Unauthorized repairs or modifications could result in permanent damage to the equipment, and will void your warranty and your authority to operate this device under Part 15 regulations. The shielded interface cable which is provided must be used with the equipment in order to comply with the limits for a digital device pursuant to Subpart B of Part 15 of FCC Rules.
Windows is a registered trademark of Microsoft Corporation in the United States and other countries. Mac and Mac OS are trademarks of Apple Inc., registered in the U.S. and other countries. Other names may be trademarks of their respective owners.
Customer Service: (800) 423-3537 www.bushnellgolf.com©2013 Bushnell Outdoor Products![]()
References
[xyz-ips snippet=”download-snippet”]