
![]()
www.buyersproducts.comPhone (440) 974-8888Fax 800-841-8003
Installation Instructions
Drill-free 3rd Brake Light Lightbar Mount Series
These instructions provide all the necessary directions and information to allow your Lightbar Mount mount to be safely and properly installed. Before beginning the installation of your new mount, please have the installer and the operator read these directions thoroughly. Important information regarding the safe installation and safe operation is contained that could prevent serious damage and injury to yourself or others. Please note supplemental sections 8.1, 10.1, 12.1, and 13.1 for GM Colorado/ Canyon with OnStar antenna mast.
The Buyers Products Drill-free Lightbar Mount is designed for the quick and simple installation of devices normally mounted to the roof of a pickup truck. Our product provides a durable platform onto which these devices may be mounted without requiring holes to be drilled into the cab roof for fastening or wiring access. Buyers Products provides a system of weather-resistant gaskets and deflectors designed to redirect wind and moisture in common applications.
PLEASE NOTE: The Lightbar Mount is not designed to be weather-proof in the event of power washing, mechanical car washing, or other forces beyond normal highway operation.
It is the responsibility of the owner/operator to periodically inspect the to be sure the clamping system remains secure and the weather-resistant gasketing is snug. The Drill-free Lightbar Mount is designed to provide a mounting platform for lighting, antennas, GPS, and other devices. In no way is the light bar mount to be used as a load-bearing rack for ladders or other equipment or supplies. The recommended weight restriction of the Lightbar Mount is 30 lbs.
While the Drill-Free Lightbar Mount is designed to provide a mounting platform, Buyers Products cannot advise on the possible electronic effect of mounting various devices within proximity to another. The Lightbar Mount is manufactured of powder-coated aluminum but is mounted to the vehicle with gaskets to provide a water-resistant bond and protect the finish of the vehicle. As such, the lightbar mount may not be grounded to the vehicle without the installation technician applying an appropriate grounding mechanism.MOUNTING THE UNIT:The mount has been designed with a commonality of many parts for the different vehicle installations. Each vehicle type has a corresponding modification kit designed specifically to fit the shape and contours of the interior and exterior of the trailing edge of the truck cab. Each set of instructions is common overall with vehicle-specific notations to highlight individual model applications.NOTE: To maximize success of the water-resistant seal, the must be centered and level on the vehicle when installed.
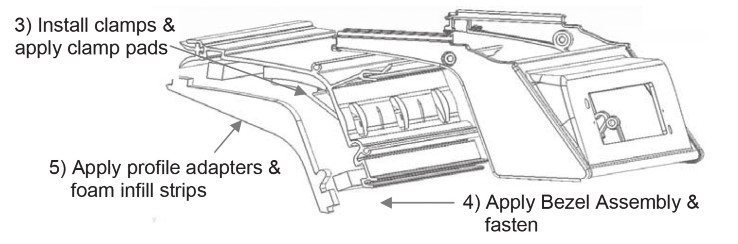
- Open package and remove all parts. Confirm proper adapter kit for vehicle model type.
- Lower Mount Preparation: Remove Aluminum components from shipping position inside the box. Slide out the unsecured end cap and gasket, then remove the Lower mount from its shipping position. Set aside.
- Open the vehicle-specific adapter bag. Remove the two clamps from the adapter bag. Apply the adhesive-backed foam clamp pads to the top of each, aligning with the front edge. One at a time, set rounded end of clamp into the pivot channel and align with the mounting slots in the Lower Housing. Insert bolt through slot with flat washer closest to the hole and lock washer closet to the bolt head. Thread loosely into the clamp.
- Position the Vehicle Specific Bezel Assembly onto the lower mount, inserting the upper and lower plastic endsheet into the aluminum channel slots. Align the mounting holes with screw boss in the aluminum housing, and clip the plastic tab s on the leading edge of the end caps under the aluminum housing, just behind the bird mouth gasket. Fasten with two black stainless screws provided.
- Install the two Vehicle Specific Profile Adapter shapes, then slide to align with the outside edges of the Lower End Caps. Install the ½” x ½” x 16” foam strip into the aluminum channel adjacent to the bird mouth gasket. Apply the second foam strip into the aluminum channel at the bottom of the aluminum housing. Both foam strips will align with the thickness of the Vehicle Specific Profile Adapter at their location.

- NOTE: With some vehicles, a third foam infill piece identified by an adhesive tape strip will be included. Remove the paper backing tape and attach to the indented cab roof sheet metal below the CHMSL light opening, parallel to the top of the rear window.
- Upper Platform Preparation: Mount and fasten lights and other apparatuses to be installed on the upper platform, attaching and fastening each to their manufacturers’ installation requirements. All wiring should include 8 to 10 inch leads and connectors. At same time, make up the corresponding wire harness for connection inside the vehicle. Lengths with vary.
- Vehicle Preparation: Remove the two mounting screws securing the CHMSL (Cab High Mount Stop Light). Remove light housing from truck body, detach wiring connector, and set aside for re-installation at end of the upfit.8.1 GM Colorado/Canyon with OnStar Antenna Mast Only (8895110): Additional to step 8, locate in the vehicle-specific adapter bag a 1″ thick foam component in the shape of a “C”. On the interior of the piece, remove the paper backing to the adhesive strips and attach to the back of the antenna base.
- Install the corresponding apparatus wiring harness through the CHMSL hole into the vehicle and snake through the interior for connection. Be sure to leave enough wire length for maneuvering and attachment of connectors at the end of the upfit.
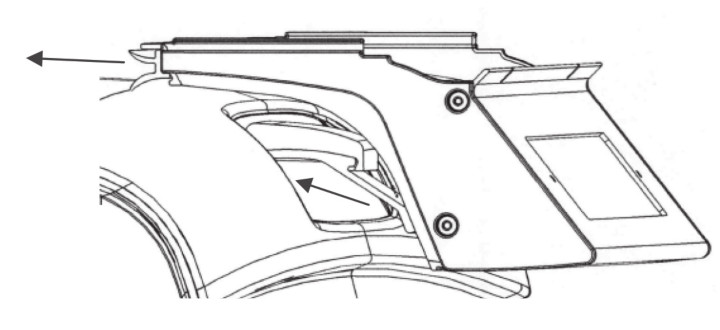
- Installation of the Lower Mount: Pull all harness wires and CHMSL lead though the access hole between the clamps while easing the clamps up and into the cab body. In some cases, the clamp bolts must be pulled back while installing to insure the clamps slide up along the interior of the roof and not get hung up on interior roll bar structure.10.1 GM Colorado/Canyon with OnStar Antenna Mast Only (8895110): When aligning the Lower Mount, slide the birdsmouth vinyl gaskets in from each side and compress leading edge of the aluminum into the gasket prior to tightening.
-
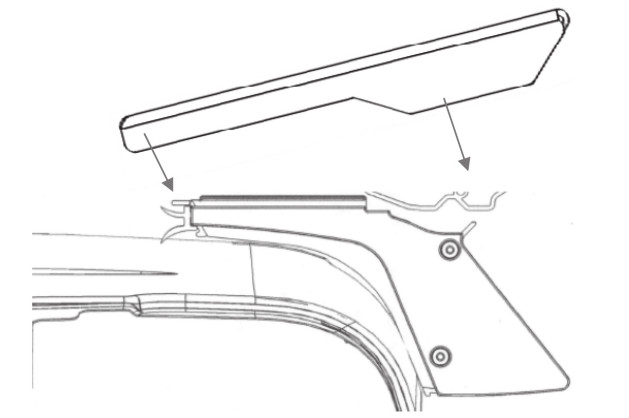
BE SURE TO CENTER AND LEVEL THE LOWER MOUNT ON THE VEHICLE CAB. Tighten the clamp adjustment fasteners to take up the slack until the gaskets fit uniformly against the profile of the cab body. Sight the leading-edge aluminum shelf as a reference for level and true. Final tighten both clamp fasteners equally to flatten the lock washers, 15-18 ft/lbs each.12. Installation of the LP Upper Platform: Holding the Low
- Profile platform off-center to the lower mount, drop the wiring leads into the lower mount. Next, slide the projection tongue on the forward edge of the Lower Mount into the slot on the forward section of the Upper Housing. Be sure the slot on the forward section of the upper housing captures only the projection tongue on the lower mount and not the birdmouth vinyl gasket. When inserting, be careful the wind/rain seal compresses evenly for proper performance. Finally, compress the interior gaskets in the LP Upper Platform against the endcaps of the Lower Mount, aligning the slots and holes, and fasten with the #8 pan head screws provided. AGAIN: CONFIRM CENTERING AND LEVEL OF THE (ROOFTOP MOUNT) BEFORE PROCEEDING.12.1 GM Colorado/Canyon with OnStar Antenna Mast Only (8895110): When installing be sure the slot on the forward section of the upper housing captures only projection tongue on the lower mount and not the birdmouth vinyl gasket. Remove adhesive-backed black vinyl sheet from backer sheet and slide down and over the antenna mast and adhear to the upper platform, the “C” gasket, and wrapping forward and down over the antenna housing/ leading edge of the upper platform.
- Connect the new apparatus’ wiring harnesses and test. Reconnect the CHMSL harness and reinstall housing into Lower Mount with original fasteners.13.1 GM Colorado/Canyon with OnStar Antenna Mast Only (8895110): This step is eliminated.
WARRANTY
Buyers Products Co. warrants all truck/trailer hardware manufactured or distributed by it, to be free from defects in material and workmanship for a period of one year from date of shipment. Parts must be properly installed and used under normal conditions. Any product which has been altered, including modification, misuse, accident, or lack of maintenance will not be considered under warranty. Normal wear is excluded. The sole responsibility of Buyers Products Co. under this warranty is limited to repairing or replacing any part or parts which are returned, prepaid, and are found to be defective by Buyers Products Co. Authorization from Buyers Products Co. must be obtained before returning any part. No charges for transportation or labor performed on Buyers’ products will be allowed under this warranty.
8895100SERIESINST_C
[xyz-ips snippet=”download-snippet”]