![]()
LED LIGHT PANEL HEATERINSTRUCTION MANUAL
SYMBOLS
 WarningThis signal word indicates a hazard with an average risk level which, if not avoided, can result in serious injury or death.
 Warning of electrical voltageThis symbol indicates dangers to the life and health of persons due to electrical voltage.
| Symbols | Meaning |
|
This symbol located on the device indicates that it is prohibited to place objects (such as towels, clothes, etc.) above or directly in front of the device.In order to avoid overheating and fire hazards, the device must not be covered. |
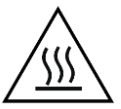 |
This symbol located on the device indicates dangers to the life and health of persons due to hot surfaces. |
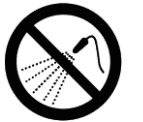 |
This symbol located on the device indicates that it is prohibited to spray the device. |
 |
This symbol is located on the device and the information marked indicates that the operating manual must be observed. |
WARNING & PRECAUTION
Read this manual carefully before starting or using the device. Always store the manual in the immediate vicinity of the device or its site of use!Read all safety warnings and all instructions.Failure to follow the warnings and instructions may result in electric shock, fire, and/or serious injury. Save all warnings and instructions for future reference.WarningThis series must be mounted above 1.8meters high Make sure the series you bought and install it in accordance with the tips in the installation part!WarningThis appliance can be used by children aged from 8 years and above and persons with reduced physical, sensory or mental capabilities or lack of experience and knowledge if they have been given supervision or instruction concerning the use of the appliance in a safe way and understand the hazards involved. Children shall not play with the appliance. Cleaning and user maintenance shall not be made by children without supervision.WarningChildren of less than 3 years should be kept away unless continuously supervised. Children aged from 3 years and less than 8 years shall only switch on/off the appliance provided that it has been placed or installed in its intended normal operating position and they have been given supervision or instruction concerning use of the appliance in a safe way and understand the hazards involved. Children aged from 3 years and less than 8 years shall not plug in, regulate and clean the appliance or perform user maintenance.
WarningDo not use the device in small rooms if persons are present who cannot leave the room independently and who are not under constant supervision.WarningSome parts of this product can become very hot and cause burns. Particular attention has to be given where children and vulnerable people are present. Its dangerous of installation close to curtains and other combustible materials. To avoid the possibility of burns, the following people should be much more careful when using the heaters: infants and kids, people with sensitive skin, the old, the sick, people who is drunk, people who take sleeping pills.
- The devices will draw more current than small appliances, so a separate 5A socket is required.
- Do not use the device in potentially explosive rooms.
- Do not use the device in an aggressive atmosphere.
- Set the device up in an upright and stable position.
- Let the device dry out after a wet clean. Do not operate it when wet.
- Do not use the device with wet or damp hands.
- Do not expose the device to directly squirting water.
- Never insert any objects or limbs into the device.
- Do not cover or transport the device during operation.
- Do not sit on the device.
- This appliance is not a toy! Keep away from children and animals. Do not leave the device unattended during operation.
- Check accessories and connection parts for possible damage prior to every use of the device. Do not use any defective devices or device parts.
- Ensure that all electric cables outside of the device are protected from damage (e.g. caused by animals). Never use the device if electric cables or the power connection are damaged!
- The electrical connection must correspond to the specifications in chapter Technical data.
- Insert the mains plug into a properly secured mains socket.
- Do not use the device when the socket or wire is overloaded.
- Observe the device’s power input, cable length, and intended use when selecting extensions to the power cable. Completely unroll extension cables. Avoid electrical overload.
- Before carrying out maintenance, care or repair work on the device, remove the mains plug from the mains socket. Hold onto the mains plug while doing so.
- Switch the device off and disconnect the power cable from the main socket when the device is not in use.
- Do not use the device under any circumstances if any damages to the mains plug or power cable. If the supply cord is damaged, it must be replaced by the manufacturer, its service agent, or similarly qualified persons in order to avoid a hazard. Defective power cables pose a serious health risk.
- During the installation of the device observes the minimum distances from walls and other objects as well as the storage and operating conditions specified in the Technical data chapter.
- Never drill into the heating device.
- Do not use the device in immediate proximity to curtains.
- Do not place the device on the combustible ground.
- Do not transport the device during operation.
- Do not touch the surface during the device working to avoid burns.
- Allow the device to cool down before transport and/or maintenance work.
- Do not use this device near bathtubs, shower trays, swimming pools, or other water containers. Risk of electric shock!
- The device must be placed where the switches and controllers cannot be touched by a person in a bathtub or shower.
- Do not use this device in a child-care center and bathroom.(Only for Sweden)
FEATURES
- The device is designed to provide an efficient, comfortable, and healthy heating system for any domestic user.
- These devices can reduce air circulation and help to maintain a clean, silent, dust-free environment.
- A wide range of devices are available in a huge choice of colors, sizes, and styles.
TECHNICAL INFORMATION
LED Light HH series
| Heating element | Nice heating wire |
| Heating way | Far infrared heating |
| Heating Voltage input | 220-240V/50Hz |
| LED Light power input | 220-240V/50Hz |
| Surface temperature | Main 130-150°C |
| Frame | Aluminum |
| Over heating protection | Yes |
| Power cord length | Cl.9m |
| Model NO. | Size(cm) | Heating | Voltage | Rated |
| HH0606L | 70.3*70.3*3.3 | 350 | 230V/50HZ | 1.6A |
| HH1006L | 110.3*70.3*3.3 | 600 | 2.6A | |
| HH1206L | 130.3*70.3*3.3 | 800 | 3.5A | |
| HH1506L | 160.3*70.3*3.3 | 1050 | 4.6A | |
| HH1806L | 190.3*70.3*3.3 | 1300 | 5.7A | |
| HH0808L | 90.3*90.3*3.3 | 700 | 3.1A |
SCOPE OF SUPPLY
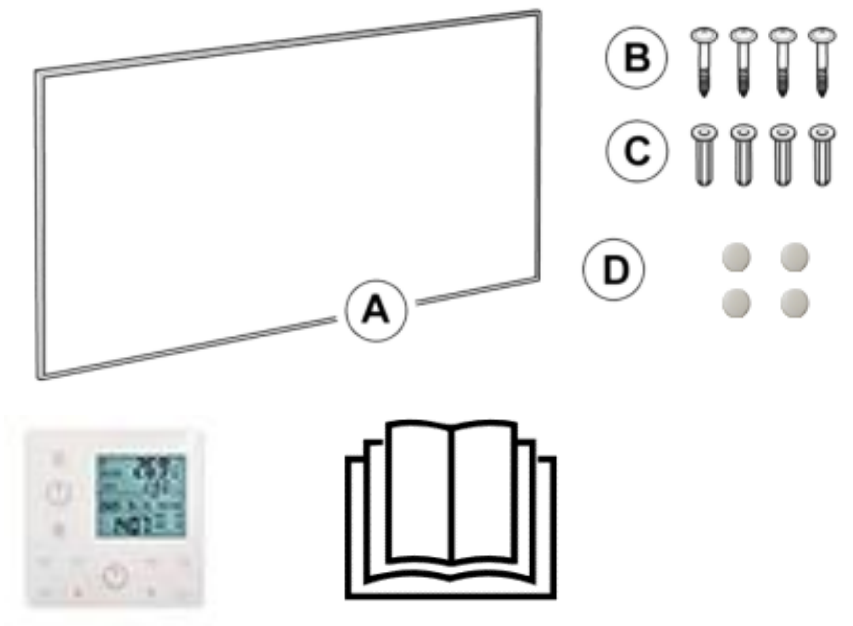
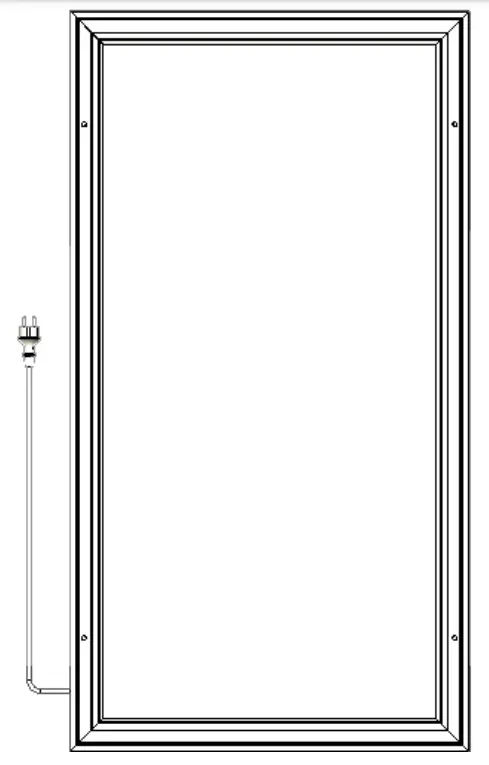
| • (A)1 x heating device• (B)4 x Screws• (C)4 x Dowels | • (D)4 x rubber hole plugs• 1 x thermostat• 1 x Manual |
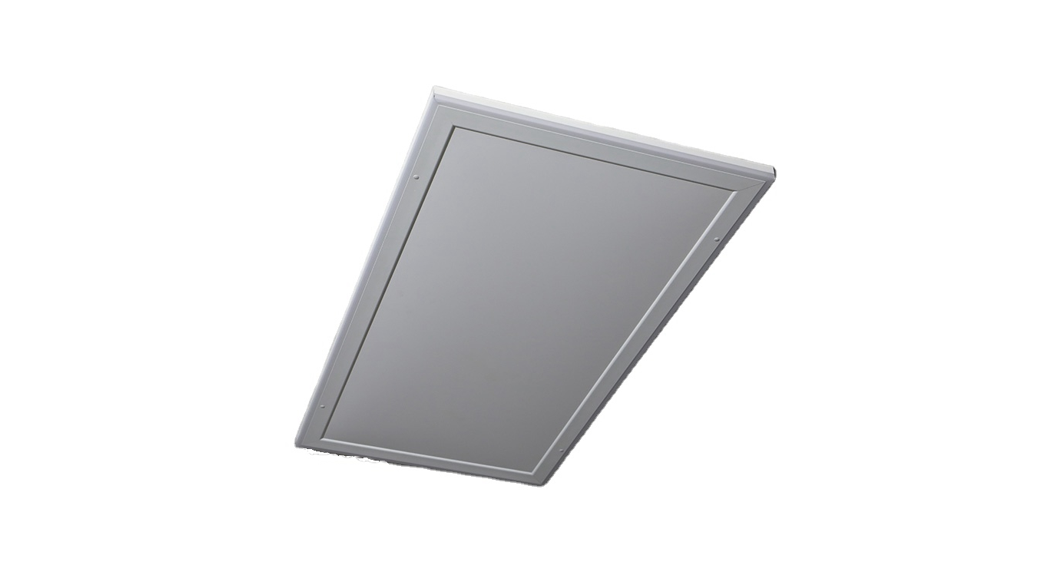
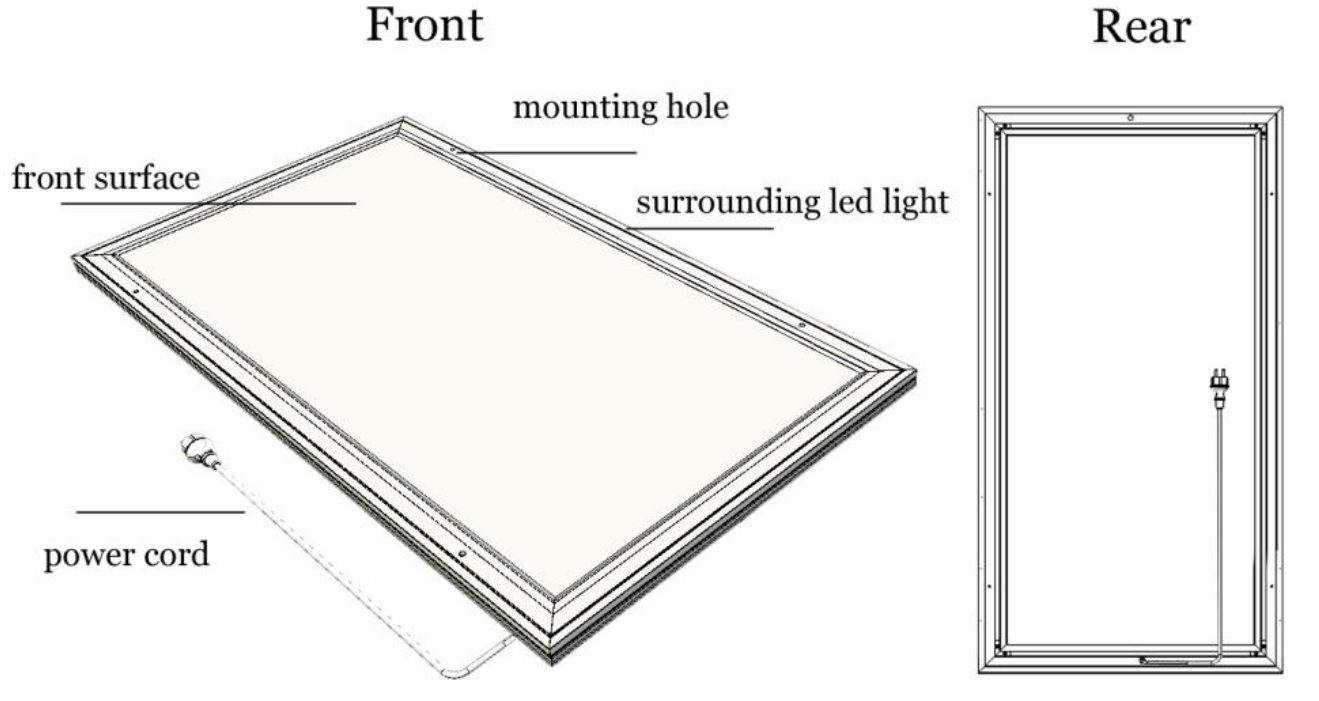
DEVICE STRUCTURE
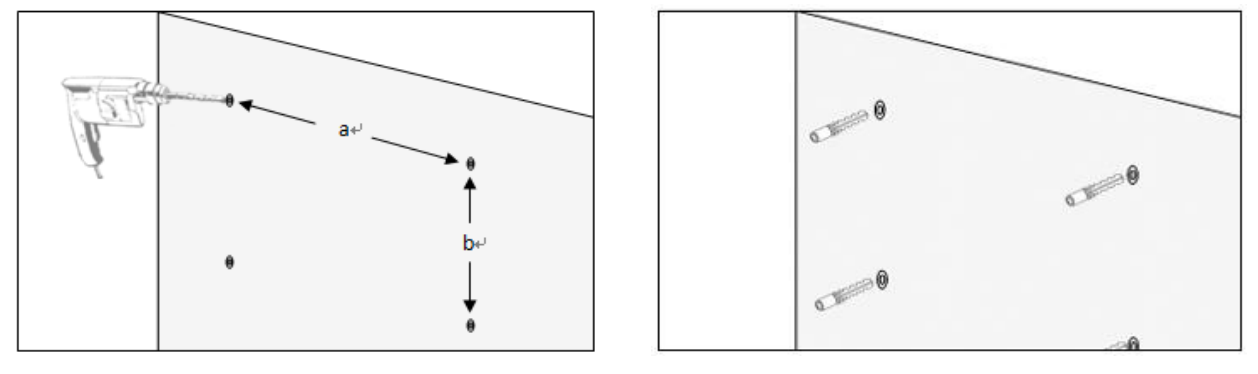
INSTALLATION
Warning
- Mounting work must be carried out by a professional electrician!
- Do not suspend panels by heating the power cord!
- No, sticking ways are allowed to be used for hanging or suspending support!
- Make sure the ceiling is stable enough! · Do remove the front protective film before using it!
- The power cord must be well-grounded!
- Drill the holes in the ceiling.
 Must use CORRECT diameter drilling bit to avoid panel falling!
 - Put the expansion tubes into the holes which can hold the tubes tightly enough.
- Insert the screws through the mounting holes on the panel front, then screw them into the expansion tubes.
- CHECK if the panel has been fixed to the ceiling stable enough!
- Cover the naked holes with the rubber hole plugs.
THERMOSTAT
Specification
- Battery-powered: DC 4x 1.5V AAA batteries (not included)
- Set temperature range: 0℃~ 45℃, resolution: 1℃
- Room temperature range: 0℃~ 50℃, display resolution: 0.1℃
- Accuracy of the measured temperature: ±0.5℃
- Working environment range 1℃~ 50℃
- Radiofrequency 433.92MHz
Description
- This thermostat also includes individual operation parts for LED light.
- The thermostat acquires the room temperature with its integrated sensor and transmits a signal to the panel to turn on/off the heating as the ambient temperature changing, in order to maintain a constant room temperature. When the ROOM temperature is 0.5℃ higher than the SET temperature, the thermostat will send OFF commands to the panel; When the ROOM temperature is 0.5℃ lower than the SET temperature, the thermostat will send ON commands to the panel to turn on the heating function.
- The screen display shows the set temperature as well as the measured temperature, time, date, modes, etc.
- The thermostat has week programmable、temperature setting、 smart (adaptive start control)、auto-off when temperature jump、favorite temperature 、time setting functions etc.
- It is powered by 4pcs of 1.5V AAA batteries. Please change with new ones if the battery symbol gets flashing, or else it will not be able to control the panel.
- The keypad locking function is designed to prevent the children from misusing.
- LCD screen powered off means only the panel heating power off, the remote control itself is still under working state until batteries dead/out or broken.
- The LCD screen only can work in the temperature range from 1℃~ 50℃.
Operation
- Power on the panel, press ON/OFF for the thermostat, then press the button °C/°F and MODE buttons at the same time to pair the thermostat and panel until the long beep sound.NOTE:1) Pairing should be finished within 1 minute, or else you need to re-power on the panel.2) Please re-power on the panel if you want to pair the panel with another thermostat.3) One thermostat can be paired to and work with several panels at the same time.4) Before pairing please do power off those panels which you don’t want to pair.
- Press ON/Off button for the LED light to turn on/off the led light surrounding the panel, and long press to switch light color (for some models only).
- Press +/- to adjust the brightness, the short press can adjust the brightness to 100%, 75%, 50% and 25%, long press can adjust from 100% to 5%.
- Press the ON/off button for the thermostat to turn on/off the heating power.
- Long press LOCK 3 seconds to lock/unlock the buttons.
- Press the ℃/℉ button to convert the temperature display measurement unit.
- Press UP and DOWN to set the target temperature.Even during the week timer on period, users can also press UP and DOWN to set a temporary temperature which will convert to week target temperature at the time when the next TIMER ON starts to work.
- Long press MODE 3 seconds to set SMART and TIMER ON/OFF mode.Both SMART and TIMER symbols display “OFF” status at thermostat first turning on.TIMER ON/OFF means the programmed timer and temperature settings of 1-5 (Monday-Friday), 6 (Saturday) and 7 (Sunday) will work or not. The 1-5, 6, 7-week icons will be displayed on the left of the set temperature and under TIMER ON.SMART ON means the thermostat will itself 3 hours earlier calculate the temperature difference between room and set , and decide how earlier before timing to turn on the heating device, so that environment temperature could reach set temperature on time. The calculating logic is 6 minutes earlier per 1 ℃.
- SET means setting week timer and temperature, smart adaptive start time and temperature, FAV temperature. Important: SET finished does not mean it will start to work unless the model TIMER has been ON!
- Long press SET 3 seconds to start timer\smart\FAV setting. 1) week timer and temperature setting. 1-5 (Monday-Friday) first, set time for turning on and off the heating device, press UP to set the hour and DOWN to set the minutes (15 minutes per press) and press SET to finish for next setting, then set the temperature of this period with UP and DOWN button. Same operations for 6 (Saturday) and 7 (Sunday) settings.2) After the above settings, there is a timer and temperature set for SMART mode.NOTE: Smart mode is independent of the Timer function.3) Following the above finished it comes to the FAV (favorite temperature) setting, there is only the ‘temperature’ icon flash to set FAV Temperature after the smart start facility temperature set is finished.
- Long press TIME 3 seconds to set year, month, date and time with UP and DOWN buttons.
- Press FAV, set temperature will convert to favorite temperature, and it will convert again to week target temperature at the time when TIMER ON start to work.
- The symbol means heating, it only displays when the room temperature is 0.5℃ (or more) lower than set temperature.
- The backlight will be ON when pressing any button in the state of power-on.
Notes
- All settings need to be re-set after battery replacement.
- An alkaline battery is recommended. If ALL buttons on the thermostat are not working, try replacing the batteries.
- Please do change the batteries with new ones once the screen battery symbol gets flashing, or else it may result in halted/stuck/not working.
- Check if set temperature is higher enough than room temperature first if the heating can not be turned on by the thermostat.
- If users want the week timer and temperature to work, make sure theTIMER function has been switched to ON by long press MODE setting;If users want it not working, switch the TIMER to OFF.
- Do not cover or touch the temperature sensor which is at the top of the thermostat.
- Do put the thermostat in an open normal room environment rather not inside a drawer/pocket or under pillow/quilt etc.
- Please do take out the batteries from the thermostat if long time no use.
TROUBLESHOOTING
| Problem | Reason | Measure |
| It has noise when originally charged with electricity | Due to the structural stress of the heat insulator. | It is a normal phenomenon.Don’t worry about it. |
| The surface of the device was slightly raised. | Due to the thermal expansion of the surface material. | It is a normal phenomenon. Don’t worry about it. |
| The surface of theheating device is slightly warm. | 1. The voltage is low.
2. In a low-temperature environment. |
1. Install a voltage regulator.2.It is normal. |
MAINTENANCE & SERVICING
Activities required before starting maintenanceWarning of electrical voltageDo not touch the mains plug with wet or damp hands.
- Hold onto the mains plug while pulling the power cable out of the mains socket.
- Allow the device to cool down completely.
Warning of electrical voltageTasks which require the housing to be opened must only be carried out by authorized specialist companies.
Cleaning the deviceWarning of electrical voltageNever immerse the device in water!Clean the device with a soft, damp and lint-free cloth.Ensure that no moisture enters the housing. Protect electrical components from moisture. Do not use any aggressive cleaning agents such as cleaning sprays, solvents, alcohol-based or abrasive cleaners to dampen the cloth. Wipe the housing dry after cleaning
STORAGE
When the device is not being used, observe the following storage conditions:
- dry and protected from frost and heat
- in an upright position where it is protected from dust and direct sunlight
- with a cover to protect it from invasive dust, if necessary
- Place no further devices or objects on top of the device to prevent it from being damaged.
TECHNICAL ANNEX
| Item | Unit |
| Type of heat input, for electric storage local space heaters only (select one) | |
| manual heat charge control, with integrated thermostat | N/A |
| manual heat charge control with room and/or outdoor | N/A |
| electronic heat charge control with room and/or outdoor | N/A |
| fan assisted heat output | N/A |
| Type of heat output/room temperature control (select one) | |
| single stage heat output and no room temperature control | [no] |
| Two or more manual stages, no room temperature control | [no] |
| with mechanic thermostat room temperature control | [no] |
| with electronic room temperature control | [no] |
| electronic room temperature control plus day timer | [no] |
| electronic room temperature control plus week timer | [yes] |
| Other control options (multiple selections possible) | |
| room temperature control, with presence detection | [no] |
| room temperature control, with open window detection | [no] |
| with distance control option | [no] |
| with adaptive start control | [yes] |
| with working time limitation | [no] |
| with black bulb sensor | [no] |
DISPOSAL
 report this ad
The icon with the crossed-out waste bin on waste electrical or electronic equipment stipulates that this equipment must not be disposed of with the household waste at the end of its life. You will find collection points for free return of waste electrical and electronic equipment in your vicinity. The addresses can be obtained from your municipality or local administration.The separate collection of waste electrical and electronic equipment aims to enable the re-use, recycling and other forms of recovery of waste equipment as well as to prevent negative effects for the environment and human health caused by the disposal of hazardous substances potentially contained in the equipment.
[xyz-ips snippet=”download-snippet”]