
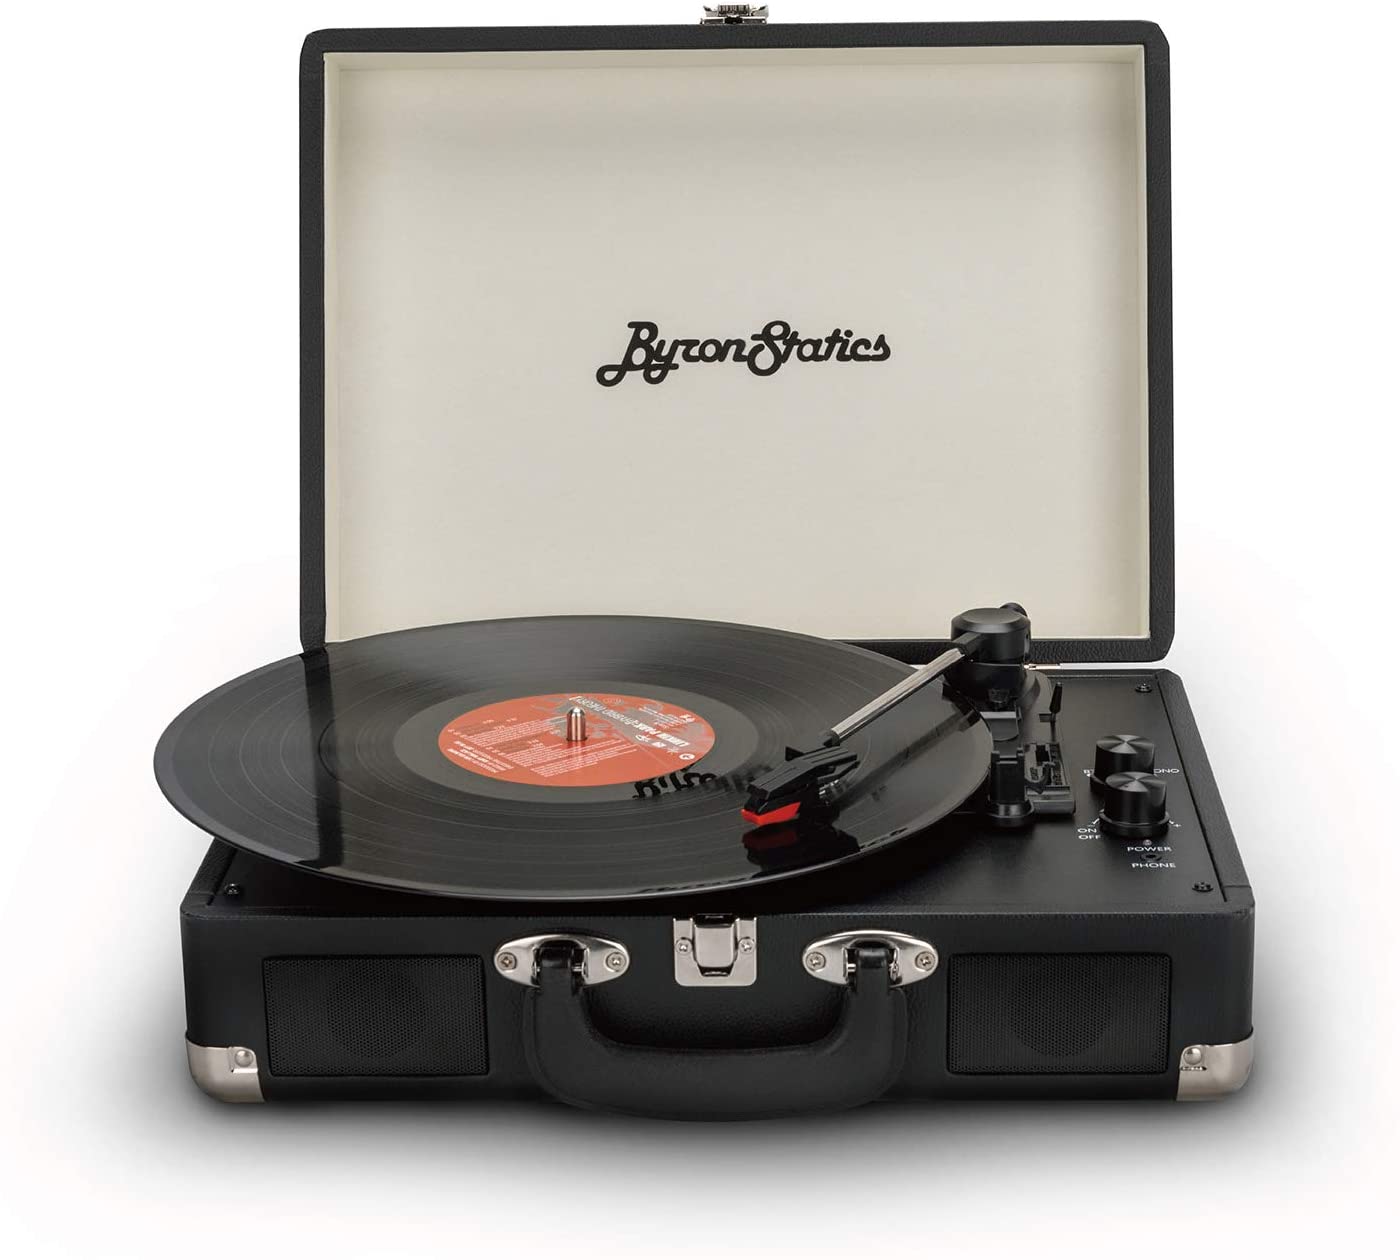
Byron StaticsTurntable with Bluetooth
Model: KTS-601BTInstruction Manual
You’ll soon be enjoying your new Turntable.It all begins here, with your instructions. Don’t worry, there’s nothing too technical coming up. Just simple, step-by-step guidance to get you up and running quickly. Sound good? Then lets get started.
Safety Information
Important – Please read these instructions fully before installing or operating.
Power Source
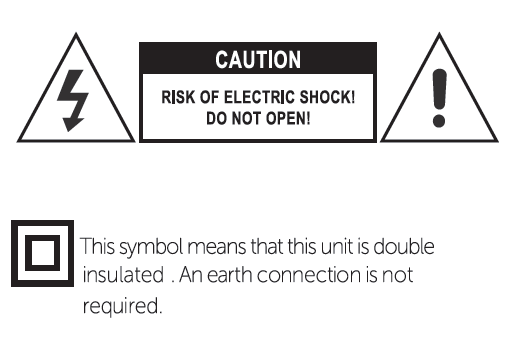
Caution: To reduce the risk of electric shock, do not remove any cover. No user-serviceable parts inside, refer any servicing to qualified service personnel.
- Please read this owner’s guide
- Please take the time to follow the instructions in this owner’s guide carefully It will help you set up and operate your system properly and enjoy all of its advanced features.
- Please save this owner’s guide for future reference .
- The product label is located on the back of the product
- Heed all warnings – on the product and in the owner’s guide.
- Do not use this apparatus near water or moisture .
- Do not use this product near a bathtub wash bowl, kitchen sink and laundry tub, in a wet basement, near a swimming pool, or anywhere else that water or moisture is present .
- Only use attachments/accessories specified by the manufacturer.
- Unplug this apparatus during lightning storms or when unused for long periods of time – to prevent damage to this product .
- Refer all servicing to qualified service personnel
- Servicing is required when the apparatus has been damaged in any way such as liquid has been spilled or objects have fallen into the apparatus; the apparatus has been exposed to rain or moisture, does not operate normally, or has been dropped –
- Do not attempt to service this product yourself.
- Opening or removing covers may expose you to dangerous voltages or other hazards .
- To prevent risk of fire or electric shock, avoid overloading wall outlets, extension cords, or integral convenience receptacles.
- Use suitable power sources – Plug the product into a suitable power source, as described in the operating instructions or as marked on the product The mains plug is used as the disconnect device, the disconnect device shall remain readily accessible.
Disposal information
 WEEE marking “Information for the consumer” Disposal of your old product Your product is designed and manufactured with high quality materials and components, which can be recycled and reused . When this crossed out wheeled bin symbol is attached to a product it means the product is covered by the European Directive 2002/96/EC.
Please make yourself aware of the local collection system for electrical and electronic products. Please act according to your local rules and do not dispose of your old products with your normal household waste. The correct disposal of your old product will help prevent potential negative consequences for the environment and human health.
Warning
- No naked flame sources, such as lighted candles, should be placed on or near this equipment.
- Do not place the product in enclosed bookcases or racks without proper ventilation.
- The mains adaptor is used as the disconnect device and must be easily reached to unplug.
- Always use the power adaptor supplied if it needs to be replaced make sure the replacement has the same rating.
- The ventilation should not be impeded by covering the ventilation openings with items, such as newspapers, table-cloths, curtains, etc.
- Do not expose to dripping or splashed fluids. Objects filled with liquids, such as vases, must not be placed on or near this equipment.
- The unit should not be exposed to direct sunlight, very high or low temperature, moisture, vibrations or placed in dusty environment.
- Do not use abrasives, benzene, thinner or other solvents to clean the surface of the unit. To clean, wipe with clean soft cloth it and a mild detergent solution.
- Never attempt to insert wires, pins or other such objects into the vents or opening of the unit.
- Do not disassemble or modify the turntable – apart from the stylus which can be replaced, there are no other user serviceable parts.
- If the turntable is damaged in anyway or malfunctions do not use. Consult a qualified service engineer.
- Switch off the mains socket the power adaptor is connected to when the turntable is not in use.
- Do not dispose of this product with household waste at the end of its life cycle; hand it over to a collection centre for the recycling of electrical and electronic appliances. By recycling, some of the materials can be reused. You are making an important contribution to protect our environment. Please check with your Local Authority or recycling advice.
Disposal of your old appliance:
- When this crossed-out wheeled bin symbol is attached to a product it means the product is covered by the European Directive.
- All electrical and electronic products should be disposed of separately from household waste at an appropriate recycling point/centre.
- The correct disposal of your old appliance will help prevent potential negative consequences for the environment and human health.
- For more detailed information about disposal of your old appliance, please contact your local authority or the shop where you purchased the product.
Box contents and Features
Box Contents
- 1 x Turntable with attache case housing
- 1 x Power adaptor
- 1 x 2 Phono to 3.5mm jack AUX IN lead
- 1 x User guide
- 1 x Spare stylus
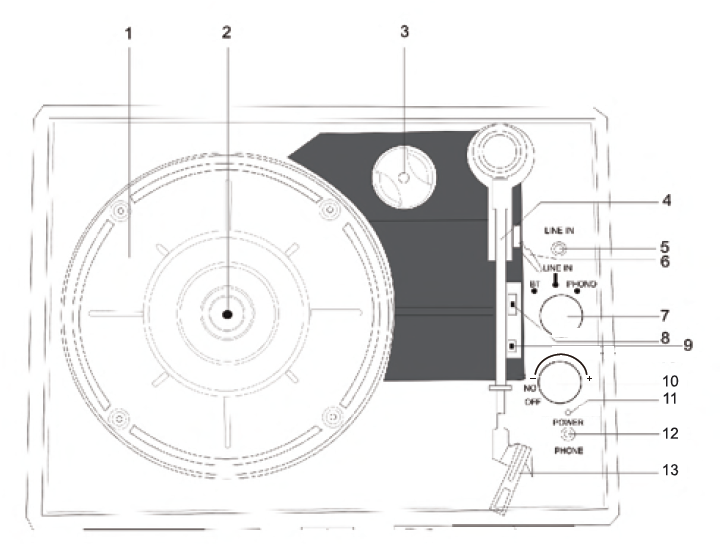


| 1. Turntable deck | 10. Power switch/Volume control |
| 2. Turntable shaft | 11. LED power indicator |
| 3. Centre hole adaptor | 12. Head phone jack |
| 4. Tone arm | 13. Stylus |
| 5. Line in | 14. Lock catch |
| 6. Cuing lever | 15. Carrying handle |
| 7. Function selection knob | 16. Speaker |
| 8. Turntable speed selector | 17. Line out channel R/L |
| 9. Auto stop control switch |
Using the Turntable

- Place the tunable case on a flat level surface.
- Insert the adaptor cord into the DC jack at the rear of the case and plug the adaptor into the mains supply socket
- On first use, ensure that the cable tie is removed from the player arm
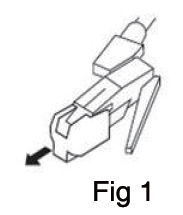
- Remove the stylus cover (fig. 1) and keep in a safe place for future use
- Move the speed selector to the speed (33, 45 or 78rpm) corresponding to the record to be played
- Jam the VOLUME knob to turn the turntable on and the mode indicator will illuminate red
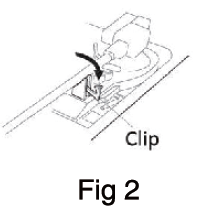
- Place a record onto the turntable spindle and unclip the tone arm(tig. 2)
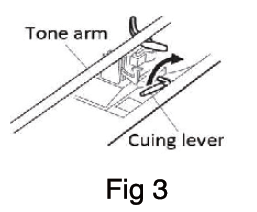
- Use the cuing lever to lift the tone arm (fig3) and move the ann (fig 4)so that the stylus is positioned just inside the edge of the record or aligned with the start of the track to be played.
- Slowly lower the ann and after a short interval the record will start to play
- Adjust the volume to the desired level by rotating the volume control knob
- When the end of the record has been reached thez turntable will stop
- Use the lever again to lift the tone arm (the deck will start to rotate again), move it back to the dip and lower into the cradle. The deck will stop
- Secure the tone arm using the dip and refit the stylus cover after use and ALWAYS before moving the turntable
- To turn off the turntable at any time, lift the tone ann on the record and turn the VOLUME knob fully anticlockwise. A
Note
Some records have larger centre hole and it may be necessary to fit the centre hole adaptor to the turntable shaft before placing the record on the turntable Always refit the stylus cover and secure the turntable arm using the clip before moving the turntable
Using With Auxiliary Device
- Auxiliary analogue audio equipment can be connected and amplified via the turntable
- Connect the auxiliary equipment using a 3.5mm jack cable (cable not Included) into the LINE IN jack next to the mode knob
- Press the PLAY button on the auxiliary equipment and use the track controls as usual on the auxiliary device
- The volume can be adjusted using the volume knob on the turntable or the controls on the connected auxiliary device.
- To tum off the unit at any time, turn the volume knob fully anticlockwise
Using Headphones (not included)
A stereo headphone jack has been provided so that the turntable can be used without disturbing others. Plug in the headphones at the point marked” HEADPHONE near the volume knob and adjust the listening volume to your chosen level. Excessive sound pressure from earphones and headphones can cause hearing loss. The turntable speakers will not operate when earphones are fitted.
Bluetooth Operation
- Turn the function control to the BT position,The blue indicator light will begin to flash
- Turn your devices Bluetooth setting on And search devices.
- Select the Bluetooth pairing name “Byron Statics 02 “to connect to the record player
- Once you are connected the blue indicator light will stop flashing you can now play music from your device through your record player use the volume control dial to adjust the volume
Note: After initial pairing the record player will stay paired to your device unless it is unpaired manually or the device is reset.
Connecting the Turntable to External Speaker
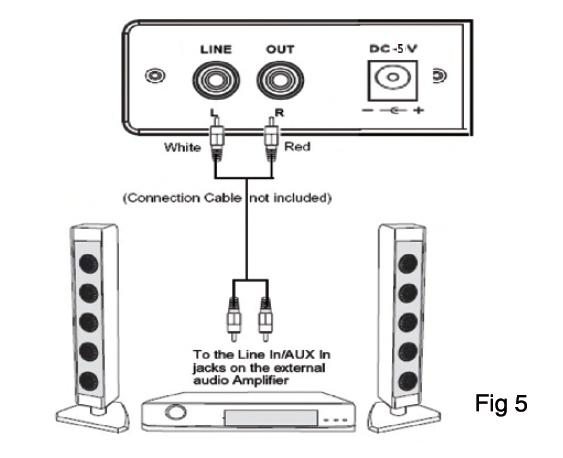
If connecting the turntable to external speakers (via a suitable amplifier) use a twin phono to twin phono lead (not included) to connect the RCA output jacks to the AUDIO IN of the amplifier (see Fig. 5).Ensure red plugs are inserted into the red sockets and white into white.
Care and Maintenance
Charging the stylus
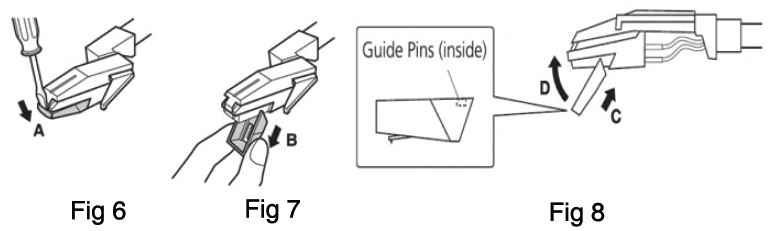
- Ensure the tone arm is secured by the clip
- Insert a tip of a small screwdriver as shown and gently push in a downward direction
- Remove the old stylus (fig.7)
- Hold the tip of the new stylus, align the guide pins as shown and clip into position (fig 8)
Caring for the turntable
- Wipe external surfaces with a soft cloth. If the case is very dirty, unplug from the mains supply and use a damp cloth soaked in a weak solution of washing up liquid and water. Allow to dry thoroughly before reusing Caring for records
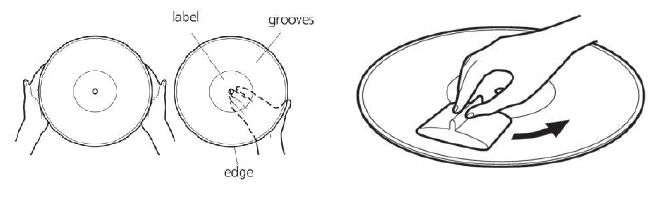
- Hold records by the label or edges (fig 9).
- Oils from clean hands can leave a residue on the record surface that will gradually deteriorate the quality of your record
- Keep in a cool, dry place and store records in their sleeves and jackets when not in use Store records upright (on their edges). Records stored horizontally will eventually bend and warp.
- Do not expose records to direct sunlight, high humidity and high temperatures. Long exposure to high temperatures will warp the record
- Should the record become dirty, gently wipe the surface in a circular motion using a soft anti-static cloth(fig. 10) suitable for this application
Trouble Shooting Guide
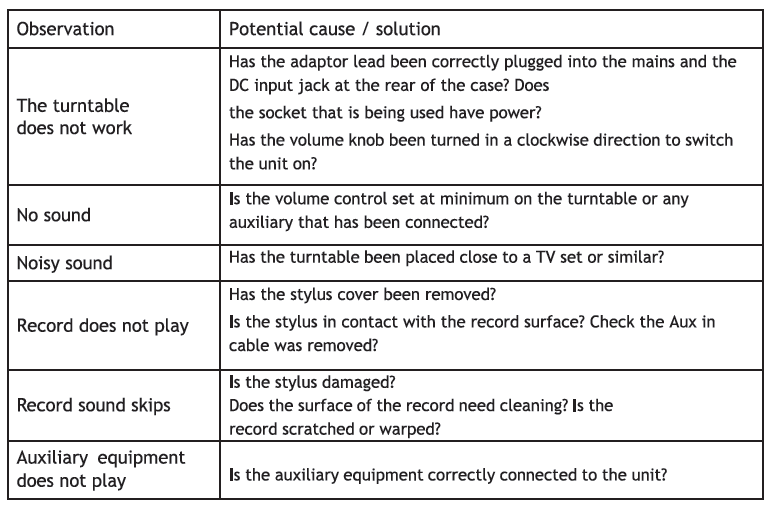
In the unlikely event of difficulties with your appliance please follow the trouble shooting guide If the problem persists, Please send email to
RECYCLING ELECTRICAL PRODUCTS
You should now recycle your waste electrical goods and in doing so help the environment. This symbol means an electrical product should not be disposed of with normal household waste. Please ensure it is taken to a suitable facility for disposal.
CAUTION
Changes or Modifications not expressly approved by the party responsible could void the user’s authority to operate this device.
This equipment has been tested and found to comply with the limits for a Class B digital device, pursuant to Part 15 of the FCC Rules. These limits are designed to provide reasonable protection against harmful interference in a residential installation. This equipment generates, uses and can radiate radio frequency energy and, if not installed and used in accordance with the instructions, may cause harmful interference to radio communications. However, there is no guarantee that interference will not occur in a particular installation.
If this equipment does cause harmful interference to radio or television reception, which can be determined by turning the equipment off and on, the user is encouraged to try to correct the interference by one or more of the following measures:
- Reorient or relocate the receiving antenna.
- Increase the separation between the equipment and receiver.
- Connect the equipment into an outlet on a circuit different from that to which the receiver is connected.
- Consult the dealer or an experienced radio/TV technician for help.
This equipment complies with the FCC RF radiation exposure limits set forth for an uncontrolled environment. This equipment should be installed and operated with a minimum distance of 20 centimeters between the radiator and your body.
Any support you need, anything you feel like to share, You are more than welcome to contact us.
Downloads
Byron Statics Turntable with Bluetooth – User Manual –
Byron Statics Turntable with Bluetooth – User Manual –
[xyz-ips snippet=”download-snippet”]