
COLD BREW COFFEE MAKER
User Manual and Brewing Guide
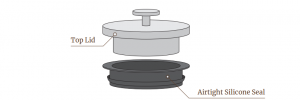
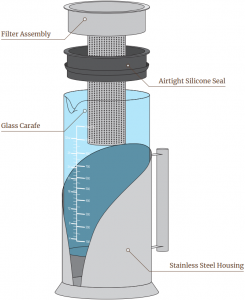
Fig 1. Exploded Diagram
2
Safety Precautions
- CAUTION: Note the carafe is fully removable from the stainless steel housing. Wash thoroughly before use.
- Inspect glass carafe thoroughly for scratches, cracks, or chips. Do not use if any are found on the glass carafe.
- Inspect the filter and all other components for any frayed or scrap metal. Do not use Cold Brew Coffee Maker if any frayed or scrap metal is found.
- CAUTION: Use caution while handling all parts of the Cold Brew Coffee Maker, including the filter. There are sharp edges that need to be handled with care. The edges of the stainless steel housing are very sharp! Be sure to inspect glass carafe for chips, cracks, or other sharp edges before use.
- Keep out of reach from children and infants.
- DO NOT put top lid or filter assembly in the dishwasher as it may cause the siliconeseals to warp. Stainless steel housing and glass carafe are dishwasher safe.
- Not for use on stovetop. Do not place on a heated surface.
- Always place on a dry, flat, non-slip surface.
- Use extra coarse ground coffee only. Finely ground coffee may pass through the filter and end up in your coffee.
- Do not overfill past the max fill line.
Cleaning Instructions
Disassembly: Remove the top lid and filter assembly. To remove the top lid, hold the filter with one hand, and pull the top lid back and up with the other hand. Remove the glass carafe from the stainless steel housing by holding the stainless steel housing with one hand and firmly twist and pull up on the glass with the other hand until it slides out.
There should be 4 main parts to clean:
- Top lid
- Filter assembly
- Glass carafe
- Stainless steel housing
Wash all parts with dishwashing soap and warm water. Avoid cleaning stainless steel housing with brushes or steel wool as it will cause scratches and will dull the finish. Dry all parts. Place glass carafe back into the stainless steel housing.
3
Brewing Guide
1 Set the filter on a dry, flat, non-slip surface and gently pour coarse ground coffee into the filter. Pour to the top of the filter. Let the grounds settle themselves. Do not overfill.

A IF OVERFILLED: Gently shake filter back and forth to settle grounds. If necessary, lightly tap filter a couple of times on a countertop or use a spoon to move and settle grounds inside the filter. Note: A small amount of excess grounds around the top edge of the filter is ok.
B CAUTION: Excessive tapping of the filter can cause coffee grounds to over-settle or “pack too tightly” in the filter. If grounds are over-settled, empty the coffee grounds from the filter and start over.
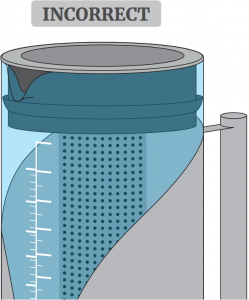
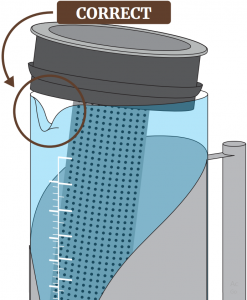
2 Rest filter gently on the top of the glass carafe without pushing it all the way down.
IMPORTANT: Do not push filter fully into the glass carafe. There should be a small gap between the bottom of the silicone seal around the filter and the top of the glass carafe.
4
3 Slowly pour filtered water into the filter. Water will begin to pool at the top of the filter.
IMPORTANT:
Make sure to wet all coffee grounds evenly so water flows easily and full flavor is extracted from the coffee grounds.
Each time water is added, wait a few seconds for the water to dissipate into the filter.Repeat this process until the water is about a ½ in below the max fill line.
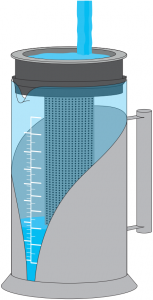
4 Push filter all the way down into the glass carafe, and continue to top off with water until it reaches the max fill line.
 Use a spoon to move excess or overflowed coffee grounds into the filter.A small amount of coffee grounds around the top edge of the filter is ok.
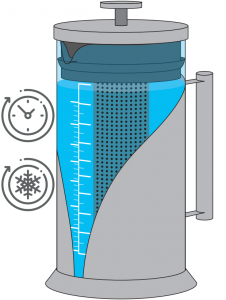
5 Place lid on Cold Brew Coffee Maker and press down firmly to seal. Refrigerate for 16-24 hours.The longer the brew time, the stronger the flavor and potency.
5
6 Place Cold Brew Coffee Maker on a flat and dry surface.Use one hand to hold the glass carafe and the other hand to pull the top lid up firmly to remove the filter and top lid from the glass carafe.
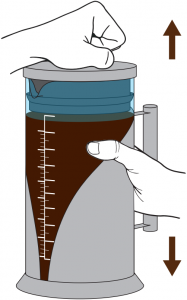
7 Hold the top lid and filter over the sink and remove the top lid from the filter.Use one hand to hold the filter, and with the other hand pull the top lid back and up.Dispose coffee grounds into a garbage can. Wash filter and top lid.

8 Use a spoon to generously stir cold brew coffee in the glass carafe. The top lid is universal and can be placed on top of the glass carafe when storing the coffee.
Pour the cold brew into a cup and enjoy!

6
Recommended Serving Sizes
BREWING TIME SERVING SIZE
16-hour 3-4 ounces24-hour 2-3 ounces
All materials are food safeand surpass U.S.F.D.A.and European Commission standards.
HAVE AN ISSUE WITH YOUR COLD BREW COFFEE MAKER?
Enjoy hassle-free replacements: if your cold brew coffee maker is defective or damaged, we will ship you a new one ABSOLUTELY FREE.
For fast and knowledgeable service, get in touch with one of our customer service experts right now!
Contact Upper Echelon Products directly through Amazon for any assistance. We’re here to help!
- Go to product listing on Amazon and select Upper Echelon Products.
- Select the “Ask a Question” button.
- Write your message and send! We’ll reply in less than 24 hours.
HAVE AN ISSUE WITH YOUR BACK CUSHION?
Enjoy hassle free replacements: if your back cushion is defective or damaged, we will ship you a new one ABSOLUTELY FREE.
For fast and knowledgeable service, get in touch with one of our customer service experts right now!

7
[xyz-ips snippet=”download-snippet”]


