![]()
 HCG OIOQiDAB-BTManual
| Power supply: | AC 100V-240 ~ 50/60 Hz |
| Adapter output: | 5V 3,5A |
| Qi charge pad | 5Watt |
| Bluetooth® version: | v4.2supports A2DP & AVRCP profile |
| Bluetooth® range: | up to 10 meters (without barrier) |
| Bluetooth® Freq range: | 2402-2480 Mhz |
| Bluetooth® Max e.r.p: | <100mW/20dBm |
| Frequency range FM: | FM 87.5-108MHz |
| Frequency range DAB/DAB+: | 174-240 Mhz |
| Presets: | Store up to 10 DAB and 10 FM stations as presets Dual alarm with snooze function |
| USB output | DC 5V 1A charger port |
| Dimensions: | 175(W) x160(D) x 80(H)mm |
We are continuously improving/updating our products and product information. It’s, therefore, possible that there is a slight difference between the description in this manual to the operation of the product.If something is different or not clear; always check our website for the most current version.
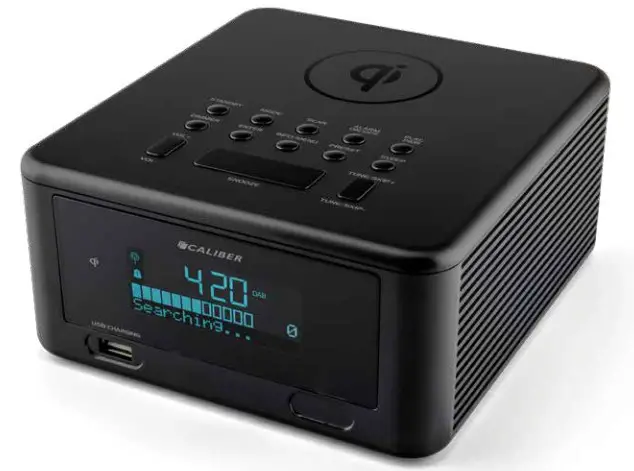
- Qi (Wireless charging) surfaceLocation to place a device suitable for wireless charging*
- Standby © buttonPower ON / Standby
- ModePush repeatedly to switch between: FM radio / Line in (AUX) / DAB+ / Bluetooth
- ScanAutomatically scan for DAB+ / FM radio channels
- Alarm ON / OFFTo set alarm 1 & 2
- Play / Pair– Play /Pause when connected via Bluetooth-Pair/Unpair Bluetooth device
- Dimmer4 steps dimmer
- EnterPress to confirm changed settings
- Info / Menu-Info toggle-Menu settings
- PresetSave a radio channel to a preset
- SleepTo set sleep time
- Volume-/+Increase or decrease the audio volume
- SnoozeSet alarm to 9 minutes later
- TUNE / SKIP -/ +Skip a track in BT mode, or use to manually tune
- LED display
- USB charging portCharge your phone max. 5V 1A
- Qi Wireless Charging indicatorIndication LED for if wireless charging is active «A special sticker is included in the packaging to cover the light If you think it’s too bright.
- DC 5V power inputDC input for provided adapter
- Radio antennaExtent fully for best reception
- AUX-inFor optional wired connection to the audio device*Make sure your device is compatible with wireless charging. Check the specifications/manual of your wse54y674w5trersdce


Precautions
Points to observe for safe usageRead this manual carefully before using this item and its components. They contain instructions on how to use this product in a safe and effective manner. Caliber Europe BV cannot be responsible for problems resulting from failure to observe the instructions in this manual.
Turn off the device immediately in case of a problem.Failure to do so may cause personal injury or damage to the product. Return it to your authorized Caliber Europe BV dealer for repair.
Product cleaning.Use a soft dry cloth for periodic cleaning of the product. For more severe stains, please dampen the cloth with water only. Anything else has the chance of dissolving the paint or damaging the plastic.
Temperature.Ensure that the ambient temperature is between 0°C and +45°C before turning on the device.
 Maintenance.If you have problems, do not attempt to repair the unit yourself. Return it to Caliber Europe BV dealer for servicing.
Placement.Place the product on a flat surface. Provide enough space around the product for sufficient ventilation.
Below are the descriptions of the features/options of the HCG 010QiDAB-BT. The number between the “(…)” refers to the key or connections on the device. The illustrations can be found in the front of this manual.
Connection and clock set
- Plug the adapter into a 100~240V AC outlet and the other end in the DC in (18).
- This unit will automatically sync the time from the DAB radio station once it is connected to the AC power outlet. It may take several minutes for the first sync.
Alarm settingThis product features convenient dual alarms. Each alarm function can be set independently, with a choice of Wake To Radio or buzzer. If either alarm is set to Wake To Radio, please remember to select the desired band and station before turning OFF the radio.
- Press the ALARM ON/OFF button once to select ALARM 1 or press the ALARM button twice to select ALARM 2
- Press the SKIP UP or SKIP DOWN (14) button to turn ON the alarm or turn OFF the alarm and press ENTER (8) button to confirm
- If you select alarm ON, there are two times on the display. The one on the left is the current time and the one on the right is the alarm time with hour digit flashing.
- Press the TUNE/SKIP+ or TUNE/SKIP- button to select the desired alarm hour and press the ENTER button to confirm, the alarm time minute digit will start flashing.
- Press the TUNE/SKIP+ or TUNE/SKIP- button to select the desired alarm minute and press the ENTER button to confirm.
- Press the TUNE/SKIP+ or TUNE/SKIP- button to select the desired alarm wake-up sound (Beep Tone 1 / Beep Tone 2 / DAB/ FM) and press the ENTER button to confirm.
- Press the TUNE/SKIP+ or TUNE/SKIP- button to select the desired alarm volume level and press the ENTER button to confirm.
Note: The alarm will start and increase gradually to the desired volume setting.
Snooze function
- Whenever the alarm activates, it can be temporarily suspended for a short period of 9 minutes by pressing the SNOOZE button once. The snooze indicator “ZZ” on the display will flash.
- The alarm will then automatically activate again after the 9 minutes SNOOZE period has ended.
- This procedure can be repeated for up to approximately one hour. Turn OFF the alarm When the Alarm activates, press the ALARM ON/OFF button to turn OFF the Alarm.
Listening to the FM radio
- Press the STANDBY button to turn ON the unit.
- Press the MODE button to select FM band.
- Press the SCAN button to the next available radio station. Hold the SCAN button to the previous radio station.
- For Manual Tuning, press the TUNE/SKIP + or TUNE/SKIP-button to tune up or down the frequency by 0.5 MHz.
- Press the STANDBY button again to turn OFF the FM Radio.
AntennaFor best reception, fully extend the FM wire antenna to receive FMstations.FM Mono / Stereo Mode In FM mode, press ENTER button to choose Mono or Stereo mode.
Listening to DAB radio
- Press the STANDBY button to turn ON the unit.
- Press the MODE button to select the DAB band.
- Press the SCAN button to the auto full scan.
- Press the TUNE/SKIP+ or TUNE/SKIP- button to select the desired DAB radio Station.
- Press the STANDBY button again to turn OFF the DAB Radio.
Note: When first used, the unit scanned the DAB band for available stations. The station services found were then stored in its memory.You can re-scan the band at any time if you move to a different area or just refresh the stored list of available stations. The scanning process will take a few minutes. The number of services found during the scan will be shown on the right side of the display.Attention: The reception of the DAB signal is very dependent on the environment where the device is located. For best DAB reception, also try to place the antenna and adapter as far away from each other as possible.Performing a Manual Tuning:
- Press and hold the ENTER button until “Manual Tune” appears.
- Using the TUNE/SKIP+ or TUNE/SKIP- button, toggle through the frequencies to tune a station.
- Press the ENTER button twice to confirm the frequency and exit from “Manual Tuning”.
Storing a station preset:
- Tune your desired radio station you wish to store as a preset.
- Press and hold the PRESET button. The number on the right bottom flash. (It is the preset number of the radio station)
- Using the TUNE/SKIP+ or TUNE/SKIP- button, select the preset number (1~10) you wish to use and press the ENTER button to store that station into the radio memory.
Note: When you store a preset, the preset number and “Stored” will be displayed to confirm the number you selected. You can choose a preset number that is already in use. The new station details will overwrite the stored station.
Recalling a preset station:
- Press the PRESET button until the first preset appears.
- Using the TUNE/SKIP+ or TUNE/SKIP- button, scroll through the station presets.
- Press the ENTER button to select the station you wish to listen to. Prune (DAB only)
You may remove all unavailable stations from the list.
- In DAB mode, press and hold the INFO/MENU button.
- Press the TUNE/SKIP+ or TUNE/SKIP- button to select PRUNE.
- Press ENTER button to confirm.Automatically deletes all the question marked (?) channels from the list
Browse station InformationPress the INFO/MENU button repeatedly to view information transmitted by the station in DAB / FM modes.
| DAB mode1. Multiplexer name2. Signal Strength3. Time and Date4. DLS Information5. Program Type6. Frequency7. Bit Rate | FM mode1. RDS Information2. Program Type3. Signal Strength4. Time and Date5. Channel Frequency6. Audio Mode |
DLS (Dynamic Label Segment): This is a scrolling message giving real-time information-song titles, news headlines, or detail of the program and is provided by the broadcaster.
Program Type: This describes the style of the program being broadcast Multiplex numbers.
RDS (Radio Data System): Small amounts of digital data supplied by the broadcaster that may provide song/station details, results, etc.
Factory ResetIf a factory reset is required, follow these steps.
- In FM or DAB mode, press and hold the MODE button
- Press ENTER when prompted to perform the factory reset.
Sleep to music function
- This function allows you to listen to the radio while you fall asleep.
- Press and hold the SLEEP button,
- Press the SLEEP button repeatedly to set the desired sleep time. (The options are : 15, 30, 45, 60, 90 minutes or OFF)
- Press Enter to confirm the setting.
- After the pre-set time has elapsed, the radio will turn OFF automatically.
AUX-IN Connection
- Insert one side of the audio cable (requires 3.5mm stereo plug, not supplied) into the line-out jack or phone jack on your MP3 player and the other side to the AUX-in jack on the unit.
- Press the MODE button to select AUX-IN mode.
- Turn ON your MP9 player and follow the playback instruction.
- To stop this function, simply turned off your MP3 player.
DimmerPress the DIMMER button repeatedly to select the brightness of the display.
Bluetooth operationConnecting Bluetooth
- Press the MODE button to select Bluetooth mode, ‘Pairing’ will show in the display.
- Turn ON the Bluetooth of your device and search the unit for connection. Your Bluetooth device should find “HCG010QDAB”. Select this for connection.
- If the connection is successful, your Bluetooth device may show Bluetooth is connected.
- Select and play the audio file through your Bluetooth device.
- You can use the TUNE/SKIP+ button to go to the next track or press the TUNE/SKIP- button to go back to the previous track.
- Press the PLAY/PAIR button to temporarily pause playing. To resume, press the PLAY/PAIR button again.
- To disconnect the Bluetooth, press and hold the PLAY/PAIR button.
Turn OFF the Bluetooth OperationTo turn OFF the Bluetooth operation, press the STANDBY button, and the connection will be broken.Charge your devicesCharge with USB portConnect the standard size end of a USB cable (not included) to the USB charging port on the unit and connect the other end to the charging port of your mobile phone or USB device.The unit contains one USB port with 1A charging power.Wireless charging
- Place a supported mobile device on the phone support.
- Check the charging icon displayed on the mobile device’s screen for the charging status.
- While charging, the Qi indicator will light up in red, and when the mobile device is fully charged, the Qi indicator will turn white. The wireless charger is compatible with Wireless Power
- Consortium (WPC) certified devices.
Note:
- If the mobile device is not placed properly on the charging surface or depending on the location of the mobile device’s wireless charging coil, your mobile device may not charge properly.
- When the mobile device is fully charged, remove it from the wireless charger.
- Do not place foreign materials, such as metal objects, magnets, and magnetic stripe cards between the mobile device and the wireless charger. The mobile device may not charge properly or may be damaged due to overheating.
- Wireless charging may not work properly if you have attached a thick case to your mobile device. If your case is thick, remove it before placing your mobile device on the wireless charger.
TROUBLESHOOTING
| Problem | Solution |
| Under an environment with electrostatic discharge, the device may malfunction. | • It requires the user to unplug & reconnect the power source again to resume. |
| • Under the environment with Fast Transient,the unit may malfunction on the LCD display. | • It requires the user to unplug & reconnect the power source again to resume. |
| • The unit may malfunction on Qi’s LED when there is radio interference appeared on the power line. | • The unit will revert to normal operation when the interference stops. |
| • Can’t receive any or only a few DAB stations | • DAB signal reception is very dependent on the environment in which the device is located. For best DAB reception, try moving the antenna and adapter as far away from each other as possible. |
Caliber hereby declares that the item HCG0O10QiDAB-BT is in compliance with the essential requirements and other relevant provisions of Directive 2009/125/EC (ERP), 2014/53/EU (RED) and 2011/65/EU (RoHS).
 Latest declaration form can be found at: www.caliber.nl/media/forms/DeclarationHCG010QiDAB-BT.pdf
| Old appliances and/or batteries must not be disposed of with garbage!If the device/battery can not be used anymore, every user is legally obliged to dispose of old appliances and/or batteries separated from the garbage, e.g. at a collection point of his municipality/district. | |
 |
 report this ad
![]() APPAREIL ETwww.quefairedemesdechets.fr
APPAREIL ETwww.quefairedemesdechets.fr
CALIBEREURPOE.COMCALIBER EUROPE BV :Kortakker 10-4264 AE Veen The Netherlands
[xyz-ips snippet=”download-snippet”]