![]()
HCG 019QiManual
SPECIFICATIONS, CONNECTIONS AND BUTTONS
| Input adapter: | 100~240V / 50/60Hz |
| Input: | 5V/2A 9V/1,7Anote: use your original (QC3.0) adapter for fast charging |
| Wireless output:Charge distance | 10W/7,5W/5W4-8mm |
| USB output | 5V/0.8A |
| Backup battery (for clock memory): | CR2032 included – replaceable |
| Dimensions: | 140(W) x 100(D) x 75(H)mm |
| What’s in the box? | HCG019Qi, charging cable USB-A to USB-C, manual, power adapter (5V 2.1A output) |
We are continuously improving/updating our products and product information.It’s, therefore, possible that there is a slight difference between the description in this manual to the operation of the product.If something is different or not clear; always check our website for the most current version.
| Qi-certified :Any phone that can work with the Qi standard is compatible with this Qi charger, regardless of manufacturer or brand. Check the technical specifications of your phone to see if it supports Qi “The ‘Qi’ symbol is a trademark of the Wireless Power Consortium” |
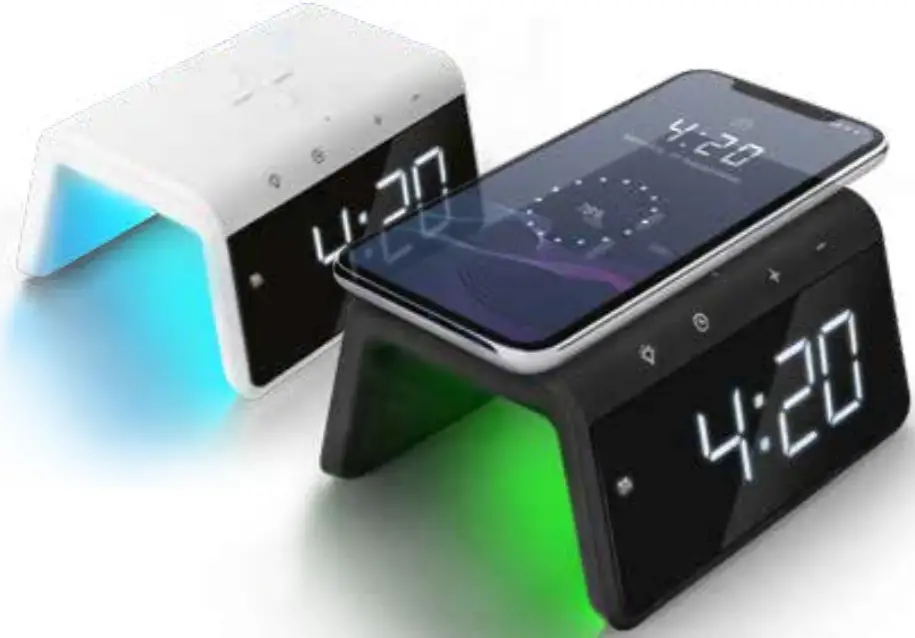
 Night light button• Multi color options, press once to switch• Press & hold to turn OFF
- Clock button• Press once to set clock, minutes• Press once again to set the hour• Press & hold to set the alarm(s)• Press & hold to set alarm hour• Press twice to toggle between 12Hr and24Hr display
-
+Button• Increase Clock display brightness• Set hour/minute forward when settingclock or alarm• Press & hold to turn ON / OFF alarm 1 -Button• Decrease clock display brightness• Set hour/minute backward when settingclock or alarm• Press & hold to turn ON / OFF alarm 2- AM/PM time indicatorIndication LED for AM/PM in 12Hr mode
- Alarm indicator 1 / 2Indication LED for if buzzer alarm 1 or 2 is active
- Clock display
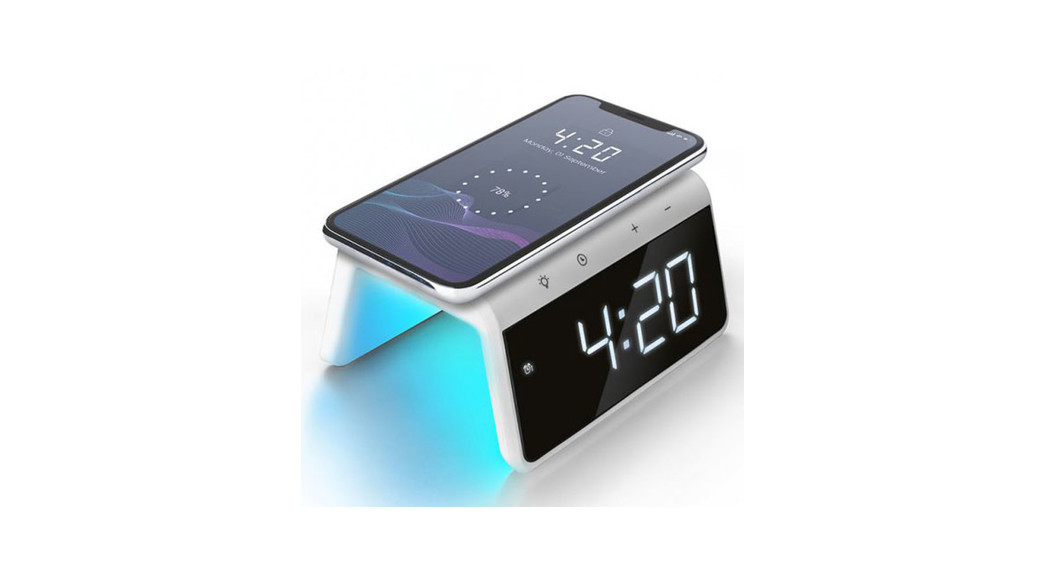
- Qi Wireless Charging surfacePlace chargeable device here
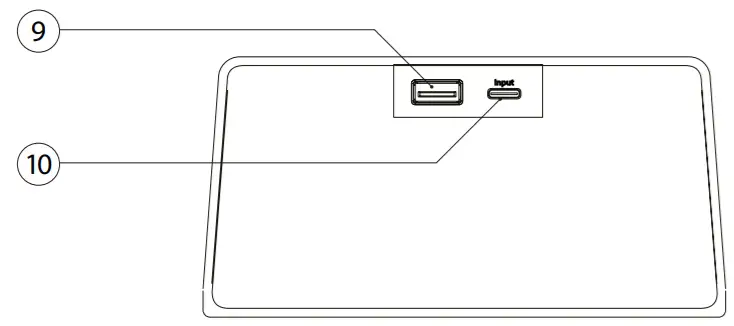
- USB-A charging port 5V 0,8AFor optional wired charging (cable not incl.)
- DC power input USB type-CDC input for provided adapter
Front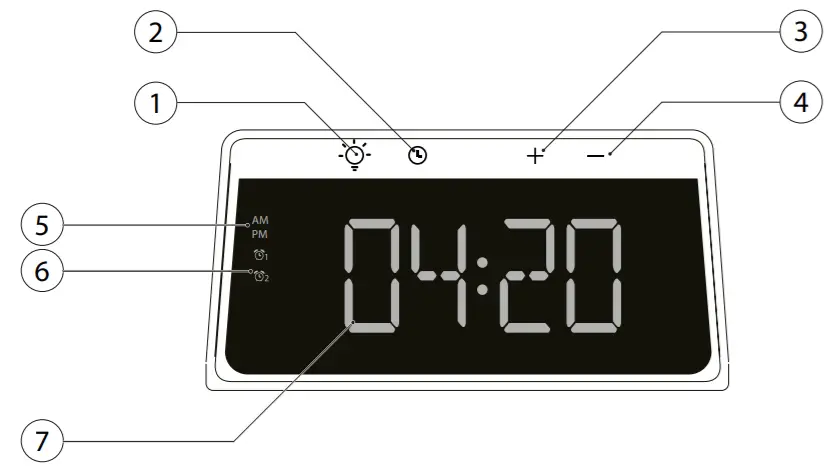
Top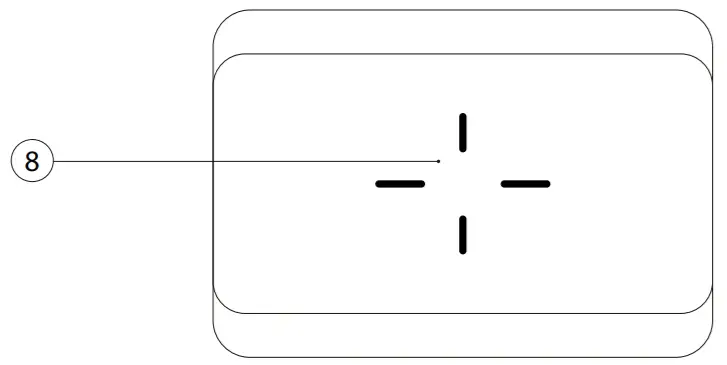
Rear
Precautions
Points to observe for safe usageRead this manual carefully before using this item and its components.They contain instructions on how to use this product in a safe and effective manner. Caliber Europe BV cannot be responsible for problems resulting from failure to observe the instructions in this manual.Turn off the device immediately in case of a problem.Failure to do so may cause personal injury or damage to the product.Return it to your authorized Caliber Europe BV dealer for repair.Product cleaning.Use a soft dry cloth for periodic cleaning of the product. For more severe stains, please dampen the cloth with water only. Anything else has the chance of dissolving the paint or damaging the plastic.
Temperature.Ensure that the ambient temperature is between 0°C and +45°C before turning on the device.![]() Maintenance.If you have problems, do not attempt to repair the unit yourself.Return it to your Caliber Europe BV dealer for servicing.
Maintenance.If you have problems, do not attempt to repair the unit yourself.Return it to your Caliber Europe BV dealer for servicing.![]() Placement.Place the product on a flat surface. Provide enough space around the product for sufficient ventilation.
Placement.Place the product on a flat surface. Provide enough space around the product for sufficient ventilation.![]() Heat. Do not locate the appliance in the vicinity of a heated surface or in direct sunlight.
Heat. Do not locate the appliance in the vicinity of a heated surface or in direct sunlight.
Below are the descriptions of the features/options of the HCG 019Qi. The number between the “(…)” refers to the key or connections on the unit. The illustrations can be found in the front of this manual.
Connection and clock set
- Plug the adapter into a 100~240V AC outlet and the other end in the DC in (10).
- Press the “ button (2)” to change the time shown on the clock
- The minutes will start blinking. Use the
-/+Button (3 / 4) to set the minutes. - Press the “ button (2)” again to set the hour
- The hour(s) will start blinking. Use the
-/+Button (3 / 4) to set the hour. - Press the “ button (2)” again to confirm or wait for 5 sec.
Setting the alarm time
- Long press the “ button (2)” to change the alarm time
- The minutes will start blinking and the alarm indicator will show on the displays the
-/+Button (3 / 4) to set the minutes. - Press the “ button (2)” again to set the hour
- The hour(s) will start blinking. Use the
-/+Buttons(3 / 4) to set the hour. - Press the “ button (2)” again to set alarm 2, repeat the steps above
- Press the “ button (2)” again to confirm or wait for 5 sec.
General settings
- Double press the “ button (2)” to change to a 12-hour / or 24-hour display.
- Press and hold the “
+Button” for 2 sec to activate / de-activate alarm 1. - Press and hold the “
-Button” for 2 sec to activate / de-activate alarm 2. - Short press – /
+Button (3 / 4) to dim/brighten the clock display, The clock display is dimmed to minimal brightness automatically from 0:00 – 6:00
When the Alarm sounds…
- The alarm will sound for 3 minutes until it automatically shuts OFF with no action.
- Tap any button on the device to SNOOZE. The alarm will sound again 5 minutes later; for 3 more times. The alarm indicator will blink.
- To exit SNOOZE mode press and hold the “
+Button” 2 seconds for alarm 1“-Button” 2 seconds for alarm 2
Wake-up lightThis alarm clock is equipped with an automatic wake-up light.The wake-up light will start lighting up 10 minutes before the alarm sounds.E.G: If you set the alarm at 6:30 AM; the wake-up light will start at 6:20 AM and will shine at full strength 10 minutes later.
Night light
- Press the button (1) multiple times to toggle between the different color modes.
- Press and hold the button to switch OFF the light.
Charge function
The HCG019Qi is equipped with a Qi-certified wireless charging pad (8) and a 5V USB output (9).
- Wireless charging:Place your wireless charging compatible phone/device on the pad (8).Charging starts as soon as the device is close enough to the charging pad (<8mm). Left, right or upside down. If the device is already fully charged or not compatible, nothing happens.To make use of fast charging, please use a QC2.0 or QC3.0 adapter (original phone adapter).
- USB charging:The USB connector on the HCG019Qi has 5V 0,8A output and can only be used for charging.The USB charger cannot be used simultaneously with the wireless charging surface using the provided adapter. Please use a QC2.0 or QC3.0 adapter.
Caliber hereby declares that the item HCG019Qi is in compliance with the essential requirements and other relevant provisions of Directive 2009/125/EC (ERP), 2014/30/EU (EMC), and 2011/65/EU (RoHS).
![]() The latest declaration form can be found at:https://calibereurope.com/nlmedia/forms/DeclarationHCG019Qi.pdf
The latest declaration form can be found at:https://calibereurope.com/nlmedia/forms/DeclarationHCG019Qi.pdf
 |
Old appliances and/or batteries must not be disposed of with garbage! If the device/battery can not be used anymore, every user is legally obliged to dispose of old appliances and/or batteries separated from the garbage, e.g. at a collection point of his municipality/district. |
 report this ad
![]()
 APPAREL ETwww.quefairedemesdechets.fr|WWW.CALIBEREUROPE.COMCALIBER EUROPE BV • Kortakker 10 • 4264 AE Veen • The Netherlands
[xyz-ips snippet=”download-snippet”]