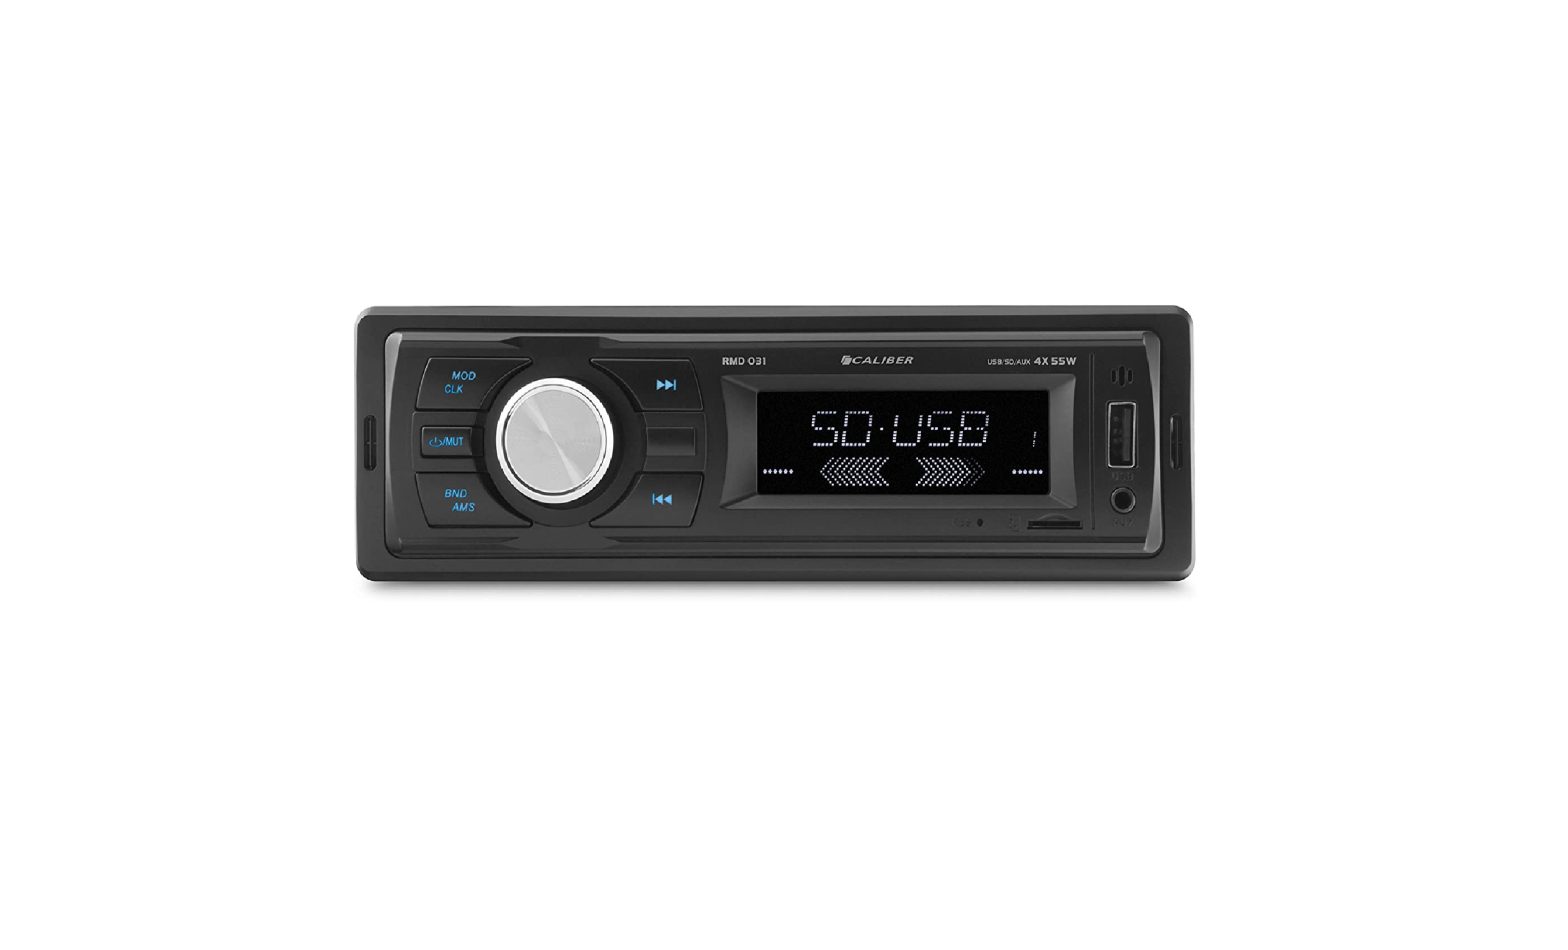
CALIBER RMD031BT Bluetooth Handsfree Kit with Remote Control Instruction Manual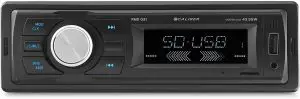
Control Panel
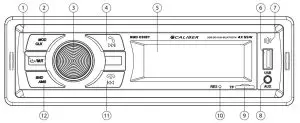
- Power switch/Mute/Pause
- Mode switching/Clock button
- Volume control/Function selection
- Next track/Search radio station forwards/Answer button
- Display
- USB interface (No charge function)
- Built-in microphone
- AUX-IN jack
- MicroSD card slot
- Reset button
- Previous track/Search radio station backwards/Hang-up button
- Band switching/Automatic memory storage
- Power ON/OFF
- End/ignore call
- Mode switch (Tuner/AUX/Bluetooth)
- Intro play / Preset 2 / No. 2
- Play/Pause playback / Preset 1 / No. 1
- Shuffle playback / Preset 4 / No. 4
- Preset 5 / No. 5 / -10 tracks
- RDS AF mode / Preset 8 / No. 8
- RDS TA mode / Preset 9 / No. 9
- Audio (settings) menu / Numeric #
- Call pickup
- Increase volume / + in menu
- Next track / tune seek
- Decrease volume / – in menu
- Repeat mode / Preset 3 / No. 3
- PTY / Preset 7 / No. 7
- Preset 6 / No. 6 / +10 tracks
- Display / Numeric *
- Band / Numeric 0


Basic operations
- Power switch/mute/pause button ( )
- Short press ” ” button in the standby state and the radio will be started up; long press “a’ in the ON state and the radio will be shut down.
- Shod press this button in the radio or AUX state, and It is the ‘Mute” function. Short press this button when the MP3 is being played, and it is the ‘Pause/Play” function.
- Short press ”
- Mode switching/clock button (MOD/CLK)
- Short press this button to switch the mode (Radio/USB/SO/AUXMT).
- Long press this button to display the clock which will automatically exit after 3 sec. When the clock is displayed, long press this button for 2 sec. to adjust the hour: the digit will flicker, and rotate the volume knob to adjust the time; short press this button again to adjust the minute: the digit will flicker, and rotate the volume knob to adjust the time. 5 sec. after completion of the operation, the system will automatically confirm the time and return to the state before entering the clock adjustment.
- Volume control/function selection button / RDS features
- Adjust this button clockwise to increase the volume and counterclockwise to reduce the volume in the radio/playback state.
- Short press this button in the radio/playback state to enter function of BASS, TER (treble), BAL (balance), FAD (fader), EQ (equalizer), LOUD ALL (loudness), DX/LOC (distant/local), STEREO/MONO (stereo radio/ force mono), CH/STEP (choose radio station/stepped frequency), CLOCK24/12 (24/12•hour clock), or AREA EUMS (European standard/American standard), and adjust the volume knob to select the corresponding function.
- When it is receiving or playing, long press it for functions selection (AF ON, TA OFF, TAVOL25, REG OFF, EON OFF). Select relative functions through the volume knob.
- Next track/search radio station forwards/answer button ( )
- In the radio state, short press this button to select next radio station, and Iforig press this button to semi-automatically search the radio stations forwards.
- In the MP3 playback state, short press this button to select the next song, and long press this button to fast forward the song.
- In the Bluetooth phone state, short press this button to “Answer the call.
- DisplayIt displays the radio frequency and current playback information.
- USB interface (USB)Insert a USB flash drive, and it will automatically play the song In the corresponding format.
- Built-in microphoneBuilt-in microphone for handsfree calling
- AUX-IN jack (AUX)it is used for connecting external audio signal.
- MicroSD card slot /TF card slot (TF)Insert a MicroSD card, and it will automatically play the song in the corresponding format.
- Reset button (RES)Shod press this button to conduct system resetting when the radio system functions in disorder. The radio shall be restarted for operation after the resetting.
- Previous track/search radio station backwards/hang-up button ( )
- In the radio state, short press this button to select previous radio station, and long press this button to Semi-automatically search the radio stations backwards.
- In the MP3 playback state, shod press this button to select the previous song, and long press this button to fast backward the song.
- In the Bluelooth phone state, short press this button to “Hang up- the call.
- Band switching/automatic station locking (BND/AMS) In the radio state, short press this button to switch the band (FM1-FM2-FM3), and long press this button to automatically search the radio stations and store the searched stations in Pt-P6 in order; after the automatic search, the radio station stored in P1 will be automatically played. 6 radio stations can be stored in each band, and 18 radio stations in total can be stored.
0perating Instructions for Station Adjustment
Manual step-by-step station adjustment In the radio state, short press -SEC button for many times to enter the “CH” (choose radio station) state. and adjust the volume knob to enter “STEP’ (stepped frequency) state. And then short press “![]() “4- or “
“4- or “![]() ” to adjust the station step by step, and the system will automatically return to “CH” state after 5 sec. without operation.
” to adjust the station step by step, and the system will automatically return to “CH” state after 5 sec. without operation.
Bluetooth Operation
- Pairing the mobile phone and radioApproach the mobile phone to the radio, turn on the Bluetooth of the mobile phone, and search the Bluetooth name of the radio “RMD 031 BT CALIBER’ (password: 0000) in the mobile phone and conned them.
- Making call via the BluetoothPress ‘MODE button to switch to “Br state after completion of Bluetooth connection, and then long press ” ” to call the last number connected.
- Answering call via the BluetoothAfter completion of Bluetooth connection. short press the ” “- button on the panel to answer the phone when there is an incoming call. To switch the voice, long press “BAND” on the panel to switch the call between the mobile phone and the radio. Press ” ” on the panel to hang up the phone after end of the call.
- Playing music via the BluetoothPress “MOD/CLIC button to switch to “BT” state when the mobile phone is connected with the radio. Short press ” ” on the panel for twice to play/pause the music. Press the ” ” button on the panel to select next song. Press ” ” on the panel to select previous song.
Basic RDS operation
- AF functionAt the first time to start the device, the system will be in RDS (AF) status automatically by default. RDS (AF) must be dosed to connect to FM band stations.
- REG functionAt any status when the device is on, long press “SEL” and then briefly press it again to enter into “REG OFF”. Then adjust the volume knob to choose whether open local selection function.
- TA functionAt any status when the device is on. long press “SEL* and then briefly press it again to enter into “TA OFF°. Then adjust the volume knob to choose ‘TA ON”, i.e. automatic play of traffic information.
- TA volume selection functionAt any status when the device is on. long press “SEL’ and then briefly press it again to enter into ‘TA VOL’. Then adjust the volume knob to modify TA volume.
- EON functionAt any status when the device is on, long press SEL and then briefly press it again to enter into “EON”. Then adjust the volume knob to choose whether to display information of other stations.
- PTY functionWhen the device is in reception. briefly press “PTY/7” on the remote controller to enter into “PTY” select state. Then choose program types via volume +/-.
Wiring Diagram
ISO connector:
B1. Rear right speaker(+) / PurpleB2. Rear right speaker(-) / Purple-BlackB3. Front right speaker(+) / GreyB4. Front right speaker(-) / Grey-BlackB5. Front left speaker(+) / WhiteB6. Front left speaker(-) / White-BlackB7. Rear left speaker(+) / GreenB8. Rear left speaker(-) / Green-Black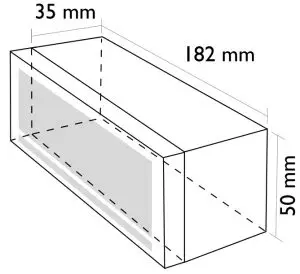
Al. Not connectedA2. Not connectedA3. Not connectedA4. Battery 12V (+) / YellowA5. Antenna power / Blue-WhiteA6. Not connectedA7. ACC+ / Red A8. Ground / Black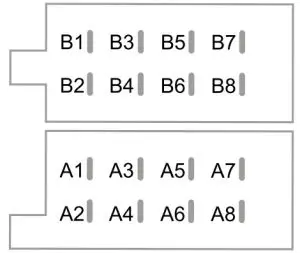
 Warning: The negative speaker lead should NOT be grounded, otherwise it will damage the radio!
WARNING! To connect the unit, use ISO connectors only. If your vehicle isn’t equiped with an ISO connector. please use the provided ISO loom cable.This prevents an incorrect wired connection.Damage caused by faulty wiring: warranty will be void.
Installation Drawing
- Before installing the radio, place the radio according to the assembly position, and connect the corresponding speaker line and power line for listening test.
- Fix the radio only after its running effect is ideal.
Install the radio
- Install the support on the dashboard, and bend its partial parts for sticking in the positions.
- Connect the power line and speaker line, and fix the fixing plate on the car.
- Insert the antenna plug and push the radio into the support, and tighten fixing screws of the fixing plate.
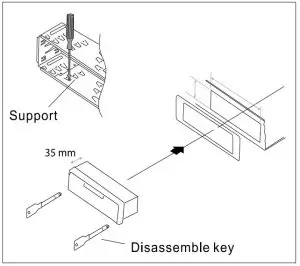
Disassemble the radio
Insert both of the tool for disassembling radio into the gaps on left and right sides to make them hook the radio, and then gently pull out the tools to make the radio separated from the support. Then disassemble the connecting lines and unplug the antenna plug.
 report this ad
Lamer Hereby declares mat me item Kwiu USIti I is in compliance with me essential requirements and other relevant provisions of Directive 2014/53/EU (RED), 2011/65/EU (RoHS), 2014/30/EU (EMC) and 2014/35/EU (LVD).
[xyz-ips snippet=”download-snippet”]