
 8′ X 7′ HITTING NET INSTRUCTIONS

KEY:
A. Hitting TargetB. Base SleeveC. White Securing LoopsD. Base Poles (2)E. Side Base Frames (2)F. Top Frame Rod (2)G. Bottom Frame Rod (2)H. Side Sleeves (2)I. Sewn in TabsJ. Black Threaded CordK. Spring Loaded HolderL. Metal Stakes (4)
INCLUDES:
 Carry Case
ASSEMBLY
STEP 1.
1. Lay net flat on the ground with the longest Base Sleeve (B) closest to you (this is the bottom of the net) & the White Securing Loops (C) farthest away from you (this is the top of the net).2. Connect the (2) Base Poles (D) by pushing spring button in. Line button up with hole and push until you hear a click.

STEP 2
Slide the connected Base Poles (D) through the Base Sleeve (B).

STEP 3
Attach the connected Base Poles (D) to the Side Base Frames (E).

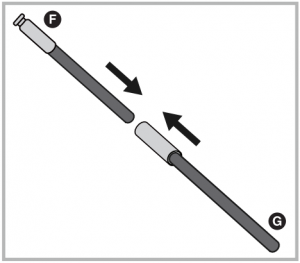
STEP 4
Create the Side Frame Poles by connecting the (2) Top & Bottom Frame Rods (F & G) (The top frame rods are distinguished by the silver notched end). Slide the black end of the Top Frame Rod (F) into the silver end of the Bottom Frame Rod (G).
STEP 5
Take connected side frame poles & slide through Side Sleeves (H). Secure in Side Base Frame (E). (Make sure silver notched end of side frame pole is at the top of net.

STEP 6
Take side frame pole by silver notch and loop White Securing Loops (C) at top of net around notch on top of frame pole. Repeat on other side.

STEP 7 (FIG. 1)

Attach Hitting Target (A) to net by locating the Sewn-In Tabs (I) at top of net. Run the Black Threaded Cord (J) through the Sewn-In Tab (I) on each side of the net. Then loop the Black Threaded Cord (J) through the hole in the Spring Loaded Holder (K) to create a loop.
STEP 8 (FIG. 2)
FOR OUTDOOR USE ONLYSecure net to ground by placing Metal Stakes (L) around base and pushing firmly into the ground. Repeat on other side.
FOR MORE INFORMATION PLEASE VISIT WWW.CALLAWAYTAG.COM OR CALL 1-800-456-2129
[xyz-ips snippet=”download-snippet”]