Campanola Watch CAN12
Thank you for your purchase of this Campanola watch. Before using the watch, read this instruction manual carefully to ensure correct use. After reading the manual, store it in a safe place for future reference.Visit the Citizen website (http://www.citizenwatch-global.com/) to view visual guides for operation of your watch. Some models may be equipped with external features (calculation scale, tachymeter, etc.). Visual guides for operation of such external features can also be found on the website.
To check the movement number
Engraving position example
A case number–4 alphanumeric characters and
6 or more alphanumeric characters–is engraved
on the case back. (Figure on the right)
The first 4 characters of the case number
represent the movement number of the watch.
In the example on the right, ”
” is the
movement number.
The engraving position may differ depending on watch model.
1
Safety precautions (IMPORTANT)This manual contains the following instructions that should be strictly followed at all times to prevent injury to yourself and other persons as well as damage to property.·Safety advisories are categorized and depicted in this manual as follows:
DANGER WARNING CAUTION
Highly likely to cause death or serious injury. Can cause serious injury or death. Can or will cause minor or moderate injury or damage.
· Important instructions are categorized and depicted in this manual as follows:Warning (caution) symbol followed by instructions that should be followed or precautions that should be observed.Warning (caution) symbol followed by prohibited matters.
2
<Protective stickers> Be sure to remove any protective stickers that may be on your watch (case back, band, clasp, etc.). Otherwise, perspiration or moisture may enter the gaps between the protective stickers and the parts, which may result in a skin rash and/or corrosion of the metal parts.<Band adjustment> We recommend seeking the assistance of an experienced watch technician for sizing of your watch. If adjustment is not done correctly, the bracelet may unexpectedly become detached leading to loss of your watch or injury. Consult Citizen Owners’ Help Desk.3
How to use a specially designed crown
Some models are equipped with a specially designed crown and/or push button to prevent accidental operation.Screw down crown and screw down push button Unlock the crown prior to operate your watch.
Unlock
Lock
Screw down crown
Rotate the crown counterclockwise until it releases from the case.
Push the crown in to the case. With gentle pressure towards the case, rotate the crown clockwise to secure it to the case. Be sure to tighten firmly.
Screw down push button
Rotate the locking screw counterclockwise, and loosen until it stops.
Rotate the locking screw clockwise, and tighten firmly.
4
Please check the model number (Caliber No. ) of your watch and refer to the instructions for your watch.
Contents
How to use a specially designed crown…………….. 4
A. Grand ComplicationP. 7 Cal. 677*
1. Main Features …………………………………………. 8 2. Names of Components …………………………….. 9 3. Before Use ……………………………………………. 12 4. Setting the Reference Position ………………… 14 5. Setting the Time …………………………………….. 16 6. Setting the Calendar ………………………………. 19 7. Using the Chronograph …………………………… 22 8. Troubleshooting …………………………………….. 27 9. Specifications ………………………………………… 29
5
B. Perpetual Calendar
1. Features ……………………………………………….. 32 2. Component Names ………………………………… 33
P. 31 Cal. 670*
3. Viewing the Watch Indications …………………. 354. Before Using the Watch – Reference position verification – …………….. 375. Setting the Time …………………………………….. 38
6. Setting the Calendar ………………………………. 39
7. Calling the Calendar ………………………………. 40
8. Troubleshooting …………………………………….. 42
9. Adjusting the Reference Positions ……………. 44
10. Specifications ………………………………………… 46
C. Dual time
1. Features ………………………………………………. 48 2. Names of Components …………………………… 49
P. 47 Cal. 776*
3. Setting the Time …………………………………….. 504. Correcting the Time Difference of the Local Time……………………………………. 525. Low Battery Warning Function …………………. 53
6. Specifications ………………………………………… 54
Handling Your Watch Service Information6
Precautions…………………………………………………. 55 Contact us ………………………………………………….. 64
Grand Complication
A. G Grand Complication
randCompliCation
1. Main Features …………………………………. 8
2. Names of Components …………………….. 9 3. Before Use …………………………………….. 12
677 * Cal.No.
4. Setting the Reference Position …………. 14
5. Setting the Time ……………………………… 16
6. Setting the Calendar ……………………….. 19
7. Using the Chronograph……………………. 22
8. Troubleshooting………………………………. 27
9. Specifications …………………………………. 29
CAL. 677
1. Main FeaturesThis watch is a multi-hand analog quartz watch equipped with minutes repeater function using an electronic tone, perpetual calendar function, which corrects the date for each month including leap years, and a chronograph function that is able to measure time for up to 12 hours.8
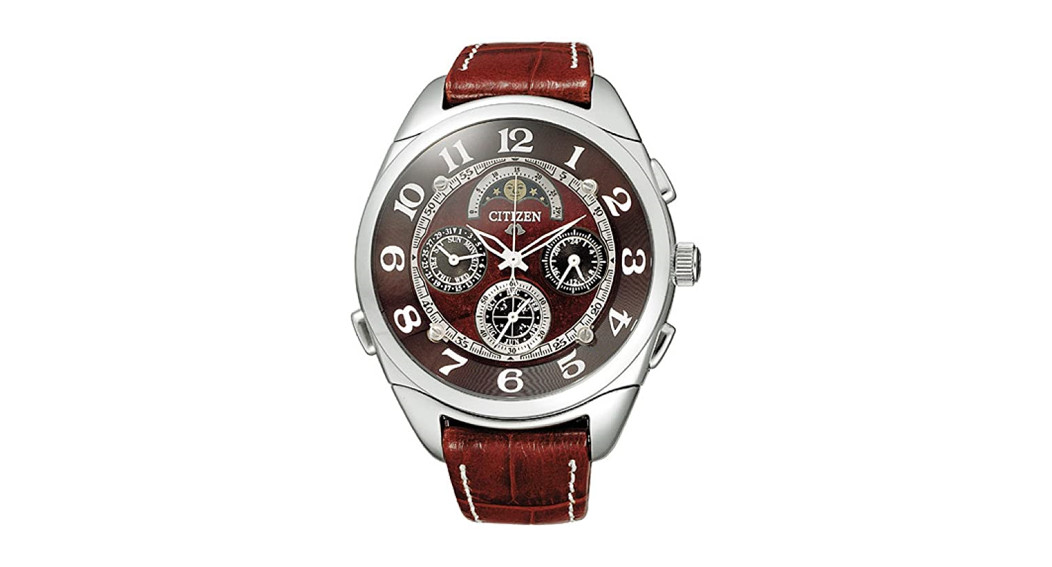
Grand Complication
2. Names of ComponentsMoon age
Chronograph second hand Minute hand
Hour hand
Button (B)
Moon age correction buttonDay handButton (C)
Crown 24 hour handButton (A)
Date hand
Second hand
Month hand
Year hand
* The illustrations in this instruction manual may differ from the actual appearance of your watch.
9
Functions of Each Hand
CAL. 677
Hand
Display
Hour hand
Time/calendar
Chronograph
Continuously indicates hours
Minute hand
Continuously indicates minutes
Second hand
Continuously indicates seconds
24 hour handChronograph second handDate hand
Continuously indicates the 24 hour clock
—
Chronograph seconds
Continuously indicates the date
Day hand Month hand Year hand
Continuously indicates the day
Month or minutes (when chiming)Year or hours (when chiming)
Chronograph minutes Chronograph hours
10
Grand Complication
Functions of Each Button
Crown position displayButton (A)Button (B)
Normal position
1st position
2nd position
Time/calendar Chronograph Setting the calendar Setting the time
— Chime
Zero position check/Split/ ResetStart/Stop
Yearly/Monthly
Setting of chime:
correction:
Clockwise
Clockwise direction direction
Yearly/Monthly correction: Counterclockwise direction
Setting of chime: Counterclockwise direction
Button (C)
To chronograph To time/
display
calendar
Date correction
—
CrownMoon age correction button
—
—
—
Setting of hour, minute, 24 hour clock and day
Moon age correction (can be performed at any time regardless of crown position)
11
CAL. 677
3. Before UseBefore using this watch, please check the reference positions of each hand using the following procedure to ensure that each function operates properly.Reference position:The initial position of each hand to ensure that this watch functions properly.Confirmation of Reference Position1) Put the crown in the normal position. · Press button (C) for at least 2 seconds to switch to the chronograph display. Check that the hands are at the positions indicated below. Chronograph second hand : 00.00 seconds Year and month hands: 00:00 (12:00 position) · Press button (A) for at least 2 seconds and check that the date hand is at the position indicated below. Date hand: (Between 31 and 1)2) Once you have confirmed that the hands are at the reference position, press button (C) for at least 2 seconds to return the watch to the time and calendar display.* If the hands are not at the reference position, set the reference position of each hand by following the procedure described in “4. Setting the Reference Position” on the following12 page.
Grand Complication
(B) (C)(A) 13
4. Setting the Reference Position
CAL. 677
The hands of the watch will not indicate the correct positions unless the reference position is set
properly. If the reference position has changed, reset it by following the procedure described
below.
* The reference position must also be reset after the battery has been replaced.
Perform the All-Reset procedure
(B)
1) Pull out the crown to the 2nd position.
2) Press buttons (A), (B) and (C) simultaneously.
3) When the buttons are released, the hands will move
in the order of the chronograph secondhand, date
hand, and year and month hands. A tone will sound
(C)
(A)
confirming that All-Reset has been performed when
this procedure is completed.
If the crown is returned to the normal or 1st position without setting the reference position after performing the All-Reset procedure, the reference position failure alarm will be activated. At this time, the date hand will turn counter-clockwise indicating that the reference position has not been set. When this happens, pull out the crown to the 2nd position again, and perform the procedure for setting the reference position. 14
Grand Complication
Setting the Reference Position
(B)
1) Press button (A) and set the year and month
hands to 00:00.
2) Press button (B) and set the chronograph
second hand to 00.00 seconds.
3) Press button (C) and set the date hand to
the position.
(C)
(A)
· Pressing button (A), (B) or (C)
continuously causes the hands to advance
rapidly.
4) Always make sure to return the crown to
the normal position.
* After setting the reference position, always make sure to reset the time (basic time and minutes repeater time) and the calendar.
15
5. Setting the Time
CAL. 677
Setting the Time and Day of the Basic Clock
Minute hand
24 hour
Hour hand
Once the time has been set for the basic clock,
hand
always make sure to set the time of the minutes repeater according to the time of the basic
(B)
clock.
If the time is different between the basic clock
and minutes repeater, the chime will not sound
at the correct time shown on the basic clock
(current time).
(C) (A)
1) Pull out the crown to the 2nd position so that the second hand stops at 0 seconds.2) Turn the crown in the clockwise direction (so that the hour and minute hands rotate clockwise) to set the day.
Day hand
Second hand
· The day can be corrected rapidly by moving the hands back and forth between 9:00 PM and
1:00 AM. 3) Turn the crown either to the right or left to set the hours, minutes and 24 hour hand to thecurrent time. · Set the time while paying attention to AM and PM by looking at the 24 hour hand. 4) Always make sure to return the crown to the normal position. 16
Grand Complication
Setting the Time of the Minutes Repeater
(C) Year hand
(B)(A) Month hand
1) Pull out the crown to the 2nd position so that the second hand of the basic clock stops at 0 seconds.2) Push button (A) or (B) and set the year and month hands to the time of the basic clock. · Button (A) : Hands move forward 1 minute each time it is pressed. · Button (B) : Hands move backward 1 minute each time it is pressed. Pressing button (A) or (B) confinuosly causes the hands to advance rapidly.
3) The basic time and minutes repeater time can be synchronized with a telephone time service or other official time service by pushing in the crown to the 1st or normal position at the same time you hear the tone.4) The minutes repeater time will return to the year and month display when the crown is pushed in. Setting the minutes repeater time to the time in another city based on the time of the basic clock enables the minutes repeater time to be used to indicate local time in that city. Press button (B) to find out the local time. 17
Using the Minutes Repeater
CAL. 677
· The minutes repeater is a convenient function that lets you know the time (hours and minutes).
Pressing button (B) in the time and calendar display
informs you of the current time with an electronic tone.
· The crown should be in the normal position.
(B) <Interpretation of Chime Tones>
Hour tone: A high-pitched tone will sound at 1 second
intervals for the number of hours from 1:00 to
12:00 (there is no distinction between AM and
(C)
PM).
(A) Minute tone: A combination high-pitch and low-pitch tone
will sound for every 15 minutes past the hour.
The number of minutes past that 15 minute
interval is sounded with a low-pitch tone.
Example Current time is 4:34
4 hours: A high-pitched tone sounds 4 times at 1 second intervals. 30 minutes: A combination high-pitched and low-pitched tone sounds twice at 1 secondintervals 1 second after the hour tone has sounded. 4 minutes: A low-pitched tone sounds 4 times at 1 second intervals 1 second after the 30minute tone has sounded.
18
Grand Complication
6. Setting the Calendar
Moon age correction button
Setting Date, Month and Year (Leap Year)(B) 1) Pull out the crown to the 1st position.
2) Press button (A) or (B) to set the month and
year (leap year for number of years passed
since the last leap year).
· Button (A) : The hand moves forward by 1
(C)
(A)
month each time it is pressed.
· Button (B) : The hand moves backward by 1 Day hand
month each time it is pressed.
Date hand
Leap Year Time Difference Quick Reference Chart
<Determination of the number of years that have elapsed since the most recent leap year>
Year2016 2017 2018 2019
Time difference from leap year (years)Leap year1st year2nd year3rd year
Year2020 2021 2022 2023
Time difference from leap year (years)Leap year1st year2nd year3r d year
Month hand
Year hand 19
CAL. 677
3) Press button (C) to set the date. · The date advances by 1 day each time button (C) is pressed. Pressing button (A), (B) or (C) confinuosly causes the hands to advance rapidly.4) Return in the crown to the normal position.Since the day is linked with the operation of the basic clock (24 hour, hour and minute hands), make sure to also set the day when setting the time.20
Grand Complication
Setting the Moon AgeThe moon age can be corrected regardless of the position of the crown. Press the moon age correction button to set the age of the moon. · Look in a newspaper to find out the moon age for the day, and then set the moon markwhile referring to the moon age reference chart shown below.
Moon Age Reference Chart The indication of moon age is shown to indicate the age of the moon and not its shape. It can be used as a general indicator of moon age.
New moon Moon age: 0 (spring tide)
First quarter Moon age: approx. 7 (neap tide)
Full moon Moon age: approx. 15 (spring tide)
Last quarter Moon age: approx. 22 (neap tide)
<Accurate Setting of Moon Age> Moon age can be set more accurately by setting the moon age either during a new moon (when the moon mark is not visible; moon age: 0 weeks) or during a full moon (when the moon mark is facing straight up (in the direction of 12:00); moon age: approx. 15 weeks).
21
7. Using the Chronograph
CAL. 677
The chronograph second hand is normally placed at 12 o’clock position. Once the measurement
starts, it can measure up to 12 hours in units of 1/4 second. After 12 hours have elapsed, the
chronograph returns to the chronograph reset display and stops. The chronograph can also be
used to measure split time (intermediate elapsed time).
Chronograph Reset Display Chronograph seconds(B)(C) (A)Chronograph minutes, hours
Switching to the ChronographPress button (C) for least 2 seconds to switch from the calendar display to the chronograph display.· At this time, the month and year hands move to the 00:00 position (12:00 position) and stop.<Interpretation of Display> Chronograph seconds: Seconds are read with thechronograph second hand. Chronograph minutes: Minutes are read with the monthhand. Chronograph hours: Hours are read with the year hand.
Measurement is canceled when the watch is switched to the calendar displayduring chronograph measurement. 22
Grand Complication
Simple Measurement(B) 1) Press button (B) to start measuring time.
2) Press button (B) again to end measurement and display
elapsed time.
3) Pressing button (A) resets the chronograph and returns
each chronograph hand to zero.
(C)
(A)
Integrated Measurement
1) Press button (B) to start measuring time. 2) Press button (B) again to end measurement and display elapsed time. 3) Pressing button (B) again restarts measurement and that time is integrated with the previoustime. · Measurement is started and stopped repeatedly each time button (B) is pressed. 4) After ending measurement by pressing button (B), pressing button (A) resets the chronograph and returns each hand to zero.
(A)
(B)
(B)
End measurement
Reset
Measurement
(display elapsed time)
23
Measurement of Split Time (Intermediate Elapsed Time)
CAL. 677
1) Press button (B) to start measuring time.
2) Pressing button (A) stops each chronograph hand to display the split time.
· Measurement of time continues even though the hands are not moving.
3) Pressing button (A) again cancels the display of split time after which measurement
continues with the time that elapsed during display of split time added to the
measured time (the chronograph hands begin to move again).
· Repeat steps (2) and (3) in the case of repeatedly displaying split time.
4) Pressing button (B) when the split time is displayed ends split time measurement.
5) When button (A) is pressed, the time that elapsed during display of split time is added
to the measured time and that time is displayed.
6) Pressing button (A) again resets the chronograph and each of the chronograph hands
returns to zero.
24
Grand Complication
(A)
Reset
(B) Measurement(A)
(B) End measurement (display elapsed time)(B)
Split time
(B)
(A)
End split time
Split time display
measurement
(display of final elapsed time)
(A)
25
Simultaneous Measurement of 1st Place and 2nd Place Times
CAL. 677
1) Press button (B) to start measuring time.
2) Press button (A) when the 1st place competitor crosses the finish line. The time of the
1st place competitor is displayed.
· Measurement of the time of the 2nd place competitor continues even while the time
of the 1st place competitor is being displayed.
3) Press button (B) when the 2nd places competitor crosses the finish line. Time
measurement will stop at this point.
· The time of the 1st place competitor is still displayed.
4) Press button (A) to display the time of the 2nd place competitor.
5) Pressing button (A) again resets the chronograph and returns each of the hands to
zero.
(A)
Reset
(B)
(A)
Measurement
Split time (time of 1stplace competitor)
(B)
End
(A) Display of final elapsed
measurement
time
of split time
(time of 2nd
place
competitor)
26
Grand Complication
8. TroubleshootingThe date hand is moving backward (in 1 second intervals)· This indicates that the Reference Position Failure Alarm has been activated as a result of not setting the reference position. Perform the All-Reset and Reference Position Setting procedures by referring to “4. Setting the Reference Position”.The hands do not indicate the correct positions in each mode· The hand reference positions may shift if the watch is subjected to a strong impact and so forth. Perform the All-Reset and Reference Position Setting procedures by referring to “4. Setting the Reference Position”.Abnormal display or operation· There may be extremely rare occasions on which the watch exhibits an abnormal display or operation (such as the hands continually turning) as a result of the effects of static electricity or strong impact. When this happens, perform the All-Reset and Reference Position Setting procedures by referring to “4. Setting the Reference Position”.27
After Replacing the Battery
CAL. 677
· Always make sure to perform the All-Reset and Reference Position Setting procedures
by referring to “4. Setting the Reference Position” after replacing the battery. If these
procedures are not performed, the watch may not operate properly.
28
Grand Complication
9. Specifications· Caliber No: 677* · Type: Multi-hand analog quartz watch · Accuracy: Within ±20 seconds per month on average (when worn at normaltemperatures (+5 ~ +35°C)) · Operating Temperature Range: -10°C to +60°C · Display Functions:· Time: Hours, minutes, seconds, 24 hour clock · Calendar: Year, month, date, day, moon age · Chronograph: 12 hour time measurement, 1/4 second units, split time measurementfunction · Additional Functions:· Calendar: Perpetual calendar function · Moon age: Graphic wheel display function · Minute repeater function · Reference position failure alarm function · Second hand arbitrary stop function29
CAL. 677
· Battery: Battery no. 280-44 (SR927W) · Battery Life: Approx. 2 years (assuming that the minute repeater sounds for 17seconds/ day and chronograph measurement is used for 1 hour per/day)
* Specifications are subject to change without notice.
30
B. Perpetual Calendar1. Features ………………………………………… 32 2. Component Names …………………………. 33 3. Viewing the Watch Indications ………….. 35 4. Before Using the Watch– Reference position verification – ……… 37 5. Setting the Time ……………………………… 38 6. Setting the Calendar ……………………….. 39 7. Calling the Calendar ……………………….. 40 8. Troubleshooting………………………………. 42 9. Adjusting the Reference Positions…….. 44 10. Specifications …………………………………. 46
perpetual Calendar 670 * Cal.No.31
Perpetual Calendar
1. Features
This product is an analog quartz watch that uses to hands to show the hour, minutes, and
seconds, indicate the hours on a 24-hour basis, and furnish calendar information (year,
CAL. 670
month, date, and day of the week).
The calender is a perpetual calender, which automatically adjusts the end of each month,
including the month of a leap year. One useful feature of this watch enables you to
quickly call up future or past calender at one touch of a button.
32
Perpetual Calendar
2. Component NamesYear hand Hour hand
Year indicator Minute handButton (B) (future button) 24-hour hand
Day of the weekButton (C) (reset button)
Crown Second handButton (A) (past button)
Month hand
Date hand Month indicator
* The illustrations in this instruction manual may differ from the actual appearance of your watch.
* Ensure that the crown is always placed in the normal position during normal use of the watch.
Using the watch with the crown pulled to the first or second click position will shorten the
battery life. Even while not using, leave the crown in the normal position.
33
Operating procedure overview
Crown Operation
Normal position
First click position
Second click position
CAL. 670
Pressing button (A)
Calls a past calendar (backward).
Adjust the month and day of the month.
—
Pressing button (B)
Calls a future calendar (forward).
Adjusts the year.
—
Pressing button (C)
Return you to the present calendar display.
—
—
Rotating the crown
—
—
Adjust the time.
34
Perpetual Calendar
3. Viewing the Watch Indications
Viewing the time
Hour hand
Minute hand
Viewing the calendarYearDay of the week
24-hour hand Second hand
Month
Date 35
Year indication
2084
2056
The year hand indicates the years that are arranged in a
2028
straight line as shown below.
2000
In the widely used Gregorian calendar, a leap year is
1972 1944
roughly defined as a year that is divisible by four.
1916
However, years divisible by four are not regarded as a
CAL. 670
leap year and counted as a common year if its quotient
obtained by dividing by 100 is not divisible by four (e.g.,
years 1900 and 2100).
During the period of 1901 to 2099, a leap year occurs at
4-year intervals according to this regularity, and the same
calendared information is repeated on a 28-year cycle.
The year indication scale for this watch is also repeated
on a 28-year cycle. Therefore, the same calendar applies
to all the aligned years that the year hand points to.
(Example: The same calendar applies to the years 1916,
1944, 1972, 2000, 2028, 2056, and 2084.)
36
4. Before Using the Watch– Reference position verification –
Perpetual Calendar
Before the use of the watch, you should perform the following procedure to verify that the reference position is properly set for each hand of the watch. If the reference positions are not correctly set, the calendar feature does not properly work.
Year 2000 Sunday(C)
December Verifying the reference position
1) With the crown placed in the normal position, hold down button (C) for about 2 seconds. The
year, month, date, and day-of-the-week hands
then quickly move to their reference positions.
2) Verify that the hands are placed in the reference positions (Sunday, December 31, 2000).
3) Return to the present calendar display mode by pressing button (C) or allowing the reference
position verification state to prevail for about 30
seconds.
* If the hands are not placed in the reference
31st day
positions, correct their reference positions as directed in Section 9, Adjusting the Reference
Positions.
37
5. Setting the Time
Hour hand
Minute hand
1) When the second hand indicates 0 second, pull the crown out to the second click position.
CAL. 670
Time setting position
2) Rotate the crown as needed to set the time. Carefully note the 24-hour hand to distinguish between an A.M. (before noon) hour and P.M.
(after noon) hour.
Crown 3) Properly push the crown into its normal position
Normal
in accordance with a standard time signal or the
position
like.
* While you are performing a time setting
24-hour hand procedure, the time and calendar do not
Second hand
coordinate with each other. Therefore, the calendar indication remains unchanged even if the
24-hour hand passes the 12 midnight point.
Precautions when Setting Time and CalendarAvoid setting the time and calendar between the hours of about 9:00 PM to about 1:00 AM.If the time and calendar are attempted to be set (by pulling out the crown) during this period, the signal for advancing the calendar may be canceled, preventing the calendar from changing properly on the following day. 38
Perpetual Calendar
6. Setting the Calendar
YearDate Month Day of the week
1) Pull the crown out to the first click
position.
Calendar setting position
2) Press button (B) to set the year.
The year hand advances by one year
(B)
at each press of button (B). Holding
down this button rapidly advances
the year.
Crown
3) Press button (A) to set the month and date. (The month and date
hands coordinate with each other.) Normal Position The date hand advances by one day
(A)
at each press of button (A). Holding
down this button rapidly advances
the date.
4) Properly push the crown into its
normal position.
39
* The day of the week is automatically set in accordance with the month and date settings.
* Do not change the calendar indication during the time between about 9 p.m. and 1 a.m.
If you change the calendar indication during such a period of time, the calendar
indication may fail to change on the next day.
* The calendar is perpetual calendar. Once it is properly adjusted, you do not have to
CAL. 670
read just the end of each month, including the months for a leap year.
* If the calendar is adjusted for a nonexistent day, it is automatically corrected to indicate
the first day of the next month after you push the crown into its normal position (e.g.,
February 30 March 1).
* The month hand position may slightly deviate from normal at the end or beginnings of
a month. If such a situation occurs, note the date hand position to datermine the current
month (distinguish between the two successive months).
7. Calling the CalendarYou can call a past or future calendar that is within the range from March 1, 1900 to February 28, 2100. This calendar feature offers various capabilities. For example, you can datermine the day of the week of your birth date or search for a year in which Christmas Day, your 40 birthday, or other specific day falls on a Sunday.
Perpetual Calendar
Calling the calendar1) With the crown placed in the normal position, you can shift the calendar indication toward the past or future by pressing button (A) or (B). The calendar indication changes by one day at each press of button (A) or (B). (Holding down the button rapidly changes the calendar indication.)2) The watch automatically returns to the present calendar display mode at the press of button (C) or after an elapse of 30 seconds.* While the calendar is being called, the second hand makes a 2-second motion (moves two graduations at 2-second intervals) to indicate that the calendar call process is in progress.(B): Calls a future calendar (forward).(C) (A): Calls a past calendar (backward).41
CAL. 670
8. TroubleshootingThe year hand moves rapidly in reverse directionThe reference positioning procedure is not properly completed. That is why the “reference positioning failure alarm feature” is activated. Properly adjust the reference positions of all hands as directed in Section 9, Adjusting the Reference Positions.The calendar indication is incorrectIf the watch is severely shocked, the hand’s reference positions may deviate from the normal. Properly adjust the reference positions of all hands as directed in Section 9, Adjusting the Reference Positions.42
Perpetual Calendar
The watch operates erraticallyThe watch may occasionally perform an abnormal operation (e.g., the hands may rotate in an unusual manner) if it is adversely affected by static electricity or severely shocked. In this instance, properly adjust the reference positions of all hands as directed in Section 9, Adjusting the Reference Positions.After battery replacementAfter battery replacement, be sure to properly adjust the reference positions of all hands as directed in Section 9, Adjusting the Reference Positions. The watch does not properly function until the reference position adjustment procedure is completed.43
9. Adjusting the Reference Positions
CAL. 670
If the reference positions are not properly adjusted for all hands, the watch improperly operates. When the reference positions are found improper, perform the following procedure to adjust the reference position of each hand. (This procedure must also be completed after battery replacement.)
Year
(C)
1) Pull the crown out to the second click position.
(B)
2) Simultaneously press three
buttons that are designated (A),
(B), and (C). This causes the
Crown year, month, date, and day-of-
the-week hands to sequentially
start moving.
(A)
Day of the week 44
Date Month
Perpetual Calendar
3) Press button (B) to set the year hand to the year 2000.4) Press button (A) to set the month and date hands to December 31.5) Press button (C) to place the day-of-the-week hand in the Sunday (SUN) position.* Continued pressing of button (A) and button (B) will forward the hands rapidly.Reference position = December 31, 2000Reference positioning failure alarm featureIf you push the crown into its normal position without performing the button manipulation procedure after completion of Steps 1) and 2), the year hand rapidly moves in reverse direction to alert you that the reference positions are improperly adjusted. When you encounter the above situation, adjust the reference positions of all hands by performing the specified procedure again.45
10. Specifications
· Caliber No: 670*
· Type: Analog quartz watch
CAL. 670
· Accuracy: Within ±20 seconds per month
(When worn at normal temperature of +5°C ~ +35°C)
· Operating temperature range: -10°C ~ +60°C
· Display functions:
· Time: hour, minute, second, 24-hour hand
· Calendar: year, month, date, day of the week (Perpetual calendar)
· Additional functions:
· Function to access the past and future calendars
· Reference positioning failure alarm function
· Battery used: 280-74 (SR936W)
· Battery life: approximately 3 years (in case calendars for 15 years are accessed a day)
* Specifications are subject to change without notice.
46
C. Dual time1. Features ……………………………………….. 48 2. Names of Components ……………………. 49 3. Setting the Time ……………………………… 50 4. Correcting the Time Differenceof the Local Time…………………………….. 52 5. Low Battery Warning Function………….. 53 6. Specifications …………………………………. 54
dual time 776 * Cal.No.
Dual time
47
CAL. 776
1. FeaturesThis watch is an analog quartz watch featuring a dual time function that simultaneously displays time using an ordinary three-hand display (home time) as well as local time. The Local Time enables adjustment in 1-hour increments through a simple button operation without stopping the watch, allowing easy adjustment to the time of another city.
48
2. Names of ComponentsHour hand
Minute hand
Dual time
Local time minute handAM/PM mark Local time hour handSecond hand
Button (B) CrownButton (A)
* The illustrations in this instruction manual may differ from the actual appearance of your watch. 49
3. Setting the Time
The Home Time and the Local Time are synchronized. When setting the time, be sure to always set the minute hand of the Local Time at the same position as the minute hand of the Home Time.
1) Pull the crown out when the second hand arrives at the 0-second position.
CAL. 776
2) Turn the crown to set the hour hand and the minute hand of the Home Time to the
current time.
3) Press the button (A) or the button (B) to set the Local Time.
Each press of the button advances the hour and minute hands of the Local Time by 1
minute, while pressing the button continuously causes rapid advancement.
· Button (A) : Correction is performed in clockwise direction.
· Button (B) : Correction is performed in counter-clockwise direction.
Note
When setting the Local Time, please set the AM/PM mark correctly. · AM/PM mark: Blue (AM) / Yellow (PM)
4) Set to a time signal, etc. and push the crown back to the normal position.
50
Hour hand Local Time minute handAM/PM mark Local Time hour hand
Second hand Minute hand
(B) Time correction positionCrown
Normal
(A)
position
51
Dual time
4. Correcting the Time Difference of the Local Time
Perform operation with the crown in the normal position.
Pressing the button (A) or the button
(B) corrects the time difference in
1-hour increments for each time the
CAL. 776
button is pressed. (Pressing the button continuously
Local Time minute hand
causes the hand to advance
(B)
continuously.)
· Button (A) : Correction is performed
in clockwise direction. · Button (B) : Correction is performed
AM/PM mark
in counter-clockwise direction.
(A)
* Please be sure to press the button until
the hand starts moving. * When correcting the time difference,
Local Time hour hand
please set correctly for AM or PM
(color of the AM/PM mark) 52
Dual time
5. Low Battery Warning FunctionWhen the battery is near exhaustion, the second hand switches to two-second interval movements (the second hand moves in two-second interval movements every two seconds). Even at this time, the watch runs accurately however please have the battery changed as soon as possible should this happen.2 seconds 2 seconds53
6. Specifications
· Model: 776*
· Type: Analog Quartz Watch
· Accuracy: Within ±15 seconds per month (when worn at normal temperatures of
+5°C to +35°C
· Operating Temperature Range:
CAL. 776
Watch operating temperature range: 10°C to +60°C
· Display functions:
Hours, minutes, seconds, Local Time (hours, minutes, AM/PM mark)
· Additional functions:
Dual time function
Low battery warning function
· Battery: 280 39 (SR626SW)
· Battery life: Approx. 2 years
* Specifications are subject to change without notice.
54
PrecautionsWARNING Handling of the Battery· Keep the battery out of the reach of small children. · In the event a battery is swallowed, immediately consult a physician. · Do not dispose of the rechargeable cell with ordinary garbage. Please follow theinstructions of your municipality regarding collection of batteries to prevent the risk of fire or environmental contamination.WARNING Battery Replacement· If the battery should happen to be removed from the watch, keep it out of the reach of small children. Always be sure to select a battery of the correct specifications when replacing the battery.55
Handling
WARNING Water Resistance
· Refer to the watch dial and the case back for the indication of the water resistance of your watch. The following chart provides examples of use for reference to ensure that your watch is used properly. (The unit “1bar” is roughly equal to 1 atmosphere.)· WATER RESIST(ANT) ××bar may also be indicated as W.R.××bar. · Non-water resistant models are not designed to come into contact with any moisture. Take carenot to expose a watch with this rating to any type of moisture. · Water resistance for daily use (to 3 atmospheres) means the watch is water resistant foroccasional accidental splashing.
Name
Indication Dial or Case back
Specification
Handling
Non-water resistant watch
—
Non-water resistant
Everyday-use water resistant watchUpgraded everyday-use water resistant watch
WATER RESIST(ANT)WATER RESIST(ANT) 5 barWATER RESIST(ANT) 10/20 bar
Water resistant to 3 atmospheresWater resistant to 5 atmospheresWater resistant to 10 or 20 atmospheres
56
· Upgraded water resistance for daily use (to 5 atmospheres) means that the watch may be worn while swimming, but is not to worn while skin diving.· Upgraded water resistance for daily use (to 10/20 atmospheres) means that the watch may be worn while skin diving, but not while scuba or saturated diving using helium gas.Water-related use
Handling
Minor exposure Swimming and
to water (washing general washing Skin diving,
face, rain, etc.)
work
marine sports
Operate the crown Scuba diving or button when using an air tank thewatchiswet
NO
NO
NO
NO
NO
OK
NO
NO
NO
NO
OK
OK
NO
NO
NO
OK
OK
OK
NO
NO
57
CAUTION To Avoid Injury· Be particularly careful when wearing your watch while holding a small child, to avoid injury. · Be particularly careful when engaged in strenuous exercise or work, to avoid injury to yourselfand others. · Do NOT wear your watch while in a sauna or other location where your watch may becomeexcessively hot, since there is the risk of burns. · Be careful when putting on and taking off your watch, since there is a risk of damaging yourfingernails, depending on the manner in which the band is fastened. · Take off your watch before going to bed.CAUTION Precautions· Always use the watch with the crown pushed in (normal position). If the crown is of the screw lock-type, make sure it is securely locked.· Do NOT operate the crown or any push buttons when the watch is wet. Water may enter the watch causing damage to vital components.· If water enters the watch or the watch fogs up and does not clear up even after a long time, consult your dealer or Authorized Service Center for inspection and/or repair.· Even if your watch has a high level of water resistance, please be careful of the following. – If your watch is immersed in sea water, rinse thoroughly with fresh water and wipe with a dry cloth. – Do not pour water from a tap directly onto your watch.58 – Take off your watch before taking a bath.
Handling
· If seawater enters the watch, place the watch in a box or plastic bag and immediately take it in for repair. Otherwise, pressure inside the watch will increase, and parts (crystal, crown, push button, etc.) may come off.CAUTION When Wearing Your Watch<Band> · Leather, genuine skin and rubber (urethane) bands will deteriorate over time due toperspiration, body oils and dirt. Be sure to replace the band periodically. · The durability of a leather band may be affected when wet (fading, peeling of adhesive), owingto the properties of the material. Moreover, wet leather may cause a rash. · It is recommended to take off the watch if it gets wet, even if the watch itself is water resistant. · Do not wear the band too tightly. Try to leave enough space between the band and your skin toallow adequate ventilation. · The rubber (urethane) band may be stained by dyes or soil present in or on clothing or otheraccessories. Since these stains may not be removable, caution is required when wearing your watch with items that tend to easily transfer color (articles of clothing, purses, etc.). In addition, the band may be deteriorated by solvents or moisture in the air. Replace with a new one when it has lost elasticity or become cracked.59
Handling
· Please request adjustment or repair of the band in the following cases: – You notice an abnormality with the band due to corrosion. – The pin of the band is protruding.· We recommend seeking the assistance of an experienced watch technician for sizing of your watch. If adjustment is not done correctly, the bracelet may unexpectedly become detached leading to loss of your watch or injury. Consult Citizen Owners’ Help Desk.<Temperature> · The watch may stop or the function of the watch may be impaired in extremely high or lowtemperature. Do not use the watch in places where the temperature is outside the operating temperature range as stated in the specifications.<Magnetism> · Analog quartz watches are powered by a step motor that uses a magnet. Subjecting the watchto strong magnetism from the outside can cause the motor to operate improperly and prevent the watch from keeping time accurately. Do not allow the watch to come into close proximity to magnetic health devices (magnetic necklaces, magnetic elastic bands, etc.) or the magnets used in the latches of refrigerator doors, clasps used in handbags, the speaker of a cell phone, electromagnetic cooking devices and so on.60
Handling
<Strong Shock> · Avoid dropping the watch or subjecting it to other strong impact. It may cause malfunctionsand/or performance deterioration as well as damage to the case and bracelet. <Static Electricity> · The integrated circuits (IC) used in quartz watches are sensitive to static electricity. Please notethat the watch may operate erratically or not at all if exposed to intense static electricity. <Chemicals, Corrosive Gasses and Mercury> · If paint thinner, benzene or other solvents or products containing these solvents (includinggasoline, nail-polish remover, cresol, bathroom cleaners and adhesives, water repellent, etc.) are allowed to come into contact with the watch, they may discolor, dissolve or crack the materials. Be careful when handling these chemicals. Contact with mercury such as that used in thermometers may also cause discoloration of the band and case. <Protective Stickers> · Be sure to remove any protective stickers that may be on your watch (case back, band, clasp, etc.). Otherwise, perspiration or moisture may enter the gaps between the protective stickers and the parts, which may result in a skin rash and/or corrosion of the metal parts.61
Handling
CAUTION Always Keep Your Watch Clean· Rotate the crown while it is pressed in fully and press the buttons periodically so they do not become stuck due to accumulations of foreign matter.· The case and band of the watch come into direct contact with the skin in the same manner as undergarments. Corrosion of the metal or unnoticed soiling such as that caused by perspiration and dirt can soil sleeves and other portions of clothing. Keep your watch clean at all times.· The case and band of the watch come into direct contact with the skin. If you think there is something wrong, discontinue wearing the watch immediately and consult your physician. In the case of accumulation of sweat or dirt on a metal band or case, clean thoroughly using a brush and neutral detergent. In the case of a leather band, wipe clean using a dry cloth.· Leather bands may become discolored by perspiration or dirt. Always keep your leather band clean by wiping with a dry cloth.62
Handling
Caring for Your Watch · Wipe any dirt or moisture such as perspiration from the case and crystal with a soft cloth. · For a metallic, plastic or rubber (urethane) watchband, wash any dirt off with water.Remove the small amounts of dirt trapped between the crevices of the metallic band with a soft brush. · For a leather band, wipe off dirt using a dry cloth. · If you will not be using your watch for an extended period of time, carefully wipe off any perspiration, dirt or moisture and store in a proper location, avoiding locations subject to excessively high or low temperatures and high humidity.<When Luminous Paint is used for your watch> The paint on the dial and hands helps you with reading the time in a dark place. The luminous paint stores light (daylight or artificial light) and glows in a dark place. It is free from any radioactive substance or any other material harmful to a human body or environment. · The light emission gradually becomes weaker as time passes. · The duration of the light (“glow”) will vary depending on the brightness, types of anddistance from a light source, exposure time, and the amount of the paint. · The paint may not glow and/or may dissipate quickly if exposure to light was not sufficient.63
 report this ad
Handling
References
[xyz-ips snippet=”download-snippet”]