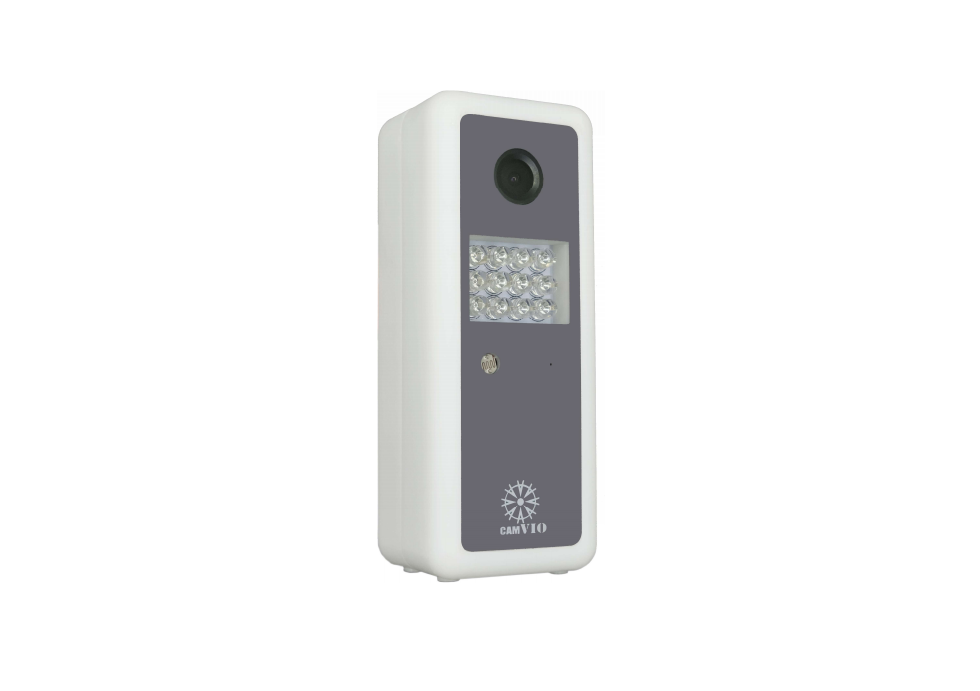
CAMVIO A1 User Guide
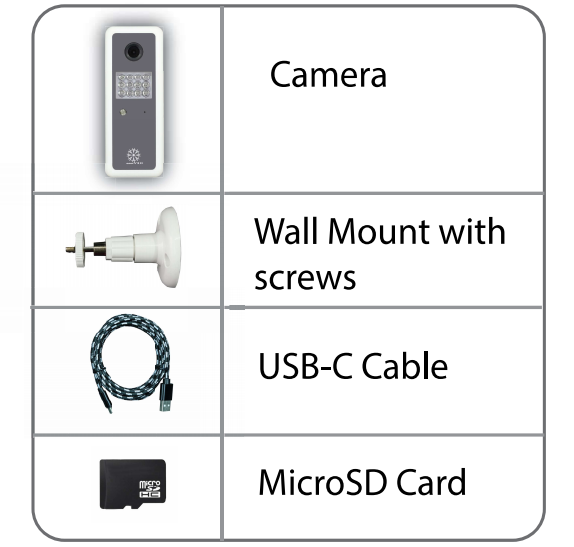
Parts List
FCC STATEMENT
- This device complies with Part 15 of the FCC Rules. Operation is subject to the following two conditions:(1) This device may not cause harmful interference, and(2) This device must accept any interference received, including interference that may cause undesired operation.
- Any Changes or modifications not expressly approved by the party responsible for compliance could void the user’s authority to operate the equipment.NOTE: This equipment has been tested and found to comply with the limits for a Class B digital device, pursuant to Part 15 of the FCC Rules. These limits are designed to provide reasonable protection against harmful interference in a residential installation. This equipment generates uses and can radiate radio frequency energy and, if not installed and used in accordance with the instructions, may cause harmful interference to radio communications. However, there is no guarantee that interference will not occur in a particular installation. If this equipment does cause harmful interference to radio or television reception, which can be determined by turning the equipment off and on, the user is encouraged to try to correct the interference by one or more of the following measures:Reorient or relocate the receiving antenna. Increase the separation between the equipment and receiver. Connect the equipment into an outlet on a circuit different from that to which the receiver is connected. Consult the dealer or an experienced radio/TV technician for help.FCC Radiation Exposure StatementThis equipment complies with FCC radiation exposure limits set forth for an uncontrolled environment.This equipment should be installed and operated with minimum distance 20cm between the radiator &your body.

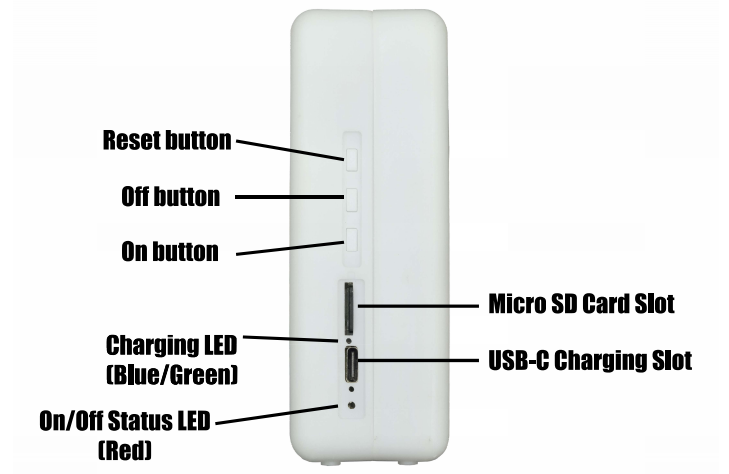
A) LED Signal Status

B) First Time Use (Android or IOS device)
- Support up to 64GB.
- The microSD card is needed for videos/images recording.
- The camera can still operate without microSD card.
- Recommend to charge the camera 6 hours before use.
- The camera is not rain/water proof.
- Remove the front and back screen protector before use.
- Insert the microSD Card into the camera.
- The pin of the microSD Card face to the front of the camera
- Recommend to format the microSD in the computer before insert to the camera.
- Download the APP on your Android or IOS DeviceAndroid Play Store: minicam
 IOS AppStore: minicam
 IOS AppStore: minicam
C) Point to Point Connection (AP Mode)
- Direct connect the camera to the Android or IOS device without using Internet connection.
- Place the camera near to your Android or IOS device during connecting
- Internet on the Android or IOS device cannot be accessed in this AP mode
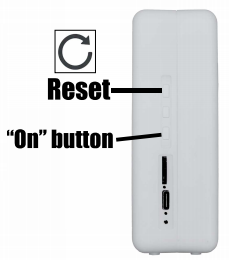
- Press “On” button and wait for around 40sec. The blue led light at the front will be lighted up, then flash rapidly and then flash slowly at the end.
- Go to “WIFI setting”in your Android or IOS device, select the WIFI SSID”CAMxxx-xxxxx-xxxxx”. Then, waiting your Android or IOS Device to show “Connected, no internet”or”Connected, Unsecure”. (Refresh your WIFI if cannot see the camera’s SSID)IMPORTANT: Do not switching to other network or your mobile network during the connection or after connected.
- Open the minicam APP at the Android or IOS Device.
- Click the Menu logo at the left top corner in the app. Then, → Add Device → Lan search device
- The camera name will be shown on the screen. Click”Add” to add the camera to the APP.
- The screen will be returned to main page. The status “connecting” will be shown next to the camera name. Wait for 1 minutes to initiate the connection until the status is changed to “Online”.
- If the status doesn’t change to “Online”, please completely exit the app, and re-open it again. And check the WIFI on your Android or IOS device is connected to the camera name -“CAMxxx-xxxxx-xxxxx”.
- Click the “Play” logo to start.
- If the “Play” Logo is not showing up, please exit the APP and reopen it again.
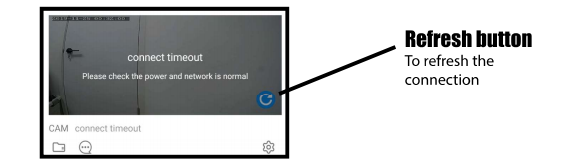
- If connection timeout, click the reflash logo at right bottom of the main screen.
D) Connect Camera to Internet (WIFI Mode)
IMPORTANT: The step 1-7 at (Section C- Point to point mode) must be completed before the following steps to connect the camera to internet.
- This camera can only support 2.4Ghz WIFI. NOT support 5Ghz WIFI.
9. Click the “setting”logo ![]() at the right in the app to go to setting page.
at the right in the app to go to setting page.
10. Click the “Network/WIFI configuration”
→ Select wifi SSID (with internet)→ Input the WIFI password→ Click the “tick/comfirm”to save
11. Back to the main page in the APP. The status “connecting”will be shown next to the camera name. Wait for 1 minutes for initiate the connection until the status is changed to “Online”
12. Click the “Play” logo ![]() to start.
to start.
13. The camera is now connecting to the internet through your WIFI router. The camera can be accessed anywhere though internet.
- The camera cannot be changed back to “Point to Point mode” unless reset the camera. To reset the camera. Please go to “Reset Camera” section.
- If the “Play” Logo is not showing up, click the refresh logo at the main screen.
- If the “Play” logo still not showing, please exit the APP and reopen it again OR Restart both the camera and the android/IOS device.
E) Password Setting
IMPORTANT: The default password is “8888” It is very IMPORTANT to change the password for the first time use.
To reset the password,Go to Setting ![]() → High Level/ Other Configuration → User Set. Input your password and then click the “Tick/confirm”to save.
→ High Level/ Other Configuration → User Set. Input your password and then click the “Tick/confirm”to save.
F) Reset Camera
 IMPORTANT: To reset the camera, all the previous setting will be deleted and return to factory default
- Do not turn off the camera during the reset.
- Please press the “On” button to turn on the camera and wait for 30sec to let the camera completely turn on.
- Press and hold “Reset” button for 3sec, the front LED flash rapidly and then will be turn off in another 3sec.
- Do not touch the camera and wait for another 10sec, then press the “On” button again to turn on the camera. The camera will be turn off one more time after few seconds. Now the camera at the factory default status.
G) Charging
 Charging adaptor is not included. You can plug the camera into the computer USB for charging. Or use a USB charger with 5V (0.5A-1.5A) output.
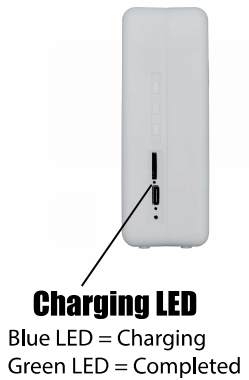
Connect the USB-C cable(included) to the charger to charge the camera. The charging light will be lighted (Blue) during charging. And changed to green when completed.
H) Battery Standby Time:
Standard mode: 10 hours.
Night Vision mode: 5.5 hours. (Infra-red leds on).
- The aboves are an estimated battery life, the actual battery life will be affected by the actual usage, WIFI signal, environments…etc.
- Video steam might turn green when the battery is in very low level.
I) Install on the Wall:
- The ideal distance between camera and subject is around 10-15 feet(3-6meter).
- Recommend to install the camera at a high position, 5- 7feet(1.5-2.1 meters) above the ground and point down the camera lens with angle (30-60 degree)
- Mark the screw position on wall for the wall mount; Use suitable tools to drill the holes on the wall.
- Install the wall mount to the wall. (Do not install the camera onto the wall mount at this step)
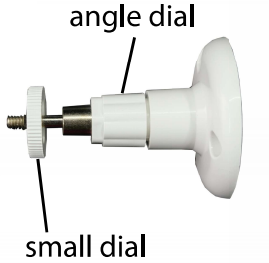
- Install the camera to the wall mount by turning it clockwise (>5turns), tighten the “small dial” ensure the camera is holding tight.
- Adjust the angle of the wall mount. And then tighten the “angle dial”.
 Mark the screw position on wall for the wall mount; Use suitable tools to drill the holes on the wall.
J) Connection Range:
For an open area, the connection range is around 160feet (50meters) in line of sight. The connection range depends on the power ofWIFI signal and any physical boundaries in between, (example: wall, window)
- Do not put the camera close to the WIFI router or other electronic device, (at least 1 meter away)
- If the video stream is lagging, please use the lower resolution of video or put the camera closer to the WIFI or using strong signal router.
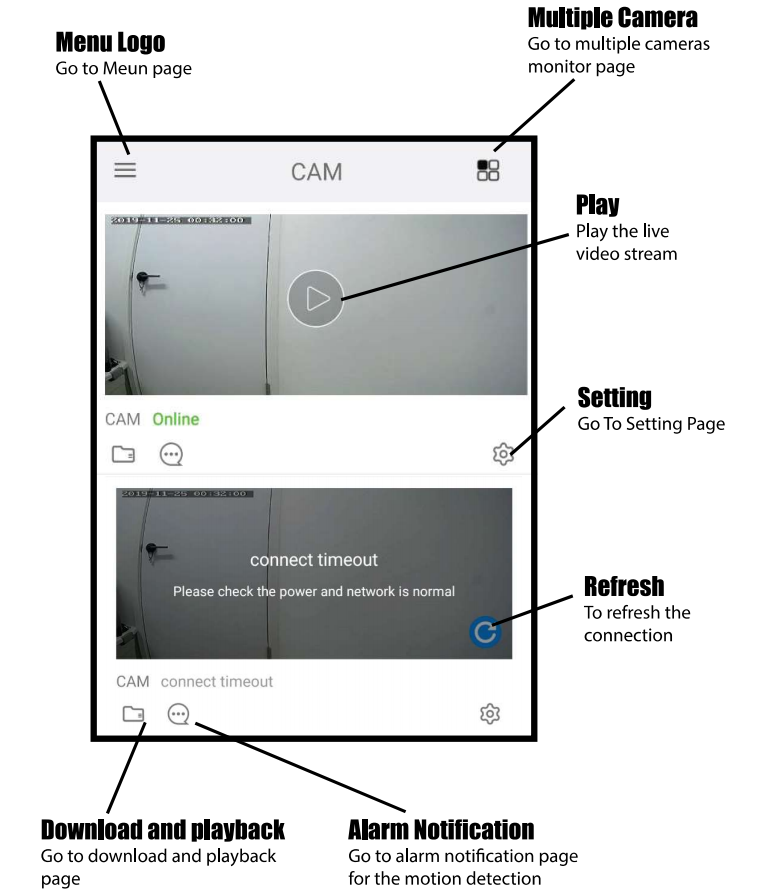
K) Main Screen:
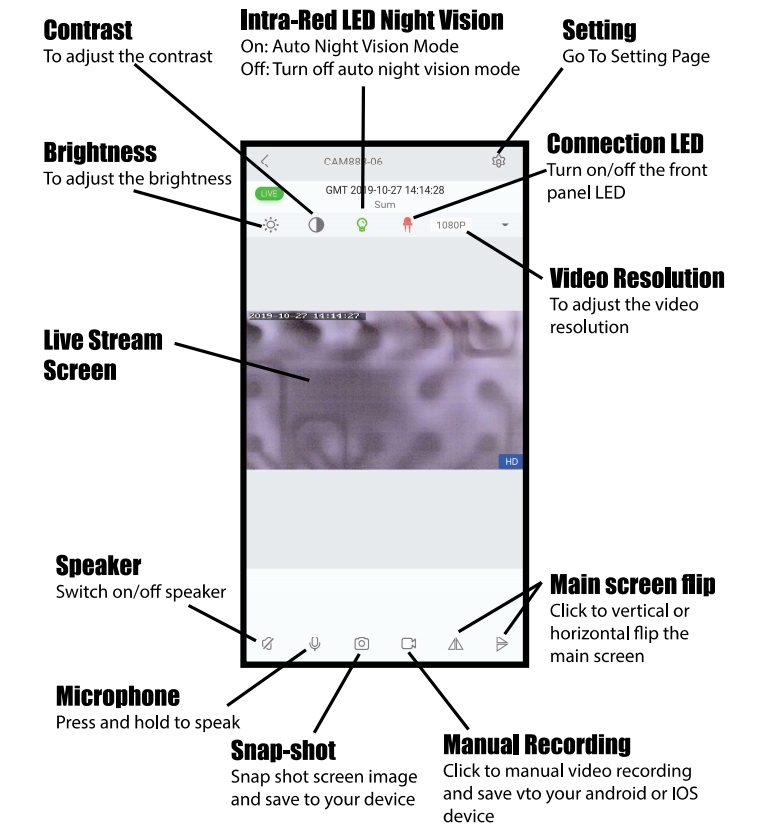
L) Live Stream Screen:
M) Setting Page:
- ID/ Device NameTo name your camera
- Device PasswordInput the password to login
- ShareA QR code of camera. Can share to other device by using this QR Code
- Alarm Notification/PushTurn on/off the alarm push(notification)
- WIFI/ Network ConfigurationTo change the wifi connection or wifi password
- Alarm/Motion Detection SetTo change motion detection setting
- Motion detection: Change the senstivty (min, low, mid, high)
- Alarm Space: To set the idle time between 2 alarms.
- MicroSD/TF Card Set
- Capacity: Show the space of the microSD card
- Uninstall SD:To safe unmount the microSD card from your machine
- Format SD:To format your microSD card
- Recording options: (Stop Recording, Full time recording, Alarm Recording Time-lapse Video)
- Delete DeviceDelete this camera from the APP
- Other/ High Level ConfigurationTime Set: Set the camera timePower Frequency: Change the camera frequency to avoid light flicker of some light source (50hz or 60hz)FTP Set: To set your FTP for uploadingMail Set: To set your Email for uploadingUser Set: To Change the login passwordFirmware: Shows the firmware version
 ID/ Device NameTo name your camera
N) Recording Options:
- MicroSD card need to be installed for the record function
There are 3 recording options:Go to Setting ![]() → TF/MicroSD Card Set
→ TF/MicroSD Card Set
a) Full time recording: Continuously full time recording, the record files will be split into for the desire record length (30sec to 6mins).
b) Alarm Record: Only record the alarm video that is triggered by the motion detection.
c) Time-lapse/short Video: To record a time-lapse video form 1 to 48 hours.
Notes: If the microSD card is full, the old recorded files will be replaced by the new recored files.
O) Motion Detection Details:
Go to Setting ![]() → Motion Detect SetMotion Detection: There are 4 levels of sensitivity of motion detection (min/lowest, low, medium and high)
→ Motion Detect SetMotion Detection: There are 4 levels of sensitivity of motion detection (min/lowest, low, medium and high)
- Set the motion detection level to “min” can reduce the false alarm
- “Min/lowest”- more focus on the middle motion detect
- “High”- more focus on full screen motion detect
- Please see the “reduce false alarm” section for more details
a) Alarm space/interval: The idle time between two single motion detection alarms.
b) Picture/photo email notification: To send the alarm images by email *(email account need to be pre-set at the setting page)
c) Picture/photo FTP notification after alarm: To send the alarm image to the FTP server. *(FTP account need to be pre-set at the setting page).
d) Video FTP notification after alarm: To send the alarm video to the FTP (FTP account need to be pre-set at the setting page).
P) Reduce False Alarm (motion detect):
a) Do not point the camera toward or too close any bright light source or reflective surface. (Example: sun light, water, light bulb, mirror, window).
b) Do not face the camera to a moving/shaking object. (Example: road with moving vehicle, sun shadows, flag, tree).
c) Do not put any high frequency electronic device close to the camera (Example: wireless router, phone).
d) Adjust the sensitivity of the motion detect level in a suitable level. Please refer to the guideline “Motion detect details”.
e) When the automatic night vision function is on. The night vision mode will be switched during sunrise or sunset which the false alarm is unavoidable in this situation.
f) Changing the setting of contrast or brightness in the main screen will trigger the motion detect alarm which is unavoidable.
g) Lower the sensitivity of motion detection can reduce the alarm trigger
h) Pointing the camera to a wide area is easier to create the false alarm trigger, try point the camera a narrower/smaller area.
Q) Download/Playback Video:
Click the folder icon at the left bottom corner to play and download all the videos are recorded in the microSD card (full time recording, alarm recording, time-lapse video).
*Full alarm images can be accessed by the alarm notification button or plugging in the microSD card into the computer.

R) Email Notification:
- To set up the email notification, need to get the SMTP server name and SMTP port of your email.
- For some email service provider, the special permission need to be grant by your email service provider.
- Please check your email service provider for more details how to get access the SMTP server.
- Go to Setting → High Level/Other Configuration → Email Config/Set
- Input the “Send” email address, SMTP Server name, SMTP port, SMTP email username, SMTP user password.
- Type the “Received” email address
- Click”Tick/confirm”to save.
S) Sharing:
- Multiple android/IOS devices can be accessed to the same camera.
- Please be careful, once the camera is shared to others devices, they can access all the data and change all the setting in your camera.
- Go to Setting → Share
- Use other lOS/Android Device to scan that QR codeOR manually typing the camera ID and password.
- Go to Setting → Device Password
- Input the device password.
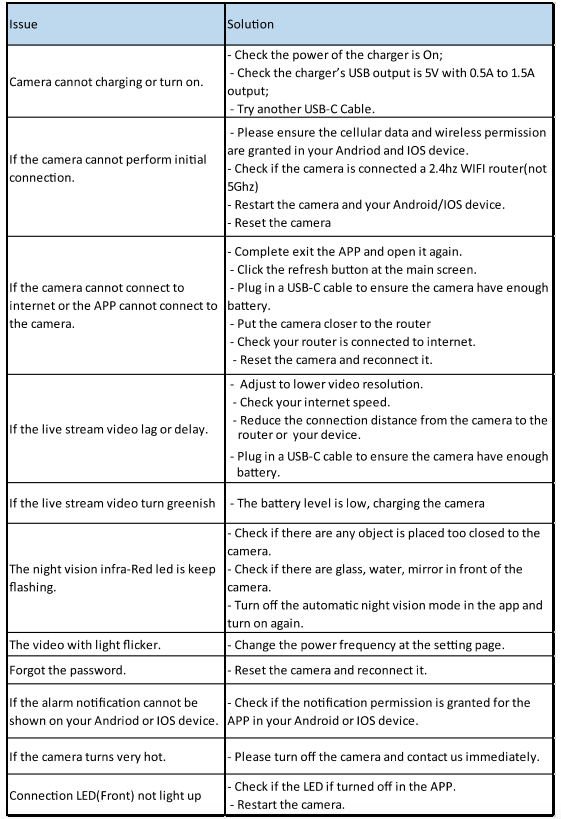
T) Problem Solving:
U) Supports:
If any enquiry, please send email to: [email protected]
[xyz-ips snippet=”download-snippet”]