
Cape Cod Tall Instructions Model # 4843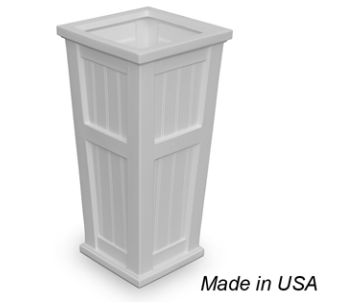 # MIS034 r3PACKAGE CONTENTS: lx Tall Planter, ‘Ix Removable Tray InsertMATERIAL: Linear low-density polyethylene (LLDPE)WARRANTY: 15-year residential warrantyIMPORTANT NOTES:• Drainage holes are not pre-drilled. Without proper drainage, the side panels may stretch causing the insert tray to slip out of place. Drainage holes are easily drilled in the side or bottom depending on the intended use of the planter. See instructions on the reverse side for more details.• Do not overload the patio planters. Lightweight fillers and potting mixes are recommended and yield better plant growth.
In the event of missing or defective parts, please email or call our customer service department toll-free at 866-363-8834 (available Monday through Friday, 8 am-5 pm EST).
General Information:
- Read instructions carefully before beginning assembly.
- Clean the product with a soap solution and high-pressure water.
- On the reverse side of this instruction sheet there are a few potting recommendations, but please consult your local garden center for more detailed information.
- The molded polyethylene construction is designed to withstand cold temperatures but you may wish to winter store the planter in a shed or garage to offer the best protection from extreme cold.
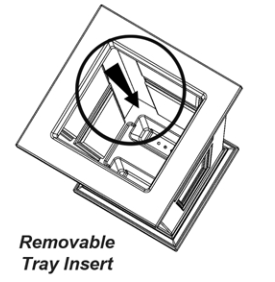
Removable Tray Insert
To remove the tray, push down firmly on one corner and lift up on the opposite corner. Due to the variations in the molding process, the tray might be a tight fit. If this is the case a little extra force may be required to pop the tray out.Note: The tray can also be flipped upside down to create a raised platform for a potted plant. To re-insert the tray, tilt it on a slight angle and wedge it back into the center of the planter. Similar to the removal, a little extra force may be needed to drop the tray back into position.
![]()
Planting instructions
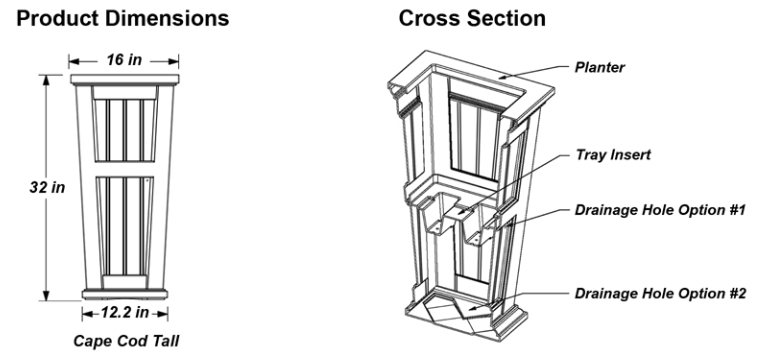
Drainage Option #1:To utilize the water trough system, drill a hole in the side of the planter as shown on the right. The overflow hole will maintain the ideal amount of water to keep the plant roots moist and avoid over saturation of the soil. Additional drainage holes are recommended for areas that receive heavy rainfall.
Drainage Option #2:To use the planter as a regular container planter simply drill two holes in the bottom to allow for proper drainage. The insert tray is completely optional and can be removed if it’s not needed. If the tray is removed, we recommend filling the bottom half of the planter with a lightweight filler to ensure proper drainage.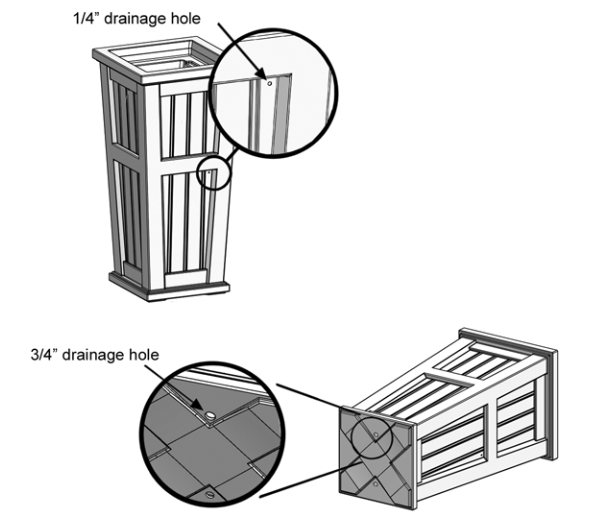
General Planting Recommendations:
To maximize the efficiency of the sub-irrigation system and encourage healthy plant growth we recommend the following:1) Make sure the tray insert is securely in place before proceeding with setup.2) Next, add a couple of inches of lightweight filler to the bottom of the planter. This is optional but reduces the amount of potting mix required. Some examples include wood chips, lava rock, foam packing peanuts, or crushed water bottles.3) Top up the planter with a potting mix. Do not use garden soil, it won’t allow for proper aeration or drainage.4) Start planting and enjoy!
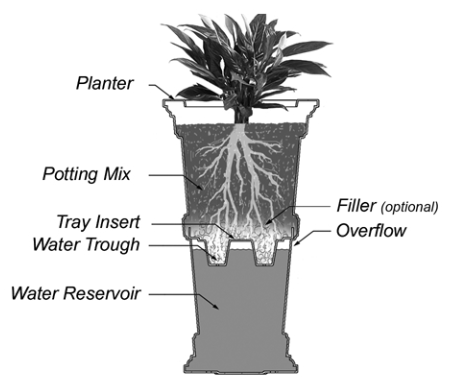
Sub-Irrigation SystemThe Cape Cod Tall planter includes a water trough insert that creates a sub-irrigation water reservoir at the bottom of the planter. Capillary action allows water in the reservoir to soak upward keeping the soil and plant roots moist. Regular watering is required for the first few weeks giving the root system time to develop. Please note that due to the height of these planters, the root system on some plants may not fully reach the water trough so regular watering may be required for a longer period of time. To avoid oversaturation, an overflow hole is drilled through the outside wall allowing excess water to drain out from the planter.
![]()
[xyz-ips snippet=”download-snippet”]