![]()
![]()
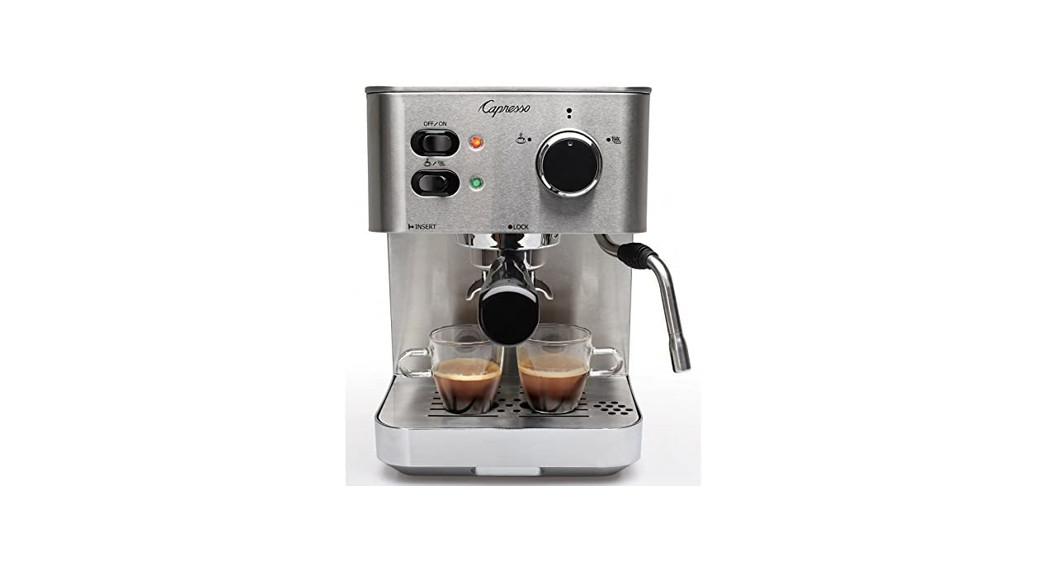
Professional Espresso &Cappuccino MachineModel #118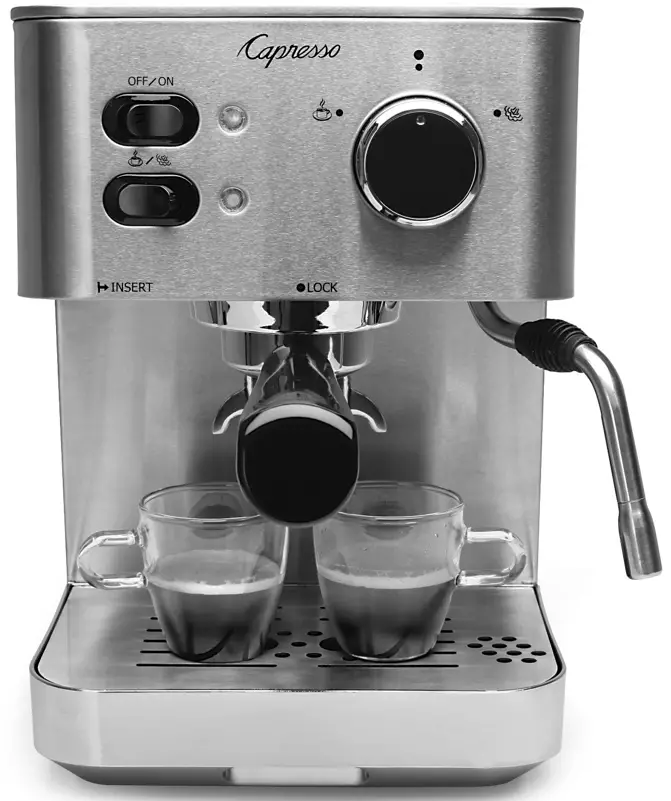
1050W / 120V / 60 Hz
Read this manual thoroughly before using it and save it for future reference
IMPORTANT SAFEGUARDS
Before using the electrical appliance, the following basic precautions should always be followed including:
- Read all instructions and any other literature included in this packaging prior to using this appliance.
- Before using check that the voltage of the wall outlet corresponds to the rated voltage marked on the machine.
- To protect against fire, electric shock, or personal injury, do not immerse the cord, plug, or appliance in water or other liquid.
- Unplug the appliance from the outlet when not in use and before cleaning. Allow the appliance to cool down before putting on or taking off parts, and before cleaning the appliance.
- Do not operate any appliance with a damaged cord or plug or after the appliance malfunctions, or has been damaged in any manner. Return appliance to the nearest authorized service facility for examination, repair, or adjustment.
- The use of accessory attachments not recommended by the appliance manufacturer may result in fire, electric shock, or injury to persons.
- Place appliance on flat surface or table, do not hang power cord over the edge of table or counter or touch any hot surfaces.
- Do not place the machine on or near a hot gas or electric burner, or in a heated oven.
- To disconnect, turn any control ‘OFF’, then remove the plug from the wall outlet. Always hold the plug and never pull on the cord.
- Do not use appliances other than intended use.
- Close supervision is necessary when your appliance is being used near children to ensure that they do not play with the appliance.
- This appliance is not intended for use by persons (including children) with reduced physical, sensory or mental capabilities, or lack of experience and knowledge unless they have been given supervision or instruction concerning the use of the appliances by a person responsible for their safety.
- Use extreme CAUTION when dispensing hot steam.
- Do not touch the hot surface of the appliance. Use handle or knobs. Do not touch the warming plate as it is HOT!
- Do not operate the espresso machine without water as it can damage the boiler.
- Do not remove the portafilter when the appliance is brewing coffee or when steaming
- Do not operate or store the appliance in environments less than 35°F.
- Do not use outdoors.
FOR HOUSEHOLD USE ONLY SAVE THESE INSTRUCTIONS
SPECIAL CORD SET INSTRUCTIONS
- A short power-supply cord is provided to reduce risks resulting from becoming entangled in or tripping over a longer cord.
- Longer detachable power-supply cords or extension cords are available and may be used if care is exercised in their use.
- If a longer detachable power-supply cord or extension cord is used,
- The marked electrical rating of the detachable power-supply cord or extension cord must be as great as the electrical rating of the appliance,
- If the appliance is of the grounded type, the extension cord should be a grounding-type 3-wire cord, and
- The longer cord should be arranged so that it will not drape over the countertop or tabletop where it can be pulled on by children or tripped over.
- This appliance has a polarized plug (one blade is wider than the other). To reduce the risk of electric shock, this plug will fit in a polarized outlet only one way. If the plug does not fit fully in the outlet, reverse the plug. If it still does not fit, contact a qualified electrician. Do not attempt to defeat this safety feature.
CAUTION
This appliance is for household use only. Any servicing other than cleaning and user maintenance should be performed by an authorized service agent.
- Do not immerse in water or try to disassemble the appliance.
- To reduce the risk of fire or electric shock, do not remove the top or base. No user-serviceable parts are inside. Repair should be done by authorized service personnel only.
- Never use warm or hot water to fill the water tank. Use cold water only!
- Keep hands and cord away from hot parts of the appliance during operation.
- Never clean with scouring powders or hard implements.
- Operate the appliance with the drip tray and support grid in place.
- Never heat flammable liquids using steam.
- To maintain the life of your machine, follow the instructions for Decalcifying in chapter 11.
 |
 |
 |
 |
The EC PRO Professional Espresso & Cappuccino Machine
Thank you for purchasing the Capresso EC PRO Professional Espresso & Cappuccino Machine. This professional-style machine includes a boiler that will internally keep a reserve of water at the ideal temperature for brewing which provides more consistent results. The EC PRO includes two different portafilters: one for convenience, one for control. The high-powered professional frothing wand can be used to create the perfect froth for cappuccinos or lattes. For Warranty please see the end of this booklet. For accessories and parts please contact Customer Service or order on our website: www.capresso.comTips for obtaining the best brew:
- Always use fresh high-quality coffee, preferably ground right before brewing.
- Use “espresso grind” coffee for pump espresso machines which are finely ground with a similar texture to fine sugar.
- Store your coffee in a dark, airtight container and leave it in a cool place (cabinet or pantry). Do not store coffee in the refrigerator. Only store unopened bags of whole coffee beans in the freezer and defrost before grinding.
- Always brew espresso into a pre-warmed cup. This can be done by leaving the cup on the warming platform or running hot water into the cup before brewing.
- Always purge the brew head and frothing wand to ensure the hottest performance.See chapter 4.
- For the best flavor, drink the espresso immediately after it is made.
- Follow all cleaning, maintenance, and decalcifying instructions.
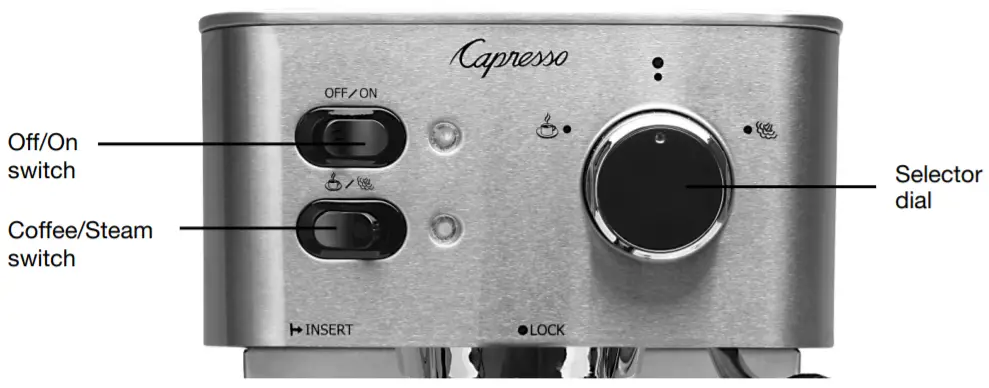
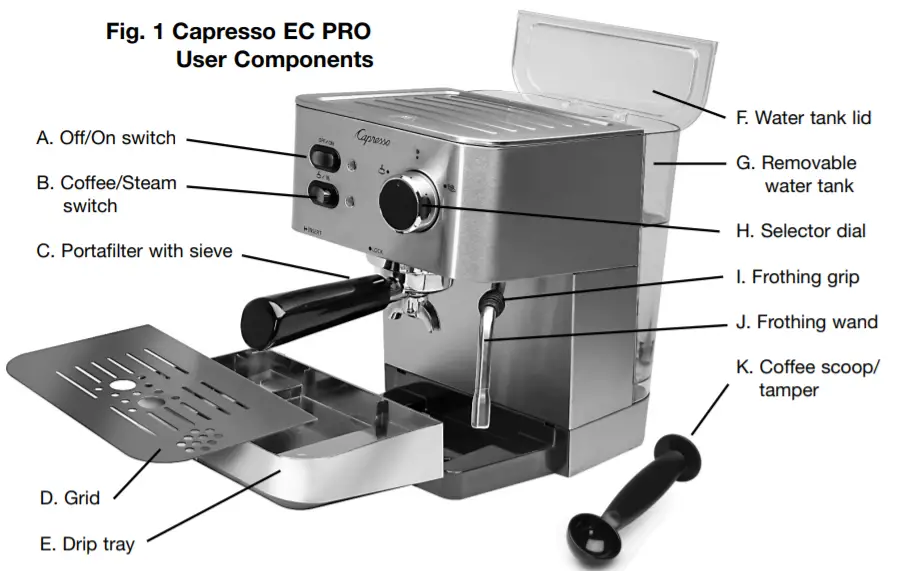
Control Panel
a) The “OFF/ON” switch on the front of the machine turns the machine on and off. When the machine is switched “ON” the indicator light next to the switch will illuminate orange, signifying that the machine is warming up the boiler.b) The COFFEE/STEAM switch on the front of the machine switches the function from coffee brewing to steaming/frothing. Press the switch on the left side for coffee brewing towards the “![]() icon. Press the switch on the right side for steaming/frothing towards the “
icon. Press the switch on the right side for steaming/frothing towards the “![]() icon. When the Coffee/Steam indicator light turns on, the switch will illuminate green and the machine is heated to the right temperature for either brewing coffee or for frothing/steaming milk for each position.NOTE: It is important to have the Coffee/Steam switch in the correct position for each function.
icon. When the Coffee/Steam indicator light turns on, the switch will illuminate green and the machine is heated to the right temperature for either brewing coffee or for frothing/steaming milk for each position.NOTE: It is important to have the Coffee/Steam switch in the correct position for each function.
c) The SELECTOR DIAL has three positions:
- LEFT (
 ) brewing coffee,
 - CENTER (•) standby, brewing, and steaming stops,
- RIGHT () steam production through the frothing wandNOTE: It is important to have the Selector Dial in the corresponding position to the Coffee/Steam switch when brewing or frothing.
d) To turn the machine off, make sure the Selector Dial is in the center “•” position and press the OFF/ON switch to the “OFF” position.NOTE: During brewing or steaming, the green Coffee/Steam indicator light will turn off, specifying the heating system is on, maintaining the propertemperature for brewing or steaming.
Before Using for the First Time
After carefully unpacking your EC PRO, wash all removable parts with warm soapy water and rinse thoroughly. Familiarize yourself with the appliance and read the instruction manual. To ensure the first cup of coffee tastes excellent, you should flush the internal parts of the machine with water as follows:a) Fill the water tank with fresh, cold water. The water level should not exceed the “MAX” mark on the tank. Then close the water tank lid.NOTE: The appliance has a removable water tank for easy cleaning; you can fill the tank with freshwater directly at your sink and then put the tank back onto the appliance, pushing down firmly to engage the base valve. Make sure the two hooks on the back of the water tank are inserted into theopenings in the back of the machine.b) Place the portafilter with sieve onto the machine with no coffee inside the sieve, then insert the portafilter into the appliance from the “INSERT” position.Push up and attach the portafilter by firmly turning it counterclockwise until it is in the “LOCK” position.c) Place a cup on the removable drip tray. Make sure the OFF/ON switch is pushed to the left in the OFF position.d) Plug the power cord into a grounded wall outlet according to the safety instructions; press the power switch to the “ON” position by pressing theright side of the switch. The orange power indicator will be illuminated and the appliance will start heating.e) Press the left side of the Coffee/Steam button which corresponds to the “![]() icon, wait until the ready indicator light illuminates green. Turn the Selector Dial to the “
icon, wait until the ready indicator light illuminates green. Turn the Selector Dial to the “![]() position. The water will flow out.f) After about one minute, turn the Selector Dial to the center “•” position to stop brewing, discard the hot water; now you can start brewing.NOTE: There may be noise when pumping the water for the first time, it is normal; the machine is releasing the air in the appliance. After about 20seconds, the noise will disappear.
position. The water will flow out.f) After about one minute, turn the Selector Dial to the center “•” position to stop brewing, discard the hot water; now you can start brewing.NOTE: There may be noise when pumping the water for the first time, it is normal; the machine is releasing the air in the appliance. After about 20seconds, the noise will disappear.
Warming Internal Components and Cups/Purging the Machine
Before making espresso, it is important to pre-warm all the internal components in the appliance and the cups by purging the machine. This short procedure will add 10° to 15° F to the first cup of espresso.a) Make sure the Selector Dial is in the center position “•”.b) Remove the water tank and open the tank lid to fill it with fresh water, the water level should not exceed the “MAX” mark on the tank. Then place the tank into the appliance properly, pushing down firmly to engage the base valve. Make sure the two hooks on the back of the water tank are insertedinto the openings in the back of the machine.c) Switch “ON” the machine. The “ON” button indicator will illuminate orange.Make sure the Coffee/Steam switch is pressed to the left in the Coffee position “![]() .d) Place the sieve inside the portafilter (without coffee). See Fig 2 for proper inserting of the sieve.e) Align the portafilter at the inscription “INSERT”, push the portafilter up and turn it firmly to the right towards the inscription “LOCK” until it feels tight.NOTE: In the beginning, it might not be possible to turn the portafilter all the way to the “LOCK” position. Just make sure the portafilter is firmly placed. Over time the portafilter can be moved closer to the “LOCK” position.f) Place cup(s) underneath the portafilter. At this time the green indicator light illuminates next to the Coffee/Steam switch showing the machine is ready to brew.g) Turn the Selector Dial to the left towards the “
.d) Place the sieve inside the portafilter (without coffee). See Fig 2 for proper inserting of the sieve.e) Align the portafilter at the inscription “INSERT”, push the portafilter up and turn it firmly to the right towards the inscription “LOCK” until it feels tight.NOTE: In the beginning, it might not be possible to turn the portafilter all the way to the “LOCK” position. Just make sure the portafilter is firmly placed. Over time the portafilter can be moved closer to the “LOCK” position.f) Place cup(s) underneath the portafilter. At this time the green indicator light illuminates next to the Coffee/Steam switch showing the machine is ready to brew.g) Turn the Selector Dial to the left towards the “![]() icon. Hot water will be pumped through the filter and into the cup(s).h) Turn the Selector Dial to the center position “•” to stop the flow of hot water.i) Empty the cup(s) and remove the portafilter. Dry the cup(s), sieve, and portafilter well. All parts are now pre-warmed and the machine has beenpurged.CAUTION! Never leave the machine unattended during brewing or steaming.You always must turn the Selector Dial to the center position “•” to stop brewing and/or steaming.TIP: Place espresso cups upside down on the warming plate on top of the machine. As long as the machine is on, the internal heater will keep the top plate warm.
icon. Hot water will be pumped through the filter and into the cup(s).h) Turn the Selector Dial to the center position “•” to stop the flow of hot water.i) Empty the cup(s) and remove the portafilter. Dry the cup(s), sieve, and portafilter well. All parts are now pre-warmed and the machine has beenpurged.CAUTION! Never leave the machine unattended during brewing or steaming.You always must turn the Selector Dial to the center position “•” to stop brewing and/or steaming.TIP: Place espresso cups upside down on the warming plate on top of the machine. As long as the machine is on, the internal heater will keep the top plate warm.
Filling and Inserting the Portafilters
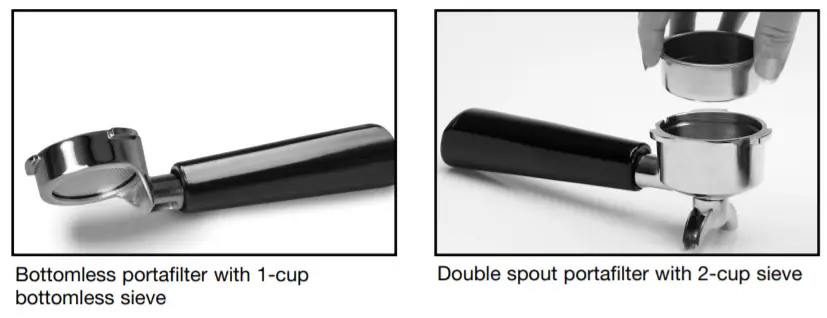
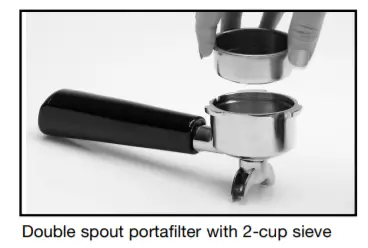
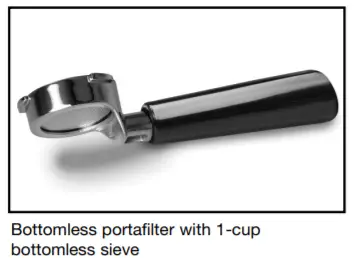
The EC PRO includes two espresso portafilters – one for convenience, one for control. Choose the one that’s right for you.a) Double Spout PortafilterThe double spout portafilter is convenient and easy to use, even if you’re brewing espresso for the first time. Use the large 2-cup sieve with the double spout portafilter. The large 2-cup sieve is pressurized and will produce a good crema by creating extra pressure within the sieve to enrich the crema. We recommend beginners use the double spout portafilter and 2-cup sieve to create the optimal brew, quickly and easily.a. Place the 2-cup sieve firmly inside of the double spout portafilter. See Fig 2 for proper inserting of the sieve.TIP: Ensure the sieve is dry so no coffee sticks to it.b. Fill sieve with finely ground coffee until it is slightly overflowing. Lightly tap the portafilter up and down on a level surface to evenly distribute grounds then level the coffee with your fingers to fill in all open space inside the sieve.NOTE: Ground coffee should be a similar texture to table salt or granular sugar.c. Using the flat side of the included coffee scoop/tamper, pack (tamp) the espresso firmly into the sieve with approximately 30 pounds of pressure.NOTE: Use the same amount of pressure it takes to remove a tight lid from a jar.d. Wipe any coffee grounds from the rim of the sieve and the portafilter.e. Insert and lock the portafilter (see chapter 4, e).b) Bottomless PortafilterThe bottomless portafilter and 1-cup/bottomless sieve let you brew barista style and perfect your technique. We suggest bottomless style brewing foradvanced/expert espresso brewers. It will allow the barista to visually see their technique and learn how to improve upon it by diagnosing the errors. The bottomless filter takes practice to use but by adjusting the grind size, tamp pressure, or quality/age of the coffee, your espresso brewing technique will drastically improve the taste of your coffee. When used correctly, the bottomless filter will produce a richer crema and a hotter brew.
CAUTION! Using the bottomless portafilter can produce spurts of espresso which can spray the machine, counter, and/or the user with espresso. This indicates the ground coffee was not dosed/tamped correctly or the grind size needs adjusting. Take care when using the bottomless filter to avoid direct contact with the hot espresso.
a. Place the bottomless sieve firmly inside of the bottomless portafilter and ensure it is fully locked inside the portafilter.TIP: Ensure the sieve is dry so no coffee sticks to it.b. Fill with extra fine ground coffee until it is slightly overflowing and level the coffee with your fingers to fill in all open space inside the sieve.NOTE: Ground coffee texture should be finer than sugar, but not as fine as powdered sugar.c. The bottomless portafilter can be placed on the side of your countertop as shown on the right to create a level tamping surface. Using the flat side of the included coffee scoop/ tamper, pack (tamp) the espresso firmly into the sieve with approximately 30 pounds of pressure.NOTE: Use the same amount of pressure it takes to remove a tight lid from a jar.d. Wipe any coffee grounds from the rim of the sieve and the portafilter.e. Insert and lock the portafilter (see chapter 4, e).
Tips on diagnosing extraction with the bottomless portafilter:
- Blonding: A very light-colored shot may be an indication that more coffee grounds need to be added to the sieve or the grind is too coarse.Alternatively, a shot that is too dark can mean there are too many coffee grounds in the sieve or the grind is too fine. Use a conical burr grinder and experiment to find the perfect grind.
- Under-extraction: Occurs when coffee is weak in taste. It can be too coarsely ground or not enough coffee is packed inside the sieve. Follow the instructions in Chapter 5b, a-d, on how to properly fill and tamp the coffee grinds.
- Over-extraction: Occurs when boiler water is too hot. There will be a thin, dark crema and the flavor will be harsh and very strong. EnsureThe coffee/Steam switch is in the coffee position and always allows the boiler to cool down after steaming.
- Channeling: The shot is not flowing evenly in one central stream and is spurting off to the sides. This is caused by uneven tamping. Ensure to place even pressure on the ground coffee when tamping.
- Tiger striping: Are the visual effects of good extraction. The tiger stripes are formed by the contrasting light and dark colors of the crema flowing down the steam of espresso into the cup.
Preparing Espresso
a) Make sure the machine is turned ON, the Selector Dial is in the “•” position and there is water in the water tank. The machine and your cup(s) should be pre-warmed as described in chapter 4.b) The Coffee/Steam switch should be in the “![]() position.c) Fill the sieve of the portafilter with ground coffee as described in chapter 5.Ensure the ground coffee is properly tamped and place the portafilter securely onto the machine.d) Place cup(s) underneath the portafilter.TIP: Use two espresso cups or one large wide-mouthed cappuccino cup when using the double spout portafilter. Use one espresso cup or onecappuccino cup when using the bottomless portafilter.e) When the green indicator light is illuminated next to the Coffee/Steam switch, turn the Selector Dial to the left towards the cup symbol “
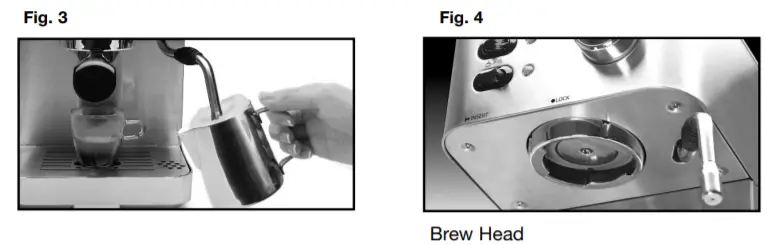
position.c) Fill the sieve of the portafilter with ground coffee as described in chapter 5.Ensure the ground coffee is properly tamped and place the portafilter securely onto the machine.d) Place cup(s) underneath the portafilter.TIP: Use two espresso cups or one large wide-mouthed cappuccino cup when using the double spout portafilter. Use one espresso cup or onecappuccino cup when using the bottomless portafilter.e) When the green indicator light is illuminated next to the Coffee/Steam switch, turn the Selector Dial to the left towards the cup symbol “![]() .Espresso will be to flow into your cup(s).WARNING: Do not leave the espresso machine unattended during operation, as you need to operate it manually.f) When the desired amount of espresso is brewed, stop the flow by turning the Selector Dial to the center position “•”.NOTE: It is normal for the green Coffee/Steam indicator light to turn off during brewing indicating the heating system is active.g) Remove the cup(s) and enjoy. Within seconds the green Coffee/Steam indicator light will illuminate, indicating that the EC PRO is ready for the nextbrewing cycle.h) Carefully and slowly, remove the portafilter from the appliance by moving the handle to the left.CAUTION! Hot water may still be on top of the coffee grinds in the sieve.Be careful.i) Turn the portafilter upside down and tap out the used coffee grounds.j) Rinse the sieve and portafilter under warm water and make sure the holes are free of coffee deposits. Dry the portafilter and sieve with a clean cloth.You are ready to prepare the next espresso.TIP: We recommend purging the brew head, (Fig. 4) with hot water after removing the portafilter to ensure all coffee residue is removed from thebrew head. Place a large cup under the brew head and turn the Selector Dial to the left towards the cup symbol “
.Espresso will be to flow into your cup(s).WARNING: Do not leave the espresso machine unattended during operation, as you need to operate it manually.f) When the desired amount of espresso is brewed, stop the flow by turning the Selector Dial to the center position “•”.NOTE: It is normal for the green Coffee/Steam indicator light to turn off during brewing indicating the heating system is active.g) Remove the cup(s) and enjoy. Within seconds the green Coffee/Steam indicator light will illuminate, indicating that the EC PRO is ready for the nextbrewing cycle.h) Carefully and slowly, remove the portafilter from the appliance by moving the handle to the left.CAUTION! Hot water may still be on top of the coffee grinds in the sieve.Be careful.i) Turn the portafilter upside down and tap out the used coffee grounds.j) Rinse the sieve and portafilter under warm water and make sure the holes are free of coffee deposits. Dry the portafilter and sieve with a clean cloth.You are ready to prepare the next espresso.TIP: We recommend purging the brew head, (Fig. 4) with hot water after removing the portafilter to ensure all coffee residue is removed from thebrew head. Place a large cup under the brew head and turn the Selector Dial to the left towards the cup symbol “![]() and let water flow for 5 to 10seconds then turn the Selector Dial to the center position “•”.
and let water flow for 5 to 10seconds then turn the Selector Dial to the center position “•”.
Preparing Cappuccino
Cappuccino is the combination of one or two shots of espresso with an equal or larger amount of hot milk and milk froth (for Latte see chapter 8).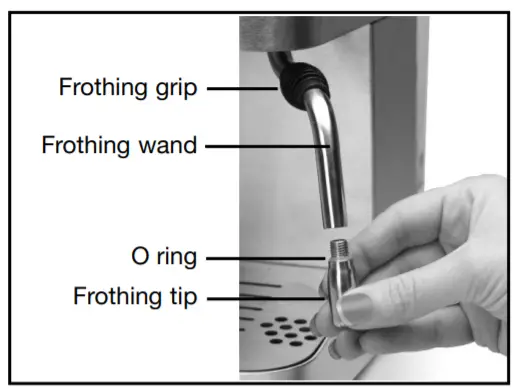
NOTE: When frothing, the sieve and portafilter should be assembled in the “LOCK” position.
Frothing MilkFor best results always start with fresh, cold milk (about 34°F). The ideal end temperature for frothed or steamed milk is between 140°F-160°F. Any type of milk can be used when frothing. Whole milk will produce good microform (small bubbles) while low-fat and fat-free milk produces large, airy bubbles in the froth. Non-dairy milk will not hold the froth as well but can be steamed and heated for lattes.a) Prepare espresso first into a large, pre-heated cup as described in chapter 6.Ensure Selector Dial is in the center position “•” once the espresso has finished brewing.b) Press the Coffee/Steam switch to the right which is the “![]() steam/frothing position. Wait for the Coffee/Steam indicator to illuminate green showing that the machine has reached the right temperature to steam.c) Fill a stainless steel pitcher with 3 to 4 oz. of cold milk for each cappuccino to be prepared.NOTE: In choosing the size of the pitcher ensure there is enough room for the milk to increase in volume by 2 to 3 times.d) Using the black silicon frothing grip for the tips of your fingers, move the frothing wand down toward the holes in the drip tray and turn the Selector Dial to the right, steam/frothing “
steam/frothing position. Wait for the Coffee/Steam indicator to illuminate green showing that the machine has reached the right temperature to steam.c) Fill a stainless steel pitcher with 3 to 4 oz. of cold milk for each cappuccino to be prepared.NOTE: In choosing the size of the pitcher ensure there is enough room for the milk to increase in volume by 2 to 3 times.d) Using the black silicon frothing grip for the tips of your fingers, move the frothing wand down toward the holes in the drip tray and turn the Selector Dial to the right, steam/frothing “![]() position to release steam for about 10 seconds in order to clear the internal tubing. Turn the Selector Dial back to the “•” position.CAUTION! Never touch the metal part of the frothing wand, use the black silicone grip.e) Using the black silicon grip, pull the frothing wand forward and insert the frothing wand into the milk about one centimeter from the surface (Fig. 4), then turn the Selector Dial to the right, steam/frothing “
position to release steam for about 10 seconds in order to clear the internal tubing. Turn the Selector Dial back to the “•” position.CAUTION! Never touch the metal part of the frothing wand, use the black silicone grip.e) Using the black silicon grip, pull the frothing wand forward and insert the frothing wand into the milk about one centimeter from the surface (Fig. 4), then turn the Selector Dial to the right, steam/frothing “![]() position. Steam will be produced from the wand and a microfoam can be created by tilting the frothing pitcher at a 45° angle and keeping the wand close to the surface of the milk. Try to create a cyclone with the milk so it spins rapidly for about 30-40 seconds.Then plunge the frothing wand all the way into the milk until the desired temperature is reached.TIP: Milk will start to scorch around 176°F so we suggest stopping frothing before the temperature reaches 170°F.f) When the desired amount of froth is reached or temperature has reached 170°F, turn the Selector Dial to the “•” position.CAUTION! Never remove the frothing wand from the milk while the Selector Dial is still in the steam position “
position. Steam will be produced from the wand and a microfoam can be created by tilting the frothing pitcher at a 45° angle and keeping the wand close to the surface of the milk. Try to create a cyclone with the milk so it spins rapidly for about 30-40 seconds.Then plunge the frothing wand all the way into the milk until the desired temperature is reached.TIP: Milk will start to scorch around 176°F so we suggest stopping frothing before the temperature reaches 170°F.f) When the desired amount of froth is reached or temperature has reached 170°F, turn the Selector Dial to the “•” position.CAUTION! Never remove the frothing wand from the milk while the Selector Dial is still in the steam position “![]() . Always turn the selector dial to the center “•” position before removing the frothing wand from the milk or it could cause hot milk to splatter.NOTE: Carefully clean the frothing wand with a wet cloth immediately after frothing to avoid milk build-up. Take care to avoid contact with hot parts.g) Tap the pitcher on the counter to settle the milk and force any air bubbles to the top. Right before pouring, roll the milk gently around the pitcher toincorporate the foam and the milk. The milk should have a shiny, smooth surface that is free of any large bubbles.h) Pour the frothed milk into the prepared espresso, now the cappuccino is ready. Sweeten to taste and add any ingredients you desire such as flavoredsyrups, extracts, or cocoa powder/spices.NOTE: After frothing, we recommended you allow the machine to cool down for at least 5 minutes before making espresso again. This allows the machine to cool down from steaming temperature to the proper espresso brewing temperature. If multiple cappuccinos will be made, prepare all the espressos first into hot cups and then froth the milk after.TIP: If you would like to prepare more espresso immediately after steaming milk, the boiler must be refilled with cold water in order to bring the boiler’s temperature down and avoid a burnt espresso taste from brewing at too high of a temperature. Change the Coffee/Steam switch to the coffee “
. Always turn the selector dial to the center “•” position before removing the frothing wand from the milk or it could cause hot milk to splatter.NOTE: Carefully clean the frothing wand with a wet cloth immediately after frothing to avoid milk build-up. Take care to avoid contact with hot parts.g) Tap the pitcher on the counter to settle the milk and force any air bubbles to the top. Right before pouring, roll the milk gently around the pitcher toincorporate the foam and the milk. The milk should have a shiny, smooth surface that is free of any large bubbles.h) Pour the frothed milk into the prepared espresso, now the cappuccino is ready. Sweeten to taste and add any ingredients you desire such as flavoredsyrups, extracts, or cocoa powder/spices.NOTE: After frothing, we recommended you allow the machine to cool down for at least 5 minutes before making espresso again. This allows the machine to cool down from steaming temperature to the proper espresso brewing temperature. If multiple cappuccinos will be made, prepare all the espressos first into hot cups and then froth the milk after.TIP: If you would like to prepare more espresso immediately after steaming milk, the boiler must be refilled with cold water in order to bring the boiler’s temperature down and avoid a burnt espresso taste from brewing at too high of a temperature. Change the Coffee/Steam switch to the coffee “![]() position. Place a large empty cup on the drip tray and turn the Selector Dial towards the cup symbol “
position. Place a large empty cup on the drip tray and turn the Selector Dial towards the cup symbol “![]() . Allow the cup to fill with water to empty the hot water from the boiler. Turn the Selector Dial to the center “•” position to stop the flow of hot water and remove the portafilter. Dry the portafilter well and the boiler should be at the correct temperature for espresso brewing.
. Allow the cup to fill with water to empty the hot water from the boiler. Turn the Selector Dial to the center “•” position to stop the flow of hot water and remove the portafilter. Dry the portafilter well and the boiler should be at the correct temperature for espresso brewing.
Preparing Latte
Latte is the combination of one or two shots of espresso with an equal or larger amount of hot steamed milk without or very little froth.Steaming MilkFor best results always start with fresh, cold milk. The ideal temperature for steamed milk is between 140°F-160°F.a) Follow steps a – d above in chapter 7. Using the black silicon grip, pull the frothing wand forward and insert the frothing wand into the milk about halfway down the pitcher, then turn the Selector Dial to the right, steam/frothing “![]() position. Steam will be produced from the wand and will heat the milk. Slowly move the pitcher around and heat to the desired temperature.TIP: Milk will start to scorch around 176°F so we suggest stopping frothing when the temperature reaches 170°F.b) When the desired temperature is reached, turn the Selector Dial to the center “•” position.CAUTION! Never remove the frothing wand from the milk while the Selector Dial is still in the steam position “
position. Steam will be produced from the wand and will heat the milk. Slowly move the pitcher around and heat to the desired temperature.TIP: Milk will start to scorch around 176°F so we suggest stopping frothing when the temperature reaches 170°F.b) When the desired temperature is reached, turn the Selector Dial to the center “•” position.CAUTION! Never remove the frothing wand from the milk while the Selector Dial is still in the steam position “![]() . Always turn the selector dial to the center “•” position before removing the frothing wand from the milk or it could cause hot milk to splatter.NOTE: Carefully clean the frothing wand with a wet cloth immediately after steaming to avoid milk buildup. Take care to avoid contact with hot parts.c) Pour the steamed milk into the prepared espresso, now the latte is ready.Sweeten to taste and add any ingredients you desire such as flavored syrups, extracts, or cocoa powder/spices.NOTE: After steaming, we recommended you allow the machine to cool down for at least 5 minutes before making espresso again. This allows themachine to cool down from steaming temperature to the proper espresso brewing temperature. If multiple lattes will be made, prepare all the espressosfirst into hot cups and then steam the milk after.TIP: If you would like to prepare more espresso immediately after steaming milk, the boiler must be refilled with cold water in order to bring the boiler’s temperature down and avoid a burnt espresso taste from brewing at too high of a temperature. Change the Coffee/Steam switch to the coffee ”
. Always turn the selector dial to the center “•” position before removing the frothing wand from the milk or it could cause hot milk to splatter.NOTE: Carefully clean the frothing wand with a wet cloth immediately after steaming to avoid milk buildup. Take care to avoid contact with hot parts.c) Pour the steamed milk into the prepared espresso, now the latte is ready.Sweeten to taste and add any ingredients you desire such as flavored syrups, extracts, or cocoa powder/spices.NOTE: After steaming, we recommended you allow the machine to cool down for at least 5 minutes before making espresso again. This allows themachine to cool down from steaming temperature to the proper espresso brewing temperature. If multiple lattes will be made, prepare all the espressosfirst into hot cups and then steam the milk after.TIP: If you would like to prepare more espresso immediately after steaming milk, the boiler must be refilled with cold water in order to bring the boiler’s temperature down and avoid a burnt espresso taste from brewing at too high of a temperature. Change the Coffee/Steam switch to the coffee ” ![]() ” position. Place a large empty cup on the drip tray and turn the Selector Dial towards the cup symbol “
” position. Place a large empty cup on the drip tray and turn the Selector Dial towards the cup symbol “![]() . Allow the cup to fill with water to empty the hot water from the boiler. Turn the Selector Dial to the center “•” position to stop the flow of hot water and remove the portafilter. Dry the portafilter well and the boiler should be at the correct temperature for espresso brewing.
. Allow the cup to fill with water to empty the hot water from the boiler. Turn the Selector Dial to the center “•” position to stop the flow of hot water and remove the portafilter. Dry the portafilter well and the boiler should be at the correct temperature for espresso brewing.
Cleaning the Frothing Wand
It is recommended to wipe the frothing wand clean with a damp cloth each and every time immediately after frothing or steaming milk to prevent build-up. Deep clean the frothing wand before turning OFF the machine to ensure cleanliness.a) Wipe off as much milk residue as possible from the frothing wand using a damp cloth.CAUTION! The frothing wand may be hot!b) Ensure the Coffee/Steam switch is in the ” ” steam/frothing position. Using the black silicon frothing grip, move the frothing wand down towardthe holes in the drip tray and turn the Selector Dial to the right, steam/ frothing “![]() position to release steam for about 10 seconds in order to clearthe internal tubing. Turn the Selector Dial back to the center “•” position.NOTE: If no steam comes out of the frothing wand, hardened milk may be built up inside of the frothing wand. See chapter 12, Troubleshooting on how to clean the blocked frothing wand.c) Fill a small pitcher or cup with cold water and immerse the frothing wand deep into the cold water so it is close to the bottom of the pitcher.d) Turn the Selector Dial to the right, steam/frothing “
position to release steam for about 10 seconds in order to clearthe internal tubing. Turn the Selector Dial back to the center “•” position.NOTE: If no steam comes out of the frothing wand, hardened milk may be built up inside of the frothing wand. See chapter 12, Troubleshooting on how to clean the blocked frothing wand.c) Fill a small pitcher or cup with cold water and immerse the frothing wand deep into the cold water so it is close to the bottom of the pitcher.d) Turn the Selector Dial to the right, steam/frothing “![]() position to release steam.e) Hold the frothing wand at the bottom of the pitcher for 20 to 30 seconds then turn the Selector dial back to the center “•” position.f) Remove pitcher from frothing wand and wipe frothing wand with a damp cloth.g) Turn the machine OFF by pressing the OFF/ON switch to the left.
position to release steam.e) Hold the frothing wand at the bottom of the pitcher for 20 to 30 seconds then turn the Selector dial back to the center “•” position.f) Remove pitcher from frothing wand and wipe frothing wand with a damp cloth.g) Turn the machine OFF by pressing the OFF/ON switch to the left.
Cleaning and Maintenance
a) Always disconnect the plug from the wall outlet and allow the appliance to cool down completely before cleaning.b) Do not immerse the appliance in water or any other liquid.c) Do not use harsh abrasives to clean. Wipe down the appliance housing with a damp cloth.NOTE: Do not clean with alcohol or solvent cleaner.d) Wipe the brew head with a damp cloth.CAUTION! HOT! The danger of burning or scalding! Allow the appliance to cool down completely before cleaning.e) Rinse the water tank, the grid, and the drip tray regularly with water.f) Empty the drip tray regularly and clean with hot soapy water.g) Detach the 2-cup sieve from the double spout portafilter by turning it clockwise, removing coffee residue with a stiff-bristled brush. If any coffee particles are stuck in the small holes, they can be removed with a pin.h) Detach the 1-cup/bottomless sieve from the bottomless portafilter by firmly pushing it out. Remove coffee residue with a stiff-bristled brush. If any coffee particles are stuck in the small holes, they can be removed with a pin.i) If the inner screen inside the brew head, (Fig. 4) accumulates coffee oils, it can be unscrewed for a thorough cleaning using a screwdriver. Ensure it isattached back onto the machine the same way after cleaning.j) Clean the seal around the brew head with a damp cloth and always keep it clean to maintain the life of your machine.k) Clean the frothing wand after every use. See chapter 9.l) Remove the tip of the frothing wand and soak in hot water. Clean the threads of the frothing tip with a hot damp cloth. Regularly inspect the opening of the frothing wand to ensure there is no milk buildup. Regularly inspect the o-ring of the frothing tip to guarantee its integrity. If there is any damage (rips or tears) to the o-ring call Customer Service to order a replacement. Screw the frothing tip (with o-ring) back onto the frothing wand.NOTE: Do not operate the machine’s frothing wand without the frothing tip and o-ring in place.
Decalcifying
When making espresso, always use cold clean water. Using spring water or filtered water will slow down calcium buildup. We recommend decalcifying the machine after 100-200 uses or at least every 2-3 months.
- When using commercial decalcifying agents it is important to follow their instructions. You can also use Capresso Cleaning Solution, available atwww.capresso.com. Dissolve 1 packet of Capresso Cleaning Solution with 30 oz. of water and add to the water tank.NOTE: Do not use vinegar as this will considerably shorten the life of the seal inside the brew head.
Decalcifying the Brew Heada) Remove the portafilter.b) For best results unscrew the screen inside the brew head. Wipe off anycoffee residue with a damp cloth.c) Fill the water tank with the decalcifying solution and water.d) Place a large bowl beneath the brew head.e) Push the OFF/ON button and turn the Selector Dial to the left, cup “![]() position. Allow 1/3 to 1/2 of the solution to be pumped through the system and the brew head.NOTE: There is no need to wait for the green ready light to illuminate.f) Turn the Selector Dial to the center “•” position to stop the process.g) Let the machine sit for approximately 10 minutes.Decalcifying the Frothing Wandh) Fill a pitcher with 6 to 8 oz. of cold water and immerse the frothing wand into the cold water.i) Ensure the Coffee/Steam switch is in the “
position. Allow 1/3 to 1/2 of the solution to be pumped through the system and the brew head.NOTE: There is no need to wait for the green ready light to illuminate.f) Turn the Selector Dial to the center “•” position to stop the process.g) Let the machine sit for approximately 10 minutes.Decalcifying the Frothing Wandh) Fill a pitcher with 6 to 8 oz. of cold water and immerse the frothing wand into the cold water.i) Ensure the Coffee/Steam switch is in the “![]() steam/frothing position. Turn the Selector Dial to the right, steam/frothing “
steam/frothing position. Turn the Selector Dial to the right, steam/frothing “![]() position, and let the steam pass through for about 30 seconds. Repeat this process three or four times.j) Now process the remaining decalcifying solution through the brew head by pressing the Coffee/Steam switch to the brewing “
position, and let the steam pass through for about 30 seconds. Repeat this process three or four times.j) Now process the remaining decalcifying solution through the brew head by pressing the Coffee/Steam switch to the brewing “![]() position and turningthe Selector Dial to the left, cup symbol ”
position and turningthe Selector Dial to the left, cup symbol ” ![]() ” until all decalcifying solution has been emptied from the water tank.Rinsing the Systemk) Remove the water tank and rinse thoroughly, then fill with fresh cold water.l) Repeat the above steps (d through j ) with fresh cold water.m) Replace the screen in the brew head and tighten the screw securely.
” until all decalcifying solution has been emptied from the water tank.Rinsing the Systemk) Remove the water tank and rinse thoroughly, then fill with fresh cold water.l) Repeat the above steps (d through j ) with fresh cold water.m) Replace the screen in the brew head and tighten the screw securely.
Troubleshooting
|
Symptom |
Cause |
Corrections |
| Water leaks from the bottom of the espresso machine. | There is too much water in the drip tray. | Clean and dry the drip tray and replace it. |
| The coffee maker has a possible internal defect. | Contact Jura Capresso Customer Service. | |
| Coffee runs down the side of the portafilter. | Portafilter not properly inserted. | Turn the handle of the portafilter further to the right. |
| Edge of sieve not free of ground coffee. | Switch OFF the appliance, remove the portafilter and clean the edges of the sieve. | |
| The sealing ring inside the brew head is dirty. | Switch OFF the appliance, remove the portafilter and brew head screen, and cleanthe sealing ring with a hot damp cloth. CAUTION! HOT! | |
| The sealing ring no longer has elasticity. | The sealing ring must be replaced. Please contact Jura Capresso Customer Service. | |
| Very little or no coffee flows through the portafilter. | No water in the water tank. | Fill the water tank with fresh, cold water. |
| The screen inside the brew head is blocked. | Brew water through the screen without the portafilter inserted. If no water comes through, unscrew the screen and clean and replace it.See chapter 10,i. | |
| The sieve is blocked. | Clean the sieve, insert it into the portafilter, and pump water through without coffee.If no water comes through the sieve call Jura Capresso Customer Service for a replacement sieve. | |
| Espresso only brews out in drops. | Coffee grounds are too fine or packed down too firmly. | Do not tamp coffee grounds so firmly. Use a coarser grind of coffee. |
| The coffee/Steam switch is not in the correct position. | Ensure the Coffee/Steam switch is in the left, cup ” |
|
| The machine is blocked by calcium deposits. | Decalcify the appliance. See chapter 11. | |
| No crema. | Coffee is old or too dry. | Use fresh coffee that is ground right before brewing. |
| Coffee is not tamped firmly enough. Water pushes through the coffee too fast. | Tamp coffee grounds more firmly. Use a finer grind. | |
| Coffee is too coarse. | Use a finer grind. | |
| Coffee blend not suited to espresso coffee. | Change brand/roast of coffee. We recommend a medium to the dark roast of high-quality Arabica beans such as the Capresso brand of Grand Aroma Beans. | |
| Acid (vinegar) tastes in espresso coffee. | Did not fully rinse the system after decalcifying. | See chapter 11 for detailed instructions on rinsing the system after decalcifying. |
| The coffee is not fresh or of high quality. | Grind fresh whole bean coffee right before brewing. After opening store whole beans in a dark, air-tight container to maintain its freshness. Use beans within 1 week. | |
| Espresso is not hot enough. | Pre-warm cups and system. | Pre-warm cups with hot water or on the cup warming tray. Purge brew head and portafilter immediately before brewing. Dry portafilter andsieve before filling with grinds. See chapter 4. |
| Uneven cup filling. | The outlet in sieve or portafilter blocked. | Remove sieve from the portafilter. Clean with a stiff brush. Clean portafilter. |
| Uneven dosing or tamping of ground coffee into a sieve. | Evenly distribute the finely ground coffee into the sieve and tamp firmly and evenly. | |
| Loud pump noise/no water from brew head. | No water in the water tank. | Fill the water tank with fresh, cold water. |
| Air blockage in the pump. | The coffee/Steam switch should be in the steam position. Place small frothing pitcher under frothing wand and turn Selector Dial to steam. After a few seconds, a steady stream of water should emerge from the frothing wand. Allow a few ounces of water to flow out of the frothing wand then turn the Selector Dial back to the center position “•”. | |
| The water tank is not in the correct position. | Adjust the water tank so it is in the right position. See chapter 3, a. | |
| Water tank drips/leaks when removed. | The base valve on the bottom of the water tank may be stuck. | Use your finger to push the valve back into place while holding the water tank over a sink. |
| The appliance does not operate(no power). | Not plugged in/power outlet damaged. | Plug the power cord into a functioning wall outlet correctly, if the appliance still does not work, please contact Jura Capresso Customer Service. |
| Mechanical or electronic defect. | Contact Jura Capresso Customer Service. | |
| No steam is produced from the frothing wand. | The Coffee/Steam switch is not in the correct position. | Ensure the Coffee/Steam the switch is in the right, steam/frothing “ |
| The green ready indicator is not illuminated. | Only after the Coffee/Steam switch is in the steam position and the ready indicator is illuminated, the steam can be used to froth. | |
| Frothing wand blocked by milk or calcium deposits. | Turn the Selector Dial to the center “•” position. Carefully use a needle to loosen themilk residue. Then steam again. See chapter 10,l to clean the frothing tip. See chapter 11 for decalcifying the frothing wand. | |
| Not enough froth when frothing milk. | Milk is not fresh. | Use the freshest milk possible.Do not use milk that has been opened for a few days as this can affect the quality of froth. |
| Milk is not suitable. | Non-dairy milk does not froth as well as fresh, dairy milk. | |
| Milk was too warm before frothing began. | Use cold, refrigerated milk preferably at 34°F. Use a cold stainless steel frothing pitcher. | |
| Not enough milk to froth. | Use more cold milk inside of a cold stainless steel frothing pitcher. |
Do not attempt to repair the appliance yourself. Contact customer service or an authorized service facility for service or repair.
LIMITED ONE-YEAR WARRANTY
This warranty covers your CAPRESSO machine, model #118 espresso machine.Model # can be found on the bottom of the machine. This warranty is in effect for one year from the date of the first consumer purchase. This warranty covers all defects in materials or workmanship (parts and labor). This warranty does not cover:
- Any machine not purchased from an Authorized JURA Capresso Dealer.
- Commercial use of machines.
- Damage caused by accident, abuse, negligence, misuse, improper operation, or failure to follow instructions contained in this manual.
- Damaged caused to pump or boiler by running the machine without water.
- Any service or alteration performed by an unauthorized person, company, or association.
Other limitations and exclusions: Any implied warranties including fitness for use and merchantability are limited in duration to the period of the express warranty set forth above and no person is authorized to assume for JURA Capresso any other liability in connection with the sale of the machine. JURA CAPRESSO expressly disclaims liability for incidental and consequential damages caused by the machine. The term “incidental damages” refers to the loss of the original purchasers’ time, loss of the use of the machine, or other costs relating to the care and custody of the machine. The term “consequential damages” refers to the cost of repairing or replacing other property which is damaged when this machine does not work properly. The remedies provided under this warranty are exclusive and in lieu of all others. This warranty gives you specific legal rights, and you may also have other rights which vary from state to state.
JURA CAPRESSO CUSTOMER SERVICE:
 report this ad
Capresso EC PRO, Model #118 Product RegistrationPlease go to our website www.capresso.com to register your product.Your information will help us to better serve you
Customer Service1-800-767-3554Mon-Thu 8AM – 9PM • Fri 8AM – 8PM • Sat 9AM – 5PMEastern Standard Time.email: [email protected]Jura Capresso Inc.81 Ruckman Road, Closter, NJ 07624201-767-3999 • Fax: 201-767-9684Website: www.capresso.com
References
[xyz-ips snippet=”download-snippet”]