
![]() M15USER INSTRUCTIONBENUTZERHANDBUCH
M15USER INSTRUCTIONBENUTZERHANDBUCH
WARNING
- Do not place in a humid environment or expose to rain. Avoid severe collisions.
- Keep the product away from high temperature and open flame environment to prevent dangers such as battery explosion.
- Do not open the cabinet of the product, or it will cause machine damage and other accidents.
- For maintenance, contact the service station or professional personnel if needed.
- Can only be replaced with the same or equivalent type of battery.
- In order to avoid charging issues, the product must be charged with the original USB cable. Accidents and machine damage caused by using other charging cables will not be covered by the warranty.
DISPLAY SCREEN
 : With a USB flash drive or TF card inserted, this symbol will light up when music is paused.
- U/TF: When a USB flash drive or TF card is inserted, this symbol will light up.
- MIC: When the microphone is in use, this symbol will light up.
- : Single cycle.
- 88:88: When in Bluetooth mode, “BLUE” will be displayed on the screen; When in the FM radio mode, it will display the frequency of the current channel; When playing music through a USB flash drive or TF card, it will display the song playing time and display “PASU” when music is paused.
- : This symbol will light up when the speaker is on a low battery.
THE OPERATION PANEL
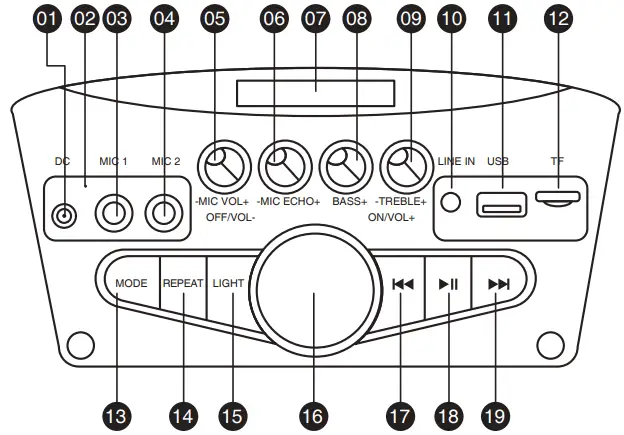
| 1. DC Charging Port2. Charging Indicator3. Mic 1 Port4. Mic 2 Port5. Microphone Volume6. Microphone Echo7. Display Screen8. Bass9. Treble10. Line In Port | 11. USB Flash Drive Slot12. TF/SD Card Slot13. Mode14. Repeat15. Light16. Power On/Off, Master Volume17. Previous Track18.. Play/Pause19. Next Track |
BLUETOOTH
- Power on the speaker. The default mode is Bluetooth. The screen display shows “BLUE” and it flashes at the same time.
- Turn on the device’s Bluetooth, search for “EARISE.M15”, and click to pair.
- A voice prompt “Bluetooth connected” to be heard indicates a successful connection. The display “BLUE” stops flashing.
MICROPHONE
- The package includes two wireless microphones.
- Each microphone needs 2pcs AA batteries, which are not included.
- After installing 2pcs AA batteries, please push the power switch to the top side to turn on the microphone, the screen display on the speaker shows “MIC” at the same time.
- When the power switch is in the middle, the microphone is on standby.
- Please keep the microphones 2 meters far away from the speaker, or it will cause a shrill noise.
MIC IN
- The speaker has two 1/4″ AUX jacks for more microphones: MIC1, MIC2.
- If connected to wired microphones, simply connect via the “MIC1″ /”MIC2” jacks. You can connect up to 2 wired microphones. So you can use 4 mics at the same time (including 2 original mics).
- If connected to wireless microphones, simply connect the wireless receiver via the “MIC1″/”MIC2” jack. You can connect up to 4 wireless microphones. So you can use 6 mics at the same time (including 2 original mics).
- Please note that the frequency of the wireless microphones cannot be the same as the original microphones’, otherwise, it will interfere with the original microphones.
ECHO
- Turn on the microphones, adjust the “ECHO” knob to select the intensity of the reverb, there are 4 levels: E00, E01, E02, E03. E00 is off, and E03 is the strongest.
- Please note that the reverb only works for the microphones, it doesn’t work on the background music.
LIGHT
- The light is the default on. Press and hold the “LIGHT” button to turn off the light.
- Press the “LIGHT” button to choose a light mode.
FM RADIO
- Press the “MODE” button to switch to FM radio mode.
- Press and hold the ” ” button to search FM stations from 87.5MHz to 108.0MHz automatically. The station will be saved automatically, the display screen shows “P01”, “P02”, etc.
- After searching, press the” ” or ” ” button to select a saved station.
- If you are listening to a saved station “P05” in which the FM range is 92.0MHz, press and hold “ ” button to searching stations from 92.0MHz to 108.0MHz and the found station will be saved automatically as “P06”; press and hold “ ” button to searching stations from 87.5MHz to 92.0MHz, and the found station will be saved automatically as “P04”
- The FM range is 87.5MHz-108.0MHz.
- It is suggested to search for radio stations automatically the first time you use them.
AUX IN
- The speaker has a “LINE IN” jack (3.5 mm AUX jack) for connecting non-Bluetooth devices. And the package includes a 3.5mm AUX cable.
- One end of the cable is plugged into the AUX jack, and the other end is connected to the audio output port of the device, such as a computer, mobile phone, and amplifier.
- The speaker will automatically switch to AUX IN mode. Alternatively, you can switch to the AUX IN mode by pressing the “MODE” button.
USB
- Press the “MODE” button to switch to USB/TF mode.
- Please ensure that there is at least one song in the USB flash drive, or the speaker can’t recognize it.
- Insert a USB flash drive and the speaker will automatically start playing the existing music from the first song. The display shows “U/TF” in the upper left corner.
- The song file format must be MP3.
- The USB flash drive must have a capacity of 8G to 32G.
- The USB flash drive must be USB 2.0 and the file system must be FAT32.
- If the USB flash drive is formatted and the file system is not FAT32, it will not work properly.
TF/SD CARD
- Please ensure that there is at least one song in the TF/SD card, or the speaker can’t recognize it.
- Insert the TF/SD card and the speaker will automatically start playing the existing music from the first song. The display shows “U/TF” in the upper left corner.
- The song file format must be MP3.
- The capacity of the TF card must be 8G to 32G.
- The file system of the TF card must be FAT32.
REPEAT
- The repeat function only works when a TF/SD card or USB flash drive is inserted.
- Press the “REPEAT” button to select a loop mode.
- There are 4 modes: ONE (single song cycle), FOLD (loop the playlist in a folder), RAN (play all songs randomly), ALL (loop all playlist of all folders).
BASS & TREBLE
- Adjust the “BASS” knob to select the intensity of the bass.
- Adjust the “TREBLE” knob to select the intensity of the treble.
LOW BATTERY ALERT
- When there’s only 20% power left, ” ” will flash on the display screen.
- Use the included power cord to charge the speaker.
- During charging, the charging indicator lights up and turns off when fully charged.
- It can be fully charged in 2 to 3 hours.
- When using for the first time, the charging time should not be less than 2 hours.
THE REMOTE CONTROL

| Key | Function |
| MUTE | Press the button to enter mute mode, press it again to cancel. |
| MODE | Switch modes: LINE IN, USB, TF/SD card, Bluetooth, FM. |
| Play/Pause | |
| Previous track | |
| Next track | |
| VOL+ | Master volume up |
| VOL- | Master volume down |
| EQ | EQ mode: normal, rock, pop, classic, jazz, country. |
| RPT | Repeat |
| 0∼9 | When playing music via a USB flash drive or TF/SD card, you can select the song you want quickly. For example, you need to select the 258th song, just press the “2”, “5”, “8” three buttons in sequence and wait for 1 second, then it will automatically locate to the 258th song. |
SPECIFICATION
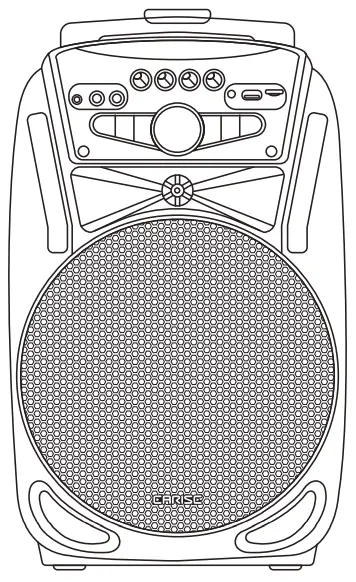
Power Output: 400W Max.R.Frequency: 90Hz-20KHzLi-ion battery: 7.4V / 2600mAhDrive Unit: 8″4Ωx1+1″tweeterx1S/N Ratio: ≥60dBPower Supply: AC 100-240VDimension: L263xW279xH414mm
WHAT’S IN THE BOX
1 x M15 Trolley PA System2 x Wireless Microphones (Batteries Not Included)1 x Remote Control1 x Power Cord1 x AUX Cable1 x User Manual
 report this ad
[xyz-ips snippet=”download-snippet”]