
Carl Schmidt Sohn Foodi Pressure Cooker & Air Fryer

Thank you for purchasing the mufti-functional Carl Schmidt Sohn pressure cooker & air fryer. Please read the User Manual carefully before use and keep it in a convenient place for future reference.
When using electrical appliances, basic safety precautions should always be followed. Do not use The appliances until you have read this manual thoroughlyPlease feel free to call +1(833)-985-0628 if you have questions or concerns.
IMPORTANT SAFEGUARDS
When using electrical appliances, basic safety precautions should always be followed, including:
- NEVER IMMERSE the Main Unit Housing, which contains electrical components and heating elements, in water. Do not rinse under the tap.
- TO AVOID ELECTRICAL SHOCK, DO NOT put liquid of any kind into the Main Unit Housing containing the electrical components.
- This appliance has a polarized plug (one blade is wider than the other). To REDUCE THE RISK OF ELECTRIC SHOCK, this plug is intended to fit into a polarized outlet only one way. If the plug does not fit fully into the outlet, reverse the plug. If it still does not fit, contact a qualified electrician. DO NOT ATTEMPT to modify the plug in any way.
- MAKE SURE the appliance is plugged into a wall socket. Always make sure that the plug is inserted into the wall socket properly.
- To prevent food contact with the interior upper screen and heat element, DO NOT OVERFILL the Rotating Mesh Basket.
- DO NOT COVER the Air Intake Vent or Air Outlet Vent while the Power Air Fryer Oven is operating. Doing so will prevent even cooking and may damage the unit or cause it to overheat.
- NEVER POUR oil into the Rotating Mesh Basket. Fire and personal injury could result.
- While cooking, the internal temperature of the Unit reaches several hundred degrees Fahrenheit. TO AVOID PERSONAL INJURY, never place hands inside the Unit unless it is thoroughly cooled down.
- This appliance is NOT INTENDED FOR USE by persons with reduced physical, sensory, or mental capabilities, or lack of experience and knowledge unless they are UNDER THE SUPERVISION of a responsible person or have been given proper instruction in using the appliance. This appliance is NOT INTENDED FOR USE by children.
- When cooking, DO NOT PLACE the appliance against a wall or against other appliances. Leave at least 5″ free space on the back and sides and above the appliance. Do not place anything on top of the appliance.
- DO NOT USE this Unit if the plug, the power cord, or the appliance itself is damaged in any way.
- DO NOT PLACE The Unit on stovetop surfaces.
- If the power cord is damaged, YOU MUST HAVE IT REPLACED by the manufacturer, its service agent, or a similarly qualified person in order to avoid hazards.
- Keep the appliance and its power cord OUT OF THE REACH of children when it is in operation or in the “cooling down” process.
- KEEP THE POWER CORD AWAY from hot surfaces. DO NOT PLUG in the power cord or operate the Unit controls with wet hands.
- NEVER CONNECT this appliance to an external timer switch or separate remote-control system.
- NEVER USE this appliance with an extension cord of any kind.
- DO NOT OPERATE the appliance on or near combustible materials such as tablecloths and curtains.
- DO NOT USE the Power Air Fryer Oven for any purpose other than described in this manual.
- NEVER OPERATE the appliance unattended.
- When in operation, the air is released through the Air Outlet Vent. KEEP YOUR HANDS AND FACE at a safe distance from the Air Outlet Vent. Also, avoid the air while removing the Rotating Mesh Basket from the appliance.
- The Unit’s outer surfaces may become hot during use. The Rotating Mesh Basket WILL BE HOT. WEAR OVEN MITTS, or use the fetch tool when handling hot components. Wear oven mitts when handling hot surfaces.
- Should the Unit emit black smoke, UNPLUG IMMEDIATELY and wait for smoking to stop before removing oven contents.
- When the time has run out, cooking will stop but the fan WILL CONTINUE RUNNING for 20 seconds to “cool down” the Unit.
- Always operate the appliance on a horizontal surface that is level, stable, and noncombustible.
- This appliance is intended for normal household use only. It is not intended for use in commercial or retail environments.
- If the Power Air Fryer Oven is used improperly or for professional or semi-professional purposes or if it is not used according to the instructions in the user manual, the warranty becomes invalid and we will not be held liable for damages.
- Always unplug the appliance after use.
- Let the appliance cool down for approximately 30 minutes before handling, cleaning, or storing.
- Make sure the ingredients prepared in this Unit come out cooked to a golden-yellow color rather than dark or brown. Remove burnt remnants.
Overheating ProtectionShould the inner temperature control system fail, the overheating protection system will be activated and the Unit will not function. Should this happen, unplug the power cord. Allow time for the Unit to cool completely before restarting or storing.
Electric PowerIf the electrical circuit is overloaded with other appliances, your new Unit may not operate properly. It should be operated on a dedicated electrical circuit.
Precautions
Before each use, please make sure to inspect the following:
- The anti-block shield, float valve, and exhaust valve are not blocked by food debris.
- The bottom surface of the inner pot and the heating plate is free of any foreign objects.
- The steam release handle is in the “Sealing” position for all pressure cooking.
After cooking, wait until the cooker cools down for a while and release the pressure using the steam release handle. Use extreme caution when opening the lid. Scald and serious burns can be caused by the steam inside the unit.
If all LED lights are flashing on the control panel, unplug the power cord immediately and consult the “Troubleshooting” section.
Care must be taken with the sealing ring to avoid deformation. Failure to do so may prevent the product from working properly.
Special Cord Set Instructions
Model CSSAP06-1 has a 3-prong grounding plug. To reduce the risk of electric shock, plug the power cord into a grounded (earthed) electrical outlet that is easily accessible at all times.
A short power-supply cord is provided to reduce the hazards resulting from entanglement and tripping. An extension cord may be used if care is exercised in its use. If an extension cord is used, use only a 3-wire extension cord that has a 3-prong grounding plug and a 3-slot receptacle that will accept the plug on the appliance. The electrical rating of the cord must be at least 12 amps and 120 volts. The extended cord must be arranged so that it will not drape over the edge of the table or counter where it can be pulled by children or tripped over accidentally.
Product Introduction
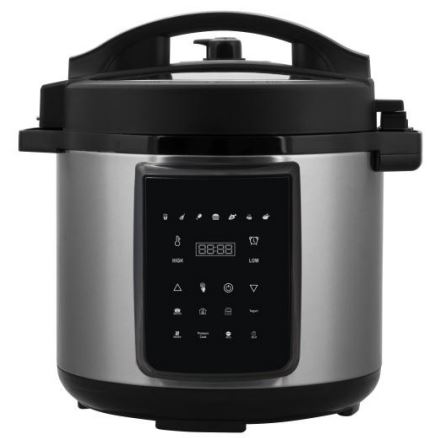
Carl Schmidt Sohn’s programmable pressure cooker is the new generation of smart kitchen appliances. It is an 8-in-1 multi-function cooker combining the benefits of a Pressure Cooker, Air fryer, Sauté, Slow Cooker, Rice Cooker, Steamer, Yogurt Maker, and Food Warmer. Carl Schmidt Sohn is a convenient and kitchen-friendly time saver. Its 22 microprocessor-controlled intelligent programs make your everyday cooking as easy as pressing a button.
It brings your green thinking right into the kitchen by saving up to 90% of energy compared with conventional cooking. In most cases, your Carl Schmidt Sohn reduces the cooking time by 90% and preserves more vitamins and minerals in the natural ingredients.
Carl Schmidt Sohn has been designed to avoid the common errors and safety hazards of old stove-top pressure cookers using safety mechanisms and patented technologies. They include lid position monitoring, locking the lid under pressure, electronic pressure and temperature control, dry burn detection with automatic shutoff, over-pressure protection, and temperature and electrical current-limiting fuse. Carl Schmidt Sohn has earned the entrusted UL certification by going through rigorous UL lab testing.
Features
- Mufti-function: Air frying, pressure cooking, slow cooking, making yogurt and keeping warm, etc. (not available to sauté)
- convenient cooking programs controlled by a microprocessor: Simply press one of the function keys to start cooking. The microprocessor controls the time, cooking pressure, and temperature eliminating the need to watch over the cooker in the kitchen.
- Clean and pleasant: Carl Schmidt Sohn produces very little noise and leaks almost no steam. This keeps the aromas and flavor of ingredients in the food and avoids messy spills, splashes, or spatters to clean up.
- Dual pressure settings for fast and flexible cooking: Cooking with high pressure reduces cooking time by up to 90% and the low pressure avoids overcooking delicate food.
- Up to 12-hour delayed cooking: Long 12 hour timer. Perfect for meal planning.
- Up to 240 minutes of manual cooking time selection.
- Auto keeps warm: After cooking, the keep-warm function starts automaticallyfor 10 hours.
Before the First Use
Before the first use, please take out all accessories from the package and read this manual carefully. Please pay particular attention to operational instructions and cautions to avoid any injury or property damage. Please wash the inside of the lid and the inner pot with warm soapy water, rinse and dry thoroughly. Wipe the outer housing with a clean damp cloth. Never immerse the cooker housing in water or any other liquid. The inner pot, sealing ring and steam release handle, and all accessories are dishwasher safe. But never clean the lid and housing in a dishwasher.
Install the Condensation Collector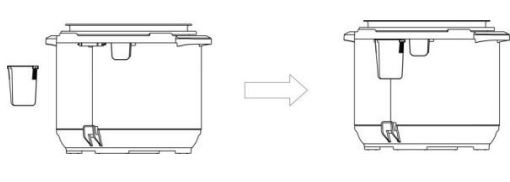
To install the condensation collector, slide it into the slot on the cooker housing. Follow the reverse order to remove it for cleaning.
Remove and Install the Anti-Block Shield
The anti-block shield can be removed by pushing it on the side to lift it up. To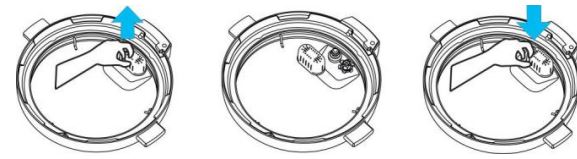 install the anti-block shield, position it in place andpress it down. The anti-block shield can be installed in either direction lengthwise.
Remove and Install the Sealing Ring
The sealing ring can be removed by pulling upwards from the sealing ring rack in sections. To re-install the sealing ring, pressing it downinto the rack section by section. The sealing ring can be installed on either side facing up.
Please note the following:
- Prior to each use, inspect to make sure the sealing ring is well seated in the sealing ring rack and the anti-block shield is mounted properly onthe steam release pipe. A properly seated sealing ring can be shifted, with a bit of effort, clockwise or anti-clockwise inside the sealing ring rack.
- After use, remove any foreign objects from the sealing ring and anti-block shield.
- Keep the sealing ring clean to avoid odor. Washing the sealing ring in warm soapy water or dishwasher can remove odor. However, it is normal for the sealing ring to absorb the smell of certain acidic foods. That’s why it is always a good idea to have more than one sealing ring on hand.
- Never pull the sealing ring by force, as the pulling may cause deformation and affect its function in sealing the pressure.
- A sealing ring with cracks, cuts, or other damages should not be used. A new sealing ring replacement should be used.
Safe Lid Opening
1. Make sure the pressure cooking program has completed or press the “Keep-Warm/Power button” to terminate the program.2. Releasing pressure in one of the following approaches.
Quick Release:
Slide the steam release handle to the “Venting” position to let out steam until the float valve drops down.
Caution:
- Please keep hands and face away from the hole on the top of the steam release handle when using Quick Release. The escaping steam is very hot and can cause scalding.
- Never pull out the steam release handle when it is letting out steam.
- Please be aware that Quick Release is not suitable for food in large liquid volume or with high starch content (e.g. porridge, congee, sticky liquids, soup, etc.). Food content may splatter out with steam. Use Natural Release instead.
Natural Release:
- Allow the cooker to cool down naturally until the float valve drops down. This may take 10 to 15 minutes after cooking is finished and the cooker is in Keep-Warm mode.
- Putting a wet towel on the lid can speed up cooling.
3. Open the lid: Hold the lid handle, turn the lid counterclockwise to the open position, and lift the lid up to open. To avoid vacuum suction on the lid, turn the steam release to the “Venting” position to let in the air when lifting the lid.
- Caution: Do not open the lid until the pressure inside the pot is completely released. As a safety feature, until the float valve drops down, the lid is locked and cannot be opened.
- If the float valve is stuck due to food debris or stickiness, you can push it8 down with a pen or chopsticks when you are certain the pressure has been released by moving the steam release handle in the venting position.
SAVE THESE INSTRUCTIONS – FOR HOUSEHOLD USE ONLY.
Parts & Accessories
NOTE: Unpack all listed contents from packaging. Varies by model. Please remove any clear or blue protective film on the components.
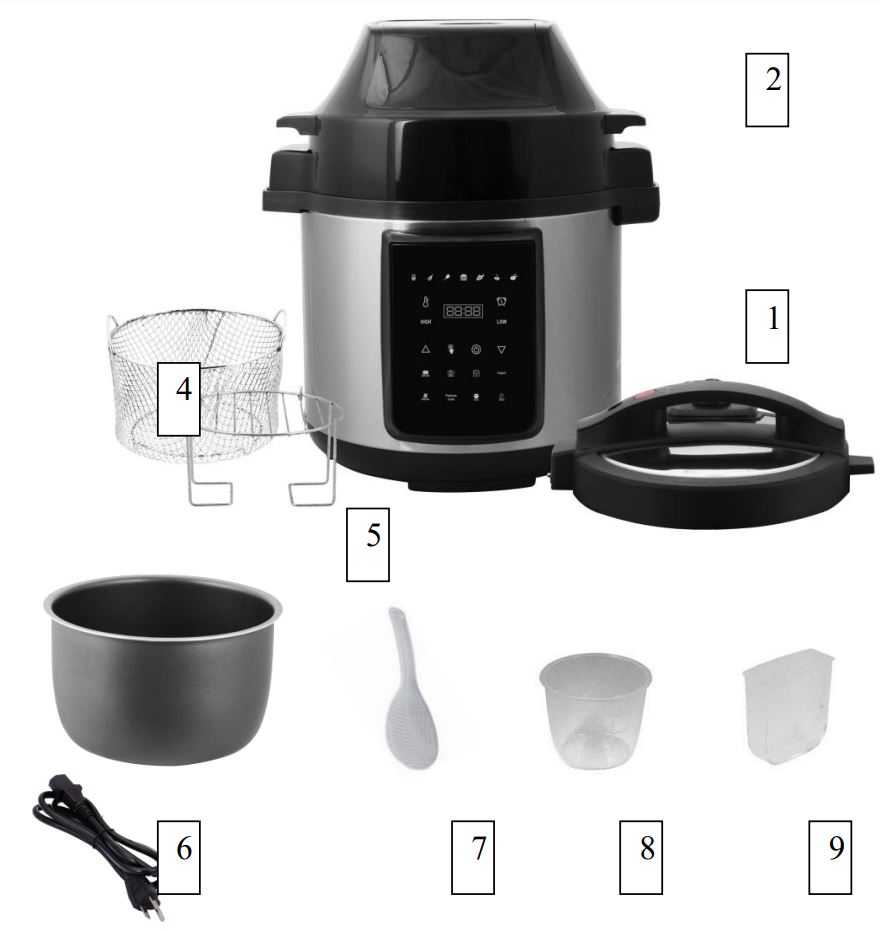
- Main unit
- Air fryer unit
- Pressure lid
- Fry basket
- Roast rack
- 6L pot
- Spoon
- measuring cup
- water box
- Power cable
WarningGreat care should be taken to avoid personal injury. Wear protective air fryer gloves.
Unit Specifications
Model Number Temperature CSSAP06-1Supply Power Display AC 120V 60HzRated Power Air fryer 1500W 150° F – 400° FFunction (165° C – 200° C) LED Touch Screen
Using the Accessories
pressure cook1000W
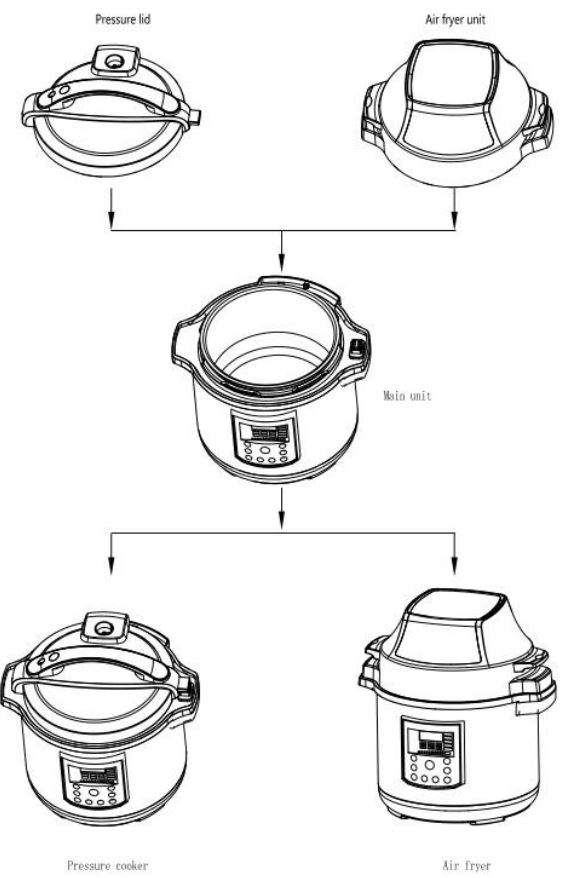
Air fryer with pressure cooker assembly
- When using an air fryer, the appliances will recognize the working state of the frying mode by placing a frying basket or Roast rack in the pot with covering the overhead steam fryer unit.
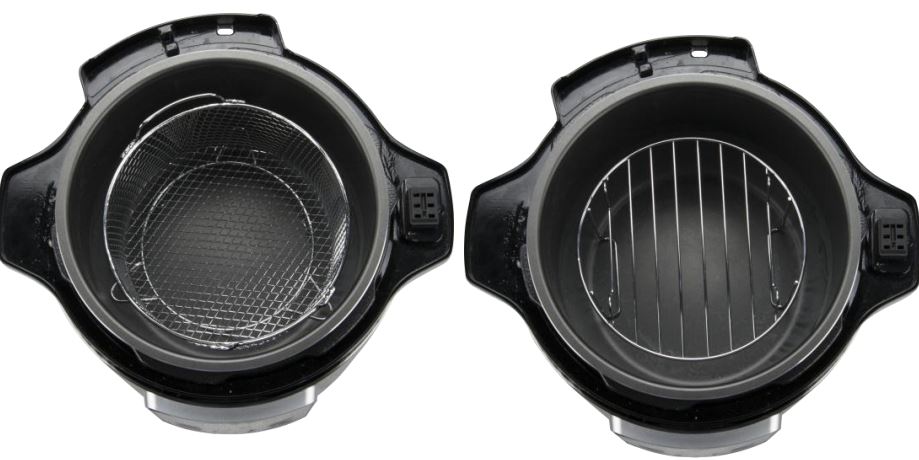
- When using the pressure cooker, after placing the food in the pot, cover the pressure cooker lid the appliances will recognize the working state of the pressure cooker mode

Operation of the Digital Control Panel

1. Power button ![]() 2. Air fryer menu button
2. Air fryer menu button ![]() 3. TIME & TEMP Control button
3. TIME & TEMP Control button ![]() 4. Time & TEMP Adjust Buttons
4. Time & TEMP Adjust Buttons ![]() 5. Temperature Control symbol
5. Temperature Control symbol ![]() 6. Time Control Symbol
6. Time Control Symbol ![]() 7. Air fryer menu
7. Air fryer menu ![]()
1) Frozen fries![]() default work time 20min and TEMP 400° F.
default work time 20min and TEMP 400° F.
2) Lamb chops![]() , default work time 15min and TEMP 360° F.
, default work time 15min and TEMP 360° F.
3) Chicken leg![]() , default work time 22min and TEMP 400° F.
, default work time 22min and TEMP 400° F.
4) Hamburger![]() , default work time 30min and TEMP 350° F.
, default work time 30min and TEMP 350° F.
5) Fish![]() , default work time 15min and TEMP 400° F.
, default work time 15min and TEMP 400° F.
6) Steak![]() , default work time 15min and TEMP 360° F.
, default work time 15min and TEMP 360° F.
7) Chicken![]() , default work time 40min and TEMP 360° F.
, default work time 40min and TEMP 360° F.
Air fryer Operation Method
(1)Assemble the air fryer lid correctly to the body.
(2)Press the power button![]() to begin the air fryer operation.
to begin the air fryer operation.
(3)Press the menu button![]() to select different air fryer model(flashing)
to select different air fryer model(flashing)
(4)Press the TIME&TEMP Control button![]() , the temperature will flash, then press Time&TEMP Adjust Buttons
, the temperature will flash, then press Time&TEMP Adjust Buttons ![]() to increase or decrease the temperature.
to increase or decrease the temperature.
(5)When the temperature stops flashing, pressure the TIME&TEMP Control button![]() twice, the time will flash, then press the Time&TEMP Adjust Buttons
twice, the time will flash, then press the Time&TEMP Adjust Buttons ![]() to change the time at your request.
to change the time at your request.
(6)Finally, press the power button![]() to start air cooking the button will flash during working.
to start air cooking the button will flash during working.
(7)If you want to stop cooking at any time, just re-press the power button![]() , the air fryer will stop working.
, the air fryer will stop working.
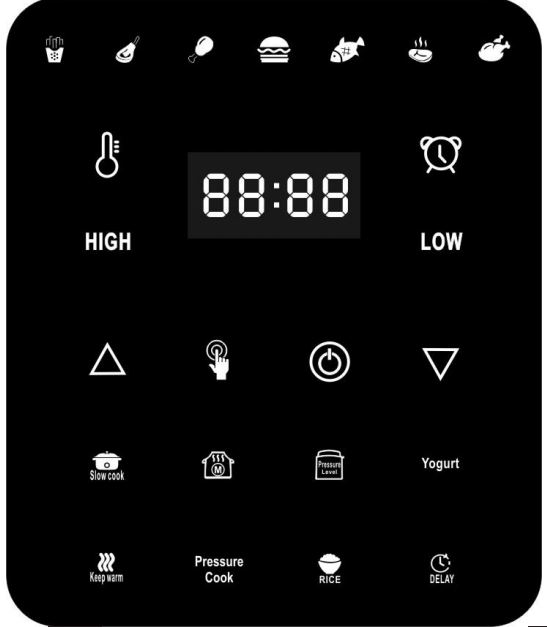
1. Power button ![]()
2. Pressure level button ![]()
3. Slow cook button ![]()
4. Yogurt button ![]()
5. Keep warm button ![]()
6. Delay button ![]()
7. Pressure cooking button ![]()
8. Rice cooking button ![]()
9. Time Adjust Buttons ![]()
Pressure cooker operation method
(1)Assemble the pressure cooker lid correctly to the body by aligning thearrow both the lid and body, then turn right to clasp the lid. If the lid is not assembled correctly, the panel will show the lid and can’t work corporately.
(2)Press the power button![]() to begin the pressure cooker operation.
to begin the pressure cooker operation.
(3)Select the Slow cook/Yogurt/Pressure cooking/Rice cooking button(flash), then press the Pressure level button![]() to set the high or low-pressure level.
to set the high or low-pressure level.
(4)Press the Time Adjust Buttons![]() to set the time at your request.
to set the time at your request.
(5)Then press the power button![]() to start cooking, the panel will show “on”. When inside pressure got the request, the set time will replace “on” and start the count down.
to start cooking, the panel will show “on”. When inside pressure got the request, the set time will replace “on” and start the count down.
(6)When the set time is over, it will show bb on the panel. Then you can release the pressure naturally or by manual with turning the valve to the VENTING position.
(7)After pressure is released completely, then press the red “push to open” button and turn to the left, the lid will be open, and can enjoy the food servings.
(8)For slow cook function, can’t adjust the pressure level, kindly be noted.
(9)For the Delay button![]() , you can pre-set the time you needed, then start from, it will start working after the time you pre-set.
, you can pre-set the time you needed, then start from, it will start working after the time you pre-set.
(10)When the pressure cooker is working, press the power button![]() or the keep warm button
or the keep warm button![]() , the cooker will stop working. Kindly be noted.
, the cooker will stop working. Kindly be noted.
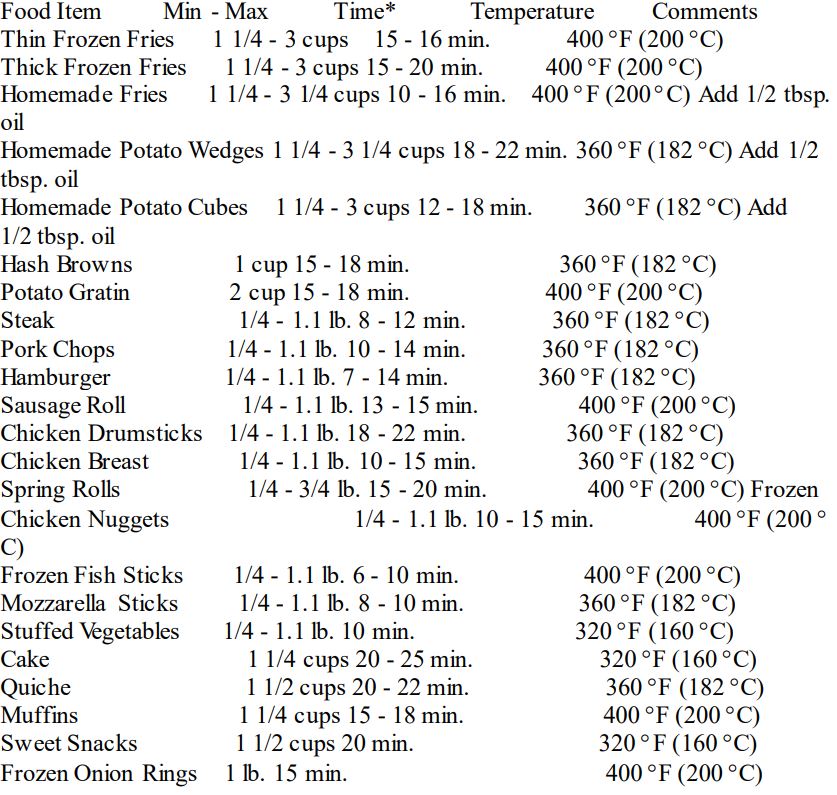
Cooking Chart for air fryer
Pressure Cooker Mode Parameters

Care and Maintenance
Regular care or maintenance is essential in ensuring that this product is safe for use. If any of the following circumstances take place, please stop using the appliance immediately and contact the Carl Schmidt Sohn support team.
- Power cord and plug suffer from expansion, deformation, discoloration, damages, etc.
- A portion of the power cord or the plug gets hotter than usual.
- The electric pressure cooker heats abnormally, emitting a burnt smell.
- When powered on, there are unusual sounds or vibrations.
If there is dust or dirt on the plug or socket, please remove dust or dirt with a dry brush.
Cleaning
Caution: Please make sure the appliance has cooled down and is unplugged before cleaning.
- Clean the product after each use. Wipe the black inner housing rim and slot dry with cloth to prevent rusting on the exterior pot rim.
- Remove the lid and take out the inner pot, wash them with detergent, rinse with clear water and then wipe dry with a soft cloth. The stainless steel inner pot is also dishwasher safe.
- Use water to clean the lid, including the sealing ring (which can be removed), exhaust valve, anti-block shield, and wipe them clean with a dry soft cloth. Do not take apart the steam release pipe assembly.
- Clean the cooker body with a clean damp cloth. Do not immerse the cooker in water. Do not use a wet cloth to clean the pot while the power cord is plugged into the power outlet.
Troubleshooting
If you experience any problem with the appliance, please DO NOT return the product to the retail store or online merchant. For technical assistance and product return information, please email s[email protected]
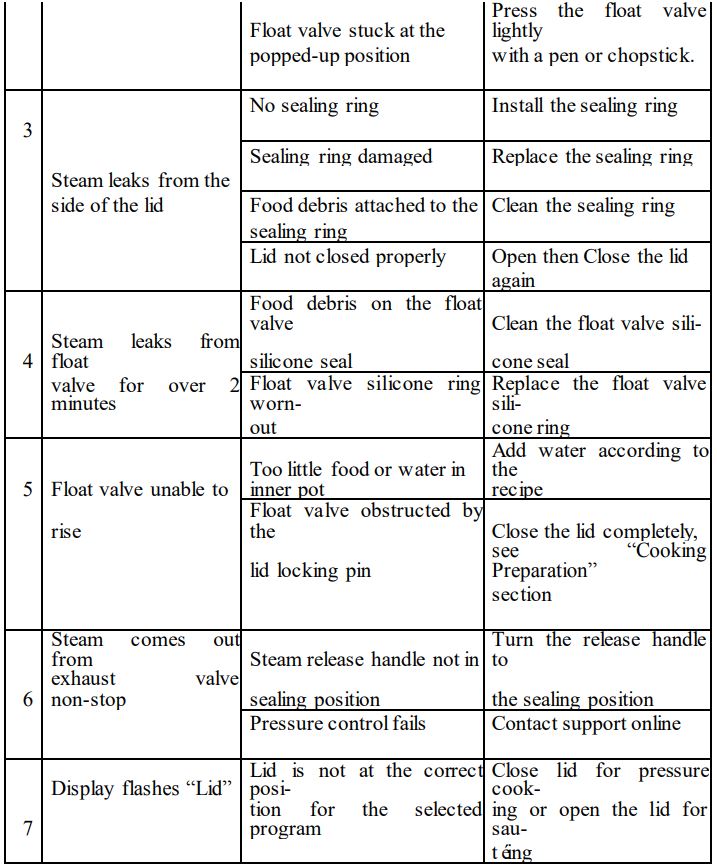
Troubleshooting Table


Limited Warranty
Carl Schmidt Sohn warrants this appliance to be free from defects in workmanship and material, under normal residential use, for a period of one (1) year from the date of purchase. This warranty extends only to the original purchaser and uses in the USA and Canada. A purchase receipt, purchase order number, or other proof of date of original purchase is required before warranty service is performed. Carl Schmidt Sohn’s obligation under this warranty is limited to replacing or repairing, or assisting in the repair at Carl Schmidt Sohn option. All repairs for which warranty claims are made must be pre-authorized by Carl Schmidt Sohn.
This appliance comes equipped with many safety features. Any attempt to interfere with their operation may result in serious injury/damages and void this warranty. No warranty service will be provided to any appliance that has been tampered with unless directed by a Carl Schmidt Sohn representative.
This warranty does not cover normal wear of parts or damage resulting from negligent use or misuse of the appliance, use contrary to the operating instructions, failure to provide reasonable and necessary maintenance, or disassembly, repair, or alteration by anyone unless directed by a Carl Schmidt Sohn Representative. This warranty does not cover units that are used outside of the US and Canada. Further, the warranty does not cover damage resulting from Acts of God, such as fire, flood, hurricanes, and tornadoes. Carl Schmidt Sohn is not responsible for the shipping costs for warranty service.
Limitation and ExclusionsTo the extent permitted by applicable law, the liability of Carl Schmidt Sohn, if any, for any allegedly defective appliance or part shall be limited to repair or replacement of the appliance or part and shall not exceed the purchase price of a comparable replacement appliance or part. THE PROVISIONS OF THIS WARRANT Y ARE YOUR SOLE AND EXCLUSIVE REMEDY WITH RESPECT TO THE PRODUCT(S) COVERED BY THIS WARRANT Y. ALL IMPLIED WARRANTIES WITH RESPECT TO THE APPLIANCES(S) INCLUDING, BUT NOT LIMITED TO, IMPLIED WARRANTIES OF MERCHANTABILITY AND FITNESS FOR A PARTICULAR PURPOSE, ARE HEREBY EXPRESSLY EXCLUDED.
Carl Schmidt Sohn is not responsible or liable for indirect, special, or consequential damages arising out of or in connection with the use or performance of the appliance or damages with respect to any economic loss, loss of property, loss of revenues or profits, loss of enjoyment or use, costs of removal, installation or other consequential damages of whatsoever nature. Some provinces/ states do not allow the exclusion or limitation of incidental or consequential damages. Accordingly, the above limitation may not apply to you.
You the buyer may have other rights and remedies under your state’s or province’s applicable laws, which are in addition to any right or remedy which may be available under this limited warranty.
Warranty Service
If the appliance should become defective within the warranty period, please contact Carl Schmidt Sohn Customer Service team by
- Email to [email protected]
representative To facilitate speedy service, please provide:
- Your name, email address, or phone number
- A copy of the original purchase receipt with the order number, the model, and serial numberDescription of the product defect, pictures, or video if possible
All contents in this document have been checked carefully. Carl Schmidt Sohn Company reserves the right to interpret any printing mistake or miss understanding of content.
For any technical improvement or change in appearance or nameplate, changes shall be placed in the revised manual without further notice. In case of changes in appearance and color, please refer to the actual product for detailed information.
CS Group Holdings Limited10/F, Union Park Centre, 771-775 Nathan Road, Kowloon, HKTelephone: + (852) 3756 0600Fax: + 852 2770 7779Web: http://www.cs-kochsysteme.comE-mail: [email protected]
References
[xyz-ips snippet=”download-snippet”]