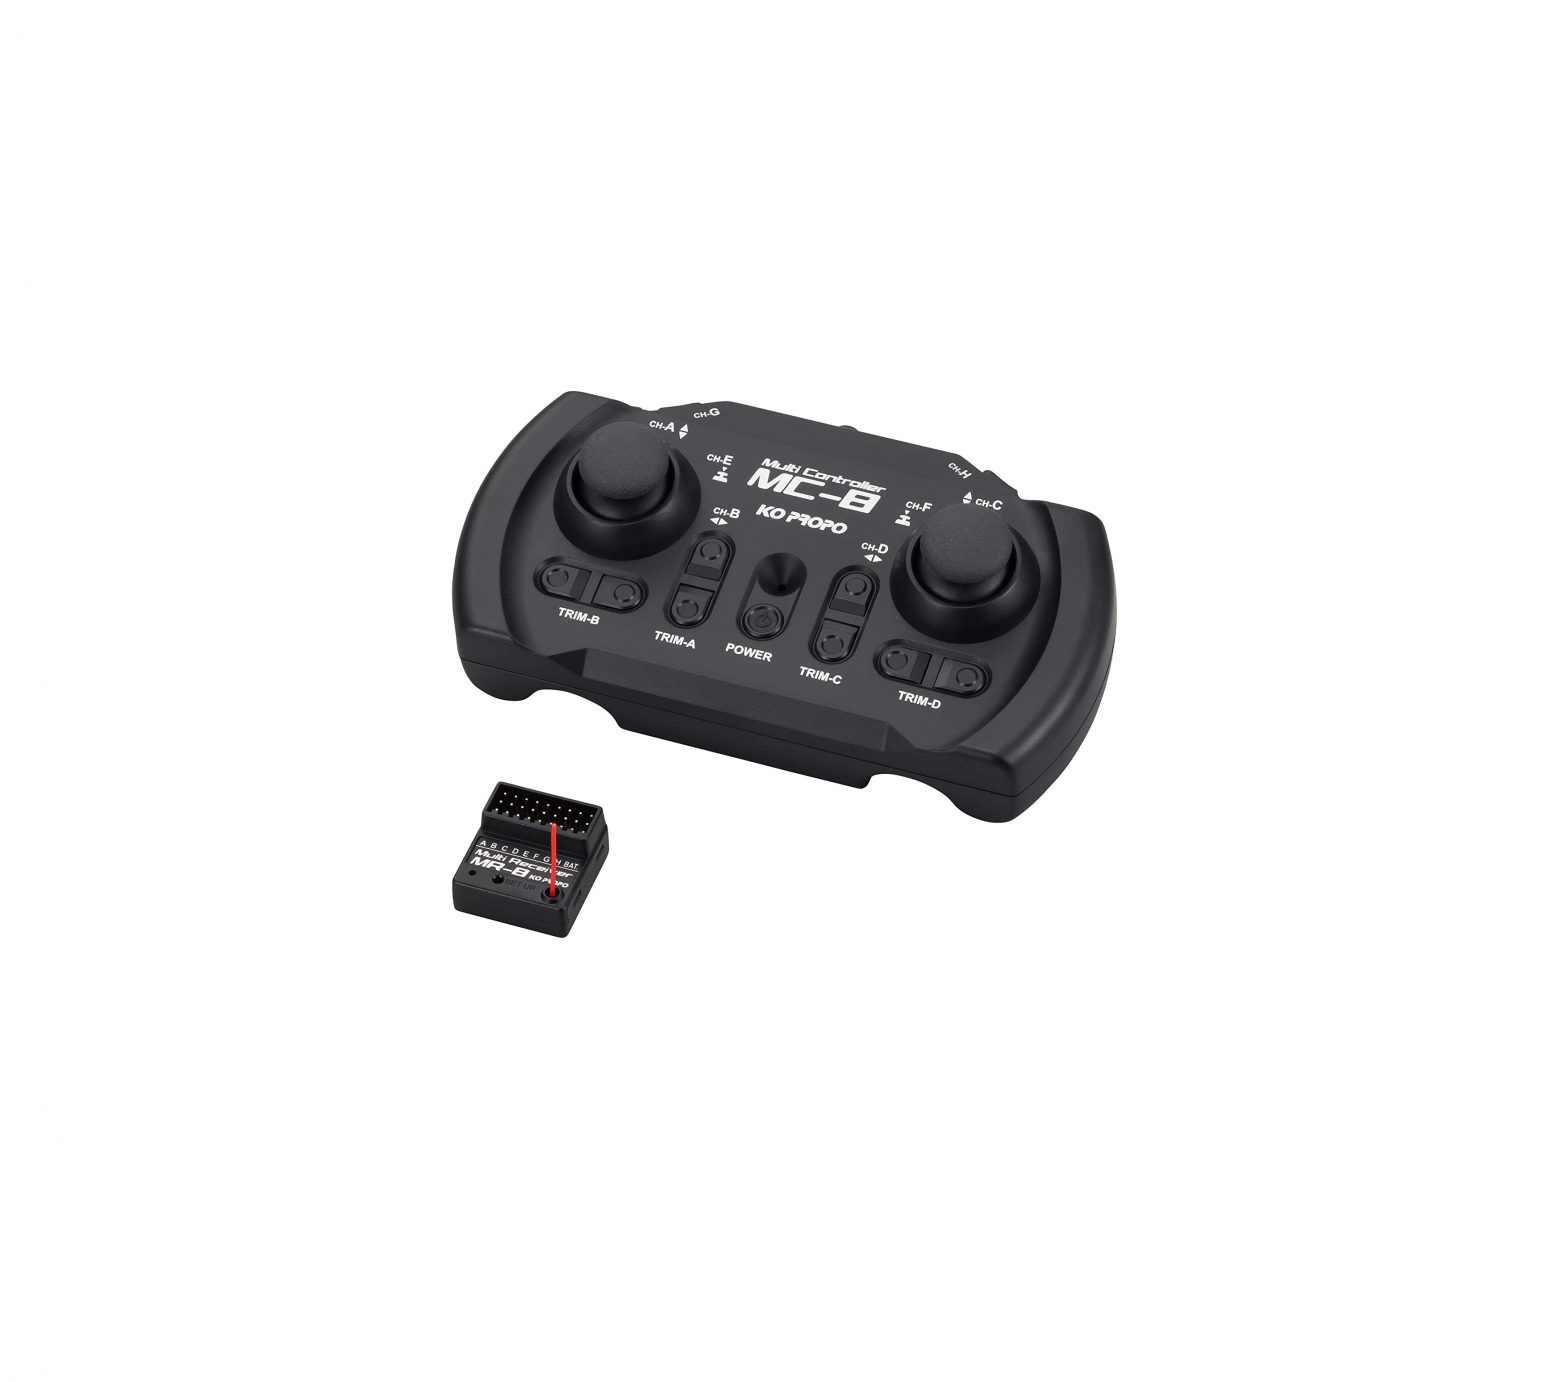
CARSON 2.4 Ghz Digital Proportional Radio Control System

Functions MC-8
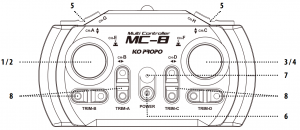
- CH-A/B (channel A/B) – JoystickBy moving up and down, a servo/speed controller connected to channel A can be controlled.By moving left and right, channel B can be controlled.
- CH-E (channel E) – ButtonWhen pressing down on the joystick, ON/OFF of channel E can be controlled.
- CH-C/D (channel C/D) – JoystickBy moving up and down, a servo/speed controller connected to channel C can be controlled. By moving left and right, channel D can be controlled.
- CH-F (channel F) – ButtonWhen pressing down on the joystick, ON/OFF of channel F can be controlled.
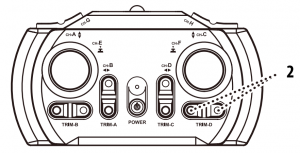
- CH-G/H (Channel G/H) – ButtonBy moving the respective button to the left and right, channels G/H can be controlled in 10 increments.
- Power switchPress and hold to turn ON. To turn OFF, press for at least 1 second.
- LEDWhen the LED is lit, the power is ON. When the LED is slowly flashing, the LED is in pairing mode. A flashing LED making a beeping sound means the battery level is low and that the battery needs to be replaced.
- TRIM-A to TRIM-D buttonBy operating the individual TRIM buttons, the neutral position (not the position of the joystick) for the individual channels is changed.
Cannot be used if there are more than 20 radio systems in the same area. If there is a lot of traffic, radio problems will happen. Please don’t use the product when this situation occurs. The MC-8 uses 2.4GHz radio waves which are a citizen bandwidth that is also used for other electrical equipment. Please understand in advance that a radio problem may occur even if there are less than 20 devices being used.
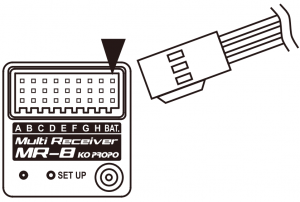
Receiver MR-8
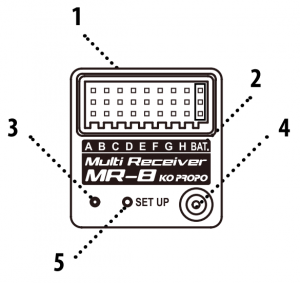
- A to H channel interfaceConnect the servo/speed controller to the connections that you want to control.
- Battery connectorConnection to the battery
- LEDThe LED flashes if there is a connection. The LED flashes when searching for a paired transmitter.
- AntennaPlease position the antenna vertically and as high as you can.
- SET-UP switchIs used for the pairing.
Install the transmitter batteries
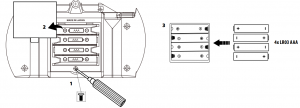
- Please remove the 2 mm screw in the back side of the MC-8 to remove the battery cover
- Insert AAA batteries, observing the positions shown in the figure.
- Replace the battery cover on the compartment and tighten.
Receiver power supply
Connect power to the battery terminal. Please notice direction of connector.
Operation voltage: 3.0 V to 6.6 VPlease refer to your servo or motor that you’d like to connect for the maximum voltage allowed. Please use a power source that is lower than the maximum voltage.
Please note the direction of the connectionIf you are using a speed controller for remote-controlled cars, the receiver is powered by the speed controller. If you are using a speed controller for remote-controlled cars, do not connect power to the BAT channel (battery channel) in the receiver.
Connect the servos or speed controllers that you want to control to the channels A-H.
MC-8 MR-8 Pairing the MC-8 and MR-8

- While pressing on the TRIM-A (upper button), turn on the power of the MC-8. The LED will start to blink.
- While pressing on the SET-UP button on the MR-8, turn on the power to the MR-8. The MR-8 LED will turn on, release the SET-UP button and the LED will go off and then back on again.
You will only need to pair both before first usage.Once pairing is done, usually the communication will only require turning on the power.
MC-8 MC-8 Working Mode Settings
There are 2 types of working mode settings at each CH A,B,C,D stick operations
Quick modeYou can set 2 types of mode settings for CH A,B,C,D operation.
Multi modeStick operation has some lag, so servos and ESC response has some delay when operating. This mode is recommended for operating multiple functions by the stick like when operating a robot.
- Turn off the power in the MR-8 (receiver). This is for protection of the connected devices like servos, etc.
- With the power off on the MC-8, press the TRIM C(upper) and then turn on the power of the MC-8.
- While holding down the TRIM C (upper) wait for the LED light to go off then release the TRIM C (upper).
- The initial setting of the MC-8 is quick mode. If you want to change the mode, please start from step 1 again.
MC-8 MC-8 start and end
- When the Power switch is held for longer then 0.5sec, the MC-8 is started.
- When the MC-8 is on and the Power switch is held for over 1sec the MC-8 is turned off.
If there is no operational use of the MC-8 for over 5 minutes, the MC-8 will ring the buzzer alarm. If there is continuously no operation for 5 more minutes the MC-8 will turn off automatically
MC-8 Trim Setting for CH A-D
Neutral position (operation center position) can be set for channels A-D
- With the MC-8 power on, press the trim button in the direction you want it to change to.
- Please adjust the setting value according to each model..
The steering neutral position can be set when the car will not run straight.Please only adjust the setting for the channel that is needed.
MC-8 CH A-D Reverse Setting
CH A,B,C,D output signal direction can be reversed (operate in a reverse direction)

Ex. Reverse CH A
- Turn off the power in the MR-8 (receiver). This is for protection of the connected devices like servos, etc.
- Turn on the power of the MC-8 and hold the stick in the full up position (up for A and C). For B and D hold in the full left position.
- Hold the stick in the full position and press and hold the TRIM (same direction button as the stick). You will hear a ‚blip‘ when pressing the TRIM and while continuing to hold it you will another ‚blip‘ about 1sec later and release the TRIM.
- Please check the operation by turning on the power of the MR-8.
This is used when the steering operation is wrong, etc. Please only set the channel that needs the change. Holding the stick in the full direction and pressing the TRIM (same direction as the stick) is the same operation method for channels A-D. minutes the MC-8 will turn off automatically
MC-8 End point setting at the CH A-D
The maximum operation range (angle) can be set for channels A-D

Ex. Change the operation range for the right direction for channel C
- Turn on the power for the MC-8 and operate the stick you want to change.
- Hold the stick in the full position and press the trim button to change the value.
- Please adjust the setting value for each model.
You can change the setting value when the maximum operational movement of the stick allows for the tire to touch the chassis of the car. Please only change the channel that needs change. The operation method is the same for channels A-D.
MC-8 Reset MC-8 to factory default setting

- Turn off the power in the MR-8 (receiver). This is for protection of the connected devices like servos, etc.
- Turn off the MC-8. While pressing and holding TRIM A (down side) and TRIM C (down side), turn on the power.
- Please wait after release power Button but hold pushing TRIMA(down side) and TRIM-C(down-side),After 1 sec later LED is light off.Release TRIM A (down side) and TRIM C (down side) after the LED light goes off. The MC-8 will be in factory default settings.
If you perform this, all information of the MC-8 except the pairing are reset to factory settings. Also steps 4 ‚Mode Setting‘ to 8 ‚End Point Setting‘ will be factory default.Please set these again.
Technical data
- 8-channel transmitter: 2.4 GHz
- Transmitter operating voltage: 4.8-6V
- Receiver operating voltage: 3-6.6V
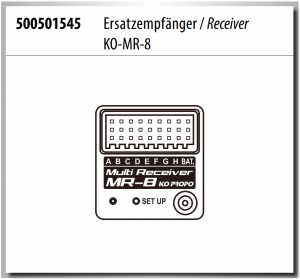
Spare Parts
Other accessories:www.carson-modelsport.com/en/products/carson-modelsport/accessories/radio-controls
TAMIYA-CARSONModellbau GmbH & Co. KG

References
RC cars & model cars | Official Carson Shop
Gewährleistung – Service – customer-service.carson-modelsport.com
RC cars & model cars | Official Carson Shop
Fernsteueranlagen – Zubehör – CARSON Modelsport – Produkte – www.carson-modelsport.com
Radio Controls – Accessories – CARSON Modelsport – Products – www.carson-modelsport.com
modelSPORT magazine – Your 2-hour window into the world of R/C
[xyz-ips snippet=”download-snippet”]