casa systems NF18MESH Wireless Cloudmesh Gateway WiFi Router User Guide
Document history
This document relates to the following product:
Casa Systems NF18MESH
| Ver. | Document description | Date |
| v1.0 F | First document release | 23 June 2020 |
Wireless Troubleshooting Guide
First, check whether your modem/router’s Wi-Fi is turned ON or not. Check LED light status for 2.4 GHz and 5 GHz Wi-Fi.
If 2.4 GHz and 5 GHz Wi-Fi is turned OFF, it means that your Wi-Fi service is disabled.
Login to Web User Interface
- Connect a computer and modem using Ethernet (Yellow) cable.
- Open a web browser (such as Internet Explorer, Google Chrome or Firefox), type following address into the address bar and press enter.http://cloudmesh.net or http://192.168.20.1Enter the following credentials:Username: adminPassword: <The password printed on the back of the modem>then click the Login button.NOTE – Some Internet Service Providers use custom password. If login fails, contact your Internet Service Provider. Use your own password if it is changed.

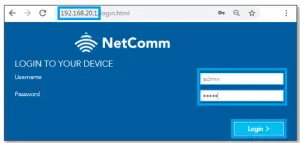
Note – If no authentication prompt is displayed or you see a request time out message, refer to “What if I cannot access Web User Interface guide” from FAQs section.
WiFi 2.4GHz/WiFi 5GHz
The NF18MESH allows you to maintain separate wireless settings for both 2.4GHz and 5GHz wireless services.Select the service you want to use (or both) and separately configure them:

t is recommended to use Ethernet cable to connect to modem using Laptop/Computer to change Wi-Fi security key/password. It is also recommended to change default Wireless name and password
Frequently Asked Questions
I cannot see my Wi-Fi (Wireless network name/SSID)
- Navigate to Wireless, select 2.4 GHz or 5 GHz. Select Main On and press Apply/Save.
A Wi-Fi client (Laptop/mobile/Pad) cannot connect toWireless network
Case1 – MAC address is restricted: Ensure that the MAC Restrict Mode is Disabled.
Navigate to Advanced, click Wireless under Local Network, select MAC Filter and make sure that MAC Restrict Mode is Disabled.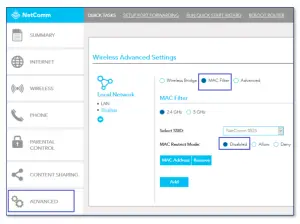
Case2 – Stored old Wi-Fi password: It may occur if the client device is storing old Wi-Fi password and it is not prompting for new password. In such case, a) the saved Wi-Fi network name and password should be removed, b) scan for the Wi-Fi network name and c) enter new password again. It is recommended to re-check the Wi-Fi security key/password from modem’s web interface. Check wireless setup guide or wireless security setup guide for the instruction to check the Wi-Fi security key/password.
Please follow the below instructions to remove stored Wi-Fi network name/SSID and Wi-Fi security key/password from client devices. Please find the appropriate operating system listed below and follow the instructions.
Windows 7
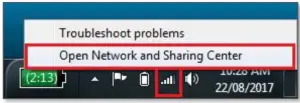
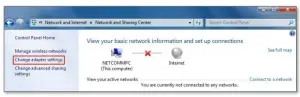
- Right Click the Wireless symbol on the bottom right of your screen and click “Open Network and Sharing CenterORClick on the Start Menu, and go to “Control Panel”. Select View by: Category. Click “View network status and tasks” under “Network and Internet”.
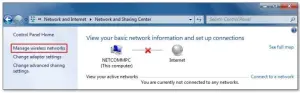
- Click “Manage wireless networks”. If it is not shown, proceed to Step 4.
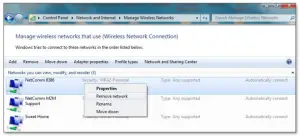
- Select your Wi-Fi network name/SSID, right click and select Remove network from the popup menu.These are stored settings and passwords for connecting to the listed networks. If your Wi-Fi network name/SSID is not listed here, close this window and return to the “Network and Sharing Center”
- Click Yes on the confirmation dialog box.
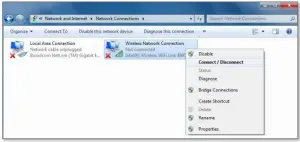
- Click on “Change Adapter settings” on the left-hand side.
- Right-click on “Wireless Network Connection” and select “Connect / Disconnect.Note – If you cannot see a “Wireless Network Connection” item, your wireless adapter may not be installed or inserted correctly. Please check this before continuing with steps in this guide.
- You should see a network listed with the SSID you obtained at the start of this guide. Select your wireless network and click “Connect”. Enter your Wi-Fi security key/password and click OK. You will be connected to the Wi-Fi network (Example: NetComm 8386).Do not forget to disconnect your ethernet cable
 ORClick on the Start Menu, and go to “Control Panel”. Select View by: Category. Click “View network status and tasks” under “Network and Internet”.
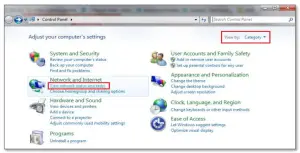
 These are stored settings and passwords for connecting to the listed networks. If your Wi-Fi network name/SSID is not listed here, close this window and return to the “Network and Sharing Center”
 Note – If you cannot see a “Wireless Network Connection” item, your wireless adapter may not be installed or inserted correctly. Please check this before continuing with steps in this guide.
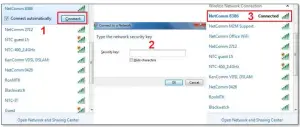 Do not forget to disconnect your ethernet cable
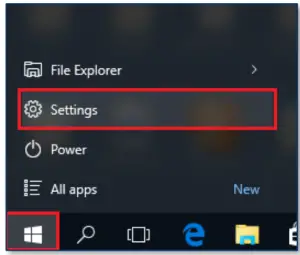
Windows 8 / Windows 10
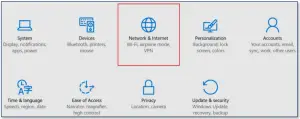
- Click the Windows button on the bottom left corner of your screen and click Settings.
- Click Network and Internet
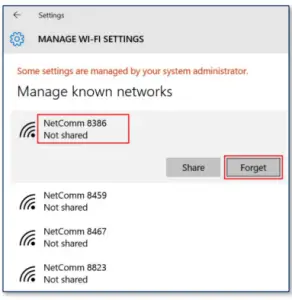
- Click Wi-Fi, scroll down to the bottom in the right side and click manage Wi-Fi settings.
- Find your Wi-Fi network name/SSID and click Forget
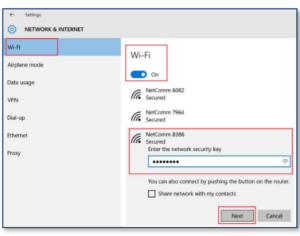
- Navigate back to Network and Internet > Wi-Fi.
- Make sure Wi-Fi in turned On.
- Select your Wi-Fi network name/SSID (Example: NetComm 8386)
- Enter your Wi-Fi security key/password
- Click Next.Note – If you cannot see a “Wireless Network Connection” item, your wireless adapter may not be installed or inserted correctly. Please check this before continuing with steps in this guide.
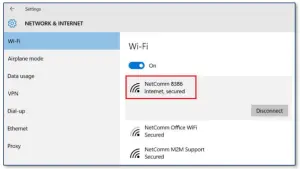
- You will now be connected to Wi-Fi network. Please remember to disconnect your ethernet cable.

iPhone
Your iPhone may be storing your old Wi-Fi password causing it not to connect to Wi-Fi network. On your iPhone, navigate to Settings > Wi-Fi.
- Press the ( i ) symbol as in the snapshot below and
- Press Forget this network and then
- Click the Forget button in the popup dialog.Scan for the Wi-Fi network name/SSID and enter new Wi-Fi security key/password again.
 Scan for the Wi-Fi network name/SSID and enter new Wi-Fi security key/password again.
Android
Your android phone may be storing your old Wi-Fi password causing it not to connect to Wi-Fi network.On your android phone, navigate to Settings > Connections > Wi-Fi. Press Wi-Fi network name (Example: NetComm 8386) as in the snapshot below and press Forget.
 Scan for the Wi-Fi network name/SSID and enter new Wi-Fi security key/password again.
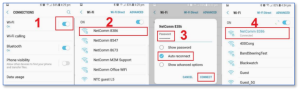
Mac OS X
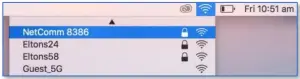
- Click on the Airport/Wi-Fi icon at the top right corner of the screen as shown below.
- Scroll down and click “Open Network Preferences…”.
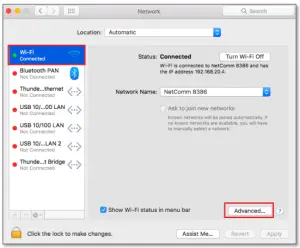
- Select Wi-Fi and then select the Advanced… button.
- Select your Wi-Fi network name (Example: NetComm 8386), click “–“ as shown below, check Remove and OK.
- Click Apply
- Scan for the Wi-Fi network name/SSID and enter new Wi-Fi security key/password again. You should see a list of Wi-Fi network name along with your Wi-Fi network name/SSID (Example: NetComm 8386). Click your Wi-Fi network name/SSID to connect to this network.
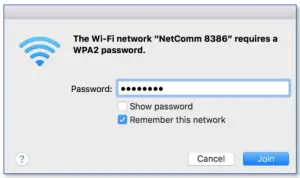
- Enter your Wi-Fi security key/password and click Join to connect to the Wi-Fi networkIf you enter an incorrect Wi-Fi security key, a message will appear, and you will be prompted to enter the correct key again.The Airport icon will now have black lines to indicate signal strength. To see if the wireless is connected, click on the Airport icon again. You should be able to see Tick on your connected Wi-Fi network.After completing the steps above, you should now be connected to your wireless network and able to surf the internet. Please remember to disconnect your ethernet cable.


 If you enter an incorrect Wi-Fi security key, a message will appear, and you will be prompted to enter the correct key again.The Airport icon will now have black lines to indicate signal strength. To see if the wireless is connected, click on the Airport icon again. You should be able to see Tick on your connected Wi-Fi network.
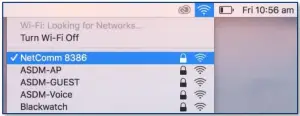 After completing the steps above, you should now be connected to your wireless network and able to surf the internet. Please remember to disconnect your ethernet cable.
I am connected to my Wi-Fi network but unable tobrowse internet
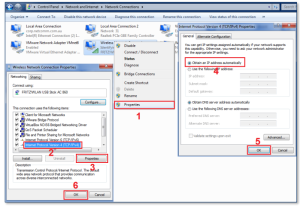
Check if you are using static IP address of different network range. It is mandatory to use automatic IP address from modem.
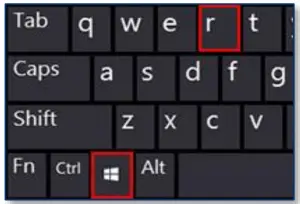
- Press Windows + R key in your keyboard.
- n Run command, type ncpa.cpl and press enter. It will open Network connections window.
- Right click “Wireless Connection” connection and 1) click “Properties”, 2) Click “Internet Protocol Version 4 (TCP/IPv4) and 3) Click properties, 4) Click “Obtain an IP address automatically”, 5) Click OK and 6) Click OK again.

Should I choose 2.4 GHz or 5 GHz?
As the name suggests, 2.4 GHz and 5 GHz operate on different frequencies. The primary differences between the 2.4 GHz and 5GHz wireless frequencies are area coverage and bandwidth. 5GHz provides faster data rates at a shorter distance, whereas 2.4GHz offers coverage for farther distances, but may perform at slower speeds.
In most cases, 5 GHz has higher bandwidth but less area coverage. The reason being higher frequency signals cannot penetrate solid objects like walls and floors. 5 GHz is suitable for streaming video and online gaming (Television and Gaming device should be closer to the modem). The 2.4 GHz has lower bandwidth but larger area coverage. Commonly, 2.4 GHz is used to browse internet using mobile client devices such as Laptop, Mobile or Pad.
Copyright
Copyright© 2020 Casa Systems, Inc. All rights reserved.
The information contained herein is proprietary to Casa Systems, Inc. No part of this document may be translated, transcribed, reproduced, in any form, or by any means without prior written consent of Casa Systems, Inc.
Trademarks and registered trademarks are the property of Casa Systems, Inc or their respective subsidiaries. Specifications are subject to change without notice. Images shown may vary slightly from the actual product
Previous versions of this document may have been issued by NetComm Wireless Limited. NetComm Wireless Limited was acquired by Casa Systems Inc on 1 July 2019.
![]() Note – This document is subject to change without notice.
Note – This document is subject to change without notice.
References
[xyz-ips snippet=”download-snippet”]