CASIO PX-S3100 Wireless MIDI and Audio Adaptor Electronic Musical Instruments User Guide
![]() IMPORTANT!
IMPORTANT!
- Whenever you connect any device to the Digital Piano, be sure to read the user documentation that comes with the device.
- Any reproduction of the contents of this manual, either in part or its entirety, is prohibited. Except for your own, personal use, any other use of the contents of this manual without the consent of CASIO is prohibited under copyright laws.
- IN NO EVENT SHALL CASIO BE LIABLE FOR ANY DAMAGES WHATSOEVER (INCLUDING, WITHOUT LIMITATION, DAMAGES FOR LOSS OF PROFITS, BUSINESS INTERRUPTION, LOSS OF INFORMATION) ARISING OUT OF THE USE OF OR INABILITY TO USE THIS MANUAL OR PRODUCT, EVEN IF CASIO HAS BEEN ADVISED OF THE POSSIBILITY OF SUCH DAMAGES.
- The contents of this manual are subject to change without notice.
- The actual appearance of the product may be different from that shown in the illustrations in this User’s Guide.
- The Bluetooth® word mark and logos are registered trademarks owned by Bluetooth SIG, Inc. and any use of such marks by CASIO COMPUTER CO., LTD. is under license. Other trademarks and trade names are those of their respective owners.
- Company and product names used in this manual may be registered trademarks of others.
Sounding a Bluetooth® Audio Capable Device (Bluetooth Audio Pairing)
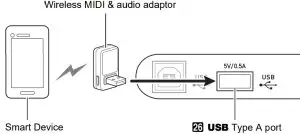
You can use the included Wireless MIDI & audio adaptor to pair the Digital Piano with a Bluetooth audio device and sound the playback of the external device from the Digital Piano’s speakers.
![]() IMPORTANT!
IMPORTANT!
- Before performing the pairing operation, turn down the volume levels of the Digital Piano and the external device.
- If external device notes sounded by this Digital Piano are distorted, lower the external device’s volume level.
- Due to Bluetooth characteristics, you may notice some lag in notes. If that happens, connect using a USB cable.
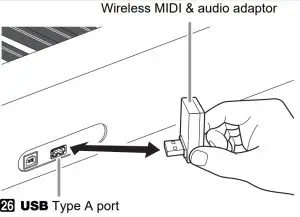
To pair the Digital Piano with a Bluetooth Audio Capable Device Connect the Wireless MIDI & audio adaptor to the 26 USB Type A port.
- Connect the Wireless MIDI & audio adaptor to the cq USB Type A port.

- On the Bluetooth setting screen that appearson the external device, turn on the Bluetooth function if it is off.
- Hold down the bp^ button until “[FUNCTION]” appears on the display. Then release the button.This enters the FUNCTION mode.
- Use the bk U and bl I buttons to display “WIRELESS”, and then touch bm ENTER.
- Use the bk U and bl I buttons to display “Audio Pairing” and then touch bm ENTER. This causes the Digital Piano’s Bluetooth indicator to flash, which indicates pairing standby.
- If the Digital Piano’s wireless function is turned off, it will turn on automatically.
- Use the setting screen of the Bluetooth audio capable device to select “WU-BT10 AUDIO” to pair with this Digital Piano.
- When pairing is complete, the Digital Piano’s Bluetooth indicator stops flashing and a piano tone notification sounds.
- Now output from the external device will sound from the Digital Piano’s speakers
- To exit the FUNCTION mode, hold down bp EXIT until “[FUNCTION]” disappears from the display.
![]() Note
Note
- You need to turn on both the Digital Piano’s wireless function and the Bluetooth audio capable device’s Bluetooth function.
- To change the Digital Piano’s wireless settings, see “Enabling and Disabling the Digital Piano’s Wireless Function” (page EN-4).
- Information about the last Bluetooth audio capable devices connected to this Digital Piano is registered by the Wireless MIDI & audio adaptor. Because of this, it can automatically perform Bluetooth audio pairing with the same device, so you will not need to perform the Bluetooth audio pairing operation again.
Deleting Bluetooth Audio Capable Device Pairing Registration
![]() Note
Note
- Performing the procedure below will delete the pairing registration between this Digital Piano and its currently paired Bluetooth audio capable device. If you are experiencing connectivity problems with a Bluetooth audio capable device, perform the procedure below and then perform the procedure under “Sounding a Bluetooth® Audio Capable Device (Bluetooth Audio Pairing)” (page EN-1).
- After performing the procedure below, you should also clear the Digital Piano connection logs from all of the Bluetooth audio devices that have been paired with the Digital Piano.For information about how to do this, refer to the user documentation of each Bluetooth audio device.
- Connect the Wireless MIDI & audio adaptor to the cq USB Type A port.
- You will not be able to delete a Bluetooth audio paring registration unless a Wireless MIDI & audio adaptor is connected to the Digital Piano.
- Hold down the bp^ button until “[FUNCTION]” appears on the display. Then release the button.This enters the FUNCTION mode.
- Use the bk U and bl I buttons to display “WIRELESS”, and then touch bm ENTER.
- Use the bk U and bl I buttons to display“Pairing Clear” and then touch bm ENTER.This causes “Sure?” to appear on the display.
- Step 5 below executes the clear operation. To cancel the delete operation at this time, touch bk –.
- To delete, touch bl +.This will terminate the Bluetooth connection, which is indicated by the Bluetooth indicator disappearing.
Adjusting Bluetooth Audio Input Volume andApplying Center CancelWhen you are playing audio input from a Bluetooth audio device through the Digital Piano’s speakers, you can adjust the volume level and even apply center cancel.
Center Cancel (Vocal Cut)
Turning on center cancel cuts (eliminates or reduces) the vocal part from the audio being input. Note that this function cancels the sound in the center position of the audio, but it may also cancel something else other than the vocal part. How center cancel is performed depends on the sound being input.
To adjust the Bluetooth Audio input volume level
- Hold down the bp^ button until “[FUNCTION]” appears on the display. Then release the button.This enters the FUNCTION mode.
- Use the bk U and bl I buttons to display “WIRELESS”, and then touch bm ENTER.
- Use the bk U and bl I buttons to display“Audio Volume” and then touch bm ENTER.
- Use the bk – and bl + buttons to change thesetting.
- You can specify a volume value from 0 to 127.
- To return to the initial default setting, touch bk – and bl + at the same time.
- To exit the FUNCTION mode, hold down bp EXIT until “[FUNCTION]” disappears from the display.
To change the center cancel setting for Bluetooth Audio input
- Under “To adjust the Bluetooth Audio input volume level”, perform steps 1 and 2.
- Use the bk U and bl I buttons to display “Audio C Cancel” and then touch bm ENTER.
- Use the bk – and bl + buttons to switch the setting between “On” (center cancel enabled) and “Off” (center cancel disabled).
- To exit the FUNCTION mode, hold down bp EXIT until “[FUNCTION]” disappears from the display
Connect the Digital Piano with a Bluetooth Low Energy MIDI Device
You can use the Wireless MIDI & audio adaptor to connect the Digital Piano with a Bluetooth Low Energy MIDI device.
- Connect the Wireless MIDI & audio adaptor to the cq USB Type A port
- Use the setting screen of app you installed onv your Bluetooth Low Energy MIDI device to select “WU-BT10 MIDI” and connect with the Digital Piano.
![]() Imprortant
Imprortant
- Do not perform any Digital Piano operation while it is in the process of connecting with a Bluetooth Low Energy MIDI device.
Note
- You need to turn on both the Digital Piano’s wireless function and the Bluetooth Low Energy MIDI device’s Bluetooth function.
- To change the Digital Piano’s wireless settings, see “Enabling and Disabling the Digital Piano’s Wireless Function” (page EN-4).
- You need to perform the above connection operation each time you connect with a Bluetooth Low Energy MIDI device.
- Depending on the device you are using and its operating system version, connecting with Bluetooth audio and Bluetooth Low Energy MIDI at the same time may cause unstable MIDI operation. If this happens, disconnect the Bluetooth audio.
Connecting and Using a Smart Device App with Bluetooth Wireless Technology
You can use the APP Function to connect the Digital Piano with a phone, tablet or other smart device and perform the operations described below.
- Control the Digital Piano from a smart device (Piano Remote Controller)
- Transfer music data from a smart device
To download the smart device app
Download the smart device app from the CASIO website and install it on the smart device you want to use.https://support.casio.com/global/en/emi/manual/PX-S3100/
- Install the app on the smart device.
- Plug the Wireless MIDI & audio adaptor into theDigital Piano’s cq USB Type A port.
- After connecting the smart device to the Digital Piano, use the smart device app to perform operations. For details about operations, refer to the user documentation of the app. Wireless MIDI & audio adaptor
- After connecting the smart device to the Digital Piano, use the smart device app to perform operations. For details about operations, refer to the user documentation of the app. Wireless MIDI & audio adaptor
![]() Important
Important
- Do not perform any Digital Piano operation while it is in the process of connecting with the smart device app.
- With a Bluetooth connection, some communication environments and use of smart device functions may cause a noticeable sound distortion. If this happens, try the countermeasures below.
- Refer to the app’s user documentation for information about MIDI playback quality.
- If your smart device is connected by Wi-Fi to another device, turn off the smart device Wi-Fi.
- Use a cable connection instead of Bluetooth.
Enabling and Disabling the Digital Piano’s Wireless Function
- Connect the Wireless MIDI & audio adaptor to the cq USB Type A port.
- Hold down the bp^ button until “[FUNCTION]”appears on the display. Then release thebutton.This enters the FUNCTION mode.
- Use the bk U and bl I buttons to display“WIRELESS”, and then touch bm ENTER.
- Use the bk U and bl I buttons to display“Adaptor” and then touch bm ENTER.
- Use the bk – and bl + buttons to switch thesetting between “On” and “Off”.
- While the wireless function is enabled, the Bluetooth indicator lights when the Digital Piano connects with the paired external device. The indicator is unlit whenthe wireless function is disabled.
- To exit the FUNCTION mode, hold down bp EXIT until “[FUNCTION]” disappears from the display.
Notification TonesA change in the Bluetooth connection causes a notification tone to sound.
|
This type of connection: |
Sounds this notification tone: |
|
Connection with a Bluetooth audio device |
Rising piano tone melody |
|
Disconnection from a Bluetooth audio device |
Falling piano tone melody |
|
Connection with a Bluetooth Low Energy MIDI device |
Rising vibraphone tone melody |
| Disconnection from a Bluetooth Low Energy MIDI device |
Falling vibraphone tone melody |
Adjusting the Notification Tone Volume Level
- Hold down the bp^ button until “[FUNCTION]” appears on the display. Then release the button. This enters the FUNCTION mode.
- Use the bk U and bl I buttons to display “WIRELESS”, and then touch bm ENTER.
- Use the bk U and bl I buttons to display “Notification Vol” and then touch bm ENTER.
- Use the bk – and bl + buttons to change the setting.
- You can specify a volume value from 0 to 127.
- To return to the initial default setting, touch bk – and bl + at the same time.
- To exit the FUNCTION mode, hold down bp EXIT until “[FUNCTION]” disappears from the display.
Checking the Bluetooth Connection Status
- Hold down the bp^ button until “[FUNCTION]” appears on the display. Then release the button. This enters the FUNCTION mode.
- Use the bk U and bl I buttons to display “WIRELESS”, and then touch bm ENTER.
- Use the bk U and bl I buttons to display“Connection Stat”, and then touch bm ENTER. The current connection status is shown in the third line of the display.
Indicator Description MIDI:C, Audio:C Bluetooth Low Energy MIDI device and Bluetooth Audio- capable device both connected. MIDI:C, Audio:– Bluetooth Low Energy MIDI device connected, Bluetooth Audio-capable device not connected. MIDI:–, Audio:C Bluetooth Low Energy MIDI device not connected, Bluetooth Audio-capable device connected. MIDI:–, Audio:– Bluetooth Low Energy MIDI device and Bluetooth Audio- capable device both not connected. - To exit the FUNCTION mode, hold down bp EXIT until “[FUNCTION]” disappears from the display.
Playing Sound from External Audio Equipment Through the Digital Piano’s Speakers
Connection requires commercially available connecting cords, supplied by you.
- The connecting cords should have a 3-pole stereo mini plug on one end and a plug that matches the configuration of the external device on the other end.
![]() Important
Important
- Turn off the external device when making connections. After connecting, turn down the Digital Piano and external device volume levels whenever turning power on or off.
- After connecting, turn on the external device and then the Digital Piano.
- If external device notes that sound through the DigitalPiano speakers are distorted, lower the external device’s volume level setting.ct AUDIO IN jack (Stereo mini jack (3.5mm))

AUDIO IN Jack Input Volume Level Adjustment and Center CancelWhen you play audio from an external source connected to the ct AUDIO IN jack through the Digital Piano’s speakers, you can adjust the volume level and even perform center cancel, which cuts the vocal part.
To adjust the volume level of AUDIO IN jack input
- . Hold down the bp^ button until “[FUNCTION]” appears on the display. Then release the button.This enters the FUNCTION mode.
- Use the bk U and bl I buttons to display“AUDIO IN JACK” and then touch bm ENTER.
- Use the bk U and bl I buttons to display“Volume” and then touch bm ENTER.
- Use the bk – and bl + buttons, or cm Knob(K1) to change the setting.
- You can set the volume within the range of 0 to 127.
- To return to the initial default setting, touch bk – and bl + at the same time.
- To exit the FUNCTION mode, hold down bp EXIT until “[FUNCTION]” disappears from the display.
To change the center cancel setting of AUDIO IN jack input
- Perform steps 1 and 2 under “To adjust the volume level of AUDIO IN jack input”.
- Use the bk U and bl I buttons to display “Center Cancel” and then touch bm ENTER.
- Use the bk – or bl + buttons to switch the setting between “On” (center cancel enabled) and “Off” (center cancel disabled).
- To exit the FUNCTION mode, hold down bp EXIT until “[FUNCTION]” disappears from the display.
Outputting Digital Piano Notes Through an Amp or Audio Equipment
You can connect audio equipment or a music amplifier to the Digital Piano and then play through external speakers for more powerful volume and better sound quality.
![]() Important
Important
- Turn off the external device when making connections. After connecting, turn down the Digital Piano and external device volume levels whenever turning power on or off.
- After connecting, turn on the Digital Piano and then the external device.
- If keyboard notes are distorted when they are sounded from external audio equipment, lower the Digital Piano’s volume setting.
Connection requires commercially available connecting cords, supplied by you.

Connecting to Audio Equipment (Figure )
Use commercially available cables to connect the external audio equipment to the Digital Piano’s LINE OUT jacks as shown in Figure. LINE OUT R jack output is right channel sound, while LINE OUT L/MONO jack output is left channel sound. It is up to you to purchase connecting cables like the ones shown in the illustration for connection of audio equipment. Normally in this configuration you must set the audio equipment’s input selector to the setting that specifies the terminal (such as AUX IN) to which the Digital Piano is connected.
Connecting to a Musical Instrument Amplifier (Figure )Use commercially available cables to connect the amplifier to the Digital Piano’s LINE OUT jacks as shown in Figure LINE OUT R jack output is right channel sound, while LINE OUT L/MONO jack output is left channel sound. Connecting to the LINE OUT L/MONO jack only outputs a mixture of both channels. It is up to you to purchase a connecting cable like the one shown in the illustration for connection of the amplifier.
Connecting to a Computer
You can connect the Digital Piano to a computer and exchange MIDI data between them. You can send play data from the Digital Piano to music software running on your computer, or you can send MIDI data from your computer to the Digital Piano for playback.
- Minimum Computer System RequirementsThe minimum computer system requirements for sending and receiving MIDI data are shown below. Check to make sure that your computer complies with these requirements before connecting the Digital Piano to it.
- Operating SystemWindows 8.1 *1Windows 10 *2macOS (OS X/Mac OS X) 10.7, 10.8, 10.9, 10.10, 10.11,10.12, 10.13, 10.14, 10.15, 11.0*1 Windows 8.1 (32-bit, 64-bit)*2 Windows 10 (32-bit, 64-bit)
- USB port
![]() Important
Important
- Never connect to a computer that does not conform to the above requirements. Doing so can cause problems with your computer.
Note
For the latest news about supported operating systems,visit the website at the URL below.https://support.casio.com/global/en/emi/manual/PX-S3100/

Connecting the Digital Piano to Your Computer
![]() Important
Important
Make sure you follow the steps of the procedure below exactly. Connecting incorrectly can make data send and receive impossible.
- Turn off the Digital Piano and then start upyour computer.
- Do not start up the music software on your computer yet!
- Use a commercially available USB cable toconnect the cp USB Type B port of the DigitalPiano to your computer.
- Use a USB 2.0 or 1.1 A-B connector type USB cable.
- Turn on the Digital Piano.
- If this is the first time you are connecting the Digital Piano to your computer, the driver software required to send and receive data will be installed on your computer automatically.
- Start up commercially available music softwareon your computer.
- Configure the music software settings to select“CASIO USB-MIDI” as the MIDI device.
- For information about how to select the MIDI device, see the user documentation that comes with the music software you are using.
![]() Important
Important
- Be sure to turn on the Digital Piano first before starting up your computer’s music software.
- USB send and receive is disabled during playback of a song.
 report this ad
Note
- Once you are able to connect successfully, there is no problem with leaving the USB cable connected when you turn off or turn on your computer and/or Digital Piano.
- For detailed specifications and connections that apply to MIDI data send and receive by this Digital Piano, see the latest support information provided by the website at the URL below. https://support.casio.com/global/en/emi/manual/P-S3100/
- For information about MIDI settings, refer to “Configuring MIDI Settings” in the User’s Guide.
CASIO COMPUTER CO., LTD.6-2, Hon-machi 1-chomeShibuya-ku, Tokyo 151-8543, Japan
PXS3100-E-3A-1MA2107-A@ 2021 CASIO COMPUTER CO., LTD.
References
[xyz-ips snippet=”download-snippet”]