![]()
Operation Guide 3238
About This Manual
- Depending on the model of your watch, display text appears either as dark figures on a light background or light figures on a dark background. All sample displays in this manual are shown using dark figures on a light background.
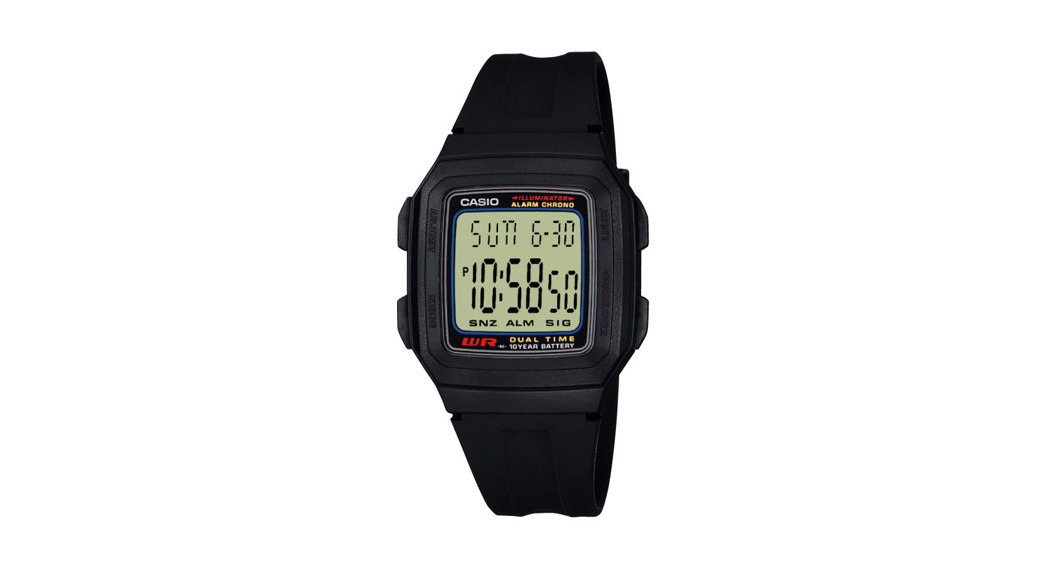
- Button operations are indicated using the letters shown in the illustration.
- Each section of this manual provides you with the information you need to perform operations in each mode. Further details and technical information can be found in the “Reference” section.

General Guide
- Press C to change from mode to mode.
- In any mode, press B to illuminate the display for about one second.
- In any mode, hold down C for about one second to return to the Timekeeping Mode.

Timekeeping
Use the Timekeeping Mode to set and view the current time and date.To set the time and date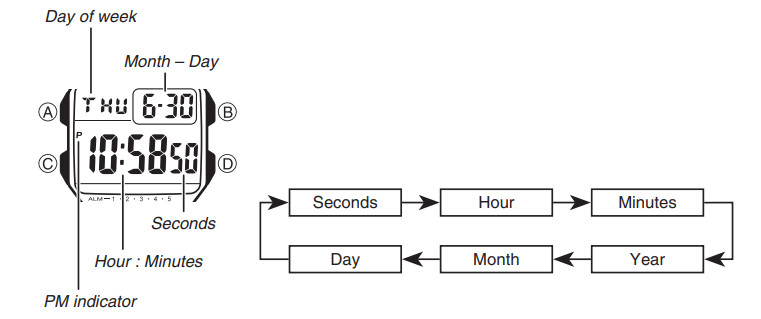
- In the Timekeeping Mode, hold down A until the seconds start to flash, which indicates the setting screen.
- Press C to move the flashing in the sequence shown below to select other settings.
- When the setting you want to change is fl ashing, press D to change it as described below.• Pressing D, while the seconds are in the range of 30 to 59, resets them to 00 and adds 1 to the minutes. In the range of 00 to 29, the minutes are unchanged.
To change this setting Perform this button operation Seconds Press D to reset to 00. Hour, Minutes, Year, Month, Day Press D to increase the setting. - Press A to exit the setting screen.• The day of the week is automatically displayed in accordance with the date (year, month, and day) settings.• The year can be set in the range of 2000 to 2099.• The watch’s built-in full automatic calendar automatically makes allowances for different month lengths and leap years. Once you set the date, there should be no reason to change it except after you have the watch’s battery replaced.
To toggle between 12-hour and 24-hour timekeepingIn the Timekeeping Mode, press D to toggle between 12-hour timekeeping and 24-hour timekeeping.
- With the 12-hour format, the P (PM) indicator appears to the left of the hour digits for times in the range of noon to 11:59 p.m. and no indicator appears to the left of thehour digits for times in the range of midnight to 11:59 a.m.
- With the 24-hour format, times are displayed in the range of 0:00 to 23:59, without any indicator.
- The 12-hour/24-hour timekeeping format you select in the Timekeeping Mode is applied in all other modes.
Alarms
You can set up to fi ve independent multi-function alarms with hour, minutes, month, and day. When an alarm is turned on, the alarm tone sounds when the alarm time is reached. One of the alarms can be configuard as a snooze alarm or a one-time alarm, while the other four are one-time alarms.You can also turn on an Hourly Time Signal that causes the watch to beep twice every hour on the hour.
- There are five alarms numbered 1 through 5. You can configure Alarm1 as a snooze alarm or a one-time alarm. Alarms 2 through 5 can be used as for one-time alarms only.
- All of the operations in this section are performed in the Alarm Mode, which you enter by pressing C (page E-4).
Alarm TypesThe alarm type is determined by the settings you make, as described below.Daily alarmSet the hour and minutes for the alarm time. This type of setting causes the alarm to sound every day at the time you set.Date alarm Set the month, day, hour and minutes for the alarm time. This type of setting causes the alarm to sound at the specifi c time, on the specifi c date you set.1-Month alarmSet the month, hour and minutes for the alarm time. This type of setting causes the alarm to sound every day at the time you set, only during the month you set.Monthly alarmSet the day, hour and minutes for the alarm time. This type of setting causes the alarm to sound every month at the time you set, on the day you set.
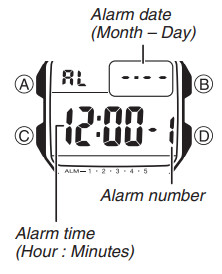
To set an alarm time
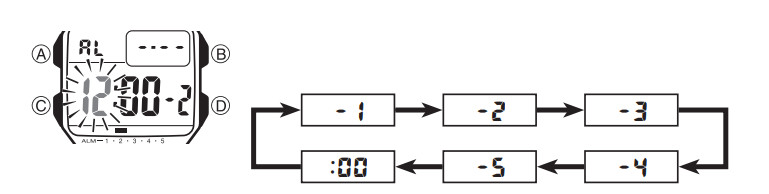
- In the Alarm Mode, use D to scroll through the alarm screens until the one whose time you want to set is displayed.To set a one-time alarm, display one of the screens indicated by an alarming number from 2 through 5. To set the snooze alarm, display the screen indicated by1.After you select an alarm, hold down 2.

- A until the hour setting of the alarm time starts to fl ash, which indicates the setting screen.This operation automatically turns on the alarm.
- Press C to move the flashing in the sequence shown below to select other settings.
- While a setting is fl ashing, press D to increase it.To set an alarm that does not include a month (Daily alarm, Monthly alarm), set – for the month. Press D until the x mark appears (between 12 and 1) while the month setting is flashing. To set an alarm that does not include a day (Daily alarm, 1-Month alarm), set — for the day. Press D until the xx mark appears (between the end of the month and 1) while the day setting is flashing.When setting the alarm time using the 12-hour format, take care to set the time correctly as a.m. or p.m. (P indicator).
- Press A to exit the setting screen.

Alarm Operation
The alarm tone sounds at the preset time for 10 seconds, regardless of the mode the watch is in. In the case of the snooze alarm, the alarm operation has been performed a total of seven times, every fi ve minutes, until you turn the alarm off or change it to a one-time alarm (page E-14).To stop the alarm tone after it starts to sound, press any button.Performing any one of the following operations during a 5-minute interval between snooze alarms cancels the current snooze alarm operation.Displaying the Timekeeping Mode setting screen (page E-6)Displaying the alarm1 setting screen (page E-11)To test the alarmIn the Alarm Mode, hold down D to sound the alarm.
To turn Alarms 2 through 5 and the Hourly Time Signal on and off
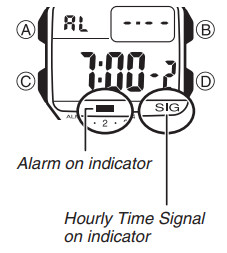
- In the Alarm Mode, use D to select a one-time alarm (alarm number 2 through 5) or the Hourly Time Signal (:00).
- Press A to toggle it on and off.The on/off status of Alarms 2 through 5 and the Hourly Time Signal is shown by indicators along the bottom of the displays.The alarm on indicators and Hourly Time Signal on indicator are displayed in all modes.While an alarm is sounding, the applicable alarm on indicator flashes on the display.
To select the operation of Alarm1
- In the Alarm Mode, use D to select Alarm1.
- Press A to cycle through the available settings in the sequence shown below.Snooze on indicator (SNZ) and Alarm1 on the indicator
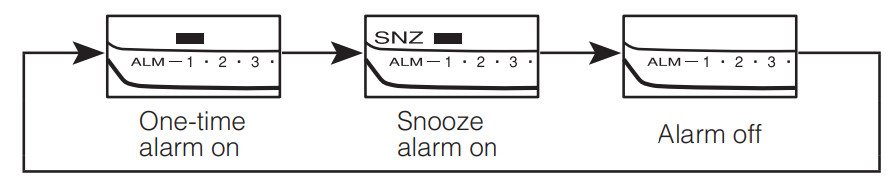
- The snooze on indicator ( SNZ) and Alarm1 on indicator are displayed in all modes.
- The snooze-on indicator ( SNZ) fl ashes during the 5-minute intervals between alarms.
- The alarm indicator (Alarm 1 on and/or SNZ) fl ashes while the alarm is sounding.
Countdown Timer
The countdown timer can be set within a range of one minute to 24 hours. An alarm sounds when the countdown reaches zero.
- You can also select auto-repeat, which automatically restarts the countdown from the original value you set whenever zero is reached.
- All of the operations in this section are performed in the Countdown Timer Mode, which you enter by pressing C (page E-5).
To use the countdown timer Press D while in the Countdown Timer Mode to start the countdown timer.

- When the end of the countdown is reached and auto-repeat is turned off, the alarm sounds for 10 seconds or until you stop it by pressing any button. The countdown time is automatically reset to its starting value after the alarm stops.
- The countdown timer measurement operation continues even if you exit the Countdown Timer Mode.
- Press D while a countdown operation is in progress to pause it. Press D again to resume the countdown.
- To completely stop a countdown operation, fi rst pause it (by pressing D), and then press A. This returns the countdown time to its starting value.
To set the countdown start time
- In the Countdown Timer Mode, hold down 1. Press A until the hours setting of the countdown start time starts to flash, which indicates the setting screen.
- C to move the flashing between the hours and minutes settings.While a setting is flashing, use 3.
- Press D to increase it.To set the starting value of the countdown time to 24 hours, set 0:00.
- Press A to exit the setting screen.
To turn auto-repeat on and off

- In the Countdown Timer Mode, hold down A until the hours setting of the countdown start time starts to fl ash, which indicates the setting screen.
- Press B to toggle auto-repeat on (A.RPT displayed) and off (A.RPT not displayed).• Note that pressing B in the above operation also turns on illumination.• When the end of the countdown is reached while auto-repeat is on, the alarm sounds, but the countdown restarts from the beginning without stopping. You can stop the countdown by pressing D and manually reset to the start time by pressing A.• The auto-repeat indicator appears in the Countdown Timer Mode only.
Stopwatch
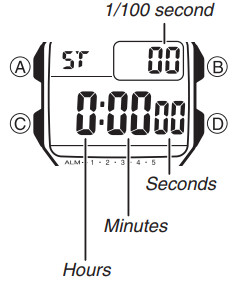
The stopwatch lets you measure elapsed time, split times, and two finishes.
- The display range of the stopwatch is 23 hours, 59 minutes, 59.99 seconds.
- The stopwatch continues to run, restarting from zero after it reaches its limit until you stop it.
- The stopwatch measurement operation continues even if you exit the Stopwatch Mode.
- Exiting the Stopwatch Mode while a split time is frozen on the display clears the split time and returns to elapsed time measurement.
- All of the operations in this section are performed in the Stopwatch Mode, which you enter by pressing C (page E-5).
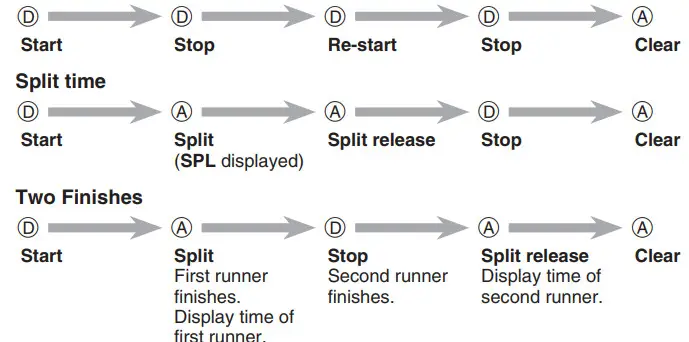
To measure times with the stopwatchElapsed time
Dual Time
The Dual Time Mode lets you keep track of time in a different time zone.In the Dual Time Mode, the second’s count is synchronized with the second’s count of the Timekeeping Mode.
To set the Dual Time
- Press C to enter the Dual Time Mode (page E-5).
- In the Dual Time Mode, hold down A until the hour setting starts to fl ash, which indicates the setting screen.
- Press C to change the selection in the following sequence.
Illumination
An LED (light-emitting diode) and a light guide panel illuminate the entire display for easy reading in the dark.
- Illumination may be hard to see when viewed under direct sunlight.
- Illumination turns off automatically whenever an alarm sounds.
- Frequent use of illumination runs down the battery life.
To illuminate the display In any mode, press B to illuminate the display for about one second.
 report this ad
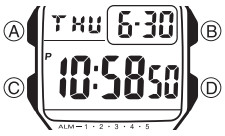
ReferenceThis section contains more detailed and technical information about watch operation.It also contains important precautions and notes about the various features and functions of this watch.Auto return featuresIf you leave a screen with fl ashing digits for two or three minutes without performing any operation, the watch automatically saves any settings you have made up to that point and exits the setting screen.Data and Setting Scrolling The D button is used to scroll through setting screen data on the display. Holding down this button during a scroll operation scrolls through the data at high speed.
Specifications
Accuracy at normal temperature: ±30 seconds a monthTimekeeping: Hour, minutes, seconds, p.m. (P), month, day, day of the week Time system: Switchable between 12-hour and 24-hour formatsCalendar System: Full Auto-calendar pre-programmed from the year 2000 to 2099Alarms: 5 Multi-function*alarms (Four one-time alarms; one snooze/one-time alarm); Hourly Time Signal* Alarm type: Daily alarm, Date alarm, 1-month alarm, monthly alarmCountdown TimerMeasuring unit: 1 secondInput range: 1 minute to 24 hours (1-minute increments and 1-hour increments)Other: Auto-repeat functionStopwatchMeasuring unit: 1/100 of a secondMeasuring capacity: 23:59′ 59.99″Measuring modes: Elapsed time, split time, two finishesDual Time: Hour, minutes, seconds, p.m. (P)Illumination: LED (light-emitting diode)Battery: One lithium battery (Type: CR2025)Approximately 10 years on type CR2025 (assuming alarm operation 10 sec./day, and one illumination operation 1.5 sec./day)
[xyz-ips snippet=”download-snippet”]