
![]() Operation Guide 3416
Operation Guide 3416
About This Manual
- Note that the product illustrations in this manual are intended for reference only, and so the actual product may appear somewhat different than depicted by an illustration.
- All explanations in this manual use expressions such as “sounds the alarm” for alarm operations. When the Vibration Alarm is turned on, these expressions should be understood to mean “causes the watch to vibrate” (page E-10).
General Guide
- Press © to change from mode to mode.
- After you perform an operation in any mode, pressing © returns to the Timekeeping Mode.
- If you do not press any button for a few minutes while making settings in any mode (indicated when settings are fl ashing), the watch automatically clears the setting screen (settings stop fl ashing) and returns to the normal display for the mode you are in.
- This watch returns to the Timekeeping Mode whenever you hold down the © button for one or two seconds. If you ever lose track of what mode you are in or what you should do next, hold down ©to return to regular timekeeping.
- In any mode press
 to illuminate the display.

Timekeeping Mode
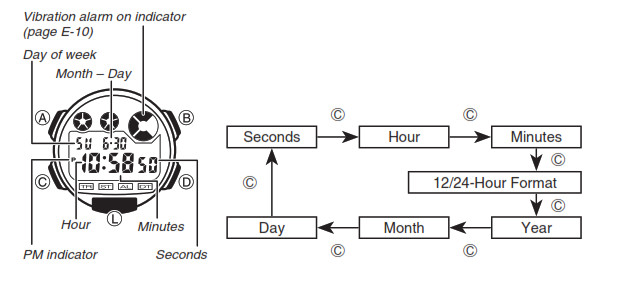
To set the time and date
- Hold down A while in the Timekeeping Mode until the second’s digits fl ash on the display because they are selected.
- Press © to change the selection in the following sequence.
- While the second’s digits are selected (fl ashing), press to reset the seconds to 00. If you press while the second’s count is in the range of 30 to 59, the seconds are reset to 00 and 1 is added to the minutes. If the second’s count is in the range of00 to 29, the minute’s count is unchanged. While any other digits (besides seconds) are selected (fl ashing),
- press to increase the number or B to decrease it. While the 12/24-hour format setting is selected, press or B to toggle it between 12 and 24.
- A to return to the Timekeeping Mode. After you set the time and date, press
- Except for when adjusting the seconds or setting the 12/24-hour format, holding down a button changes the current selection at high speed.
- When the 12-hour format is selected, the indicator P appears on the display to indicate “P.M.” times. There is no indicator for “A.M.” times.
- When the 24-hour format is selected, indicator 24 appears on the display.
- The year can be set in the range of 2000 to 2099.
- The watch’s built-in full automatic calendar makes allowances for different month lengths and leaps years. Once you set the date, there should be no reason to change it except after you have the watch’s battery replaced.
- The day of the week is displayed automatically in accordance with the date (year, month, and day) settings.
Illumination
- In any mode, press L to illuminate the display for about two seconds.
- Illumination may be hard to see when viewed under direct sunlight.
- Illumination turns off automatically whenever an alarm sounds.
- Frequent use of illumination runs down the battery.
Vibration Alarm
When the Vibration Alarm is turned on, the watch vibrates instead of sounding an alarm. This lets you use the watch without disturbing others by beeping sounds.
- The Vibration Alarm can be used to replace alarm sounds in the Countdown Alarm, Stopwatch, and Alarm Modes.
- All explanations in this manual use expressions such as “sounds the alarm” for alarm operations. When the Vibration Alarm is turned on, these expressions should be understood to mean “causes the watch to vibrate”.
- Watches with a metal band may produce noise when a vibration operation is performed.
- This is due to the vibration of the metal band and does not indicate malfunction of the watch.
To turn the vibration alarm on and off
Vibration alarm on indicator
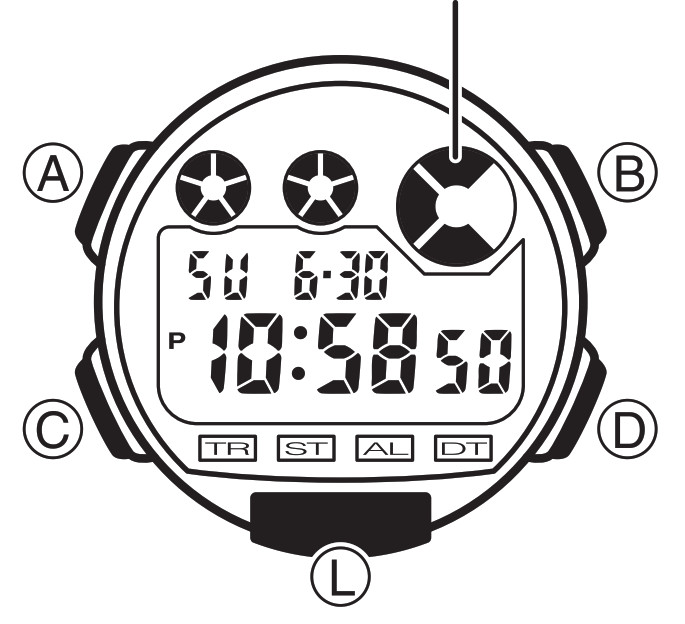
In the Timekeeping Mode, hold down ![]() for about two seconds to toggle the Vibration Alarm between on(Vibration Alarm on indicator displayed) and off (indicator not displayed).
for about two seconds to toggle the Vibration Alarm between on(Vibration Alarm on indicator displayed) and off (indicator not displayed).
- The watch will vibrate when you toggle it on, and beep when you toggle it off.
- Turning on the Vibration Alarm also disables the button operation tone.
Countdown Alarm Mode
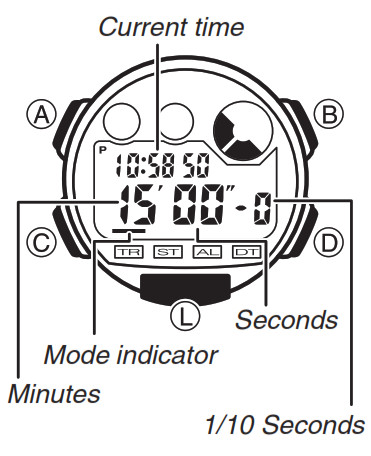
The countdown alarm can be set within a range of1 second to 24 hours. When the countdown reaches zero, an alarm sounds for 10 seconds or until you pressany button.To set the countdown start time
- Hold down A while in the Countdown Alarm Mode. The hour’s digits fl ash on the display because they are selected.
- Press©to change the selection in the following sequence.
- Press to increase the selected number or B to decrease it. Holding down either button changes the selection at high speed.• PressPress and B at the same time to clear the starting time to 0:00′ 00″.• To set the starting value of the countdown time to 24 hours, set 0:00′ 00″
- After you set the countdown start time, press twice to return to the CountdownAlarm Mode. To use the countdown alarm
- Press while in the Countdown Alarm Mode to start the countdown alarm.
- Press again to stop the countdown alarm. You can resume the countdown alarm operation by pressing.
- Stop the countdown alarm and then press B to reset the countdown time to its starting value.
 Pres
Pres- When the end of the countdown is reached, the alarm sounds for 10 seconds or until you stop the alarm by pressing any button. Countdown timing stops and the countdown time is automatically reset to its starting value after the alarm stops.
Stopwatch Mode
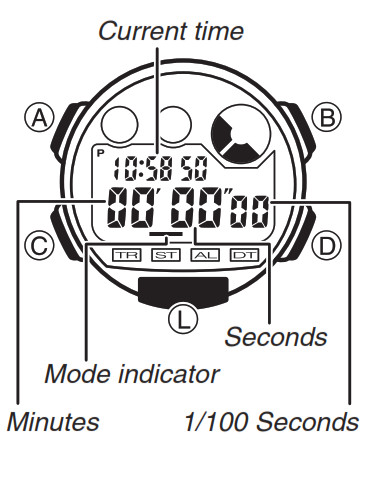
The Stopwatch Mode lets you measure elapsed time, split times, and two fi dishes. The range of the stopwatch is 23 hours, 59 minutes, 59.99 seconds. The Stopwatch Mode also features an Auto-Start function.
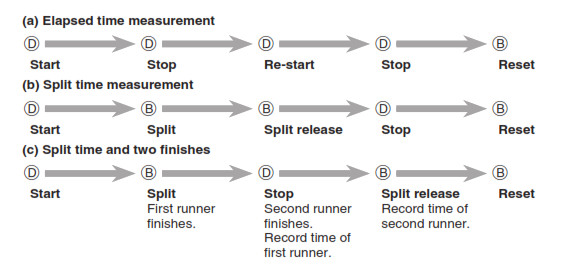
About the Auto-Start functionWith the Auto-Start function, the watch performs a 5-second countdown. When the countdown reaches zero, the stopwatch operation starts automatically. During the fi final three seconds of the countdown, a beeper sounds with each second.To turn the Auto-Start function on and offWhile the display is showing all zeros in the Stopwatch Mode, press B to toggle it on and off.The indicator AUTO-ST appears and 05 is shown in the upper display while Auto- Start is turned on. The AUTO-ST indicator is not shown and the upper part of the display shows the current time when Auto-Start is turned off.
Alarm Mode
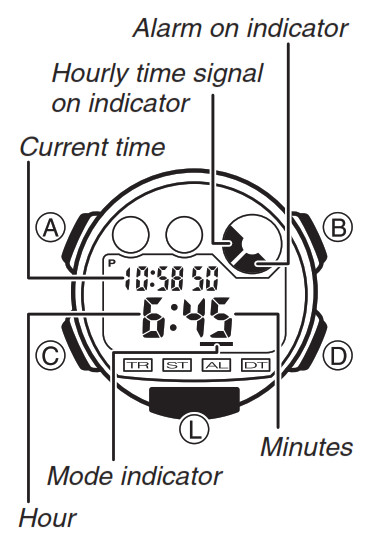
When the Daily Alarm is turned on, an alarm operation (20-second tone or 10-second vibration) is performed at the preset time each day. Press any button to stop the alarm after it starts to sound. When the Hourly Time Signal is on, the watch beeps every hour on the hour.To set the alarm time
- Hold down A until the hour digits start to fl ash on the display. The hour digits fl ash because they are selected.This operation will switch the Daily Alarm on automatically.
- Press ©to change the selection in the following sequence.

3. Press![]() to increase the selected digits and B to decrease them. Holding down either button changes the selection at high speed.
to increase the selected digits and B to decrease them. Holding down either button changes the selection at high speed.
- The format (12-hour and 24-hour) of the alarm time matches the format you select for regular timekeeping.
- When setting the alarm time using the 12-hour format, take care to set the time correctly as morning (no indicator) or afternoon (P).
4. After you set the alarm time, press A to return to the Alarm Mode.
To turn the daily alarm and hourly time signal on and offPress B while in the Alarm Mode to change the status of the daily alarm and hourly time signal in the following sequence.
![]()
- The alarm on indicator ( ) and the Hourly Time Signal on indicator () are shown on the display in all modes while these functions are turned on.
To test the alarm soundHold down B while in the Alarm Mode to sound the alarm.
- Note that pressing B also changes the alarm and the hourly time signal ON/OFF settings.
Dual Time Mode

 report this ad
The Dual Time Mode lets you keep track of the time in another time zone. You can also select the timekeepingformat (12-hour or 24-hour) separately from the Timekeeping Mode.To set the Dual Time
- Hold down A while in the Dual Time Mode. The hour digits fl ash on the display because they are selected.
- Press © to change the selection in the following sequence.
- Press to increase the selected digits and B to decrease them. Holding down either button changes the selection at high speed.
- After you set the time, press A to return to the Dual Time Mode.
- In the Dual Time Mode, the second’s count is synchronized with the second’s count of the Timekeeping Mode.
- In the Dual Time Mode, press B to toggle between the 12-hour and 24-hour formats.
Specifications
Accuracy at normal temperature: ±30 seconds a monthTimekeeping: Hour, minutes, seconds, pm (P), day of the week, month, day Time format: 12-hour and 24-hour formatsCalendar System: Full Auto-calendar pre-programmed from the year 2000 to 2099Countdown AlarmMeasuring unit: 1/10 secondInput range: 1 second to 24 hoursStopwatchMeasuring unit: 1/100 secondMeasuring capacity: 23 hours 59 minutes, 59.99 secondsMeasuring modes: Elapsed time, split time, and two fi nishes Other: Auto-StartAlarm: Daily alarm, hourly time signal
Dual TimeOther: LED (light-emitting diode); Vibration alarmBattery: One lithium battery (Type: CR2032)Battery life: 10 years under the following conditions
- One 2-second light operation per day
- One alarm operation per day
Note: One alarm operation is a 20-second audible alarm or 10-second vibration alarm.
[xyz-ips snippet=”download-snippet”]