
![]() Operation Guide 5001
Operation Guide 5001
About This Manual
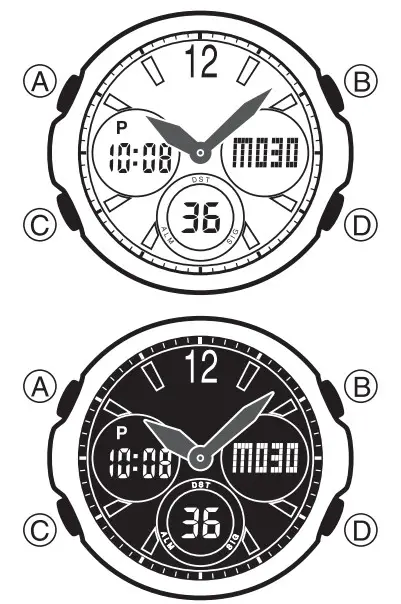
- Depending on the model of your watch, display text appears either as dark figures on a light background or light figures on a dark background. All sample displays in this manual are shown using dark figures on a light background.
- Button operations are indicated using the letters shown in the illustration.
- For the sake of simplicity, the sample displays in this manual do not show the analog hands of the watch.
- Each section of this manual provides you with the information you need to perform operations in each mode. Further details and technical information can be found in the “Reference” section.
General Guide
- Press C to change from mode to mode.
- In any mode (except when a setting screen is on the display), press B to illuminate the display for about two seconds.

Timekeeping
This watch features separate digital and analog timekeeping. The procedures for setting the digital time and analog time are different.
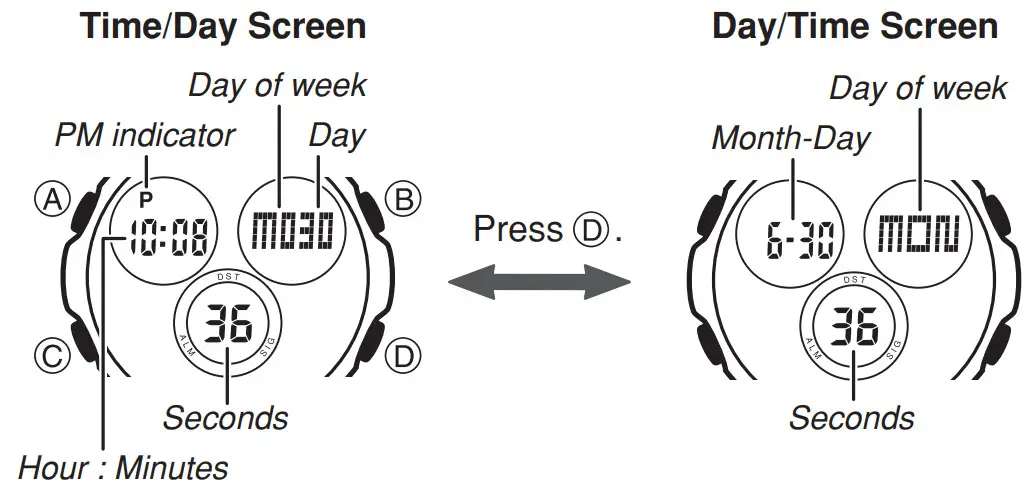
- Pressing D in the Timekeeping Mode will toggle between the Time/Day screen and the Day/Time screen.
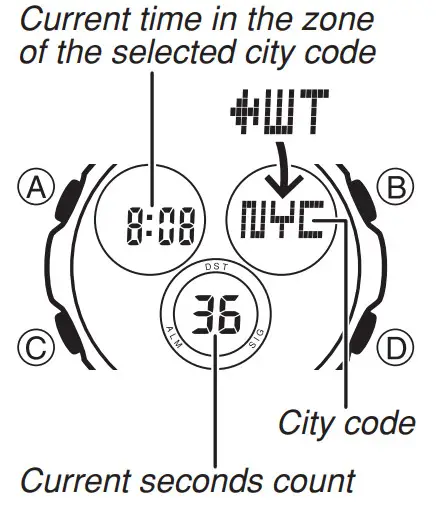
Read This Before You Set the Digital Time and Date!The times displayed in the Timekeeping Mode and World Time Mode are linked. Because of this, make sure you select a city code for your Home City (the city where you normally use the watch) before you set the time and date.
- To view the current Home City code setting, press A while in the Timekeeping Mode.
- For full information on city codes, see the “City Code Table”.
To set the digital time and date
- In the Timekeeping Mode, hold down A until the seconds start to flash, which indicates the setting screen.
- Press C to move the flashing in the sequence shown below to select other settings.

- When the setting you want to change is flashing, use D and B to change it as described below.
Screen
To do this: Do this:
Reset the seconds to Press D. Change the city code Use D (east) and B (west). Toggle between Daylight Saving Time and Standard TimePress D. Change the hour or minutes Use D (+) and B (–). Change the year Use D (+) and B (–). Change the month or day *See “Digital Time Daylight Saving Time (DST) Setting” for details about the DST setting.
- Press A to exit the setting screen.• Resetting the seconds to 00 while the current count is in the range of 30 to 59 causes the minutes to be increased by 1. In the range of 00 to 29, the seconds are reset to 00 without changing the minutes.• The year can be set in the range of 2000 to 2099.• The watch’s built-in full automatic calendar makes allowances for different month lengths and leap years. Once you set the date, there should be no reason to change it except after you have the watch’s battery replaced.• The day of the week is displayed automatically in accordance with the date (year, month, and day) settings.• A leading zero is added to dates from 1 through 9.Example: The 1st of the month is displayed as 01.

Digital Time Daylight Saving Time (DST) SettingDaylight Saving Time (summer time) advances the digital time setting by one hour from Standard Time. Remember that not all countries or even local areas use Daylight Saving Time.
To toggle the Timekeeping Mode digital time between DST and Standard Time
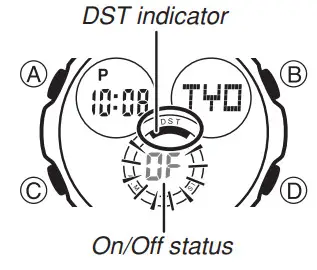
- In the Timekeeping Mode, hold down A until the seconds start to flash, which indicates the setting screen.
- Press C twice to display the DST setting screen.
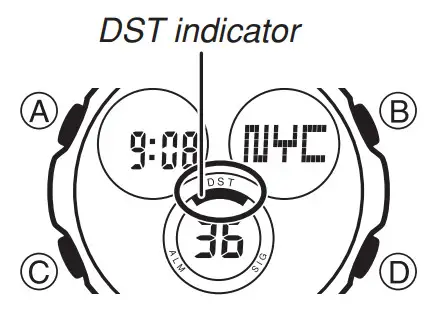
- Press D to toggle between Daylight Saving Time (ON) and Standard Time (OF).
- Press A to exit the setting screen.• The DST indicator appears on the Timekeeping Mode, Alarm Mode and Edit Mode screens while Daylight Saving Time is turned on.
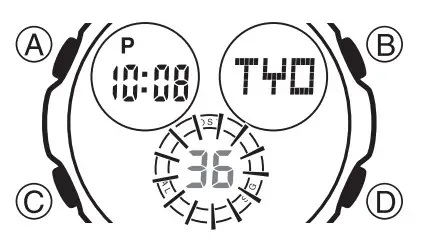
World Time
World Time shows the current time in 48 cities (29 time zones) around the world.
- All of the operations in this section are performed in the World Time Mode, which you enter by pressing ©
To view the time for another city codeIn the World Time Mode, press D to scroll eastwardly through city codes.
- For full information about city codes, see the “City Code Table”.
- If the current time shown for a city is wrong, check your Timekeeping Mode time and Home City code settings and make the necessary changes.
To toggle a city code time between Standard Time and Daylight Saving Time
- In the World Time Mode, use D to display the city code (time zone) whose Standard Time/Daylight Saving Time setting you to want to change.
- Hold down A for about one second to toggle between Daylight Saving Time (DST indicator displayed) and Standard Time (DST indicator not displayed).• The DST indicator is on the display whenever you display a city code for which Daylight Saving Time is turned on.• Note that the DST/Standard Time setting affects only the currently displayed city code. Other city codes are not affected.• You cannot toggle between Daylight Saving Time and Standard Time if the displayed city code is the city code that is currently selected as the Home City in the Timekeeping Mode. To change the DST setting of your Home City, use the procedure under “To set the digital time and date”.
Alarms

You can set five independent Daily Alarms. When an alarm is turned on, the alarm tone sounds when the alarm time is reached.You can turn on an Hourly Time Signal that causes the watch to beep twice every hour on the hour.
- There are six screens in the Alarm Mode. Five are for alarms (indicated by numbers from through ),and one is for the Hourly Time Signal (indicated by).
- All of the operations in this section are performed in the Alarm Mode, which you enter by pressing C.
- You can select any one of three alarm beeper patterns.
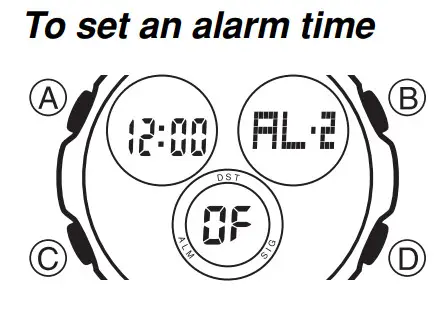
- In the Alarm Mode, use D to scroll through the alarm screens until the one whose time you want to set is displayed.• To set an alarm, display one of the screens indicated by an alarming number fromthrough
- After you select an alarm, hold down A until the hour setting of the alarm time starts to flash, which indicates the setting screen.• This operation turns on the alarm automatically.
- Press C to move the flashing between the hour and minute settings.
- While a setting is flashing, use D (+) and B (–) to change it.• When setting the alarm time using the 12-hour format, take care to set the time correctly as a.m. (no indicator) or p.m. (P indicator).
- Press A to exit the setting screen.
 • To set an alarm, display one of the screens indicated by an alarming number from
Alarm OperationThe alarm sounds at the preset time for about 10 seconds, regardless of the mode the watch is in.
- To stop the alarm tone after it starts to sound, press any button.
To test the alarmIn the Alarm Mode, hold down D to sound the alarm.
- The alarm will sound using the currently selected beeper pattern.
To turn an alarm on and off
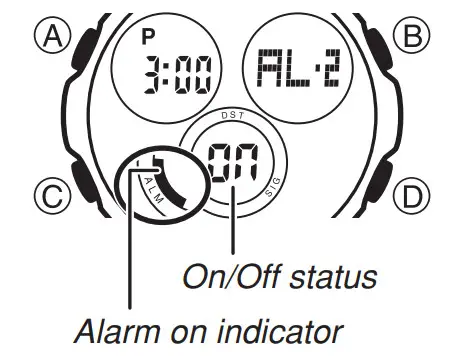
- In the Alarm Mode, use D to select an alarm.
- Press A to toggle it on (displayed) and off (displayed).• Turning on an alarm (through) displays the alarm on indicator on its Alarm Mode screen.• In all modes besides the Alarm Mode, the alarm on indicator is shown for any alarm that is currently turned on.• The alarm on the indicator flashes while the alarm is sounding.
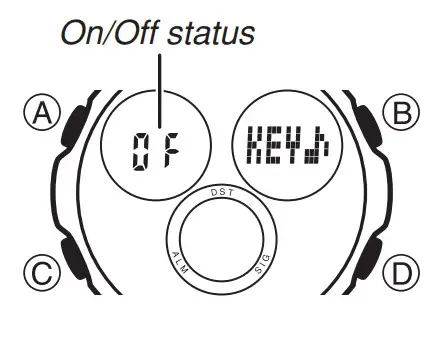
To turn the Hourly Time Signal on and off
![]()
- In the Alarm Mode, use D to select the Hourly Time Signal.
- Press A to toggle it on (displayed) and off (displayed).• Turning on the Hourly Time Signal displays the Hourly Time Signal indicator on its Alarm Mode screen.• While the Hourly Time Signal is turned on, the Hourly Time Signal on indicator is shown on the display in all modes besides the Alarm Mode.
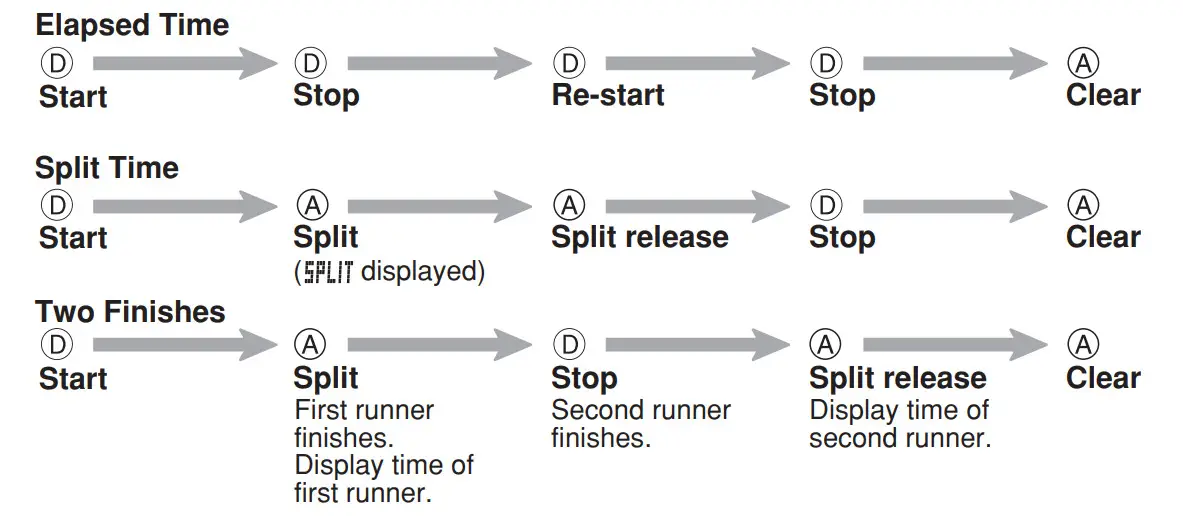
Stopwatch

The stopwatch lets you measure elapsed time, split times, and two finishes.
- The display range of the stopwatch is 59 minutes, 59.99 seconds.
- The stopwatch continues to run, restarting from zero after it reaches its limit until you stop it.
- The stopwatch measurement operation continues even if you exit the Stopwatch Mode.
- Exiting the Stopwatch Mode while a split time is frozen on the display clears the split time and returns toelapsed time measurement.
- All of the operations in this section are performed in the Stopwatch Mode, which you enter by pressing C.
To measure times with the stopwatch
Countdown Timer
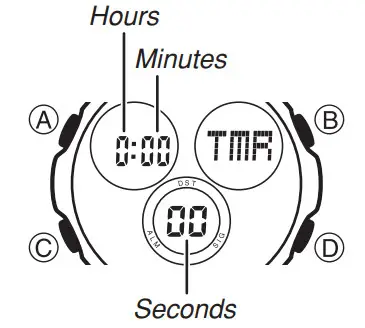
You can set the countdown timer within a range of one minute to 24 hours. An alarm sounds when the countdown reaches zero.
- You can also select auto-repeat, which restarts the countdown automatically from the original value you setwhenever zero is reached.
- All of the operations in this section are performed in the Countdown Timer Mode, which you can enter using C.
To use the countdown timerPress D while in the Countdown Timer Mode to start the countdown timer.
- When the end of the countdown is reached and auto-repeat is turned off, the alarm sounds for 10 seconds or until you stop it by pressing any button. The countdown time is reset automatically to its starting value after the alarm stops.
- When auto-repeat is turned on, the countdown will restart automatically without pausing when it reaches zero. The alarm sounds to signal when the countdown reaches zero.
- The countdown timer measurement operation continues even if you exit the Countdown Timer Mode.
- Press D while a countdown operation is in progress to pause it. Press D again to resume the countdown.
- To stop a countdown operation completely, first pause it (by pressing D), and then press A. This returns the countdown time to its starting value.
To configure countdown timer settings
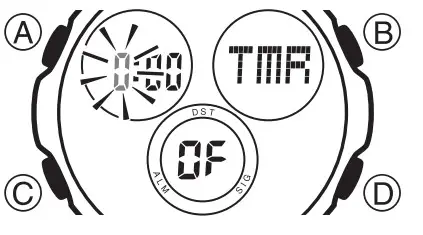
- While the countdown start time is on the display in the Countdown Timer Mode, hold down A until the hour setting of the countdown start time starts to flash, which indicates the setting screen.• If the countdown start time is not displayed, use the procedure under “To use the countdown timer” todisplay it.
- Press©to move the flashing in the sequence shown to select other settings.
- While a setting is flashing, use D and B to change it as described below.
Screen To do this: Do this: Change the hours or minutes Use D (+) and B (–). Toggle auto-repeat on ( ) and off Press D. • To specify a countdown start time of 24 hours, set
- Press A to exit the setting screen.• The auto-repeat on indicator () is displayed on the Countdown Timer Mode screen while this function is turned on.• Frequent use of auto-repeat and the alarm can run down battery power.

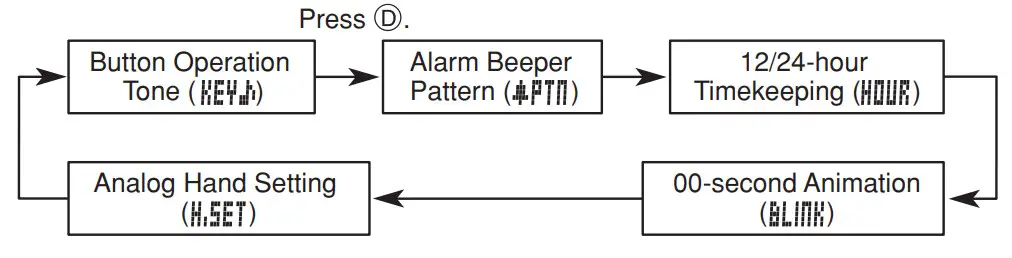
Edit Mode
You can use the Edit Mode to configure the following settings or to return the settings to their initial factory defaults.
- Button operation tone on/off
- Alarm beeper pattern
- 12/24-hour timekeeping
- 00-second animation on/off
- Analog hand setting
- The analog hand setting will not change when you reset settings to their initial factory defaults.
- All of the operations in this section are performed in the Edit Mode, which you enter by pressing C.
- Each press of D cycles through available settings in the sequence shown below.
Button Operation ToneThe button operation tone sounds any time you press one of the watch’s buttons. You can turn the button operation tone on or off as desired.
- Even if you turn off the button operation tone, the alarm, Hourly Time Signal, and Countdown Timer Mode alarm all operate normally.
To turn the button operation tone on and off
- In the Edit Mode, use D to display the Button Operation Tone selection screen.
- Press A to toggle the button operation tone on () and off
Alarm Beeper PatternYou can select any one of three alarm beeper patterns (A, B, and C).
- To hear what the current beeper sounds like, see “To test the alarm”.
To change the alarm beeper pattern
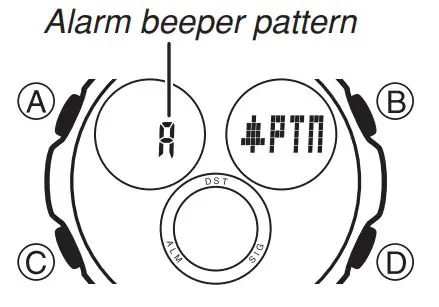
- In the Edit Mode, use D to display the Alarm Beeper Pattern selection screen.
- Use A to change the setting.
12/24-hour TimekeepingYou can select either 12-hour or 24-hour timekeeping.
To select 12-hour or 24-hour timekeeping
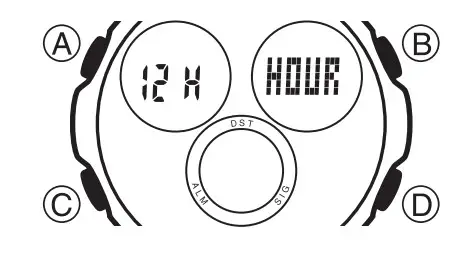
- In the Edit Mode, use D to display the 12/24-hour Timekeeping selection screen.
- Press A to toggle between 12-hour (12H) and 24-hour (24H) timekeeping.• With the 12-hour format, the P (PM) indicator appears on the display for times in the range of noon to 11:59 p.m. and no indicator appears for times in the range of midnight to 11:59 a.m.• With the 24-hour format, times are displayed in the range of 0:00 to 23:59, without any indicator.• The 12-hour/24-hour timekeeping format you select is applied in all modes.
00-second AnimationYou can use this setting to turn display animation on or off. The display animation is blink animation that is played each time the seconds reach 00 in the Timekeeping Mode (except when a setting screen is on the display) and World Time Mode.
To turn 00-second animation on and off
- In the Edit Mode, use D to display the 00-second Animation selection screen.
- Press A to toggle 00-second animation on (ON) and off (OF).
Setting the Analog TimePerform the procedure below when the time indicated by the analog hands does not match the time of the digital display.
To adjust the analog time
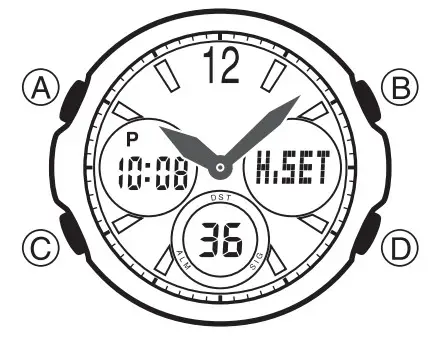
- In the Edit Mode, press D to display the Analog Hand Setting screen.
- Hold down A until the current digital time starts to flash, which indicates the analog setting screen.
- Press D to advance the analog time setting by 20 seconds.• Holding down D advances the analog time setting at high speed.• If you need to advance the analog time setting a long way, hold down D until the time starts advancing at high speed, and then press B. This locks the high-speed hand movement, so you can release the two buttons. High-speed hand movement continues until you press any button. It will also stop automatically after the time advances 12 hours or if an alarm (daily alarm, Hourly Time Signal, or countdown beeper) starts to sound.
- Press A to exit the setting screen.• The watch automatically will adjust the minute hand slightly to match its internal second count when you exit the setting screen.
To reset all Edit Mode settings to their initial defaultsIn the Edit Mode, hold down B and D for about three seconds until flashes on the display and the watch beeps.
- This returns all Edit Mode settings to their initial default settings.
| Button Operation Tone | |
| Alarm Beeper Pattern | |
| 12/24-hour Timekeeping | |
| 00-second Animation |
Reference
This section contains more detailed and technical information about watch operation.It also contains important precautions and notes about the various features and functions of this watch.
Auto Return Features
- If you leave the watch in the Alarm or Edit Mode for two or three minutes without performing any operation, it changes to the Timekeeping Mode automatically.
- If you leave a screen with flashing digits or a cursor on the display for two or three minutes without performing any operation, the watch saves any settings you have made up to that point and exits the setting screen automatically.
ScrollingThe B and D buttons are used in various modes and setting screens to scroll through data on the display. In most cases, holding down these buttons scrolls at high speed.Initial ScreensWhen you enter the Timekeeping, World Time, Alarm, or Edit Mode, the data you were viewing when you last exited the mode appears first.
World Time
- The second’s count of the World Time is synchronized with the second’s count of the Timekeeping Mode.
- All World Time Mode times are calculated from the current Home City time in the Timekeeping Mode using UTC time differential values.
- The UTC differential is a value that indicates the time difference between a reference point in Greenwich, England, and the time zone where a city is located.
- The letter “UTC” is the abbreviation for “Coordinated Universal Time”, which is the worldwide scientific standard of timekeeping. It is based upon carefully maintained atomic (cesium) clocks that keep time accurately to within microseconds. Leap seconds are added or subtracted as necessary to keep UTC in sync with the Earth’s rotation.
Illumination PrecautionsAn LED (light-emitting diode) illuminates the display for easy reading in the dark. In any mode (except when a setting screen is on the display), press B to turn on illumination for about two seconds.
- Illumination may be hard to see when viewed under direct sunlight.
- Illumination turns off automatically whenever an alarm sounds.
- Frequent use of illumination runs down the battery.
City Code Table
| City Code | City | UTC Differential | Other major cities in the same time zone |
| PPG | Pago Pago | –11.0 | |
| HNL | Honolulu | –10.0 | Papeete |
| ANC | Anchorage | –09.0 | Nome |
| YVR | Vancouver | –08.0 | Las Vegas, Seattle/Tacoma, Dawson City |
| SFO | San Francisco | ||
| LAX | Los Angeles | ||
| DEN | Denver | –07.0 | El Paso, Edmonton |
| MEX | Mexico City | –06.0 | Winnipeg, Houston, Dallas/Fort Worth, New Orleans |
| CHI | Chicago | ||
| MIA | Miami | –05.0 | Montreal, Detroit, Boston, Panama City, Havana, Lima,
 report this ad report this adBogota |
| NYC | New York | ||
| CCS | Caracas | –04.0 | La Paz, Santiago, Port Of Spain |
| YYT | St. Johns | –03.5 | |
| RIO | Rio De Janeiro | –03.0 | Sao Paulo, Buenos Aires, Brasilia, Montevideo |
| RAI | Praia | –01.0 | |
| LIS | Lisbon | +00.0 | Dublin, Casablanca, Dakar, Abidjan |
| LON | London | ||
| BCN | Barcelona | +01.0 | Amsterdam, Algiers, Hamburg, Frankfurt, Vienna, Stockholm, Madrid |
| PAR | Paris | ||
| MIL | Milan | ||
| ROM | Rome | ||
| BER | Berlin | ||
| ATH | Athens | +02.0 | Helsinki, Beirut, Damascus, Cape Town |
| JNB | Johannesburg | ||
| IST | Istanbul | ||
| CAI | Cairo | ||
| JRS | Jerusalem | ||
| MOW | Moscow | +03.0 | Kuwait, Riyadh, Aden, Addis Ababa, Nairobi |
| JED | Jeddah | ||
| THR | Tehran | +03.5 | Shiraz |
| DXB | Dubai | +04.0 | Abu Dhabi, Muscat |
| KBL | Kabul | +04.5 | |
| KHI | Karachi | +05.0 | |
| MLE | Male | ||
| DEL | Delhi | +05.5 | Mumbai, Kolkata, Colombo |
| DAC | Dhaka | +06.0 | |
| RGN | Yangon | +06.5 | |
| BKK | Bangkok | +07.0 | Jakarta, Phnom Penh, Hanoi, Vientiane |
| SIN | Singapore | +08.0 | Kuala Lumpur, Taipei, Manila, Perth, Ulaanbaatar |
| HKG | Hong Kong | ||
| BJS | Beijing | ||
| SEL | Seoul | +09.0 | Pyongyang |
| TYO | Tokyo | ||
| ADL | Adelaide | +09.5 | Darwin |
| GUM | Guam | +10.0 | Melbourne, Rabaul |
| SYD | Sydney | ||
| NOU | Noumea | +11.0 | Port Vila |
| WLG | Wellington | +12.0 | Christchurch, Nadi, Nauru Island |
*Based on data as of December 2006.
[xyz-ips snippet=”download-snippet”]