
Operation Guide 5607
Congratulations upon your selection of this CASIO watch.
To ensure that this watch provides you with the years of service for which it is designed, carefully read and follow the instructions in this manual, especially the information under “Operating Precautions” and “User Maintenance”.
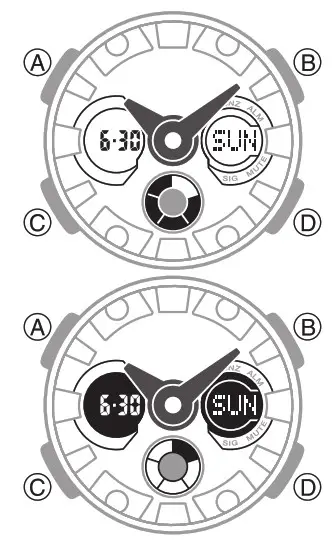
- Depending on the model of your watch, display text appears either as dark figures on a light background, or light figures on a dark background. All sample displays in this manual are shown using dark figures on a light background.
- Button operations are indicated using the letters shown in the illustration.
- Note that the product illustrations in this manual are intended for reference only, and so the actual product may appear somewhat different than depicted by an illustration.
Things to check before using the watch
- Check the Home City and the daylight saving time (DST) setting.Use the procedure under “To configure Home City settings” (page E-12) to configure your Home City and daylight saving time settings.Important!Proper World Time Mode data depend on correct Home City, time, and date settings in the Timekeeping Mode. Make sure you configure these settings correctly.
- Set the current time.See “Adjusting the Digital Time and Date Settings” (page E-15).The watch is now ready for use.
Mode Reference GuideThe mode you should select depends on what you want to do.
|
To do this: |
Enter this mode: |
See: |
| View the current date in the Home CityConfigure Home City and daylight saving time (DST)settingsConfigure time and date settingsSelect 12-hour or 24-hour timekeepingAdjust the analog hands | Timekeeping Mode | E-11 |
| View the current time in one of 48 cities(29 time zones) around the globe | World Time Mode | E-19 |
| Set an alarm time | Alarm Mode | E-21 |
| Use the stopwatch to measure elapsed time | Stopwatch Mode | E-25 |
| Use the countdown timer | Countdown Timer Mode | E-28 |
Selecting a Mode
- Press C to cycle between the modes as shown below.
- In any mode (except when a setting mode, with flashing digits, is on the display),Press B to illuminate the display.

General Functions (All Modes)The functions and operations described in this section can be used in all of the modes.
Auto Return FeaturesIf you leave a setting mode with flashing digits on the display for two or three minutes without performing any operation, the watch exits the setting mode automatically.
Initial ScreensWhen you enter the World Time Mode or Alarm Mode, the data you were viewing when you last exited the mode appears first.
ScrollingThe B and D buttons are used on the setting mode to scroll through data on the display. In most cases, holding down these buttons during a scroll operation scrolls through the data at high speed.
Timekeeping
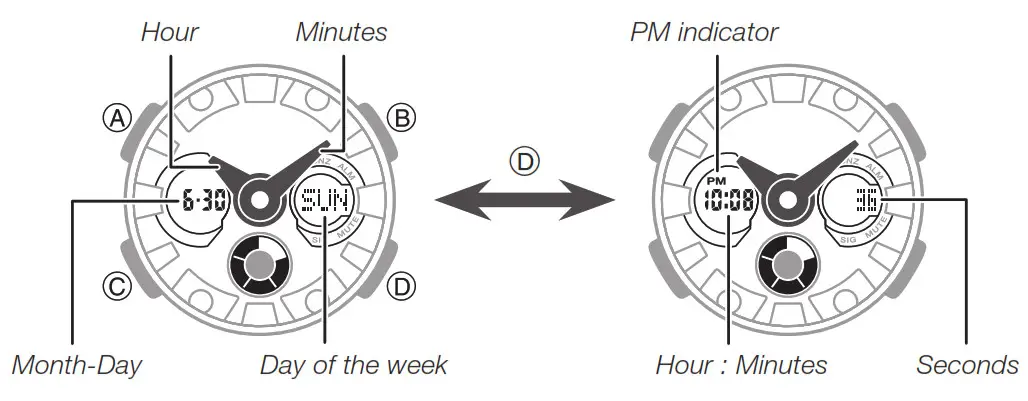
Use the Timekeeping Mode to set and view the current time and date. Each press of D toggles the digital display between the two formats shown nearby.
Configuring Home City Settings
There are two Home City settings: actually selecting the Home City, and selecting either standard time or daylight saving time (DST).
To configure Home City settings

 In the Timekeeping Mode, hold down A for at least two seconds until the seconds start to flash. This is the setting mode.• The watch will exit the setting mode automatically if you do not perform any operation for about two or three minutes.
- Press C twice to move the flashing to the city code.• For details about city codes, see the “City CodeTable” at the back of this manual.
- Press D (East) and B (West) to select the city code you want to use as your Home City.
- After the setting is the way you want, press A to return to the Timekeeping Mode.
Note
- After you specify a city code, the watch will use UTC* offsets in the World TimeMode to calculate the current time for other time zones based on the current time in your Home City.* Coordinated Universal Time, the worldwide scientific standard of timekeeping.The reference point for UTC is Greenwich, England.
To change the Daylight Saving Time (summer time) setting
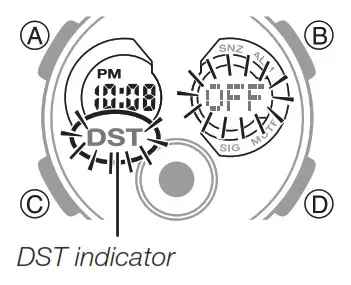
- In the Timekeeping Mode, hold down A for at least two seconds until the seconds start to flash. This is the setting mode.
- Press C to display the DST setting mode.
- Press D to toggle between Daylight Saving Time (ON) and Standard Time (OFF).
- After the setting is the way you want, press A to return to the Timekeeping Mode.• The DST indicator appears to indicate that Daylight Saving Time is turned on.
Adjusting the Digital Time and Date Settings
Use the procedure below to adjust the digital time and date settings.To configure the digital time and date settings
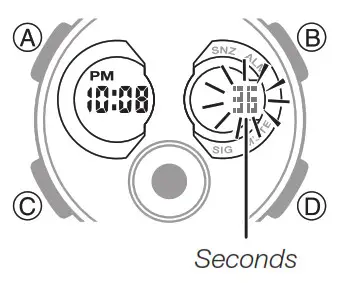
- In the Timekeeping Mode, hold down A for at least two seconds until the seconds start to flash. This is the setting mode.
- Press C to move the flashing in the sequence shown below to select the other settings.
 • The following steps explain how to configure timekeeping settings only.
 - When the timekeeping setting you want to change is flashing, use D and/or B to change it as described below.
Screen
To do this: Do this:
36 Reset the seconds to 00 Press D. OFF Toggle between Daylight Saving Time (ON) and Standard Time (OFF) Press D. TYO Change the city code Use D (East) and B (West). PM10:08 Change the hour or minute Use D (+) and B (–). 12H Toggle between 12-hour (12H) and 24-hour (24H) timekeeping Press D. 20 19 6.30 Change the year, month, or day Use D (+) and B (–). - Press A to exit the setting mode.
Note
- For information about selecting a Home City and configuring the DST setting, see “Configuring Home City Settings” (page E-12).
- While 12-hour format is selected for timekeeping, a PM indicator will appear for times from noon to 11:59 p.m. No indicator appears for times from midnight to 11:59 a.m. With 24-hour format, time is displayed from 0:00 to 23:59, without any PM indicator.
- The watch’s built-in full automatic calendar makes allowances for different month lengths and leaps years. Once you set the date, there should be no reason to change it except after you have the watch’s battery replaced.
- The day of the week changes automatically when the date changes.
Checking the Current Time in a Different Time Zone
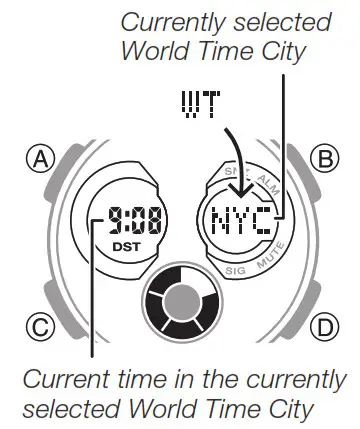
You can use the World Time Mode to view the current time in one of 29 time zones (48 cities) around the globe.The city that is currently selected in the World TimeMode is called the “World Time City”.
To enter the World Time ModeUse C to select the World Time Mode as shown on page E-8.
To view the time in another time zoneIn the World Time Mode, use D (East) to scroll through city codes.
To specify a standard time or daylight saving time (DST) for a city

- In the World Time Mode, use D (East) to display the city code (time zone) whose Standard Time/Daylight Saving Time setting you to want to change.
- Hold down A for at least two seconds.• This toggles the city code you selected in step 1 between Daylight Saving Time (DST indicator displayed) and standard time (DST indicator not displayed).• You cannot use the World Time Mode to change the DST setting of the city currently selected as your Home City in the Timekeeping Mode.• Note that you cannot switch between standard time/daylight saving time (DST) while UTC is selected as the World Time City.• The standard time/daylight saving time (DST) setting affects only the currently selected time zone. Other time zones are not affected.
Using the Alarm
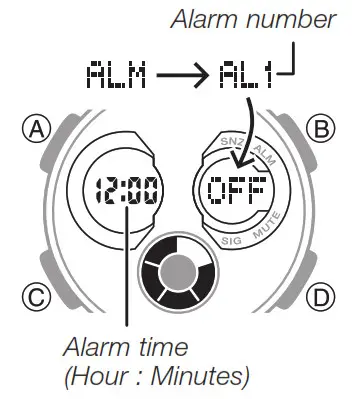 When an alarm is turned on, the alarm tone will sound when its alarm time is reached. One of the alarms is a snooze alarm, while the other four are daily alarms. The snooze alarm operation will repeat every five minutes,up to seven times. You also can turn on an Hourly Time Signal that causes the watch to beep twice every houron the hour.
To enter the Alarm ModeUse C to select the Alarm Mode as shown on page E-9.• The snooze alarm screen is indicated by SNZ, while the other alarm screens are numbered AL1 through AL4. The Hourly Time Signal screen is indicated by SIG.
To set an alarm time
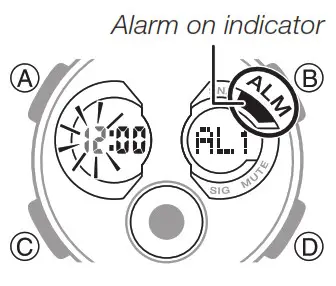

- In the Alarm Mode, use D to scroll through the alarm screens until the one whose time you want to set is displayed.
- Hold down A for at least two seconds until the alarm time starts to flash. This is the setting mode.
- Press C to move the flashing between the hour and minute settings.
- While a setting is flashing, use D (+) and B (–) to change it.• When setting the alarm time using the 12-hour format, take care to set the time correctly as a.m. (no indicator) or p.m. (PM indicator).
- Press A to exit the setting mode.To test the alarmIn the Alarm Mode, hold down D to sound the alarm.To turn an alarm and the Hourly Time Signal on and off
 In the Alarm Mode, use D to select an alarm or the Hourly Time Signal.• When the alarm you want or the Hourly Time Signal is displayed, press A to toggle it between on (“On”displayed) and off (“OFF” displayed).• The alarm on indicator (when any alarm is on), snooze alarm on indicator (when the snooze alarm is on), and the Hourly Time Signal on indicator (when the Hourly Time Signal is on) are shown on the display in all modes
To stop the alarmPress any button.NOTE
- In the case of the snooze alarm, the alert operation has performed a total of seven times, every five minutes, until you turn the alarm off.
- Performing any one of the following operations during a 5-minute interval between snooze alarms cancels the current snooze alarm operation.− Displaying the Timekeeping Mode setting screen− Displaying the snooze alarm setting screen
Using the Stopwatch
The stopwatch measures elapsed time, split times, and two finishes.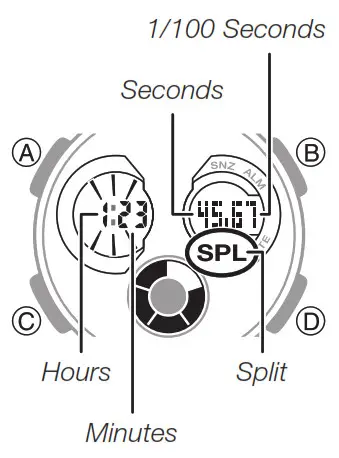
To enter the Stopwatch ModeUse C to select the Stopwatch Mode as shown on page E-9.
To perform an elapsed time operation

To measure two finishes

Note
- The Stopwatch Mode can indicate elapsed time up to 23 hours, 59 minutes, 59.99 seconds.
- Once started, stopwatch timing continues until you press D to stop it, even if you exit the Stopwatch Mode to another mode and even if timing reaches the stopwatch limit defined above.
- Exiting the Stopwatch Mode while a split time is frozen on the display clears the split time and returns to elapsed time measurement.
Countdown Timer

The countdown timer can be set within a range of one minute to 24 hours. An alarm sounds when the countdown reaches zero.
To enter the Countdown Timer ModeUse C to select the Countdown Timer Mode as shown on page E-9.
To configure the countdown timer

- While the countdown start time is on the display in the Countdown Timer Mode, hold down A until thecurrent countdown start time starts to flash, which indicates the setting mode.• If the countdown start time is not displayed, use the procedure under “To perform a countdown timeroperation” (page E-30) to display it.
- Press C to move the flashing in the sequence shown below to select other settings.

- Use D (+) and B (–) to change the hours and minutes settings.• To count down from 24 hours, set a start time of 0:00.
- Press A to exit the setting mode.
To perform a countdown timer operation

• Before starting a countdown timer operation, check to make sure that a countdown operation is not in progress (indicated by the seconds counting down).If it is, press D to stop it and then A to reset to the countdown start time.
To stop the alarmPress any button.
Adjusting the Analog Hand Setting
Use the following procedure to adjust the analog hands so their settings match the digital time.
To adjust the analog time
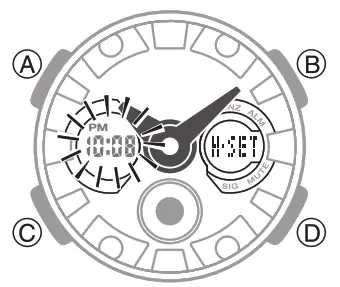
- In the Timekeeping Mode, hold down D for at least three seconds until the current time starts to flash. This is the analog setting mode.
- Press D to advance the analog time setting by 20 seconds.• Holding down D advances the analog time setting at high speed.• If you need to advance the analog time setting a long way, hold down D until the time starts advancing at high speed, and then press B. This locks the high-speed hand movement, so you can release the two buttons. High-speed hand movement continues until you press any button. It will also stop automatically after the time advances 12 hours or if an alarm (daily alarm, Hourly Time Signal, or countdown beeper) starts to sound.
- Press A to exit the setting mode.• The watch will automatically adjust the minute hand slightly to match its internal second count when you exit the setting mode.
Illumination
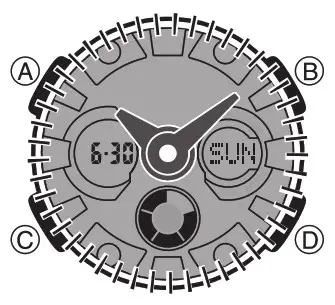
The face of the watch is illuminated for easy reading in the dark.
To turn on illuminationIn any mode (except when a setting mode, with flashing digits, is on the display), press B to illuminate the display.
Illumination Precautions
- Illumination may be hard to see when viewed under direct sunlight.
- Illumination turns off automatically whenever an alar sounds.
- Frequent use of illumination runs down the battery.
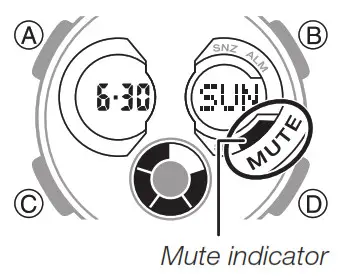
The button operation tone sounds any time you press one of the watch’s buttons. You can turn the button operation tone on or off as desired.• Even if you turn off the button operation tone, alarms, the Hourly Time Signal, and other beepers all operate normally.To turn the button operation tone on and offHold down C until the button operation tone sounds (about 3 seconds).
- This will toggle the button operation tone either ON or OFF.
- The mute indicator is displayed while the button operation tone is turned off (muted).
- The mute indicator is displayed in all modes when the button operation tone is turned off.
Troubleshooting
Time Setting■ The current time setting is off by hours.Your Home City setting may be wrong (page E-12). Check your Home City setting and correct it, if necessary.
■ The current time setting is off by one hour.You may need to change your Home City’s standard time/daylight saving time (DST) setting. Use the procedure under “Adjusting the Digital Time and Date Settings” (page E-15) to change the standard time/daylight saving time (DST) setting.
World Time Mode■ The time for my World Time City is off in the World Time Mode.This could be due to incorrect switching between standard time and daylight saving time. See “To specify a standard time or daylight saving time (DST) for a city” (page E-20) for more information.
Main Indicators
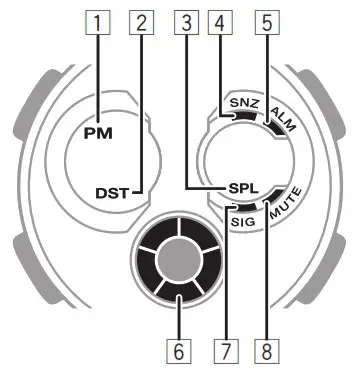
| Number | Name | See |
| 1 | PM indicator | E-11 |
| 2 | DST indicator | E-14, E-20 |
| 3 | Split indicator | E-25 |
| 4 | Snooze alarm on indicator | E-23 |
| 5 | Alarm on indicator | E-22 |
| 6 | Graphic indicator | – |
| 7 | Hourly time signal on indicator | E-23 |
| 8 | Mute indicator | E-34 |
Graphic indicator
| Mode | Indicator Meaning |
| Timekeeping World Time Alarm | Current second |
| Countdown Timer | Timer seconds |
| Stopwatch | Elapsed 1/10 seconds |
Specifications
Accuracy at normal temperature: ±30 seconds a monthDigital Timekeeping: Hour, minutes, seconds, p.m. (PM), month, day, day of theweekTime format: 12-hour and 24-hourCalendar System: Full Auto-calendar pre-programmed from the year 2000 to 2099Other: Home City code (can be assigned one of 48 city codes);Standard Time/Daylight Saving Time (summertime)Analog Timekeeping: Hour, minutes (hand moves every 20 seconds)World Time: 48 cities (29 time zones) and Coordinated Universal Time (UTC)Other: Daylight Saving Time/Standard TimeAlarms: 5 daily alarms (with one snooze alarm); Hourly time signalStopwatch:Measuring unit: 1/100 secondMeasuring capacity: 23:59’59.99″Measuring modes: Elapsed time, split time, two finishesCountdown Timer:Measuring unit: 1 secondCountdown range: 24 hoursCountdown start time setting range: 1 minute to 24 hours (1-minute increments)Illumination: LED (light-emitting diode)Battery: Two silver oxide batteries (Type: SR726W)Approximately 2 years on type SR726W (assuming alarm operation 20 secondsper day and one illumination operation 1.5 seconds per day)Frequent use of illumination runs down the battery.Specifications are subject to change without notice.
Note that CASIO COMPUTER CO., LTD. assumes no responsibility for any damage or loss suffered by you or any third party arising through the use of your watch or its malfunction.
User Maintenance
Caring for Your WatchRemember that you wear your watch next to your skin, just like a piece of clothing. To ensure your watch performs at the level for which it is designed, keep it clean by frequently wiping it with a soft cloth to keep your watch and band free of dirt, sweat, water, and other foreign matter.
- Whenever your watch is exposed to seawater or mud, rinse it off with clean fresh water.
- For a metal band or a resin band with metal parts, use a soft toothbrush or similar tool to scrub the band with a weak solution of water and a mild neutral detergent, or with soapy water. Next, rinse with water to remove all remaining detergent and then wipe dry with a soft absorbent cloth. When washing the band, wrap the watch case with kitchen plastic wrap so it does not come into contact with the detergent or soap.
- For a resin band, wash with water and then wipe dry with a soft cloth. Note that sometimes a smudge-like pattern may appear on the surface of a resin band. This will not have any effect on your skin or clothing. Wipe with a cloth to remove the smudge pattern.
- Clean water and sweat from a leather band by wiping with a soft cloth.
- Not operating a watch crown, buttons, or rotary bezel could lead to later problems with their operation. Periodically rotate the crown and rotary bezel, and press buttons to maintain proper operation.Dangers of Poor Watch CareRust
- Though the metal steel used for your watch is highly rust-resistant, rust can form if your watch is not cleaned after it becomes dirty.− Dirt on your watch can make it impossible for oxygen to come into contact with the metal, which can lead to the breakdown of the oxidization layer on the metal surface and the formation of rust.
- Rust can cause sharp areas on metal components and can cause band pins to fly out of position or to fall out. If you ever notice any abnormality immediately stop using your watch and take it to your original retailer or to an authorized CASIO service center.
- Even if the surface of the metal appears clean, sweat and rust in crevasses can soil the sleeves of clothing, cause skin irritation, and even interfere with watch performance.Premature WearLeaving sweat or water on a resin band or bezel, or storing your watch an area subject to high moisture can lead to premature wear, cuts, and breaks.Skin IrritationIndividuals with sensitive skin or in poor physical condition may experience skin irritation when wearing a watch. Such individuals should keep their leather band or resin band particularly clean. Should you ever experience a rash or other skin irritation, immediately remove your watch and contact a skin care professional.
Battery Replacement
- Leave battery replacement up to your original retailer or authorized CASIO service center.
- Have the batteries replaced only with the type specified in the User’s Guide. Use of a different battery type can cause malfunction.
- When replacing the batteries, also request a check for proper water resistance.
- Ornamental resin components may become worn, cracked, or bent over time when subjected to normal daily use. Note that if cracking or any other abnormality indicating possible damage is noticed in a watch submitted for battery replacement, your watch will be returned with an explanation of the abnormality, without the requested servicing being performed.
Initial Batteries
- The batteries that come loaded in your watch when you purchase it are used for function and performance testing at the factory.
- Test batteries may go dead quicker than the normally rated battery life as noted in the User’s Guide. Note that you will be charged for the replacement of these batteries, even if replacement is required within your watch’s warranty period. E-54
Low Battery Power
- Low battery power is indicated by large timekeeping error, by dim display contents, or by a blank display.
- Operation, while battery power is low, can result in malfunction. Replace the batteries as soon as possible.

City Code Table
| City Code | City | UTC Offset/ GMT Differential |
| PPG | Pago Pago | -11 |
| HNL | Honolulu | -10 |
| ANC | Anchorage | -9 |
| YVR | Vancouver | -8 |
| LAX | Los Angeles | |
| YEA | Edmonton | -7 |
| DEN | Denver | |
| MEX | Mexico City | -6 |
| CHI | Chicago | |
| MIA | Miami | -5 |
| YTO | Toronto | |
| NYC | New York | |
| SCL | Santiago | -4 |
| YHZ | Halifax |
| City Code | City | UTC Offset/ GMT Differential |
| YYT | St. John’s | -3.5 |
| RIO | Rio De Janeiro | -3 |
| RAI | Praia | -1 |
| UTC | 0 | |
| LIS | Lisbon | |
| LON | London | |
| MAD | Madrid | +1 |
| PAR | Paris | |
| ROM | Rome | |
| BER | Berlin | |
| STO | Stockholm | |
| ATH | Athens | +2 |
| CAI | Cairo | |
| JRS | Jerusalem |
| City Code | City | UTC Offset/ GMT Differential |
| MOW | Moscow | +3 |
| JED | Jeddah | |
| THR | Tehran | +3.5 |
| DXB | Dubai | +4 |
| KBL | Kabul | +4.5 |
| KHI | Karachi | +5 |
| DEL | Delhi | +5.5 |
| DAC | Dhaka | +6 |
| RGN | Yangon | +6.5 |
| BKK | Bangkok | +7 |
| SIN | Singapore | +8 |
| HKG | Hong Kong | |
| BJS | Beijing | |
| TPE | Taipei |
| City Code | City | UTC Offset/ GMT Differential |
| SEL | Seoul | +9 |
| TYO | Tokyo | |
| ADL | Adelaide | +9.5 |
| GUM | Guam | +10 |
| SYD | Sydney | |
| NOU | Noumea | +11 |
| WLG | Wellington | +12 |
- This table shows the city codes of this watch (As of July 2018).
- The rules governing global times (UTC offset and GMT differential) and summertime are determined by each individual country.
CASIO COMPUTER CO., LTD.6-2, Hon-machi 1-chomeShibuya-ku, Tokyo 151-8543, Japan
[xyz-ips snippet=”download-snippet”]


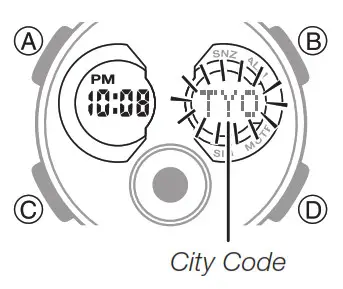 In the Timekeeping Mode, hold down A for at least two seconds until the seconds start to flash. This is the setting mode.• The watch will exit the setting mode automatically if you do not perform any operation for about two or three minutes.
 • The following steps explain how to configure timekeeping settings only.
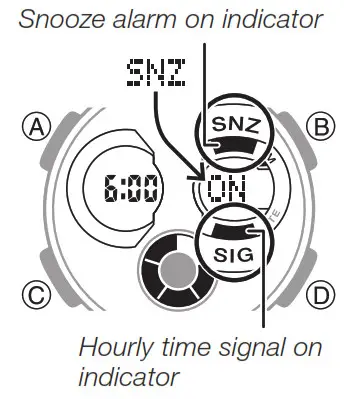 In the Alarm Mode, use D to select an alarm or the Hourly Time Signal.• When the alarm you want or the Hourly Time Signal is displayed, press A to toggle it between on (“On”displayed) and off (“OFF” displayed).• The alarm on indicator (when any alarm is on), snooze alarm on indicator (when the snooze alarm is on), and the Hourly Time Signal on indicator (when the Hourly Time Signal is on) are shown on the display in all modes
