CASIO Watch Owner’s Manual
Operation Guide 5633
- Your watch may differ somewhat from the one shown in the
Before Using the Watch for the First Time
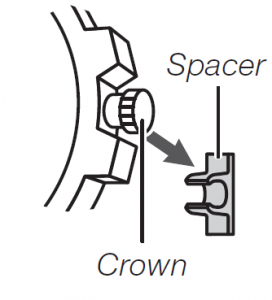
- Depending on your watch model, there may be a spacer installed at the factory around the crown. If your watch has a spacer, you should remove the spacer before using the watch
- After removing the spacer, use the procedures in “Crown Operations” (page E-2) and “To adjust the time setting” (page E-12) to set up the watch for use.
Crown Operations
Some water-resistant models (10BAR, 20BAR) have a screw- in crown. When you need to perform a crown operation, rotate it towards you to unscrew it. Then pull the crown out. Avoid applying undue force when pulling. The watch loses its water resistance while the crown is unscrewed. After performing a crown operation, fully screw the crown back in.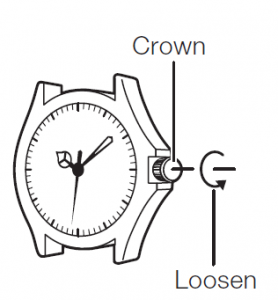
If your watch has a rotary bezel or ring…
Rotate the bezel or ring to align its mark with the minute hand. Then you can keep track of how much time has elapsed since you aligned the mark.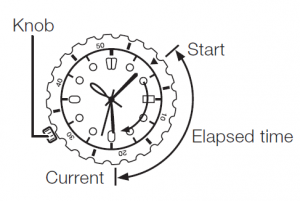
· If your watch has a rotary bezel or ring marked “COUNTDOWN”…
Align the mark with your target time (minutes) or align a minute value (start time or target time) on the rotary bezel/ring with the minute hand. Then you can use the minute hand to keep track of how much time remains until the end of the countdown.
· Some models have a bezel that can be rotated directly,while some models have a ring that can be rotating by turning a knob.
Solar Charging
A solar panel generates electrical power that charges a built-in (secondary) battery. The entire face is a solar panel, so power is generated when the face is exposed to light. Keep the watch exposed to light as much as possible.
Charging the Battery
When you are not wearing the watch, leave it where it is exposed to light. For stable operation,expose the watch to at least a half day of light per month

When wearing the watch, try to keep your clothing from blocking its face (solar panel).Charging efficiency is reduced significantly even if the face is blocked only partially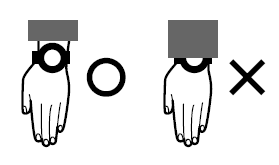
Caution!
- The case of the watch may become quite hot when Guard against burn injury after charging.
- Avoid charging in the following locations, and anywhere else where the watch may become very hot.
- On the dashboard of an automobile parked in the sun
- Close to an incandescent light source or other sources of heat
- Locations exposed to direct sunlight for long periods
Battery Indicator
The battery level/stopwatch minute hand normally indicates the approximate amount of remaining operating time of the battery will provide.
- Battery operating time is not indicated while the stopwatch is inAfter resetting the stopwatch to all zeros, the stopwatch minute hand will go back to indicating battery operating time if you press B or if you do not perform any operation for 60 seconds
Approximate Battery Operating Time
| H | At least five months | Good (high charge) |
| M | Two days to five months | Good (medium charge) |
| L | No more than two days | Low |
Low Charge and Dead Battery Conditions
An alert operation is performed when the battery charge goes low.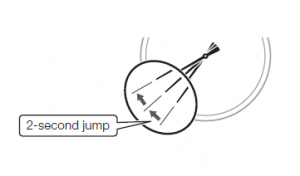
Charging Time
The times below are general guidelines for reference only.
Charging Time to Support Daily Use
| Exposure Level (Brightness) | Approximate Charging Time |
| Outdoor sunlight (50,000 lux) | 8 minutes |
| Sunlight through a window (10,000 lux) | 30 minutes |
| Daylight through a window on an overcast day (5,000 lux) | 48 minutes |
| Indoor fluorescent lighting (500 lux) | 8 hours |
Charging Time Required to Restore Operation from a Dead Battery
| Exposure Level (Brightness) | Approximate Charging Time to 1- second Hand Movement | Approximate Time to Full Charge |
| Outdoor sunlight (50,000 lux) | 4 hours | 14 hours |
| Sunlight through a window (10,000 lux) | 11 hours | 66 hours |
| Daylight through a window on an overcast day (5,000 lux) | 14 hours | 114 hours |
| Indoor fluorescent lighting (500 lux) | 195 hours | – – – |
Note
- Actual charging time depends on environmental E-10
Indicators and Crown Operation

Setting the Current Time and Day
To adjust the time setting
- When the second hand is at 12 o’clock, pull the Crown out to Click
- Rotate the Crown to change the time
- Push the Crown back in on a time signal to resume timekeeping
Note
- Take care that you set the correct AM or PM
- When changing the time, move the minute hand four or five minutes past your final setting, and then back it up to the setting you want.
To change the day indicator setting
- Pull the Crown out to Click
- Rotate the Crown away from you to set the
- Push the Crown back in
Note
- The day indicator setting uses a 31-day Make adjustments for months of shorter lengths.
- Avoid changing the day indicator setting between the hours of 9 m. and 1 a.m. Otherwise, the day indicator may not change correctly at midnight.
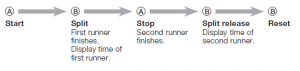
Using the Stopwatch
The stopwatch measures elapsed time in 1-second increments up to 29 minutes 59 secondsElapsed time
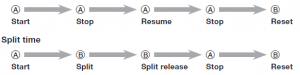
Two finishes
Important!
- Do not operate the stopwatch with the crown pulled
Note
- An elapsed time operation will stop automatically at the end of 30 minutes
Correcting Stopwatch Hand Alignment
Perform the following procedure if the stopwatch hands do not return to their home positions (12 o’clock or L) when you reset the stopwatch
- When the second hand is at 12 o’clock, pull the Crown out to Click
- Hold down A for at least two
- The Stopwatch Minute Hand will rotate to indicate the minute hand setting
- If the hand does not align with L, use the B button to adjust
- Holding down B moves the current hand at high
- Press A.
- The Stopwatch Second Hand will perform one full rotation to indicate the second hand setting mode.
- If the hand does not align with 12 o’clock, use the B button to adjust
- Holding down B moves the current hand at high
- After all of the hands are the way you want, push the Crown back
Important!
Timekeeping stops while the crown is pulled out. Correct the current time setting after performing the above operation
Abnormal Hand Movement or Function
Should the watch ever exhibit abnormal hand movement or function, or if the second hand does not move normally (one-second increments) even after the watch is fully charged, perform the procedure below to perform a system reset.
- Pull the Crown out to Click
- Hold down both A and B for at least two
- Push the Crown back
- The second hand will start to
- As required, correct the current time and day settings (page E-12), and correct stopwatch hand alignment if necessary (page E-16).
Important!
- Timekeeping stops while the crown is pulled Correct the current time setting after performing the above operation.
Specifications
Accuracy at normal temperature: ±20 seconds a monthStopwatch: Measuring Capacity: 29’59” (30 minutes) Measuring Unit: 1 second Measurements: Elapsed time; split time; two finishesOther: Low battery alertPower Supply: Solar panel and one rechargeable battery Approximate battery operating time: 6 months (no exposure to light after a full charge)Specifications are subject to change without notice.
Read More About This Manual & Download PDF:
[xyz-ips snippet=”download-snippet”]