CDN Non-Contact Forehead Thermometer User Manual
Forehead mode: 93.2 to 108°F/34 to 42.2°CSurface mode: -7.6 to +176°F/-22 to +80°C

Note: In the following instructions, names of the control buttons are shown in CAPS. Function information that appears on the display is shown in BOLD CAPS.
USAGEIndications for UseThe Non-Contact Forehead Thermometer is an infrared thermometer intended for the intermittent measurement of human body temperature in people of all ages.
Intended Operator:At least 11 years old (5 years intensive reading experience), no maximum.
Ambient TemperatureIf there is any temperature difference between the places where the device is stored and where it will be used, allow the thermometer to adjust to the room temperature where the subject is for at least 15 minutes before measurement.
Points of Attention ![]()
- Forehead temperature is displayed in oral mode. This mode converts the forehead temperature to display its “oral-equivalent” value.
- Before the measurement, the subject should stay in a stable environment for 5 minutes and avoid exercise or bath for 30 minutes.
- Keep the forehead area clean and free from sweat, cosmetics and scars while taking the temperature.
- The “Clinical Bias” is -2.5 to -3.1°F (-1.4 to -1.7°C).
- The “Limits of Agreement” is 0.98
- The “Repeatability” is 0.36°F (0.20°C)
BEFORE WE BEGIN
This thermometer has been designed for home use. It is not meant to replace a visit to the doctor. Compare the measurement result to your regular body temperature. Consult with doctor if you have health concerns.
BATTERY INSTALLATION
Replace battery when the Low Battery icon ( ![]() ) indicates the battery is low. Power off the unit before installing the batteries. A malfunction may occur if the power is on when the battery is installed. If a malfunction occurs, restart the device.
) indicates the battery is low. Power off the unit before installing the batteries. A malfunction may occur if the power is on when the battery is installed. If a malfunction occurs, restart the device.
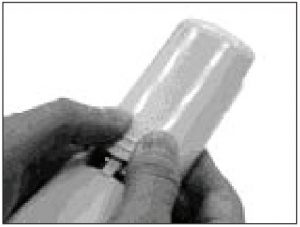
- Remove battery cover by using the thumbs to push battery cover out.

- Install two 1.5V AAA batteries observing polarity shown in compartment.
- Replace the battery cover until it clicks shut.


OPERATING INSTRUCTIONS
A. On/Off
-
- Press the POWER button ( ) to turn the thermometer on.
- Forehead is the default mode. The Forehead icon ( ) appears on the display and two beeps sound when ready.
- Press the POWER button ( ) for 5 seconds to turn the thermometer off.
- The THD2FE will automatically turn off after 1 minute of inactivity.
- Press the POWER button (
 ) appears on the display and two beeps sound when ready.
B. Temperature ScaleNote: When the temperature scale is changed, the memory is cleared.To select temperature reading in Fahrenheit or Celsius:
-
-
- Power off the unit.
- Press and hold the START button, then press and hold the POWER button for 3 seconds.
- The °F symbol changes to the °C symbol on the display or vice versa. C.
-
C. LCD BacklightThe back light will turn on automatically for 5 seconds when a reading is taken.
D. Forehead ModeForehead is the default mode of the THD2FE.
-
- Make sure that the sensor lens is clean and undamaged and that the forehead is clean.
- Hold the sensor lens 1.5 inches (4 cm) or less from the center of the forehead and press the START button to get the temperature measurement.
- Wait for the Forehead icon ( ) to stop flashing before taking the next measurement.
- a. Temperature AlertIf the thermometer detects a temperature 99.5°F (37.5°C), three short beeps sound followed by one long beep.
- b. Silent
- When the THD2FE is on, press and hold the POWER button for 3 seconds.
- The silent icon ( ) flashes on the display.
- Release the POWER button to silence the alert.
- Repeat to turn the alert on again.Note: If the POWER button is pressed for 5 seconds after the silent icon has begun flashing, the device will power off without setting the alert to silent.
- c. MemoryRecall up to 25 readings.Note: As the memory gets full, the newer readings will replace the older readings.
- When the THD2FE is on, press the POWER ( ) button to see the temperature records in memory.
- The memory icon ( ) appears on the display.
- Press the Power button again to cycle through all of the previous readings starting with the most recent.
- When the THD2FE is on, press the POWER (
 ) appears on the display.
E. Surface ModeNote: The surface mode shows the actual and unadjusted surface temperature which is different from the body temperature. It can help you monitor if the object temperature is suitable for the baby or patient, for example the baby’s milk.
- Turn the thermometer on
- Press and hold the POWER button and press the START button once to enter Surface mode.
- The surface icon ( ) appears on the display.
- Aim the sensor lens at the target and press the START button to display the surface temperature.
- Press and hold the START button to get continuous measurements.Note: Applications include temperature measurements for water, milk, cloth, skin or other objects. Note: This mode shows the actual and unadjusted surface temperature which is different from the body temperature.Important: HAND WASH AND DRY. DO NOT IMMERSE IN LIQUID.
F. Trouble Shooting
| Error Message | Problem | Solution |
 |
Error 5-9, the system is not functioning properly | Unload the battery, wait for 1 minute and repower it. If the message reappears, contact CDN for further assistance |
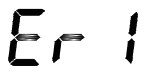 |
Measurement before device stabilization | Wait for “Er1” to disappear |
 |
The ambient temperature is not within the range between 50 to 104°F (10 to 40°C | Allow the thermometer to rest in a room for at least 15 minutes at room temperature: 50 to 104°F (10 to 40°C). |
 |
Forehead mode: Temperature taken is higher than 108°F (+42.2°C) Surface mode: Temperature taken is higher than 176°F (+80°C) | Select the target within specifications. If a malfunction still exists, contact CDN for further assistance. |
 |
Forehead mode: Temperature taken is lower than 93.2°F (+34°C) Surface mode: Temperature taken is lower than -7.6°F (-22°C) | |
 |
Device cannot be powered on to the ready stage. | Replace batteries with new batteries |
E. Battery StatusThe thermometer incorporates visual battery status indication:
- Battery OK: measurements are possible
- Battery Low: replace battery with two 1.5V AAA alkaline cells; measurements are possible
- Battery Exhausted: replace battery; measurements are not possible
CARE OF YOUR PRODUCT
- The sensor lens is the most delicate part of the thermometer and should be kept clean at all times. Take care when cleaning the lens. Use only a soft cloth or cotton swab with water or rubbing alcohol. Allow the lens to dry fully for at least 1 minute before using the thermometer.
- Do not submerge any part of the thermometer in liquids. Keep it dry and away from any liquids and direct sunlight. Wipe clean with a damp cloth.
- Store the thermometer at room temperature between -4 to +122°F/20 to +50°C, RH 85%.
- Avoid holding the thermometer too long. This could cause the body temperature measurement to be lower than usual.
PRECAUTIONS
- Dispose of used batteries promptly and keep away from children.
- Keep the thermometer and batteries away from children
- Do not clean the case with abrasive or corrosive compound, which may scratch the plastic and corrode the electronic circuits.
- Do not subject the unit to excessive force shock, dust, temperature or humidity, which may result in malfunction, shorter electronic life span, damaged battery and distorted parts.
- Do not tamper with the unit’s internal components. Doing so will invalidate the warranty on the unit and may cause unnecessary battery damage and distorted parts.
- Do not subject the unit to excessive exposure to direct sunlight. The unit is not waterproof — do not immerse it into water or expose to heavy rain.
- To avoid deformation, do not place the unit in extreme temperatures.
- Do not use the thermometer in a microwave oven. · Always read the user manual thoroughly before operating.
SPECIFICATIONS
| Measurement Range | Forehead mode: 93.2 to 108°F/34 to 42.2°C; Surface mode: -7.6 to +176°F/-22 to +80°C |
| Unit of Measure | °F/°C |
| Resolution | 0.1°F/0.1°C |
| Water Resilience | IP22: protected from solids bigger than 12.5 mm (e.g. fingers); dripping water when enclosure tilted up to 15° |
| Accuracy | Forehead mode: 95 to 107.6°F/35 to 42°C: ±0.4°F/0.2°C, otherwise ±0.5°F/0.3°C; Surface mode: 71.6 to 108°F/22 to 42.2°C: ±0.5°F/0.3°C, otherwise ±4% or ±4°F/2°C whichever is greater |
| Measurement Distance | Within 1.5 in/4 cm |
| Distance:Spot | Surface mode: 1:1 |
| Emissivity | Surface mode: 0.95 |
| Operating Range | 50 to 104°F/10 to 40°C, 15% to 85% RH |
| Storage Range | -4 to +122°F/-20 to 50°C, RH ≤85% |
| Power Supply | Two AAA 1.5V IEC LR03 alkaline batteries, included |
| Product Dimensions | 1.89 W x 6.22 H x 1.58 D (in)/ 4.8 W x 15.8 H x 4.02 D (cm) |
| Weight | 3.5 oz / 100 g (including battery) |
SYMBOL DESCRIPTIONS
 ……………… ……………… |
The CE mark and Notified Body Registration Numbers, the requirement of Annex II from Medical Device Directive 93/42/EEC are met |
 |
Caution |
 |
BF type applied part |
| Classification for water ingress and particulate matter | |
 |
Indicates this device is subject to the Waste Electrical and Electronic Equipment Directive in the European Union. To protect the environment, dispose of useless device at appropriate collection sites according to national or local regulations |
 |
Please read the instructions for use |
 |
Power, standby |
 |
Paper recycling |
1-Year Limited Warranty:
 1-Year Limited Warranty:
Any instrument that proves to be defective in material or workmanship (excluding batteries) within one year of original purchase will be repaired or replaced without charge upon receipt of the unit prepaid at: CDN, PO Box 10947, Portland, OR 97296-0947. This warranty does not cover damage in shipment or failure caused by failure to adhere to the accompanying instructions, inadequate maintenance, normal wear and tear, tampering, accident, misuse, unauthorized modification, obvious carelessness or abuse. CDN shall not be liable for any consequential or incidental damages whatsoever
For more detailed information on our products, please visit CDNkitchen.com orcall 800-338-5594.Distributed by: Component Design Northwest, Inc. dba CDN2355 NW Vaughn Street Portland, OR 97210-2311
[xyz-ips snippet=”download-snippet”]