
![]()
The expert for robots in your home
With one click to the online shop

 myRobotcenter.eu myRobotcenter.co.uk

 900 ULTIMATE ERGOWETAspirador vertical / Upright vacuum

![]() Instruction manual
Instruction manual
1. PARTS AND COMPONENTS
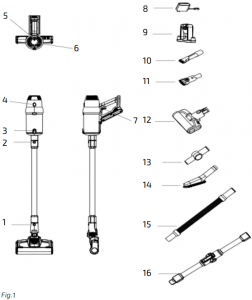
- Suction base
- Floor brush release button
- Vacuuming tube release button
- Dust tank bottom cover unlock button
- Dust tank emptying button
- Speed-control dial
- Display
- On/off button
- Power adapter
- Fast charge base
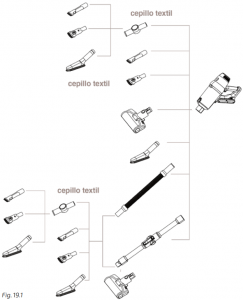
- Includes a 2-in-1 narrow accessory for corners and furniture
- Includes a wide 2-in-1 accessory for corners and furniture
- Motorised brush for upholstery.
- Union elbow
- Long brush
- Flexible hose
- Flex vacuuming tube
- Jalisco brush
- Best Friend Care special brush for pet hair
- Special brush for fabrics
- Wet scrubbing accessory with mop
- Flex button

- Display
- Speed-control dial
- On/off push button
2. BEFORE USE
Take the product out of the box.Check for any visible damage. If any is observed, contact as soon as possible the Technical Support Service of Cecotec for advice or reparation.Fully charge the device before the first use.During the first 3 uses, it is recommended to charge the device for 12 hours between uses.Once the battery has been charged and used, it will start charging normally.The normal charge time is 2 hours approx. When the battery is fully charged, unplug it.
3. PRODUCT ASSEMBLY
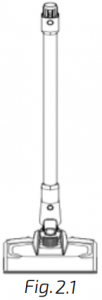
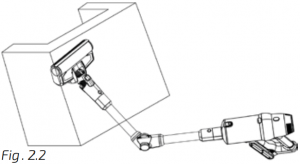
Vacuuming tube and suction base assemblyTo install the suction base into the vacuuming tube, align both of them making sure the tab on the suction base matches the guides on the tube, and introduce one into the other until they are firmly fixed. To disassemble them, press the suction base release button and pull from the vacuuming tube while you hold the suction base.Warning: When assembling these 2 parts, make sure the handle and the brush are facing the same direction.Use the Flex tube to reach and vacuum dirt from the most inaccessible zones. Press the Flex button to bend the tube.
![]()
Battery assemblyIntroduce the battery in the slot located in the handheld vacuum cleaner. Once it is introduced, it will click into place. Move it slightly to ensure it is properly assembled in place.
Note: Take the battery out and store it in a safe, dry place if the device is not going to be used in a long period of time.
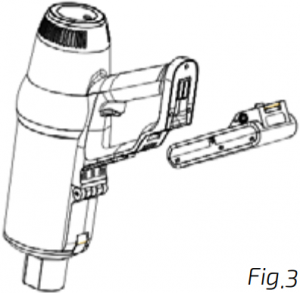 Following the below illustration, keep the vacuuming tube vertically, align the tab on the vacuuming tube with the guides in the handheld vacuum cleaner and introduce the tube.
Dust tank and handheld vacuum cleaner assemblyTo assemble the dust tank to the handheld vacuum cleaner, first separate the handheld vacuum cleaner from the vacuuming tube.Then, press the vacuuming tube release button with one hand and, holding from the handle with the other one, turn the dust tank anticlockwise to the unlock position indicated on the dust tank edge.
4. OPERATION
Wall charging base installationFirst, fix the charging base to the wall. To do so, we recommend you place a protective film (not included) on the wall’s surface. Then, put the charging base on the wall and make 3 corresponding to the holes to be drilled in order to fix the base. Take into account the height of the installation, it is important that suction base rests on the floor to avoid the charging base from holding all the vacuum cleaner’s weight. Make 3 holes on the wall and fix the charging base with the supplied M4 x 32 nuts and screws.
The height should be 102.5 mm from the base of the wall charging base to the ground. Make sure that the charging base is securely fixed on the wall, place the vacuum cleaner on the charging base as shown in figure 5 by putting the vacuum cleaner’s charging terminals into contact with the charging base’s ones (plastic tab).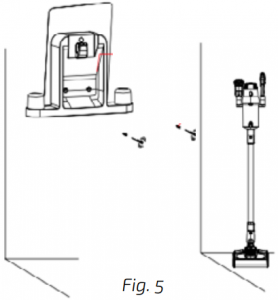 Once the wall charging base is installed, the charging port must be connected to the power adapter, and then the device can be charged by sliding it from top to bottom into the wall charging base.
Charge and displayWhen the battery percentage is 20 % or below, the device will automatically enter low consumption mode. It is recommended to charge the device when it reaches this percentage. The battery must be charged while it is inside the device, and on the fast charge base. Connect one of the ends of the power adapter to the power supply and the other to the fast charge base. During charging, the charge light indicator will turn on red and will turn green once the charge is completed.In order to charge only the battery, plug the power adapter and connect the other end of the cord to the battery. During charging, the charge light indicator will turn on red and will turn green once the charge is completed. The display will show the battery charge.
Charging modesCharging mode 1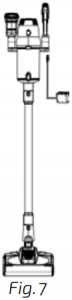
 Charging mode 2
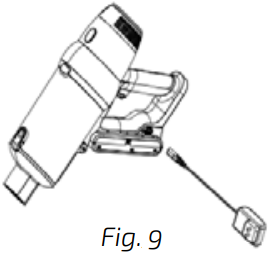
Charging mode 3
How to use the handheld vacuum cleanerPress the On/off button to turn the device on or off.Press the speed control dial to select the device operating speed: Low, Medium, High or Smart. The device will start operating at low speed by default, and the screen will display “LOW”. The battery percentage and sync will also be displayed.Press the speed control dial to set the device at medium speed. “MED” will be displayed on the screen. The battery percentage and sync will also be displayed. 2/3 of the opening radio will be shown (vacuuming).Press the speed control dial to set the device at high speed. “HIGH” will be displayed on the screen. The battery percentage and sync will also be displayed. The vacuuming openingradious will be completely shown.Press the speed control dial to set the device at Smart speed. Under this mode, the device will automatically adjust suction power according to the concentration of dust and to the amount of dust on the floor brush. “AUTO” will be displayed on the screen. The battery percentage and sync will also be displayed. The screen will display: the amount of absorbed dust, 1/3 when the concentration opening radious is low, 2/3 when the concentration opening radious is medium and the full display when the concentration opening radious is high. When operating at high speed and the battery is 20 % or lower, the device will automatically switch to medium speed in order to lengthen the battery life.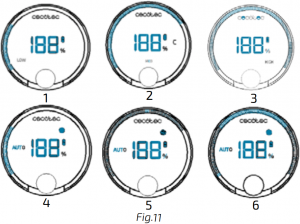
How to use the suction base for floorsIt removes dust from carpets, hard and soft floors, and tiles.If too many particles or fibres are vacuumed, or if a child touches the brush during operation by accident, the rotary brush stops spinning automatically in order to prevent tangles and possible damage.Both brushes can be equally assembled to the suction base:Best Friend Care brushRemoves pet hair from all types of surfaces, including carpets and mats.Jalisco brushVacuum 3 times more dust in one pass. It is recommended to use it on hard floors, but it can be used on soft ones too.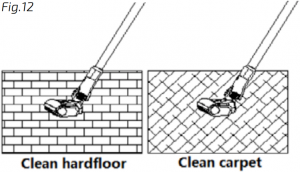
Includes a 2-in-1 narrow accessory for corners and furnitureIncludes a 2-in-1 narrow accessory for corners and furnitureSuitable for cleaning doors, windows, narrow corners, etc. Suitable for cleaning sofas, cabinets and wardrobes, windows, etc.
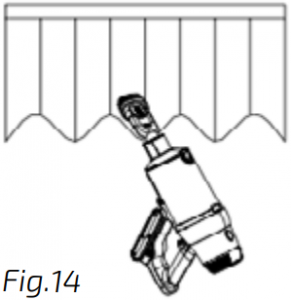
Long brush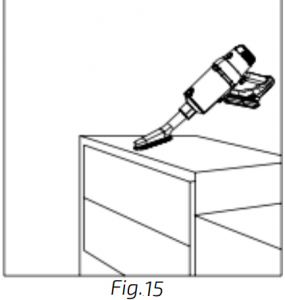
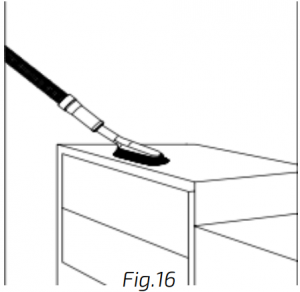 Suitable for cleaning surfaces which are sensible to scratches such as furniture, wardrobes, etc.
Flexible hoseIt can be assembled onto the device for a more flexible cleaning, to reach the most difficult corners.
Motorised brush for upholstery.Removes dust mites and bacteria from beds and sofas.
Union elbowSuitable for cleaning dust from high wardrobes, roofs, windows, corners, etc.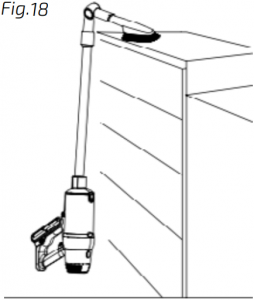
Special brush for fabricsAdjustable accessory to remove all types of dust trapped in fabrics.
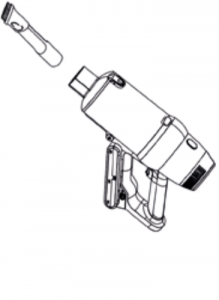
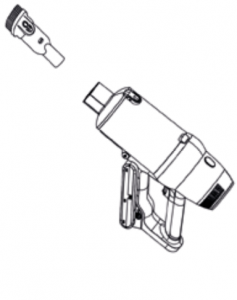
Installation of accessories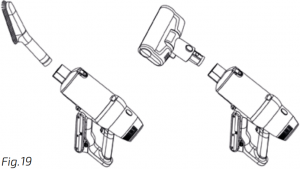
5. CLEANING AND MAINTENANCE
Disconnect the appliance from the power supply and allow it to cool down before cleaning. Use a soft, damp cloth to clean the device’s surface.Do not immerse the appliance in water or other liquid.Do not use abrasive cleaners or scouring pads to clean the product.It is recommended to clean the dust tank after every use. If the device clogs due to built-up excessive dust, clean it or replace it.After the brush has been used for a long time, bristles might start to tangle with hair and other particles. Clean it in order for it to operate correctly again.
Cleaning the dust tank and the filters
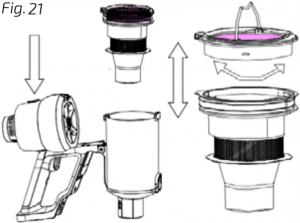

Open the dust tank bottom cover unlock button and empty the dust inside. Hold the device from the handle and pull from it upward to separate de device from the dust tank.Turn the filter as shown on the image and disassemble the filter.After washing and drying all the parts, assemble it back in order to use it again.
Cleaning the Jalisco brush and the Best Friend Care brushMove the rotary brush release button with the finger toward the arrow and remove the coverof one of the ends of the brush.
Take one end of the brush out as shown on the image. After washing and drying all the parts, assemble it back in order to use the brush again.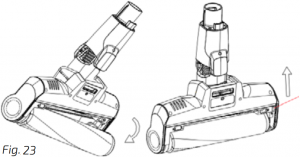
Removing the batteryPress the battery release button and take the battery out as shown on the image. Store the battery in a plastic bag and leave it in a dry place.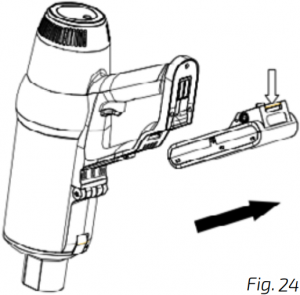
Storing the deviceIf the robot is not going to be used for a long time, remove the battery from the product and store it in a dry and safe place.
Dirt sensorsWhen the device does not detect dirt or dust, or detects very little, the screen will display a full circle when turned on. In this case, wipe the dirt sensors with a soft, dry cloth.
6. WET ACCESSORY FOR SCRUBBING
When the vacuum cleaner is not going to be used for a long time, please remove the water tank and empty the remaining water. Do not expose it to direct sunlight or to damp environments.Mop installation/removalRemoving/installing the water tank In order to install/remove the cleaning cloth you must first disassemble the water tank from the rest of the appliance. In order to remove the water tank, use your foot to hold it against the ground and pull upward until it unclicks from position.Once the cloth has been installed and the water tank has been filled, to reinstall the water tank, simply push it back together until it clicks into position.Note: Do not use cleaning agents. Use clean and room temperature water only. Do not use the vacuum cleaner to vacuum water.
Installing the mop clothPlace the mop cloth on the ground with the Velcro facing upwards. Align the mop cloth with the Velcro strips on the water tank and attach it.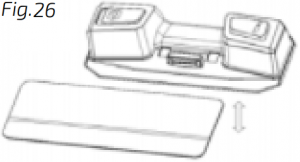
Water emission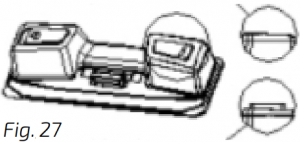 When using this product for the first time, make sure the water tank lid is not fully open. When not in use, pay attention to the water emission push button and to the tank lid, as water leak may occur when the water tank is full.To activate water emission, the water emission push button must be pressed, and to stop water emission, the push button must be released as shown on the following figure.Note: If the vacuum cleaner is not going to be used for a long period of time, make sure to remove the water tank and to empty the remaining water. Do not expose it to direct sunlight or to damp environments.
Removing the mop clothTo remove the mop cloth, just hold it with your hand and pull form it to detach it from the water tank.
Cleaning and maintenanceCleaning the water tankTo clean the water tank, fill the tank with clean water, shake it and then empty it. The mop is washable; therefore, it is suggested to wash it after every use.Replace the cloth after 20-30 uses, depending on the use.When the mop cloth is used for a long time, it is possible that the water output is affected.This can be avoided by cleaning both cloth and water tank regularly.
7. TROUBLESHOOTING
| Problem | Possible cause | Solution |
| The motor does not operate | The battery does not work any longer. The metallic tubes, floor brushes, batteries or the device itself are not properly assembled. | Charge the vacuum cleaner. Make sure all parts of the device are correctly assembled. |
| Suction power has been reduced. | The dust tank is full. The filter has too much dust. The electric rotary brush inlet is obstructed, or the brush is blocked. | Clean dust. Clean or replace the filter. Clean the dust inside the electric rotary brush. |
| Insufficient operating time after charge. | Insufficient charge time. The battery is old. | Fully charge the battery following the instructions in this manual. Batteries are easily recycled. Go to the closest maintenance point and buy new batteries. |
8. ERROR CODES
| Code | Problem | Cause |
| E1 | The device turns off and does not charge | Short-circuit |
| E2 | The device does not charge | The charger’s voltage is over 36.3 Vor below 32.1 V |
| The device turns of | Low battery | |
| E3 | The device turns off and displays E3 | The motor shortcircuits when battery is low |
| E5 | The device turns off and displays E5 | Main motor overload (second level) |
| E6 | The device turns off and displays E6 | Main motor overload |
| E9 | The device turns off and displays E9 | Temperature too high or low |
| E7 | The device stops working or does not turn on and shows E7 | Battery fault (first level) |
| E8 | The device turns off and displays E8 | NTC error (thermistor short-circuit) |
| High-efficiency filter indicator blinks | The device stops working or does not turn on | High-efficiency filter not installed |
| The indicator blinks | Works normally | The dust tank o the inlet filter is blocked |
| The indicator blinks | Works normally | Long brush full of hair |
| The indicator blinks | Long brush and motor stop working | Blocked long brush |
Note:The low battery warning will disappear when the charger is disconnected.Low battery error (excluding shut down due to low battery), will stop after 10 seconds. If not, press the on/off button to stop it.Communication or NTC error: It will stop after 50 seconds.
9. TECHNICAL SPECIFICATIONS
Product reference: 05708Product: Rockstar 900 Ultimate100-240 V ~ 50/60 HzMotor rated power: 550 WBrush rated power: 50 WMade in China | Designed in Spain
10. DISPOSAL OF OLD ELECTRICAL APPLIANCES
![]()
The European directive 2012/19/EU on Waste Electrical and Electronic Equipment (WEEE), specifies that old household electrical appliances must not be disposed of with the normal unsorted municipal waste. Old appliances must be collected separately, in order to optimize the recovery and recycling of the materials they contain and reduce the impact on human health and the environment.The crossed out “wheeled bin” symbol on the product reminds you of your obligation to dispose of the appliance correctly. If the product has a built-in battery or uses batteries, they should be removed from the appliance and disposed of appropriately. Consumers must contact their local authorities or retailer for information concerning the correct disposal of old appliances and/or their batteries.
11. TECHNICAL SUPPORT AND WARRANTY
This product is under warranty for 2 years from the date of purchase, as long as the proof of purchase is submitted, the product is in perfect physical condition, and it has been given proper use, as explained in this instruction manual.The warranty will not cover the following situations:The product has been used for purposes other than those intended for it, misused, beaten, exposed to moisture, immersed in liquid or corrosive substances, as well as any other fault attributable to the customer.The product has been disassembled, modified, or repaired by persons, not authorised by the official Technical Support Service of Cecotec.Faults deriving from the normal wear and tear of its parts, due to use.The warranty service covers every manufacturing defects of your appliance for 2 years, based on current legislation, except consumable parts. In the event of misuse, the warranty will not apply.If at any moment you detect any problem with your product or have any doubt, do not hesitate to contact Cecotec Technical Support Service at +34 963 210 728.
ROCKSTAR 900 ULTIMATE ERGOWET
References
[xyz-ips snippet=”download-snippet”]