cecotec Force Clima 12750 Cold& Warm Connected
SAFETY INSTRUCTIONS
- Read these instructions thoroughly before using the appliance. Keep this instruction manual for future reference or new users. All safety instructions should be closely followed when using the appliance.
- Make sure that the mains voltage matches the voltage stated on the rating label of the appliance.
- Do not immerse the cord, plug, or any non-removable part of the appliance in water or any other liquid, nor expose the electrical connections to water. Make sure your hands are dry before handling the plug or switching on the appliance. WARNING: if the appliance falls accidentally in water, unplug it immediately. Do not reach into the water!
- Check the power cord regularly for visible damage. If the cord is damaged, it must be replaced by the official Technical Support Service of Cecotec, in order to avoid any type of danger.
- Do not pull or carry the appliance by the cord. Do not use the cord as a handle. Do not pull the cord along sharp edges or corners. Do not coil the appliance over the cord. Keep the cord away from hot surfaces.
- WARNING: do not use the appliance if its cord, plug, or housing is damaged, nor after it malfunctions or has been dropped or damaged in any way.
- Do not use the appliance in confined spaces with explosive or toxic vapours.
- Keep the device away from heat sources.
- The appliance is not intended to be used by children under the age of 8. It can be used by children over the age of 8, as long as they are given continuous supervision.
- This appliance is not intended to be used by persons with reduced physical, sensory, or mental capabilities, or lack of experience or knowledge, unless they have been given supervision or instruction concerning the use of the appliance in a safe way by a person responsible for their safety, and understand the hazards involved.
- Supervise young children to make sure that they do not play with the appliance. Close supervision is necessary when the appliance is being used by or near children.
- Keep the appliance and its cord out of reach of children under the age of 8.
- Do not leave the appliance unattended while in use. Unplug it from the mains supply when you finish using it or when you leave the room.
- Do not try to repair the appliance by yourself. Contact the official Technical Support Service of Cecotec for advice. Switch off and unplug from wall outlet when not in use, when moving the appliance from one location to another or before assembling or disassembling parts. To avoid a tripping hazard, safely coil the cable.
- Cleaning and maintenance must be carried out according to this instruction manual to make sure the appliance functions properly. Turn off and unplug the appliance before cleaning it. Cleaning and maintenance tasks must not be carried out by children.
- Store the appliance and its instruction manual in a safe and dry place when not in use.
- Place the device in a flat and dry place and keep a distance of above 50 cm between the device and the surrounding objects or walls.
- Do not expose people, specially babies and elders, to a continuous stream of cold air.
- After the air conditioning is installed, ensure that the power plug is intact and firmly plugged into the power outlet, and place the power cord orderly to prevent someone from being tripped or pulling out the plug.
- Keep the air inlet and outlet free from obstructions.
- When drainage hoses are installed, ensure that they are properly connected and are not bended.
- When moving the device, make sure that it is in an upright position.
- Do not install and use the air conditioning in the bathroom or other humid environments.
- Do not use insecticide sprays or other flammable substances near the air conditioning.
PARTS AND COMPONENTS
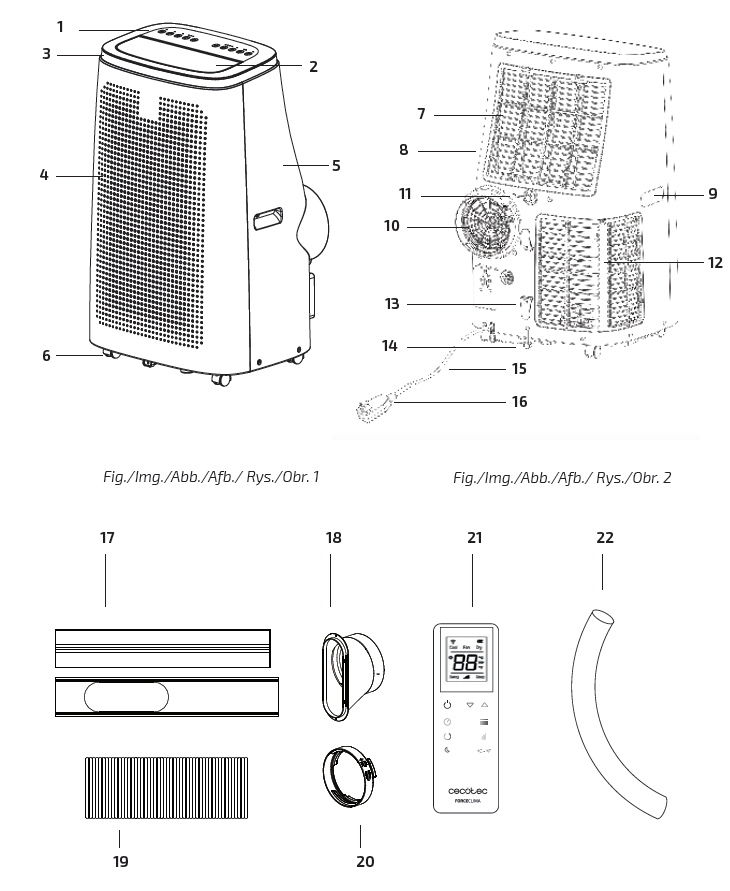
- Control panel
- Flap
- Top cover
- Front housing
- Rear housing
- Omni-directional Wheel
- EVA filter housing
- Rear housing
- Handle
- Air vent
- Continuous drainage hole
- CON filter
- Cable holder
- Drainage hole
- Mains power cable
- Power plug
- Window sealing plate assembly
- Air-outlet nozzle
- Exhaust pipe assembly
- Exhaust pipe joint
- Remote control
- Drainage hose
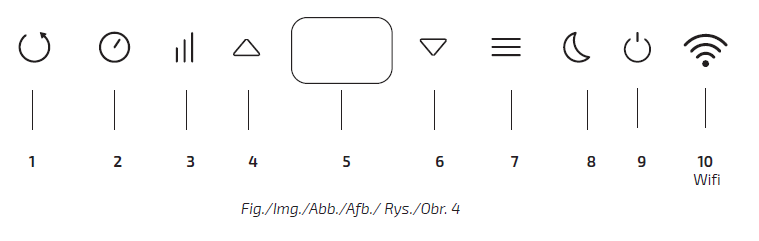
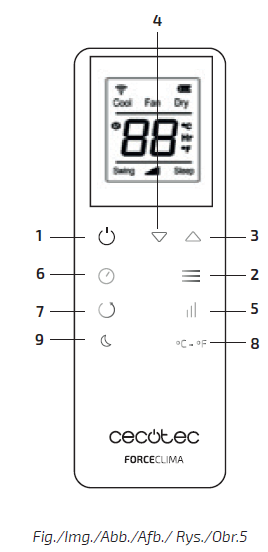
- Oscillation button: Press the oscillation button to change the direction of the air stream.
- Timer button: Press this button for activating the device´s timer. The timer can be activated when the device is on or off. When the button’s symbol lights up, press up and down to select the desired timing. Time can be adjusted from 1 to 24 hours and at intervals of 1 hour.
- Speed regulator button: Press this button when in cooling, heating or ventilation mode to choose between high, medium and low speed. This function is not available in night and dehumidifying mode.
- Temperature/timer increasing button: Press this button to adjust time upwards, after having pressed the timer button; and also to increase temperature when in cooling or heating mode. This function is not available under fan or dehumidifying mode.
- Screen
- Temperature/timer decreasing button: Press this button to adjust time downwards, after having pressed the timer button; and also to decrease the temperature, when in cooling or heating mode. This function is not available under ventilation or dehumidifying mode.
- Mode selector button: Press the mode selector button to switch between the ventilation, cooling, heating and dehumidification mode.
- Night mode button: The device will work on energy-saving mode and at the lowest speed. Press this button again to finish the night mode. When in cooling mode, the temperature will increase 1 ºC every hour. Night mode is not available under dehumidifying and ventilation mode.
- Power button: Press the power button to turn the device on or off.
- Power button: Press the power button to turn the device on and off.
- Mode selector button: Press the mode selector button to switch between ventilation, cooling, heating and dehumidification mode.
- Temperature/timer increasing button: Press it to increase the temperature and to set the desired operating time.
- Temperature/timer decreasing button: Press it to decrease the temperature and to set the desired operating time.
- Speed regulator button: Press the speed regulator button to set the speed between high, medium or low speed.
- Timer button: Press the timer button to set the duration of the operating time.
- Oscillation button: Press the oscillation button to change the direction of the air stream.
- Temperature unit button: Press the temperature unit button to choose the measure unit of temperature (Celsius or Fahrenheit).
- Night mode: Press it to turn on or off the night mode. The device will work in energy-saving mode and at the lowest speed.
BEFORE USE
Take the product out of the box.Remove all packaging materials. Keep the original box.Make sure all the components are included and in good conditions, otherwise, contact immediately the official Technical Support Service of Cecotec.
PRODUCT ASSEMBLY
Before using the device, keep it upright for at least two hours.The device can be moved easily through the room. Make sure that it is in an upright position when being moved and should be placed on a flat surface. Do not install the device in a bathroom or any other humid environment.Installation of the heating pipe (as shown in Fig. 6)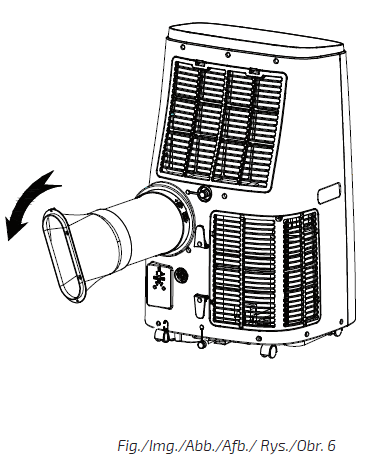 Take out the air outlet tube and the air-outlet nozzle from the box and assemble them. Then, install it in the air vent.Installation of window sealing accessoriesOpen the window halfway through and install the window sealing plate (as shown in fig. 7 and 8). Pieces can be placed in an horizontal or vertical position.Adjust the opening distance of the window sealing accessories’ pieces so they are in touch with the window frame. Fix the pieces of the assembly.Warning: The flat end of the air-outlet nozzle joints must be in place. The pipe must be perfectly stretched and have no substantial turning (greater tan 45 º). Keep the air-outlet nozzle unblocked. Fig. 7 and 8.
 Move the device closer to the window. The distance between the device and the walls or windows should be at least 50 cm (as shown in fig. 9).
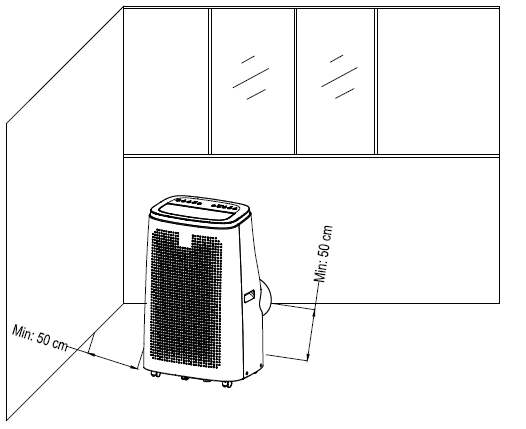 Warning: The length of the hot-air outlet tube should be between 280 and 1500 mm. Do not replace the tube nor use extension tubes because this may cause a malfunction. The tube must not be blocked, as this may cause overheating.Figure 10 and 11.
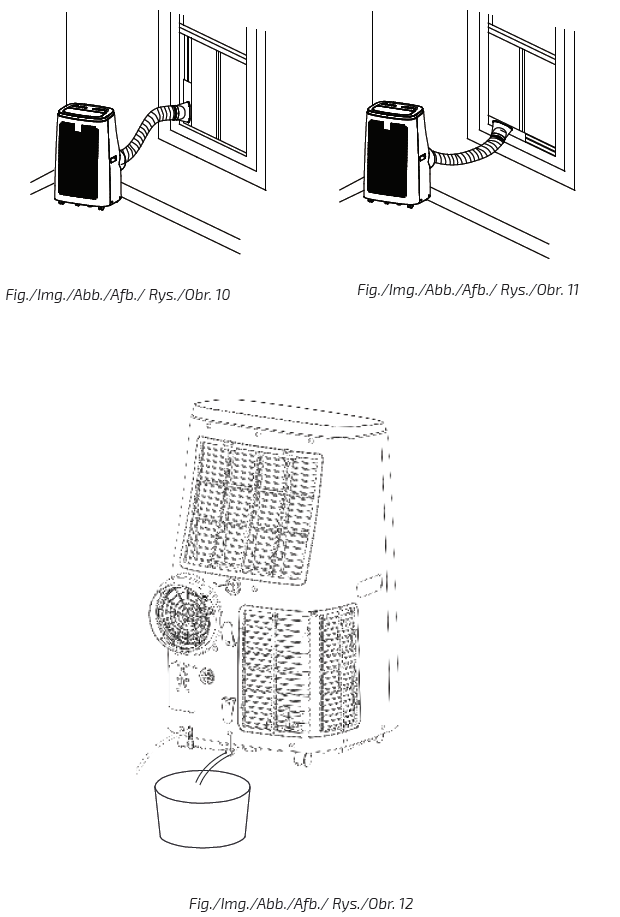 Note: the window sealing accessories are only fit for sliding windows.
OPERATION
This device can be controlled with the remote control. Two AAA-batteries are required to use the remote control.Protection functionThe device has 3 security systems: Anti-frost security (the device turns off when temperature reaches 0 ºC), overfill security system (the device turns off and the full tank indicator lights up when the tank is full) and security compressor that lengthens the lifespan (it takes 3 minutes to turn the device progressively off, avoiding sudden turn-off).
DrainageThe device has two drainage method: manual drainage and continuous drainage.Manual drainageThe device will turn off automatically when the water tank is full. Unplug it.Warning: Move the device carefully so the water inside will not spill.Place a water container below the drainage hose.Unplug the water plug and the water will automatically flow into the container. Fig. 12Keep the drainage hose and the water plug covered.During the drainage, the device can be tilted slightly backwards.If the water container has not enough capacity for all the water, insert the water plug as soon as possible before the water container is full to prevent water from spilling.When the water tank is empty, insert the water plug.
Continuous drainage (optional), as shown in figure 13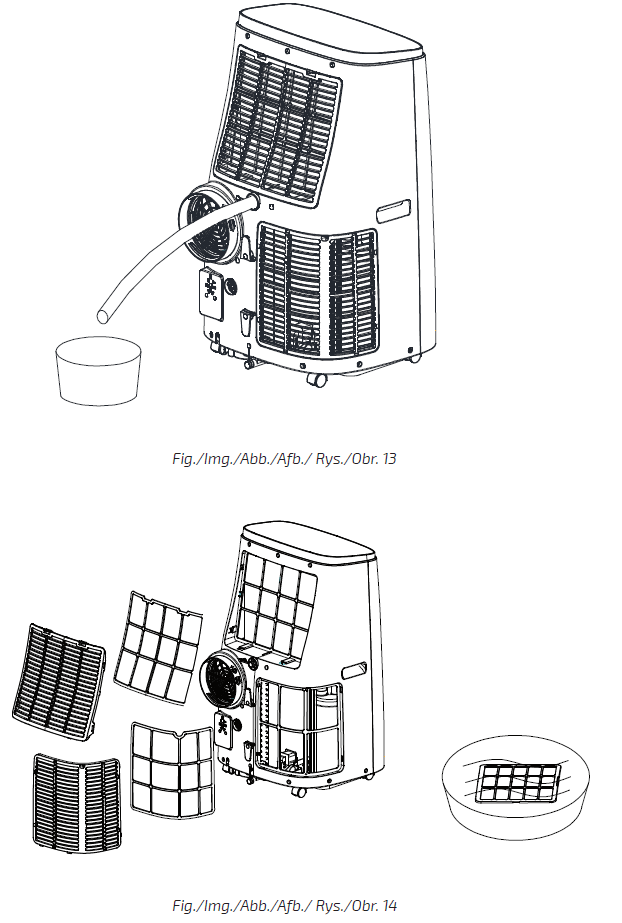 This function is only available during dehumidifying mode.Unplug the water plug.Set the drainage hose into the water outlet.Connect the drainage hose to the water container.
Device storageUnscrew the drainage hose, unplug the water plug and discharge the water into a container. You may also tilt the device to discharge the water into other containers. Place the drainage hose back on its place.Turn on the device and set low-speed mode. Keep it this way until the drainage hose becomes dry. It is important that the inside of the device remains dry to prevent it from mildewing. Turn off the device, unplug it and coil the mains cable around the cable holder. Remove the exhaust pipe and store it properly.Cover the device with a plastic bag. Store the device in a dry place and keep it out of the reach of children.
WI-FI CONNECTIVITY
Information on the App “Smart Life – Smart Living”The Smart Life – Smart Living app is available for android and iOS. Scan the corresponding QR code to download it.
How to use the AppIt allows you to operate the device via your home’s network. A permanent Wi-Fi connection and the app “Smart Life – Smart living” are required.It is recommended disconnecting the device from the power supply when you are away from home to prevent unintentional switching on.Systems required for using the AppiOs 8.0 or higherAndroid 4.1 or higherCommissioning via the AppInstall the app and create an account.Activate the Wi-Fi function in the device’s settings.Place the device 5 meters from your router.
CLEANING AND MAINTENANCE
Disconnect the appliance from the power supply and allow it to cool down before cleaning. Use a soft, damp cloth to clean the product’s surface. Do not use chemical such as benzene, alcohol or gasoline, as it might damage the device. figure 14Do not immerse the appliance in water or other liquid.
Do not use abrasive scouring pads, powders or cleaners.Clean the filter once every two weeks.To clean the filter net and the CON filter, unscrew the screw fixed on the back and take the net out. Wash it with warm water and neutral detergent (about 40ºC / 104ºF) and dry it. Clean the net with a damp cloth.To clean the filter net and the EVA filter, press both upper flaps and remove it. Wash it with warm water and neutral detergent (about 40ºC / 104ºF) and dry it. Clean the net with a damp cloth.
TROUBLESHOOTING
Do not repair or disassemble the air conditioning by yourself. Unqualified repair will lead to failure of the warranty card and may cause damage to users or their properties.
| Problems | Reasons | Solutions |
|
The air conditioning does not work |
There is no electricity. |
Turn the device on after connecting it to a socket with electricity. |
| The overflow indicator displays “FL”. |
Discharge the water inside. |
|
|
The room temperature is too low or too high |
We recommend that you use the device in a temperature of 7-35 ℃ (44-95 ℉). | |
| In cooling mode, the room temperature is lower than the set temperature; in heating mode, the room temperature is higher than the set temperature. |
Change the set temperature. |
|
|
In dehumidification mode, the room temperature is low. |
The device is placed in a room with an room temperature higher than 17
℃ (62 ℉). |
|
|
The cooling effect is not good |
There is direct sunlight. | Pull the Curtain. |
| Doors or windows are open; there are a lot of people; or in cooling mode, there are other sources of heat. |
Close doors and windows and add new air conditioning. |
|
| The filter net is dirty. | Clean or replace the filter net. | |
| The air inlet or outlet is blocked. | Clear obstructions. |
|
Loud noise |
The air conditioning is not placed on a flat surface. | Put the unit on a flat and hard place (to reduce noise). |
|
Compressor does not work |
Overheat protection starts. |
Wait for 3 minutes until the temperature is lowered, and then restart the unit. |
|
The remote control does not work |
The distance between the device and the remote control is too far. | Let the remote control get close to the unit, and make sure that the remote control directly faces to
the direction of the remote-control receiver. |
| The remote control is not in line with the direction of the remote- control receiver. | ||
| Batteries are dead. | Replace batteries. | |
| Displays ‘E2’ | The pipe temperature sensor is abnormal. | Contact Cecotec’s Technical Support Service. |
| Displays ‘E1’ | The room temperature sensor is abnormal. | Contact Cecotec’s Technical Support Service. |
Note: If your problem is not listed in the table, or the recommended solutions do not work, contact Cecotec Technical Assistance Service.
TECHNICAL SPECIFICATIONS
- Product reference: 05266/05268
- Product: Force Clima 12750/14750 Cold & Warm Connected
- Power: 220-240 V~
- Voltage: 50 Hz
DISPOSAL OF OLD ELECTRICAL APPLIANCES
The European directive 2012/19/EU on Waste Electrical and Electronic Equipment (WEEE), specifies that old household electrical appliances must not be disposed of with the normal unsorted municipal waste. Old appliances must be collected separately, in order to optimize the recovery and recycling of the materials they contain and reduce the impact on human health and the environment.The crossed out “wheeled bin” symbol on the product reminds you of your obligation to dispose of the appliance correctly. If the product has a built-in battery or uses batteries, they should be removed from the appliance and disposed of appropriately. Consumers must contact their local authorities or retailer for information concerning the correct disposal of old appliances and/or their batteries.
TECHNICAL SUPPORT SERVICE AND WARRANTY
This product is under warranty for 2 years from the date of purchase, as long as the proof of purchase is submitted, the product is in perfect physical condition, and it has been given proper use, as explained in this instruction manual.The warranty will not cover the following situations:
- The product has been used for purposes other than those intended for it, misused, beaten, exposed to moisture, immersed in liquid or corrosive substances, as well as any other fault attributable to the customer.
- The product has been disassembled, modified, or repaired by persons, not authorised by the official Technical Support Service of Cecotec.
- Faults deriving from the normal wear and tear of its parts, due to use.The warranty service covers every manufacturing defects of your appliance for 2 years, based on current legislation, except consumable parts. In the event of misuse, the warranty will not apply.
If at any moment you detect any problem with your product or have any doubt, do not hesitate to contact Cecotec Technical Support Service at +34 963 210 728.![]()
References
[xyz-ips snippet=”download-snippet”]