
CELESTRON Telescope Control Software Instruction Manual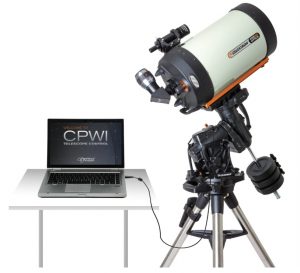
IntroductionWelcome to Celestron PWI (CPWI)! This program allows you to align your Celestron computerized mount, slew to celestial objects, and access many other features directly from your computer. CPWI is equipped with a planetarium SkyViewer, which makes it easy to search for objects and navigate the night sky. You can also use the software to align the mount using the optional StarSense AutoAlign accessory, and even perform an All-Star Polar Alignment directly within CPWI.
Before you get started, please review the PC System Requirements and list of Compatible Celestron Mounts below to ensure your equipment is compatible with CPWI.
PC System Requirements
- Windows 7, 8, or 10 operating system
- PC equipped with USB 2.0 or 3.0 Type A ports (only for cable connection). All of these cables are generic and can be purchasedfrom any supplier. Choose the cable that corresponds best with your mount from the options below.
- For CGX and CGX-L mounts: USB 2.0 cable (male type A to male type B)
- For telescopes with the newer NexStar+ or StarSense hand controls with a Mini USB port at the bottom:Mini USB 2.0 cable (male type A to male Mini-B)
- For older NexStar+ or StarSense hand controls with a serial port at the bottom: USB to serial (male type A to female RS-232 | male RS-232 to serial)NOTE: The RS-232 cables can be found on the Celestron website. Search for item #18775 and item #93920. This option requires a two cable connection..
- An internet connection is required to enable location settings and the online object database, or to auto-update drivers for the cables mentioned above
- 15 MB of hard drive storage and 64 MB of memory
- Screen resolution of 1024 x 768 or higher is recommended
- A WiFi signal if you are using a WiFi-enabled telescope or connecting via the SkyPortal WiFi Module #93973
Compatible Celestron Mounts
CPWI is compatible with all new Celestron computerized telescopes equipped with the NexStar+ hand control, StarSense hand control, or integrated WiFi (such as NexStar Evolution and Astro Fi). Please see the full list compatible telescope mounts below to confirm your mount is compatible with CPWI.
- CGE PRO
- CGX / CGX-L
- CPC / CPC Deluxe
- CGEM II / CGEM DX / CGEM
- NexStar Evolution
- Advanced VX
- NexStar SE
- NexStar SLT
- Astro Fi
- SkyProdigy
- LCM
Optional Accessories
- SkyPortal WiFi Module
- StarSense AutoAlign
- Celestron Focus Motor
- Autoguider for PEC training
NOTE: Some Celestron mounts may not have enough AUX ports to accommodate these optional accessories. If you need additional AUX ports, please see item #93919 Aux Port Splitter on the Celestron.com website. Do not connect multiple AUX Splitters to each other, as resistance and power loss may result, which will impact the performance of the mount and the connected accessories.
Installing the Software
- On the Celestron PWI webpage, find and select the “Download CPWI Software HERE” hyperlink to begin downloading CPWI.
- Open the Setup_CPWI.exe download file and follow the onscreen steps.
- Run the application and proceed to install CPWI.
Telescope Setup with an EQ Mount If you are using an equatorial mount, the mount’s RA and Dec axes should be at the index marks or homed, depending on your mount, and roughly polar aligned prior to using the CPWI software. Once roughly polar aligned, you can begin aligning the telescope. Once the alignment is complete, you can use All-Star Polar Alignment (ASPA) to accurately polar align the mount. Later in this manual, you’ll find detailed instructions on ASPA.
Telescope Setup with an Alt/Az Mount The optical tube on your Alt/Az telescope should be roughly level to the ground pointing due north. NOTE: All users should point the telescope north, regardless of whether they are in the Northern or Southern Hemisphere.
Telescope Setup with an Alt/Az Mount on a WedgeIf you are using an Alt/Az mount with an equatorial wedge, the optical tube must be at the altitude index mark pointing south if you are in the Northern Hemisphere. If you are in the Southern Hemisphere, your optical tube should be at the index mark pointing north. Be sure you have the mount roughly polar aligned before starting an alignment in CPWI.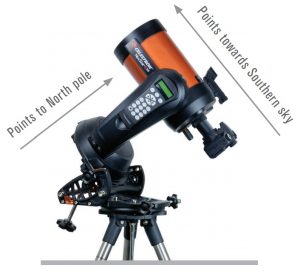 Northern Hemisphere
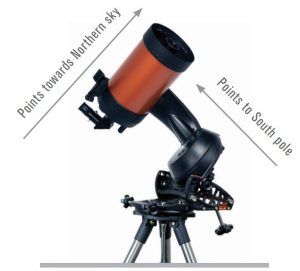 Southern Hemisphere
Connecting your Computer to your Mount
There are three ways you can connect your computer to your mount.
1. Connecting via USB (CGX / CGX-L mounts only)You will need a USB 2.0 Male Type A to Male Type B cable. Plug the Male Type A connector into the computer and plug in the Male Type B connector into the USB port on the mount.NOTE: USB 3.0 Type B cables are NOT compatible with CGX mounts; the 3.0 Type B connector is bigger and will not physically plug into the mount.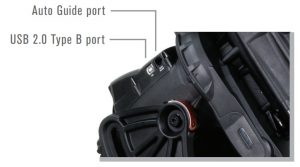
2. Connecting via Hand Control
You can connect to the mount using the port at the bottom of the Celestron hand control. Newer NexStar+ and StarSense hand controls have a Mini USB port at the bottom, while older NexStar+ and StarSense hand controls have a serial port at the bottom.
i. For newer hand controls with Mini USB port, you will need a Mini USB cable (Male Type A to Male Mini B).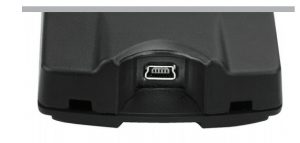 ii. Older hand controls with serial port will need the RS-232 cable combination listed in the system requirements above. Connect the RS-232 ports together from each cable, then take the USB end of the cable and plug it into the computer. Next, take the serial end of the cable and plug it into the bottom of the hand control
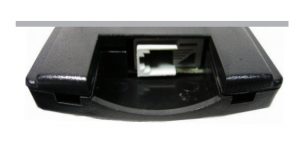
3. Connecting via WiFi
If you are using the SkyPortal WiFi module or if your mount has internal WiFi, there are two ways you can connect via WiFi: Direct Connect mode or Access Point mode. Direct Connect mode is meant for close range wireless control. This is only ideal if you are physically near the telescope with your computer (within 10-20 feet). Access Point mode is meant for remote wireless control. This is useful for backyard or remote observatories where the direct wireless connection won’t suffice for a long-range WiFi connection. Unlike Direct Connect mode, Access Point mode allows you to connect to the internet and use CPWI to wirelessly control your telescope at the same time. If your mount does not have integrated WiFi, start by plugging the SkyPortal WiFi module into an AUX port on the mount. If you are using a Celestron mount with WiFi, the module is not needed.
Direct Connect- Set the WiFi module switch to the Direct Connect position. Go to the network settings on your computer andconnect to the WiFi module. It will be identified as “Celestron-__” or “SkyQLink-__.” Once connected, go back to CPWI. Select “via WiFi” in the bottom left corner, and select Connect to start an alignment.
Access Point- Set the WiFi module switch to the Access Point position. Then, select File in the top left corner and select Connect WiFi Module to Network. Fill in your local network settings to send the WiFi configuration. Follow the onscreen instructions to proceed.
NOTE: Please refer to your Celestron telescope or WiFi module manual for more information on Direct Connect and Access Point switch position.
NOTE: For Access Point WiFi connection, you will get a warning from Windows Defender Firewall about some features being blocked for CPWI. To allow Access Point to work you will need to check and uncheck specific networks. Make sure the “public networks” box is checked, and leave “private networks” unchecked. If “domain networks” shows up, leave that unchecked as well. Then select “Allow Access.”
CPWI OVERVIEW
When you open CPWI, there are two main sections you can control.
In the Sky Viewer section, shown in the following screenshot, you can use your cursor to click and drag the model of the night sky to move it and see what stars are currently visible. This is also where you can manually search for stars, deep sky objects, or constellations. Zoom in or out of the SkyViewer by scrolling the mouse or selecting the + or buttons on the right side of the screen. Select an object by clicking on it.
SkyViewer Settings
In the top left corner of the program, locate the “View” drop-down menu. Here is where you can enable, disable, or adjust certain features that will be displayed in the SkyViewer. You can adjust this to only show specific types of celestial objects, or you can choose to show them all.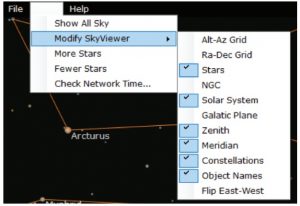
The Mount section, which is directly below the SkyViewer in the screenshot below, is where you’ll find all the main controls for your telescope mount and access to other features. Other accessories attached to the mount can also be controlled from this area, such as the Celestron Focus Motor. (More on how to use the Focus Motor appears later in the manual).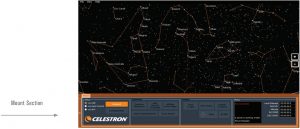
Aligning the MountFirst, connect to the telescope mount using any one of the connection methods previously outlined. If you have other Celestron accessories you want to use with the mount that work with CPWI, they must be connected to an AUX port prior to powering on the mount. (More on using these optional accessories appears later in the manual.) Select a connection option–USB (CGX and CGX-L mounts only), hand control, or WiFi–and select Connect in the Setup box.
Wait for the Align Mount window to pop up after you have selected Connect. Check and make sure the Status box in the bottom right corner in the Mount section displays in green font that you are connected to CPWI.
Before beginning an alignment, check the information in the Align Mount pop-up window to make sure it matches your current observing time and location.If you need to edit your location, select Change Location. A Location Settings window will pop up. You can either manually enter your location or use Google Maps to get your exact GPS coordinates. Using Google Maps requires an internet connection. If you are connecting to your telescope via WiFi in Direct Connect mode, you will not be able to use this feature.
If you use Google Maps, simply select a location on the map and a pop-up window will provide you with the coordinates. You can then send the coordinates to CPWI.
The time is pulled from your computer and shouldn’t need to be changed, unless your computer’s time is wrong. If needed, update it to correct the time for CPWI by selecting Change Time.
If you are manually searching for a location within CPWI’s database and your local city does not show up, use the next closest city in the database. We recommend acquiring GPS coordinates in advance whenever possible.
After checking your time and location settings, select an Alignment Type. Remember to select Wedge Enable if you are aligning an Alt/Az mount on an equatorial wedge. (More on Wedge Enable can be found later in this manual.) To begin, select Manual Align and then select Begin Alignment.
Certain alignment functions may be excluded depending on your mount type (i.e. EQ or AZ) and whether the StarSense AutoAlign accessory is plugged in.EQ AZ

After selecting Begin Alignment, a pop-up window with Slew Controls will appear, reminding you that your EQ mount should be roughly polar aligned or that your Alt/Az mount should be roughly north and level. If needed, use the Slew Controls to slew the telescope to its correct starting position. If you’re using a mount that has home sensors, you can automatically home the mount after selecting Begin Alignment. Once the mount is in its starting position, select Complete in the Home Mount window. After this point, your mount clutches should remain locked. When you need to move the telescope, use the Slew Controls in CPWI. These controls can be found in the Control box under Mount labeled “Slew” with 4 arrows. If you are connecting via WiFi or USB and have the hand control connected to the mount, you may slew the mount with the hand control or with the Slew Controls in CPWI. Slewing with the hand control while connected to CPWI won’t affect the alignment.When Slew is selected, the Slew Controls window will appear. Use these controls whenever you need to manually adjust the telescope’s position. When the Slew Controls window is onscreen and selected, you can use the arrow keys on your keyboard to slew the telescope. Adjust the Rate for different motor speeds. Rates 1-6 are useful for centering in the telescope and finderscope, while rates 6-9 are useful for high speed slewing and aren’t recommended for centering. Selecting the dots in the corners of the window will slew both axes at the same time.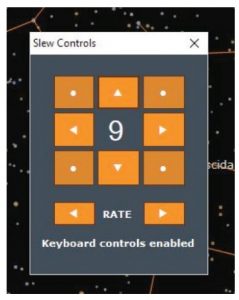
To align the mount with the night sky, you will need to select and center objects in the field of view of the telescope using the Slew Controls. Once the object is centered, it becomes an alignment point and is added to CPWI’s alignment model for the mount. To get a good alignment model, we recommend using at least 4 alignment points with any mount, each point in a different quadrant of the sky. As you go through the alignment, CPWI will recommend alignment objects to use that will provide you with the best alignment model. Use the Step 1 drop-down menu in the Manual Alignment window to select your first object. You can also select an object in the SkyViewer to use for your first alignment point. We recommend using bright, well-known stars or planets, as any deep sky objects may be difficult to accurately center. Once you choose an object, select GoTo in the Alignment window. The telescope will automatically slew near the location of the selected object. The Slew Controls window will also appear onscreen.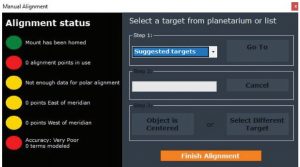
Now, use the Slew Controls to center the object in the field of view of the telescope. If the object is not already somewhere in the field of view, you may need to use your finder scope to locate it. Anytime you center an object for alignment, make sure you use the Up and Right buttons for the final slew commands when approaching the center of the field of view. This is to minimize gear backlash in the mount to achieve a more accurate alignment on objects. Once the object is centered, select Object is Centered, and the alignment point will be added to the alignment model. Now, select another object in the Step 1 drop-down menu. This time, select an object in a different quadrant of the night sky. Repeat the process until all the circles under the Alignment status column turn green, which is typically after you complete the 4th alignment point. Then, select Finish Alignment.
If you want to add more points after finishing the alignment, simply select an object in the SkyViewer and select Add to Model in the Target pop-up window. The mount will slew to the selected target, then use the Slew Controls window to center the object in the telescope, then select Object is Centered. Once completed, select Finish Alignment. If you want to add another point to the current alignment model, repeat this step by selecting another object in the SkyViewer. You can also select Add Star(s) To Model in the Mount section of the Alignment box. This will bring up the alignment window to select an object from a quadrant of the sky using the Step 1 drop-down menu. If you are using StarSense AutoAlign, selecting this will allow you to take another image for plate solving. (More on StarSense appears later in the manual.) If you are using an Alt/Az mount and have completed the alignment, you are ready to use CPWI. If you are using an EQ mount and have completed the alignment, please see All-Star Polar Alignment below for final setup.
Wedge Enable (CPC, Evolution, and NexStar SE Series Only)If you are using an Alt/Az mount and want to align with a wedge, check the Wedge Enable box under Alignment Type. Wedge Enable works with Manual Align, StarSense Auto, and StarSense Manual via hand control or via WiFi. Follow the steps under the Aligning section above.
All-Star Polar Alignment (ASPA) for EQ SetupsCPWI and the mount are now aligned to the night sky, but the mount may not be accurately polar aligned. Celestron’s proprietary All-Star Polar Alignment procedure (ASPA) can help correct your polar alignment quickly and easily. To perform an ASPA in CPWI, you must have at least 4 alignment points in your alignment model. (The Status box under Mount should indicate at least 4 alignment points.) Press the All-Star Polar Alignment button to begin. After a successful 4-point (or more) alignment is completed, CPWI will automatically ask if you want to perform an All-Star Polar Alignment. Otherwise, you can select All-Star Polar Alignment in the Control box in the Mount section. You will receive a notification if you need more alignment points to complete an ASPA. Once you select All-Star Polar Alignment you will see a Welcome window.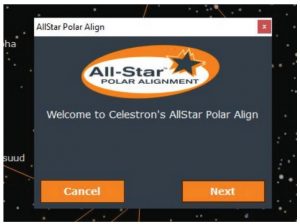 Select Next and your polar alignment error will be displayed. Take note of the displayed error if needed, then click Next again. Select a star for ASPA from the SkyViewer. If you are in the Northern Hemisphere, you should select a star on the southern horizon. Southern Hemisphere users should select stars on the northern horizon. Do not use any stars directly overhead near zenith, directly east or west at any elevation above the horizon, or near the North Pole for Northern Hemisphere users and South Pole for Southern Hemisphere users. Once you have found a star for ASPA, select it, then select GoTo in the ASPA pop-up window. The star will likely not be centered in the field of view of the telescope, but should be visible in the finderscope. Adjust the mechanical polar alignment knobs on the mount to center the star in the telescope’s field of view. Then, select Next to proceed. Polar alignment is now complete. If you want to check your results, re-align the mount in CPWI by selecting Delete Alignment, then select Perform Alignment. After realigning, check your polar align error by performing ASPA again to review your results. At this point, you can either exit ASPA and start using CPWI, or perform another ASPA if you’d like. The second time you do an ASPA, the mechanical knobs should need minimal–if any–adjustment. Once you have completed one ASPA after initial Alignment, you are ready to use CPWI to control your Celestron telescope.
Slewing to an ObjectTo select your desired object in the SkyViewer, use your cursor to click and drag to navigate the planetarium. Once you find the object you want to slew to, click on it. A Target window will pop up. Select GoTo. The telescope will then slew to the object you have chosen. The object should be in the field of view of the telescope. When you select an object in the SkyViewer, you also have the option to select Info. If you are connected to the internet, clicking Info will take you online to where you can learn more information about the object. If you are connected via WiFi in direct connect mode, you will not be able to use this feature, since your computer is connected directly to the WiFi module.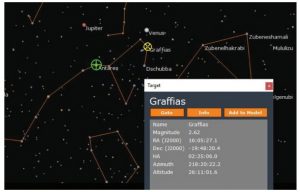 The telescope’s current position is indicated by the green crosshair in the SkyViewer. Slewing the telescope in CPWI will move the green crosshair in real time as you slew. When you make a selection in the SkyViewer, a yellow crosshair will appear over the object.
Finding TargetsYou can also manually search for targets. In the Control box under Mount, select Find Target. After you have chosen an object, a Find Target window will pop up. The Local Catalog tab allows you to manually search for objects in CPWI’s database. You can search by name and use the Visibility and Object Type filters for advanced searches. Once you select an object in the search results, select GoTo Target. Select STOP if you need to abort the slew. Use the Online Search tab to look up objects that are not listed in the Local Catalog. The Online Search requires an internet connection to search the SIMBAD database. If you are connecting via WiFi in direct connect mode, you will not be able to use this feature.
Aligning with the StarSense AutoAlign AccessoryBefore you begin, attach the StarSense camera to the telescope tube. See the StarSense AutoAlign manual for more information on how to do this. Attach the AUX cable from the StarSense camera to an AUX port on your Celestron mount. Make sure you have everything connected to the appropriate AUX ports before powering on the mount.
- If you are connecting via USB (CGX and CGX-L mounts only), simply plug in the USB Type B 2.0 cable from your PC to the mount, with the StarSense camera connected to an AUX port.
- If you are connecting via hand control, plug the StarSense hand control into an AUX port on the mount and plug in the appropriate cables, previously outlined in the manual, from your PC to your hand control.
- If you are connecting via WiFi, plug in the SkyPortal WiFi module if your mount does not have internal WiFi. Make sure the WiFi switch is in the correct position, as previously outlined in this manual.
Calibrating the StarSense CameraBefore initiating a StarSense alignment, make sure you have the mount homed or at index marks. Alt/Az mounts should be roughly north and level, and EQ mounts should be roughly polar aligned. After verifying this, you will be asked to Calibrate StarSense. Calibration aligns the StarSense camera field of view with the telescope field of view, and usually only needs to be done once. If you have already calibrated the camera to your telescope with the hand control or the SkyPortal app, you can skip this step. Select a bright star in the SkyViewer or from the suggested targets in Step 1 of the Alignment pop-up window. Then select GoTo in the Alignment window. The telescope will slew toward the object. When it stops, the object may not be in the field of view of the telescope, but should be in the field of view of the finderscope. ( Note: Your finderscope must be aligned to your optical tube during this step.) Use the Slew Controls to center the star in the telescope’s field of view.
Once the object is centered in the telescope’s field of view, select Object is Centered. The StarSense camera will take an image of that section of the sky and determine its position. If the calibration is successful, you will see a pop-up window notifying you the calibration was successful. If the calibration was not successful, you will be asked to select another star for calibration.
StarSense AutoSelect a connection method and Connect to CPWI to begin an alignment. Select StarSense Auto, then select Begin Alignment. CPWI will ask you how many references you’d like to use for alignment. This is referring to the number of “points” you’d like to use to calculate the alignment. We recommend using at least 4 references, however you can use anywhere from 2-10. More reference points provide a better alignment model, but take more time to complete. After you’ve decided how many references to use, select Begin Alignment. When the auto alignment is complete, CPWI will notify you if the alignment succeeded or failed. If the alignment succeeded, you can GoTo a star to test the alignment accuracy.
StarSense Auto is about as hands-off as it gets, but it also has its limitations. Depending on your location, sections of the sky may be blocked by a tree, building, or mountaintop. StarSense is unaware of these natural limitations and may slew to sections of the sky that are not visible. This is OK because StarSense will automatically keep scanning the sky until it finds a clear view, but it causes the alignment to take longer than usual to complete. To speed up the process, consider using StarSense Manual if your observing location has lots of obstructed sky.
StarSense ManualSelect a connection method and Connect to CPWI to begin an alignment. Select StarSense Manual. The Alignment window and a Slew Control window will pop up. Manually slew the telescope to your desired sections of the sky using the SkyViewer and Slew Controls. Then, select Take Image on the Alignment screen. The StarSense camera will then take an image, find the center coordinates of the image, and use the plate center as an alignment reference. Once completed, manually slew the telescope to another clear area of sky and repeat the process. We recommend completing at least 4 successful plate solves using this method. Select End Alignment once you are done and GoTo a star to test the alignment accuracy.
StarSense Manual is great for situations where certain sections of the sky are blocked by a tree, building, or mountaintop. If you do not have such limitations and have visibility to a wide open sky, we recommend using Starsense Auto. Both StarSense Auto and StarSense Manual use the same patented plate solving technology to align your Celestron telescope to the night sky.
Using the Celestron Focus MotorWith the Celestron Focus Motor attached to your Celestron telescope and connected to an AUX port on the mount, Connect to CPWI. In the Status box under Mount, confirm the Focus Motor is Connected. Next to the Mount tab, select Focus Motor. This is where you can control the Focus Motor and its numerous functions. The Control box allows you to manually move the Focus Motor, change the focusing rate, and move the focuser to a specific point by inputting a value and selecting Move To.
The Celestron Focus Motor requires a calibration once installed onto a telescope to find its inward and outward limits of focus and to index the focuser positions for Move To commands.
The Calibration box is where you calibrate the Focus Motor. If you have already calibrated the Focus Motor to your telescope, you may skip this step. Otherwise, select Begin. This step takes several minutes to complete. Select Force Stop to stop the calibration process if needed. Recalibrating your Focus Motor is required any time you remove it from the telescope.
The backlash setting can be adjusted to compensate for gear backlash in the telescope’s focuser assembly while moving in and moving out the focuser. Refer to the online instruction manual at celestron.com for more information on the Focus Motor.
MOUNT CONFIGURATION
Select Mount Configuration under the Connect button in the Setup box in the Mount section to access more mount functions. Some of the Mount Configuration settings may be unavailable depending on the Celestron computerized mount you are using.
Custom Rate 9Your telescope slews to objects selected for GoTo at motor speed Rate 9. Lower the Rate to conserve battery life if you are using an external power source. Raise the Rate to slew to objects as quickly as possible.
RA Slew Limits (EQ only)Adjust the sliding bar to a number between -20º to +40º to define the slew limit when the telescope is on the East or West side of the mount near meridian flip.
PEC (Periodic Error Correction)The RA worm gear inside your telescope mount carries some minor imperfections that can impact long exposure images at high magnification. To combat this, you can PEC train your RA worm gear to speed up or slow down to compensate these imperfections. This requires an autoguider and autoguiding software. Once the mount is aligned, select any star near the celestial equator and slew to it. In the Mount section, select Configuration in the Setup box. A pop-up window will appear with different configuration settings including PEC. Select the PEC drop-down menu to get started. Select Train PEC in the drop-down menu. You will then see a pop-up window for PEC training. Now, select Begin PEC Training. The telescope’s RA axis will slew to find the RA worm gear’s index position. This may put your star of choice out of the field of view. After the RA worm gear’s index is found, the autoguider and autoguiding software need to lock onto a star in the field of view the autoguider. If you cannot find a star in the field of view of the autoguider, use the Slew Controls to slew the mount to bring a nearby bright star into the autoguider’s field of view. Lock onto the star to begin autoguiding. Then select Begin in the PEC Training Ready pop-up window. Once the training is complete, CPWI will ask if you’d like to enable PEC playback. You can also manually Enable PEC Playback and select Accept to save changes in the Mount Configuration Window.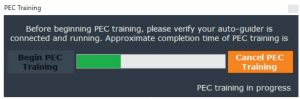
AutoGuider RatesThis allows the user to adjust autoguide rates as a percentage of sidereal rate. This is helpful for calibrating your telescope mount to an autoguider.
BacklashAll mechanical gears have a small amount of backlash between the gear mesh. Gear backlash may be noticed when reversing direction at slow speed rates with the Slew controls, as is done during manual alignments. You will notice that it takes several seconds of selecting the Slew command before any motion of the star in the telescope field of view takes place. To compensate for this, you can use the Backlash settings for each axis of mount motion.
To use these settings, you will need to experiment with different values to find what settings work best for your mount. Adjust each axis separately. Set the Slew rate to 1, and adjust the Backlash values upwards until the star immediately begins to move in the telescope’s FOV when reversing direction of the Slew Controls. If you set the backlash value too high, then the Slew command may overshoot your desired location when reversing direction. In this case, adjust the backlash value downwards. Please see your telescope’s manual for more on Backlash compensation settings.
GoTo Approach DirectionThis feature allows you to define the telescope’s direction of approach when slewing to objects. This can minimize the effects of backlash. This feature is particularly useful for telescopes with heavy accessories attached. For example, if your telescope is back heavy from using heavy optical or photographic accessories attached to the back, you can set your altitude approach to the negative direction. This ensures that the telescope always approaches an object from the opposite direction as the load pulling on the scope. Similarly, if using the telescope while polar aligned, you would want to set the azimuth approach to the direction that allows the scope to compensate for different load level on the motors and gears when pointing in different parts of the sky.
Cordwrap (AZ only)This feature safeguards against the telescope slewing more than 360º in azimuth and wrapping accessory or power cables around the base of the telescope. This is useful any time cables are plugged into the base of the telescope.
OTHER CPWI FEATURES
Disable Tracking, Enable Tracking, and StopIn the Control box under Mount, you will find a Disable or Enable Tracking button. This will enable or disable tracking when selected. Check the Status box for the current tracking mode. You can also select STOP to force stop the telescope while slewing during a GoTo.
Park MountPark Mount is very useful in situations where you need to power off the mount for a few hours to conserve battery life when using an external power source. Select Park Mount in the Control box under Mount to park the telescope in any desired position while maintaining the current alignment model. When you select Park Mount, a pop-up window will ask you to select “Park here” or “Park at previous position.” Once the mount is parked, CPWI will ask you to disconnect from the mount. After disconnecting, you may power off your mount and close CPWI. Do not move the telescope while it is parked or the current alignment model will be lost. When you reopen CPWI, select Connect in the Setup box. CPWI will ask if you’d like to un-park the mount. Once un-parked, the mount will begin tracking again. Select a bright star in the SkyViewer and slew to it to check the pointing accuracy before using the telescope further. This feature does not require saving or loading a Pointing Model. Park Mount uses your alignment model prior to parking the mount.
GoTo HomeIf your mount has auto home sensors (like the CGX, CGX-L, or CGE PRO) you can select this button to quickly slew the telescope to home position while maintaining your current alignment. This can be useful for quickly homing the mount before you select Park Mount.
View Pointing ModelSelect View Pointing Model under the Alignment box in the Mount section to review the details of your alignment. The more objects you accurately center and add to the model, the more accurate the overall pointing will be. There is some error in the centering accuracy of each star, as well as natural limitations on how accurate the system can point.
Removing an Alignment Point from the ModelIf you want to remove an alignment point from your model, select View Pointing Model, then select Cal Points in the bottom right corner of the pop-up window. Find any points that have large amounts of error from the spreadsheet and click “Delete Selected”. This feature is useful if you have added a bad point to an otherwise good model.
Saving a Pointing Model/Saving Your AlignmentOnce your alignment is completed, you may save it by going to View Pointing Model > File > Save as.
Loading a Pointing Model/Loading Your AlignmentProvided you have not physically moved your mount, you can load an alignment model to restore your telescope’s alignment after shutting the mount off. This feature is particularly useful for remote or observatory setups. Select Connect and the Align Mount window will pop up. Next, select Load Pointing Model. This will allow you to restore a previously saved alignment. Follow the onscreen instructions to sync onto a star. The sky and your mount have rotated since you last used this alignment, so the two will need to be synced again for the alignment model to be accurate. Once you have synced onto a star, your clutches should remained locked. This is useful if you plan on using the telescope again in a few days and want to keep an otherwise good alignment model. Unlike Park Mount, you can unlock the clutches while the telescope is not in use, since the alignment can be loaded later.Delete AlignmentSelect this to delete your current alignment. To continue using CPWI, you will either need to re-align or load a previously saved alignment.
 celestron.com/pages/technical-supportTelephone: 1(800) 421-9649
References
[xyz-ips snippet=”download-snippet”]