

HOMEOWNERSINSTRUCTIONS & OPERATING MANUALWALL MOUNTED ELECTRIC HEATER WITH REMOTE CONTROLModel No. CFECRORE & CFECEOREArticle No.MH36BLC/P & MH27BLC/P
DESK AND WALL-MOUNTED ELECTRIC FIREPLACE/HEATER
IMPORTANT
This appliance can be used by children aged from 8 years and above and persons with reduced physical, sensory or mental capabilities or lack of experience and knowledge if they have been given supervision or instruction concerning use of the appliance in a safe way and understand the hazards involved!Children shall not play with the appliance!Cleaning and user maintenance shall not be made by children without supervision.Warning: Electrical Plug must be completely inserted into the 16A electrical socket to avoid the risk of overheat problem.Children of less than 3 years should be kept away unless continuously supervised.Children aged from 3 years and less than 8 years shall only switch on/off the appliance provide that it has been placed or installed in its intend normal operating position and they have been given supervision or instruction concerning use of the appliance in a safe way and understand the hazards involved.Children aged from 3 years and less than 8 years shall not plug in,regulate and clean the appliance or perform user maintenance.
PLEASE READ THE INSTRUCTIONS CAREFULLY BEFORE INSTALLATION AND/OR USE OF THIS ELECTRIC FIRE AND RETAIN FOR FUTURE REFERENCE.
IMPORTANT INSTRUCTIONS
WHEN USING ELECTRICAL APPLIANCE, BASIC PRECAUTIONS SHOULD ALWAYS BE FOLLOWED TO REDUCE THE RISK OF FIRE, ELECTRIC SHOCK, AND INJURY TO PERSONS, INCLUDING THE FOLLOWING IMPORTANT SAFETY ADVICE.
READ ALL INSTRUCTIONS BEFORE USING THIS APPLIANCE.
Regarding installation of the appliance;
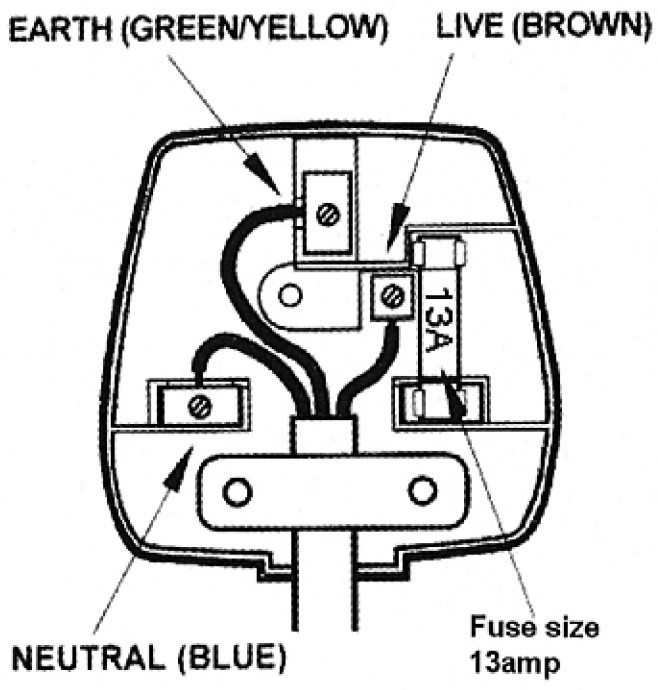
- This appliance is supplied with a rewirable plug fitted with a 13A fuse. Should the fuse or plug need replacing, and you are competent to do so, it must be replaced with a 13A fuse and the plug muse be a 13amp BS1363A approved fitted with a 13A fuse.
- Connect this appliance to a single-phase AC supply of the voltage specified on the rating plate.
- This heater must be earthed. If in any doubt consult a suitable competent person.
- Ensure that the plug socket-outlet connection for this appliance is accessible.It MUST be readily accessible for easy electrical isolation in the event of servicing and replacing components etc.
- This appliance MUST NOT be located immediately below an electrical socket-outlet.
- Avoid the use of an extension cord as this may overheat and cause a risk of fire.
- Running this appliance on heat setting 2 (2000W) with another piece of electrical equipment on the same circuit may cause the fuse of this appliance to blow, or you circuit breaker to turn off the power supply. If this occurs reconnect one of the appliances to another circuit.
- This appliance is fitted with an automatic thermal cut out to reduce the risk of damage in the event of abnormal operation e.g. when covered. If the heater stops operating whilst the flame effect continues normally this indicates that the cut out is in operation. If this occurs disconnect the power supply at the plug socket-outlet and ensure that any obstructions to the fan heater outlet or fan blades etc. are removed. The heater will automatically reset when cool enough. The thermal cut out WILL NOT BFM EUROPE LTD
DESK AND WALL-MOUNTED ELECTRIC FIREPLACE/HEATER
RESET unless the obstruction is removed and the appliance cools. If the heater is still not operating after 10 minutes disconnect the appliance and seek expert advice.
- If the supply cord is damaged it must be replaced by the manufacturer, its service agent or a similarly qualified person in order to avoid a hazard. The cable used MUST be capable of handling 2.0kW of power at 240V and MUST contain an earth wire.
- To completely shut this appliance off turn all the controls to OFF and remove the plug from the socketoutlet.
- Use the heater in a well-ventilated area.
Regarding persons operating the appliance;
- This appliance is not intended for use by persons (including children) with reduced physical, sensory or learning disabilities, or lack of experience and knowledge unless given supervision or instruction concerning use of the appliance by a person responsible for their safety.
- Children should be supervised at all times to ensure that they do not play with the appliance.
- Extreme caution is necessary when any heater is used by or near children, invalids or elderly persons and whenever the heater is left operating and unattended.
IMPORTANT INSTRUCTIONS
DO NOT cover the heater. The meaning of figure 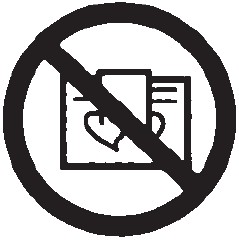 is “WARNING! DO NOT COVER”. This is to avoid over-heating of the product.DO NOT leave the heater unattended while it is in use. Always turn the appliance to the OFF position and unplug it from the electrical outlet when not in use.DO NOT operate this appliance with a damaged cord or plug, or after the appliance malfunctions, has been dropped or damaged in any way.DO NOT use this appliance with a programmable timer or any other device that switches the appliance on and off automatically. In order to avoid a hazard due to inadvertent resetting of the thermal cut out., this appliance must not be supplied through an external switching device, such as a timer, or connected to a circuit that is regularly switched on and off by an utility.DO NOT use this appliance as a freestanding appliance. It must always be fixed to a wall, fireplace or floor etc.DO NOT insert or allow objects to enter any ventilation or exhaust openings on the appliance. To prevent a possible fire do not block air intakes or exhaust openings in any manner.DO NOT use this appliance on soft surfaces, such as beds, where openings may become blocked. Use the appliance on flat, dry surfaces only.DO NOT place this appliance near flammable materials, surfaces or substances, as there may be a risk of fire. Keep flammable materials, surfaces or substances at least 1 metre from the front of the product and keep them away from the sides and rear.DO NOT use this appliance in any areas where petrol, paint or other flammable liquids are stored e.g. a garage or a workshop as the appliance contains components capable of producing a spark.DO NOT use this appliance in the immediate surroundings of a bath, shower or swimming pool. Make sure it cannot fall into water. Never touch the appliance with wet hands.DO NOT let bare skin touch any hot surfaces to avoid burns and personal injury. This heater is hot when in use.DO NOT use outdoors.
CAUTION – Some parts of this product can become very hot and cause burns. Particular attention has to be given where children and vulnerable people are present.This appliance is for household use only.This heater is not equipped with a device to control the room temperature. Do not use this heater in small rooms when they are occupied by persons not capable of leaving the room on their own unless constant supervision is provided.
EEP THESE INSTRUCTIONS IN A SAFE PLACE.
INSTALLATION PREPARATION
 This carton includes a GLASS panel! Always use extreme caution when handling glass. Failure to do so could result in personal injury or property damage.
SPECIFICATIONS
Voltage…………………………………230 V AC, 50HzTotal Watts……………………………2X900WattsDimension……………………………..916(686)mm x 110mm x 357mm
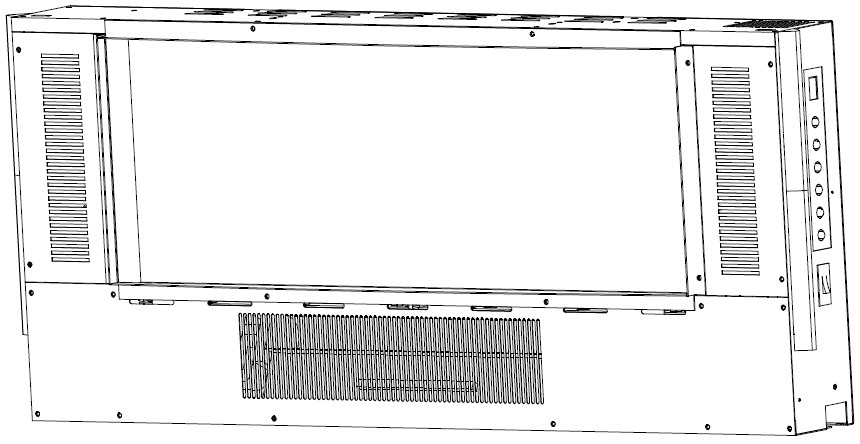
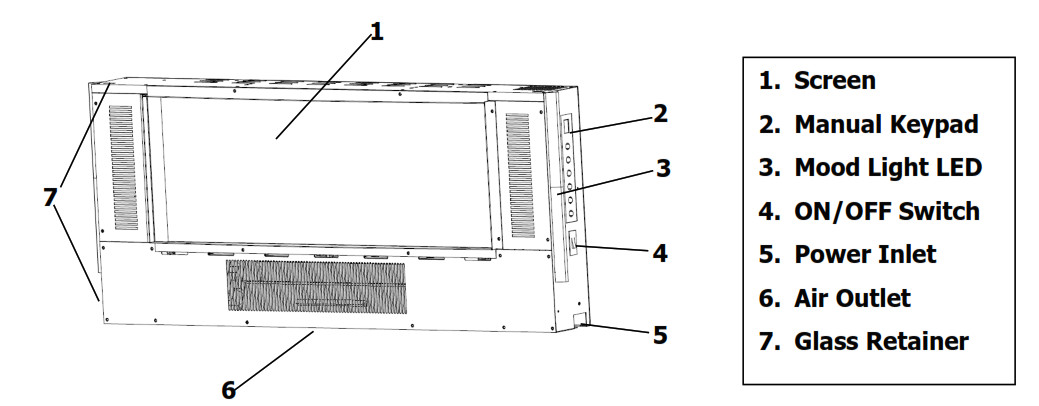
STRUCTURE AND PARTS
BFM EUROPE LTD
TOOLS REQUIRED
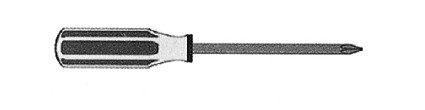 Magnetic Phillips Screw Driver
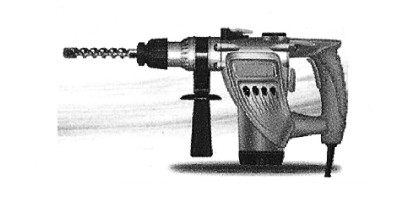
Rotary Hammer
INSTALLATION PREPARATION
WANING! DO NOT USE THIS APPLIANCE IF ANY PART HAS BEEN UNDERWATER.IMMEDIATELY CALL A QUALIFIED SERVICE TECHNICIAN TO INSPECT AND TO REPLACE ANY PART OF THE ELECTRICAL SYSTEM IF NECESSARY.
- Open the packaging carefully and remove the foam.
- Remove and discard the plastic bag.
- Be responsible when handling the packing materials.
- Keep the original packaging for future transportation and/or storage.
- Check all accessories are removed from the packaging before storing it away for future use.
NOTE: KEEP PLASTIC WRAPPING AWAY FROM CHILDREN!
LOCATING YOUR ELECTRIC FIREPLACE/HEATERThis appliance may be installed virtually anywhere in your home. However, when choosing a location please ensure that the general instructions are followed. For best results, install out of direct sunlight.
Make sure that the plug or fused spur is accessible after the electric fire is fitted.Before connecting the appliance make sure that its rating corresponds to that of the mains supply and the fuse is the correct rating.The appliance should be located close to a suitable mains socket-outlet to enable the connection. The electrical socket-outlet must be easily accessible to allow disconnection.
NOTE: the appliance is fitted with an inlet plug and socket underneath the right side of the casing.Always make sure that it is fully pushed in and secure before operating the fire. Damage could occur if it is not fitted properly.
WARNING! KEEP DRAPERY AND OTHER FURNISHINGS AT LEAST 3’/0.9M FROM THE FRONT AND SIDES OF THE ELECTRIC HEATER
CLEARANCE TO COMBUSTIBLES
Sides…………… 4in. (100mm)Floor…………… 15 3/4 in. (400mm)Top…………….. 0 in. (0mm)Back…………… 0 in. (0mm)
![]()
INSTALLATION INSTRUCTIONS
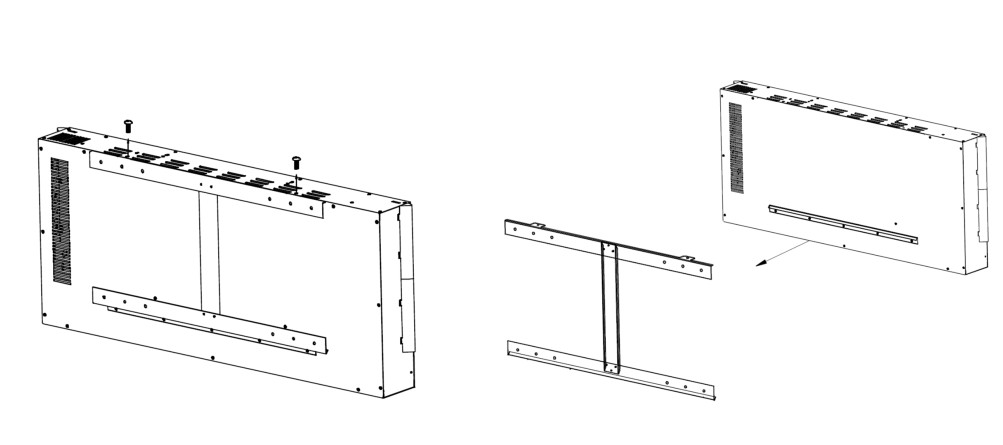
Step 1: Using a screwdriver loosen the two screws that secure the wall mounting bracket to the top of the appliance and remove the wall mounting bracket as shown below (Figure 1).
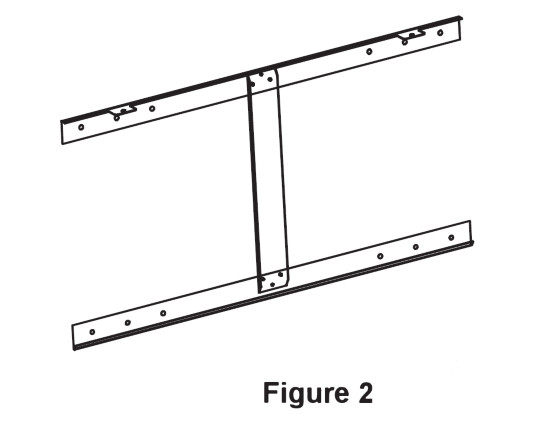
Step 2: Choose a solid and plain wall. Position the mounting bracket where the appliance is to be installed on the wall and ensure that the bracket is level. Using a pen mark the 4 holes through the 4 holes on the mounting bracket as shown below (Figure 2)
INSTALLATION INSTRUCTIONS
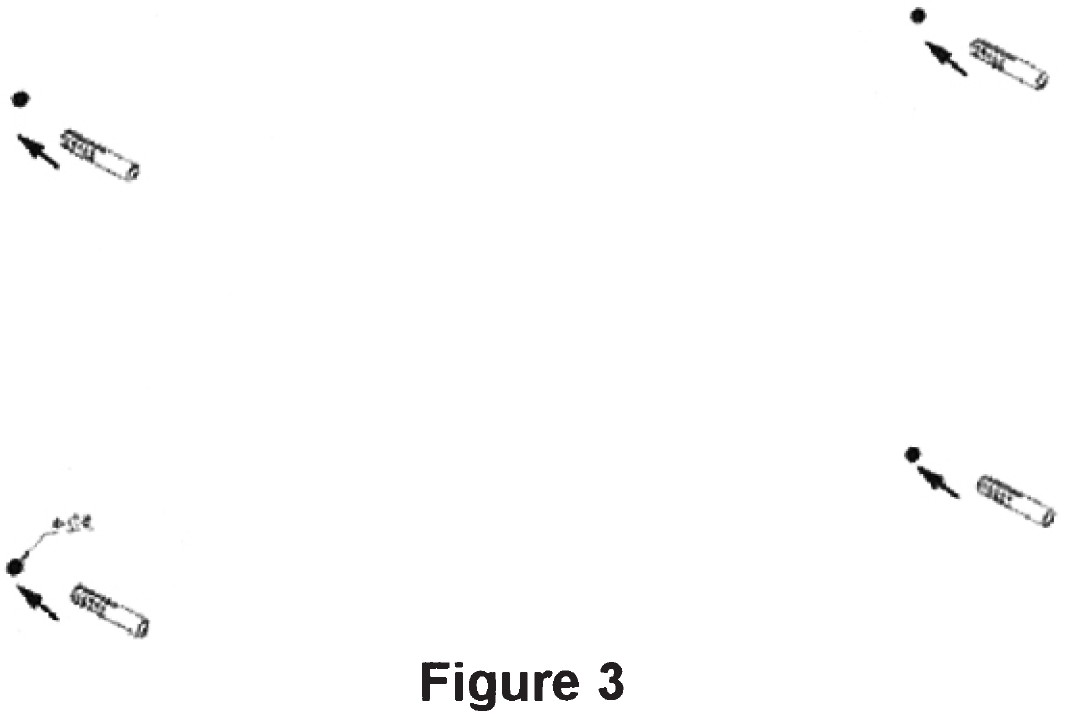
Step 3: Take away the mounting bracket and then drill four 8mm diameter holes on the wall. Insert plastic wall plug into the drilled holes (Figure 3). If installing the appliance on a solid wood wall there is no need to drill the holes in the wood and no need for the plastic wall plug.
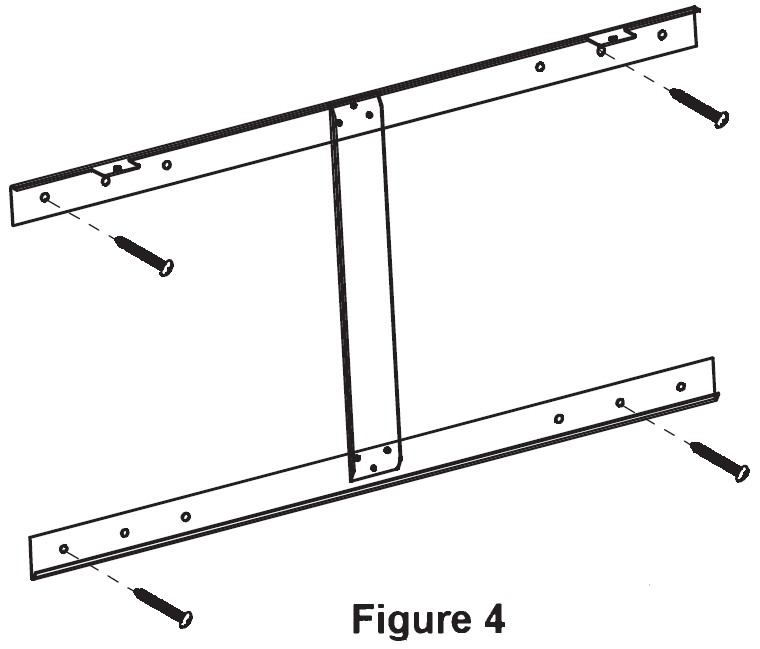
Step 4: Fix the mounting bracket using four M5×8 screws (Figure 4).
Step 5: Hang the appliance on the hooks at the bottom of the bracket and push the top of the appliance into the mounting bracket. Now fix the appliance to the mounting bracket by refitting the two M5×8 screws which were removed in step 1(Figure 5).

Step 6: Arrange the decorations (Pebbles, or Firelog) along the inset window ledge at the front of the firebox.
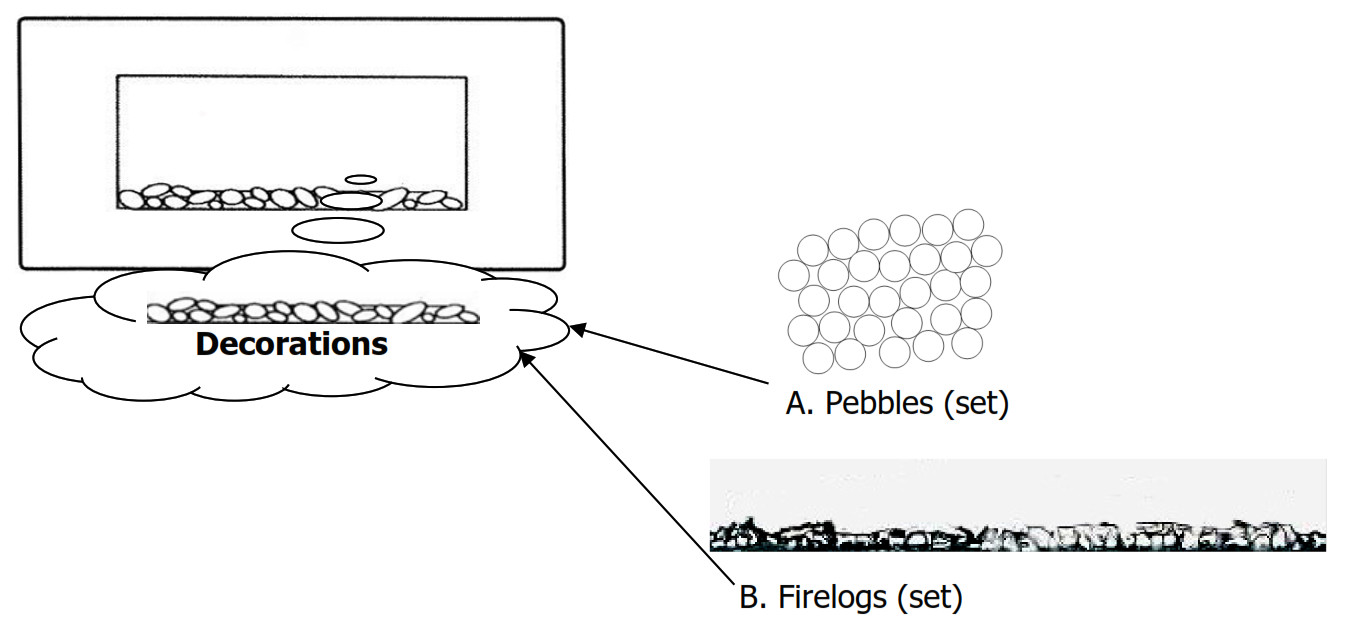
NOTE! Use care when moving the fireplace as the stones may shift positions.Before assembling the Front Fascia, you have 2 options to arrange the decorations along the inset window ledge at the front of the firebox.The two kinds of decorations are pebbles, and firelogs.
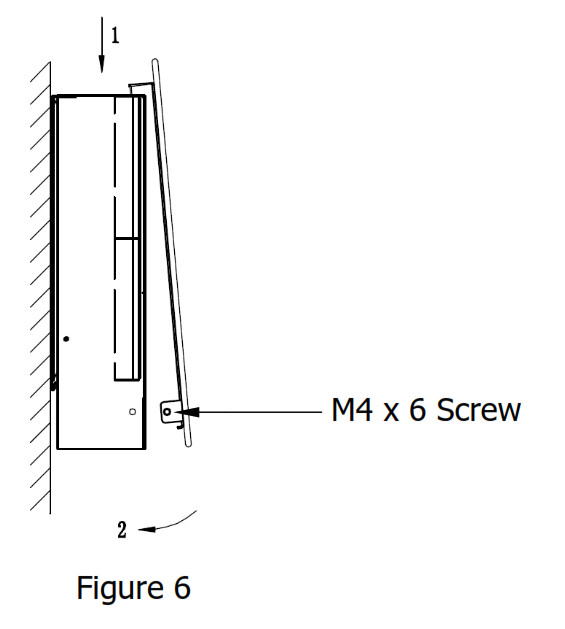
Step 7: Fit the appliance front fascia as shown below. (Figure 6) Secure the fascia by fasten two M4×6 screws on both side.
OPERATING INSTRUCTIONS
CAUTION! THE UNIT’S POWER CORD MUST BE CONNECTED TO A PROPERLY EARTHED AND PROTECTED 240V OUTLET. ALWAYS USE EARTH FAULT PROTECTION WHERE REQUIRED BY THE ELECTRICAL CODE.
This appliance can be operated by both a remote control and a manual keypad. Once the unit has been properly connected to an earthed electrical socket-outlet ensure the manual On/Off switch, located on the right-hand side of the appliance, is in the ‘ON’ position.
MANUAL ON/OFF SWITCHThis switch turns the appliance on/off. The manual on/off switch must be in the ‘ON’ position when using both remote and manual operation.
WARNING! DO NOT OPERATE THE UNIT IF IT IS DAMAGED OR HAS MALFUNCTIONED. IF YOU SUSPECT THE UNIT IS DAMAGED PLEASE CALL A QUALIFIED SERVICE TECHNICIAN TO INSPECT AND TO REPLACE ANY PART OF THE ELECTRICAL SYSTEM IF NECESSARY.
Your BFM fireplace/heater unit comes in four distinct parts:The fireplace unit itself, the fascia, the pebble set, and the Remote Control.
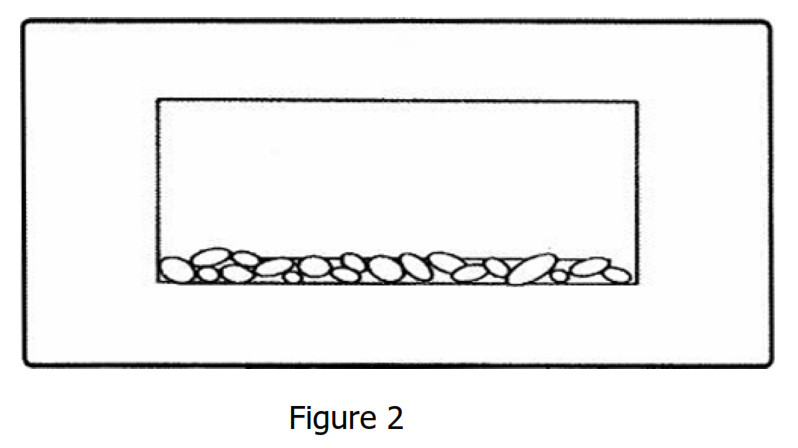
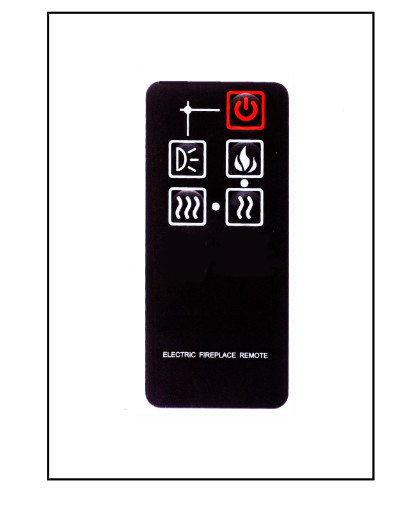
Figure 3
ELECTRICAL SPECIFICATIONSVoltage: 230 V AC, 50 HzTotal Watts: 2X900 WattsDimensions: 916(686)mm x 110mm x 357mm
- The Fireplace/Heater Unit
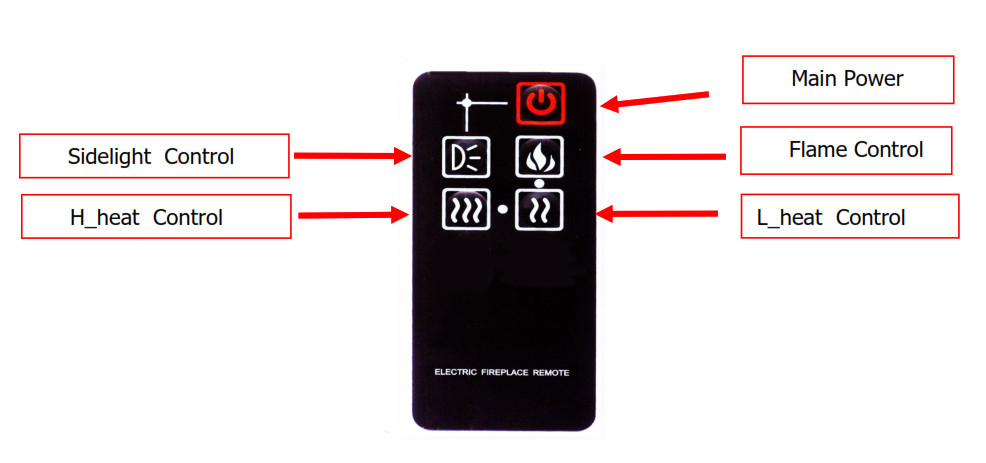
On the top right side plate of the fireplace/heater unit is the control panel. This panel contains the buttons to properly operate the fireplace/heater unit. Refer to the below figure for placement of the control buttons.
Fireplace/Heater Manual Keypad Switch
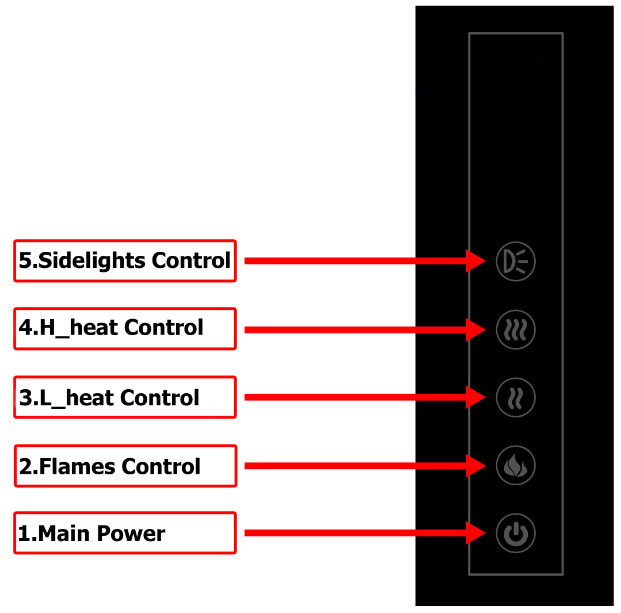
The upper segment of the control panel, (1), is the Main Power button. As the name infers, the Main Power button controls the overall power to the fireplace/heater unit. Pressing the button once turns power on to the entire unit, and pressing the button again will turn the power off to the entire unit. If you find that none of the other buttons appear to work, check to make sure that Main Power is turned on to the unit.
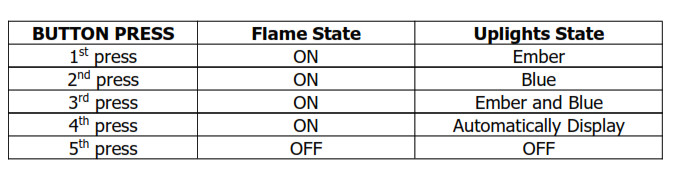
The next segment, (2), is the Flames Control button. Like the Main Power button, it controls the flames and uplights of the fireplace/heater unit. Pressing the button once turns flames on and uplights display ember and pressing the button twice the flames still on but the uplights display blue, you can control the flame and uplights as the following:
The next segment, (3), L_heat Control, is a low heat button for the heater. Pressing the button once, the low heat function is on and pressing the button twice, the low heat function is off.
OPERATING INSTRUCTIONS
The next segment, (4), H_heat Control , is a high heat button for the heater. Pressing the button once ,the high heat function is on, and pressing the button twice ,the high heat funciton is off.
When the Main Power button is on, pressing and holding this H_heat Control button 10 seconds to enter heating function locked mode, the uplights will flicker 6 times. Then every time you press the button, there are 6 times flash only the uplights but no heating function in this mode. Anew pressing and holding this H_heat Control button 10 seconds, this mode will be unlocked after 6 times flash. When you press the L_heat button or the H_heat button, The uplights will flash one time to indicate heat function is on or off.
The last segment, (5), is the Sidelights Control button. Like the Flames Control button,Pressing the button once ,the sidelights display ember,and pressing the button twice,it will show you the blue sidelights .You can control the sidelights color as the following:
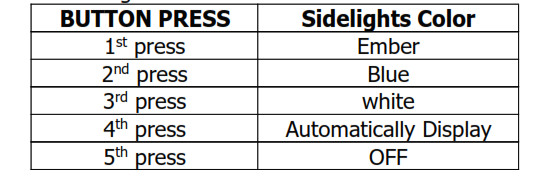
The automatically mode will show you: the ember sidelights is on and running 10 seconds, then off; then the blue sidelights is on and running 10 seconds, then off; then the white sidelights are on and running 10 seconds, then off; and then the ember sidelights is on and running 10 seconds, then off…. This mode will be circulating running.
NOTE: If this product experiences exceptionally high temperature, it may automatically stop heating. If this occurs the product should be unplugged or isolated from the main supply for a period of 30 seconds before the power is then re-supplied.
OPERATION
- The Fireplace/Heater Remote Control
A great feature of the BFM Fireplace/Heater unit is the small remote control. This remote combines all the functions of the front panel controls of the fireplace/heater with the convenience of not having to leave the comfort of your seat to change the settings of the fireplace/heater.
The first thing to do with the remote control is to install the battery. The battery is supplied with the remote control. Replacement batteries can be purchased at any electronics store. The part number for the battery is CR2032.
1. Turn the remote control over, and locate the battery cover.
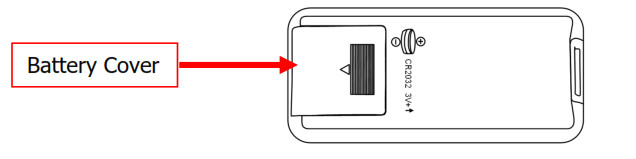
2. Remove the battery cover by sliding it towards the bottom end of the remote control.
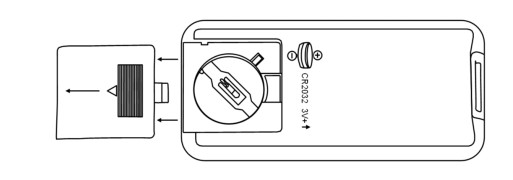
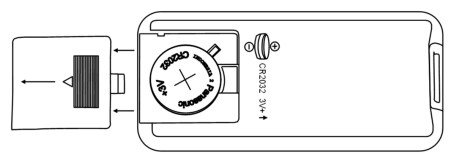
3. The battery has two sides, one with a button feature, and the other is flat.
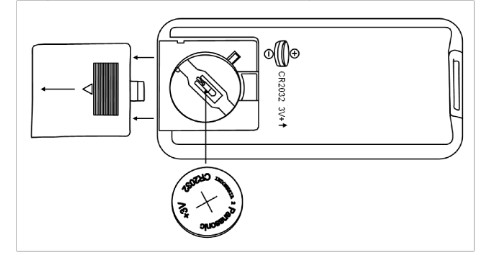
4. Insert the battery with the button side into the remote control, and make sure the battery is firmly seated into the remote control.
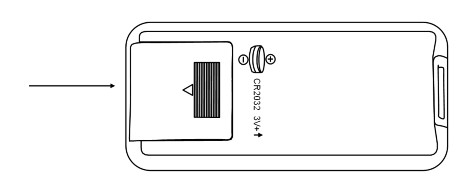
5. Reinstall the battery cover, making sure it clicks into position.
6. Turn the remote over and aim it towards the fireplace/heater unit.7. Press the power button on the upper left, and see if the flames on the fireplace/heater turn on or off.8. If nothing appears to happen, check to make sure the battery is installed correctly, and try again.
- Remote Control Button Functions
The remote control mimics the buttons on the front panel of the fireplace/heater. The remote control does not have a display function. The buttons on the remote control work as follows:
These remote control buttons work exactly the same as the buttons on the front panel of the fireplace/heater. See the FIREPLACE/HEATER section above to review the side plate panel button functions, and familiarize yourself with the remote control.
NOTE: Whatever the heat function is on or off,when you press the low heat button or the high heat button, the uplights will flash one time at 0.3 second interval.NOTE: Ensure the batteries are installed properly in the remote control handset.NOTE: The effective range of the remote control is up to 4 meters (13 feet).NOTE: The remote control only can carry on the simple functional operation to the product, but it has no function to enter Fahrenheit temperature adjustment mode.
MAINTENANCE INSTRUCTIONS
- Always remove the plug from the socket-outlet and allow the heater to cool down before cleaning it.
- Wipe the exterior surface of the appliance occasionally with a soft damp cloth (not dripping wet) and dry the exterior surface before operating the heater.
WARNING!Do not immerse the heater in water.Do not use any cleaning chemicals such as detergents and abrasives.Do not allow the interior to get wet as this could create a hazard.
- Light accumulated dust may be removed from the appliance with a soft dry cloth.
- To store away the appliance put it back into its original packaging and store it in a clean dry place.
- In the event of malfunction do not try to repair the heater yourself as this may result in a fire hazard or electric shock.
NOTE: The blower motor and flame motor are pre-lubricated for a durable period of time and need no further lubrication or maintenance. As the dust particles will accumulate on/in the fireplace, so periodic cleaning/vacuuming of the fireplace is recommended.
ENVIRONMENT
 Meaning of crossed-out wheeled binDo not dispose of electrical appliances as unsorted municipal waste.Use separate collection facilities. Contact your local government for information regarding the collection services available in your local area. If electrical appliances are disposed of in landfills or dumps hazardous substances can leak into the groundwater and get into the food chain, thus damaging your health and well-being. When replacing old appliances with new ones the retailer is legally obligated to take away you old appliance for disposal free of charge.
QUALITY GUARANTEE
BFM EUROPE LTDGORDON BANKS DRIVE, TRENTHAM LAKES STOKE-ON-TRENT ST4 4TJTechnical Queries: 01782 339039Service Fault Enquiries: 0844 7700 169Please note there are no user-replaceable parts on this appliance.
Celsi Wall Mounted Electric Heater With Remote Control User Manual[Model: CFECRORE & CFECEORE] – Celsi Wall Mounted Electric Heater With Remote Control User Manual[Model: CFECRORE & CFECEORE] –
[xyz-ips snippet=”download-snippet”]