
CERTA Variable Speed Orbital Car Polisher Waxer CTVSORBWAXA

SAFETY & WARNINGS
Before operating the polisher, carefully read through and understand all the safety information and warnings in this user guide. Failure to follow all instructions may result in fire and/or serious personal injury.
Important Information
- Always wear eye protection when using any power tool.
- The operation of a power tool can result in foreign objects being thrown into your eyes which could be harmful. Before using, always wear safety goggles or safety glasses. Eye protection with side shields is recommended for maximum protection.
- Do not wear loose clothing or jewellery and always tie back long hair while operating a power tool
Work Area
- Keep your work area clean and well lit. Cluttered benches and dark areas invite accidents.
- Do not operate power tools in explosive atmospheres, such as in the presence of flammable liquids, gases or dust. Power tools create sparks which may ignite the dust or fumes.
- Keep bystanders and children away while operating a power tool. Distractions can cause you to lose control.
Electrical Safety
- Never remove the grounding prong or modify the plug or tool in any way.
- Do not use any adaptor plugs. Check with a qualified electrician if you are in doubt as to whether the outlet is properly grounded.
- If the tool should electrically malfunction or break down, grounding provides a low resistance path to carry electricity away from the user.
- Avoid contact with grounded surfaces such as pipes, radiators, ranges, or refrigerators. There is an increased risk of electric shock if your body is grounded.
- Do not expose power tools to rain or wet conditions. Water entering a power tool will increase the risk of electric shock.
- Do not abuse the power cord. Never use the cord to carry the tools or pull the plug from the outlet. Keep cord away from heat, oil, sharp edges or moving parts. Replace damaged cords immediately.
- Damaged cords increase the risk of electric shock.
- When operating power tools outside, always use an outdoor extension cord rated for outdoor use.
- Power tool plugs must match the outlet. Avoid body contact with earthed or grounded surfaces such as pipes, radiators and refrigerators. There is an increased risk of electric shock if your body is earthed or grounded.
Personal Safety
- Stay alert. Watch what you are doing and use common sense when operating a power tool. Do not operate while tired or under the influence of drugs, alcohol or medication. A moment of distraction while operating power tools may result in serious personal injury.
- Avoid accidental starting. Be sure the switch is off before plugging in. Carrying tools with a finger on the switch or plugging in tools that have the switch on invites accidents.
- Remove adjusting keys or switches (if applicable) before turning on the tool. A wrench or key that is attached to a rotating part of the tool may result in personal injury.
- Do not overreach. Keep proper footing and balance at all times. Proper footing and balance enable better control of the tool in unexpected situations.
- Use safety equipment. Always wear eye protection. Dust mask, non-skid safety shoes, hat or hearing protection must be used for appropriate conditions.
Tool Use and Care
- Do not force tool. Use the correct tool for your application. The correct tool will do the job better and safer at the rate for which it was designed.
- Do not use tool if switch does not turn on or off. Any tool that cannot be controlled with a switch is dangerous and must be repaired.
- Disconnect the plug from the power source before making any adjustments, changing accessories or storing the tool. Such preventive safety measures reduce the risk of starting the tool accidentally.
- Store idle tools out of reach of children and other untrained persons. Tools are dangerous in the hands of untrained persons.
- Check for misalignment or binding of moving parts, breakage of parts and any condition that may affect the tools operation. If damaged, cease use immediately and contact Kogan.com for support.
- Use only accessories that are intended for this tool. Accessories that may be suitable for one tool, may become hazardous when used on another tool.
- Tool service must be performed only by qualified repair personnel. Service or maintenance performed by unauthorized personnel could result in a risk of injury.
Manufacturer: Zhejiang Chengkang Machinery & Electrical Product Manufacturing Co.,Ltd. Sheng Pan Rd., Industrial Zone, Centre Ave. Wenling City, Zhejiang Province, China 317500.Applicable Company: Kogan Australia Pty Ltd.139 Gladstone Street, South Melbourne, Victoria 3205 Australia.Authorised Representative: Kogan Australia Pty Ltd.139 Gladstone Street, South Melbourne, Victoria 3205 Australia.
OVERVIEW
Polisher
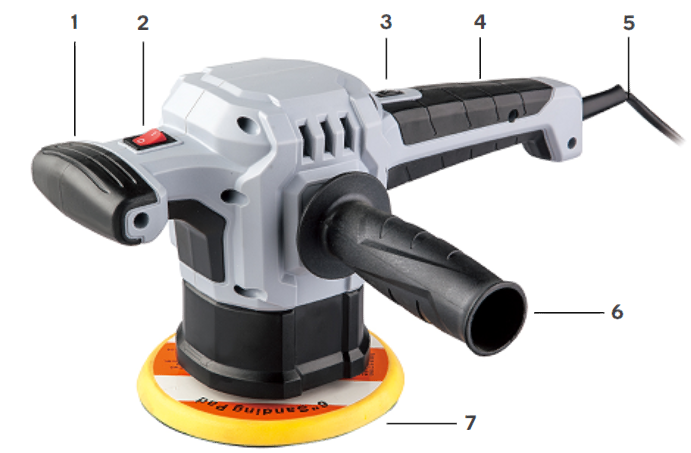
- Front handle
- Power switch
- Variable speed dial
- Rear handle
- Power cord
- Side handle
- Disc
Accessories

ASSEMBLY
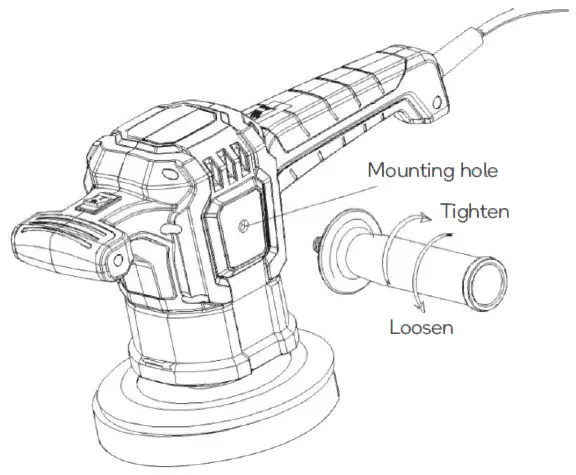
Side handle
- Attach the side handle to the polisher by inserting it into the mounting hole and rotating it in a clockwise direction.
- To remove the side handle, rotate it in a counter-clockwise direction.Note: It is recommended to use the side handle at all times to maintain complete control of the tool.

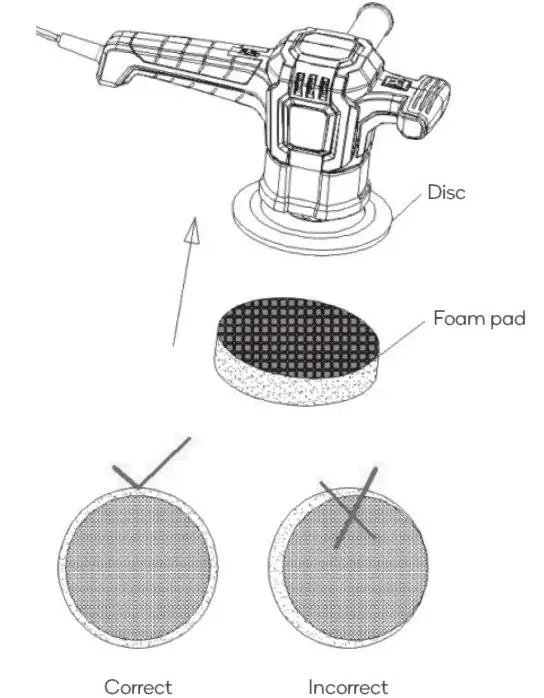
Attaching the foam pad
- Before changing pads, ensure the polisher is turned off and unplugged from the power outlet.
- Position the disc with the centre of the foam pad and press the pad firmly into the disc.Note: Ensure the foam pad is seated properly before operating the polisher. A poorly positioned pad may result in the pad being thrown from the disc, causing personal injury.
Attaching a sanding pad
- Before changing pads, ensure the polisher is turned off and unplugged from the power outlet.
- Place the polisher on a flat, stable surface with the disc facing upwards.
- Align the sanding pad with the centre of the disc and press the pad firmly onto the disc.Note: Ensure the sanding pad is seated properly before operating the polisher. A poorly positioned pad may result in the pad being thrown from the disc, causing personal injury.
Changing the disc
- Before changing the disc, ensure the polisher is turned off and unplugged from the power outlet.
- Insert the supplied 12mm wrench under the disc and use it to hold the spindle in place. The disc may need to be rotated by hand to allow access to the flat sides of the spindle.
- While keeping the wrench stationary, remove the disc by rotating it in a counter-clockwise direction.
- To replace the disc, reverse the above procedure.

Fitting a polishing bonnet (not included)
- Before attaching a polishing bonnet, ensure the polisher is turned off and unplugged from the power outlet.
- Stretch one side of the bonnet over the polishing pad.
- Gently pull the elastic edging over the polishing pad evenly and slowly. Pulling too hard on the foam pad may result in damaging the bonnet or pad.Note: Ensure the bonnet is properly attached to the pad before turning the polisher on. An improperly fitted bonnet may be thrown off and cause injury.
Tip: Keep the polishing bonnet clean.To avoid contaminating the bonnet with debris, always place the polisher with the pad facing up or its side when taking a break or when not in use. Dust or dirt particles can stick to a wet bonnet which can scratch the vehicle surface.
OPERATION
Before first use:It is very important that the vehicle be clean and dry before applying any wax or polish. Wax protection will wear longer and protect better if applied directly to the paint.Wash the car to remove all dirt and oil using a car wash which had specially formulated to clean the vehicle’s finish. Pay special attention to areas that capture excessive layers of dirt – around wheel wells and next to the bumpers.Washing the vehicle:Before you begin remove anything that may accidentally scratch the vehicle such as a belt or jewellery.
- Pre-wash: Rinse the vehicle down thoroughly, making sure all loose dirt and debris has been removed prior to washing.
- Wash: Using a soft brush or microfiber wash mitt, begin washing the vehicle at the top and work down. Dip the brush or mitt into a soap bucket to rinse away any trapped dirt and to apply more soap.
- Rinsing: Starting with the roof of the vehicle rinse thoroughly with clean water directly from the hose. After the first rinsing go back and make sure all soap residues have been rinsed away.
- Drying: Use a microfiber towel or synthetic drying towel such as PVA to wipe the vehicle dry starting at the top and working down.
Using the polisher:Before using the polisher, ensure you read and understand the directions suppled with your chosen car care product (polishes, waxes, cleaners etc.).
- Evenly apply the appropriate amount of car care product directly to the polishing pad/bonnet.Note: If you apply the polish to the pad in thin rings, the polish with leave thin “polished” rings over the surface of the paint, while other areas will remain unpolished.
- Grasp the polisher firmly with both hands and position the polisher with the pad against the surface of the vehicle. Place the power switch in the on position. Note: Always start the polisher on or against the surface of the vehicle. This will help prevent slinging wax onto unwanted areas of the vehicle such as glass and wheels.
- Move the polisher back and forth in a sweeping motion. Do not apply too much pressure, allow the polisher to work under its own weight.
- Remove any product residue with a soft cotton cloth.
Handling:
- The polisher is specially designed to offer ease of use on all areas of the vehicle.
- Use the side handle & front handle for bonnet, trunk or side panel areas.
- Use the rear handle for roof panels or areas where extra reach is needed.
Cord management:
- To avoid entanglement, place power cord over your shoulder during operation.
- Position the power cord so that it will not get caught on tools, parts of the vehicle or pose a tripping hazard during operation.
WARNING: Inspect the condition of the power cord before each use. If it shows any sign of damage, cease use immediately and contact Kogan.com for support. Never use a power tool with a damaged cord as this could lead to electrical shock, resulting in injury or death.
![]() Need more information?We hope that this user guide has given youthe assistance needed for a simple set-up.For the most up-to-date guide for your product,as well as any additional assistance you may require, head online to help.kogan.com
Need more information?We hope that this user guide has given youthe assistance needed for a simple set-up.For the most up-to-date guide for your product,as well as any additional assistance you may require, head online to help.kogan.com
[xyz-ips snippet=”download-snippet”]