CharGenius QL-M210 Fast Wireless Car Charger User Manual
Overview
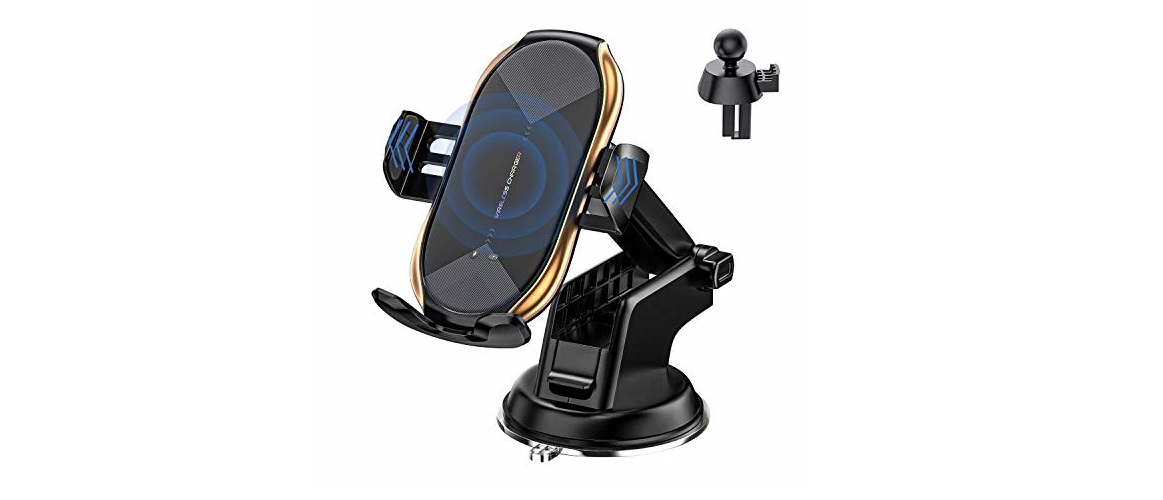
What is included
Qi wireless Charger X 1
Suction Cup Mount X 1
Air Vent Clip X 1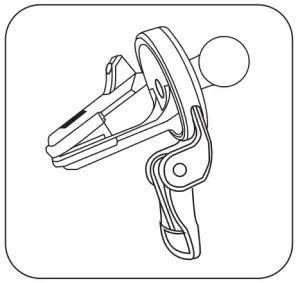
CD Slot Mount x 1 +Spacer x 3 (1.5 ~2.5mm)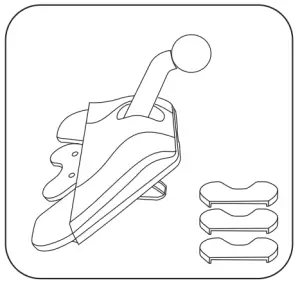
QC 3.0 Car Charger X 1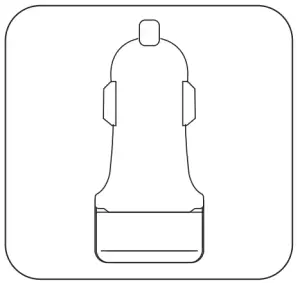
USB Type-C Cable X 1
Features:
- All-in-one mounting pack, multiple mounting option for mounting the wireless charger in your car.
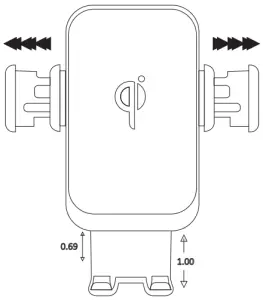
- Smart touch button and LED indicator on both sides, fully automatic induction wireless charging, one hand operation.
- Built-in wireless charging transmitter, support Qi wireless charging for all Qi-enabled smartphones.
- Adjustable bottom tray, suitable for different size of smartphones, anti-slip silicone on both arms, USB Type-C charging port.
- Built-in stepper motor, works without noise.
- NPO capacitors, lower charging temperature and high charging efficiency.
- Thermal protection sensor for dialing back charging power for safe operation.
- Standby mode: solid green indicator; Charging mode: solid blue indicator.
- FOD function: when put metal or magnet objects on the charger, the blue and green LED indicator light flash 6 times for reminding. Perfect protective function based on over-voltage, over-current, over-temperature and short-circuit.
- Built-in Super capacitor that reserve power after car engine shut off / power source off. Be able to open and close the clamps few times without power.
Product specification:
| Wireless Charger | |
| Input | DC5V = 2A DC9V=1.67A |
| Output | 10W/7.5W/5W |
| Product Standard | Qi, CE, FCC, ROHS |
| Charging Distance | <= 8 mm |
| Charging Efficiency | ≤ 80% |
| QC 3.0 Car Charge Adapter | |
| Input | DC 12˜24V |
| Smart Output | DC 5V=2.4A |
| QC 3.0 Output | DC 3.6˜6.5V = 3A, 6.5˜9V = 2A, 9˜12V = 1.5A |
| Product Standard | CE, FCC, ROHS, Qualcomm Quick Charge 3.0 |
Product Installation
Install Dash Mount Holder:
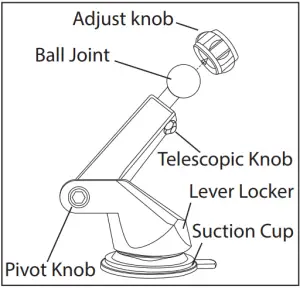
- Insert the adjuster knob into the ball joint onto the Car Mount Holder.
- Push the ball joint into the socket at the back of the wireless charger unit and fasten the adjuster knot. Adjust the wireless holder to the optimal viewing angle and tighten the nut.
- ***Important*** Please clean the dashboard or windshield first before mounting the car mount holder. This is to prevent the dust or small particle to be mounted inside the suction cup. Any object inside the suction cup will lead to air gap and cause the mount to fall.
- Once clean the dashboard or windshield, place the mount holder to your desire spot, then push the suction cup against the dashboard or windshield. Press the locker to the bottom. Note: The locker should be facing to you. Mounting in opposite direction will cause arm holder unbalance and will fall.
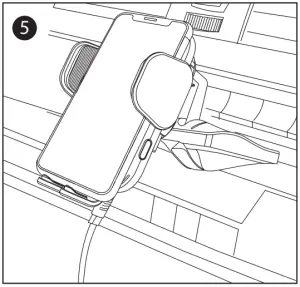
- Once the car mount holder is mounted, adjust the bottom tray on the charger holder and align your phone on the charger.
- Plug in the USB Type C cable into the charging port.


Install Air Vent Clip:
- Insert the adjuster knob into the ball joint onto the Air Vent Clip.
- Push the ball joint into the socket at the back of the wireless charger unit and fasten the adjuster knob.
- Insert the Vent Clip into the car’s air vent, adjust the wireless charger unit to the optimal viewing angle. ***Important*** DO NOT insert the adjustable stand into the car vent. The adjustable stand needs to be adjusted on the outside of the vent so it will support the wireless charger unit more stable and secure.
- Once the Air Vent Clip is mounted, adjust the bottom tray on the charger holder and align your phone on the charger.
- Plug in the USB Type C cable into the charging port.

Install CD Slot Mount:
- Insert the adjuster knob into the ball joint onto the CD Slot Mount.
- Push the ball joint into the socket at the back of the wireless charger unit and fasten the adjuster knob. Place “rubber spacer” on the center of mount insert. Try with 1.5 mm rubber spacer first and see if the mount is secured, if not, change to 2.0 or 2.5mm. ***Important*** Adjust ball joint pole between 45 ~80 degree for better viewing angle and stable hold.
- Insert the mount into CD slot and lock the button to secure the mount.
- Once the CD Slot Mount is mounted, place your phone on the charger and adjust the angle for best viewing.

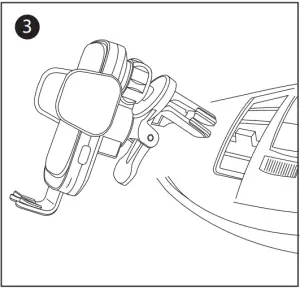
Mount your smart phone
- Connect the USB cable to the QC 3.0 Port (Orange Color) on the Car Charger Adapter.
- Plug in the Car Charger Adapter into cigarette lighter or power outlet in your car.
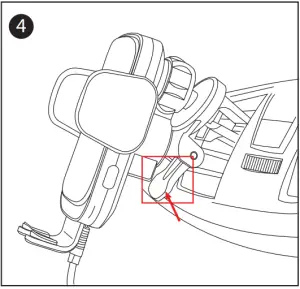
- Connect the Type-c cable head into the charging port on the rear of the charger unit.
- Connect the Type-c cable head into the charging port on the rear of the charger unit.
- Please use the product correctly according instructions.
- Please do not disassemble the product or throw it to fire and water, to avoid leakage caused by electrical short circuit.
- Please do not use wireless charger in high temperature, wet, corrosive environment, to avoid leakage from caused by damaged circuit.
- Please do not put wireless charger close to cards with magnetic stripes or chips (ID card, credit card etc.) to avoid demagnetization 5. Please keep wireless charger at least 20 CM distance away from implantable medical device (heart pacemaker, Implantable cochlea etc.) to avoid potential interferences 6. Please do safekeeping, do not let your kids treat wireless charger as toy to avoid unwanted accidents.
LED mode:
| Workiung state | LED light color |
| Working State | Blue, Green light on,
then Solid Green |
| Charging Mode | Solid Green |
| Standby Mode | Solid Blue |
| FOD Warning | Flashing Blue and
Green 6 times for warning |
| Overheat, short-
circuit detected |
Light Off |
| Charging Complete | Solid Blue |
Supports Charging with Phone Case
Charge your phone without taking off the case. Thickness of the case should be less than 6mm / 0.24 inch.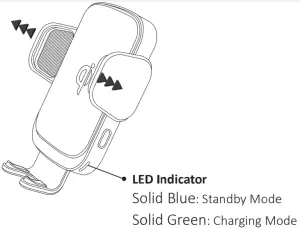
Do Not Use if your phone have any of this item
Metal Ring
Magnetic
PopSocket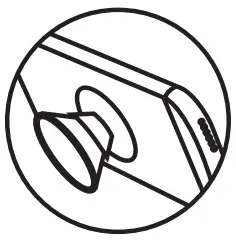
Case w/ Card Holder
Attention
- Please use the product correctly according instructions.
- Please do not disassemble the product or throw it to fire and water, to avoid leakage caused by electrical short circuit.
- Please do not use wireless charger in high temperature, wet, corrosive environment, to avoid leakage from caused by damaged circuit.
- Please do not put wireless charger close to cards with magnetic stripes or chips (ID card, credit card etc.) to avoid demagnetization.
- Please keep wireless charger at least 20 CM distance away from implantable medical device (heart pacemaker, Implantable cochlea etc.) to avoid potential interferences.
- Please do safekeeping, do not let your kids treat wireless charger as toy to avoid unwanted accidents.
- No single mounting option will fit every cars. Some mounting option will cause more vibration while driving, please try other mounting method for best fit.
Troubleshooting:
- Suction Cup Mount fall or not stable.Solution:a) Try to clean the surface (dashboard or windshield) with a wet tower.b) Rinse the suction cup with warm water and air-dry the suction cup gel pad. The sticky gel will regain its function and can be reusable in the long run.
- Wireless charger is not charging the phone. Solution:a) Try to connect the USB cable into another power source or connect to a different car charger adapter.b) If you are using the car charger adapter from 3rd party vendor, please make sure the adapter is functional.
- Parts broken after some period of usage.Solution:a) Please contact us at and we would glad to send you a replacement part. All our products carry 1-year warranty and lifetime support.
FCC Statement:
Changes or modifications not expressly approved by the party responsible for compliance could void the user’s authority to operate the equipment.
This equipment has been tested and found to comply with the limits for a Class B digital device, pursuant to Part 15 of the FCC Rules. These limits are designed to provide reasonable protection against harmful interference in a residential installation. This equipment generates uses and can radiate radio frequency energy and, if not installed and used in accordance with the instructions, may cause harmful interference to radio communications. However, there is no guarantee that interference will not occur in a particular installation.
If this equipment does cause harmful interference to radio or television reception, which can be determined by turning the equipment off and on, the user is encouraged to try to correct the interference by one or more of the following measures:
- Reorient or relocate the receiving antenna.
- Increase the separation between the equipment and receiver.
- Connect the equipment into an outlet on a circuit different from that to which the receiver is connected.
- Consult the dealer or an experienced technician for help.
This device complies with part 15 of the FCC rules. Operation is subject to the following two conditions (1) this device may not cause harmful interference, and (2) this device must accept any interference received, including interference that may cause undesired operation.
QC 3.0 stands for Qualcomm Quick Charge 3.0, and is a product of Qualcomm Technologies, Inc. Qualcomm is a trademark of Qualcomm Incorporated, registered in the United States and other countries. Quick Charge is a trademark of Qualcomm.
The QC 3.0 car charger adapter included in this package is a Qualcomm Quick Charge 3.0 official certified product.
Qi Certification is the Wireless Power Consortium’s product certification program for wireless charging devices. The WPC uses a network of independent authorized test labs around the globe that test specific properties for safety, interoperability, and usability, each of which can involve multiple test procedures. Only Qi-Certified products are allowed to carry the Qi logo.
CharGenius is a trademark of Emperor International Corporation, registered in the United States.
THANK YOU SO MUCH
For Purchasing CharGenius Product.
Our goal is to make sure that our customers are completely satisfied with the purchase.
We Want You to Be Happy!
Was there any damage to the product or was something not quite right after you received the package?No problem! Please reach out to us right away.
Confused or Problems about using the Product?
- Open the camera on your smart phone, point and scan the code. Wait for your device to recognize the QR code. Tap the notification to open the link.
- . A link will open your email app. Simply write the problems and questions you have and click send it. We will get back to you as soon as we can.

 report this ad
[xyz-ips snippet=”download-snippet”]