![]()
Milkmade Non-Dairy Milk MakerModel: CW-NMMPlease read this manual carefully before using the Milkmade. Save these instructions.
WELCOME!Dear ChefWave Customer,Congratulations on your purchase of the ChefWave Milkmade Non-Dairy Milk Maker. To ensure your safety and many years of trouble-free operation, please read this manual carefully before using this product and keep it in a safe place for future reference.We hope you enjoy your new ChefWave Milkmade Non-Dairy Milk Maker.
Sincerely,

The ChefWave TeamFor technical assistance and warranty service, please email us at [email protected]
| @ CHEFWAVEKITCHEN | |
| @ MYCHEFWAVE |
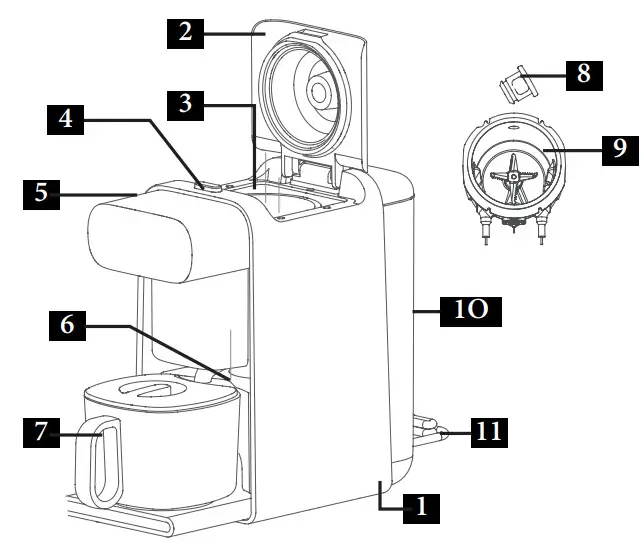
PARTS & ACCESSORIES
- Main Unit
- Grinding Compartment Cove3. Grinding Compartment
- Cover Lock Release
- Display Panel
- Wastewater Basin
- Glass Pitcher
- Steam Cover
- Blade
- Water Reservoir
- Power Cord and Plug
DISPLAY CONTROL PANEL
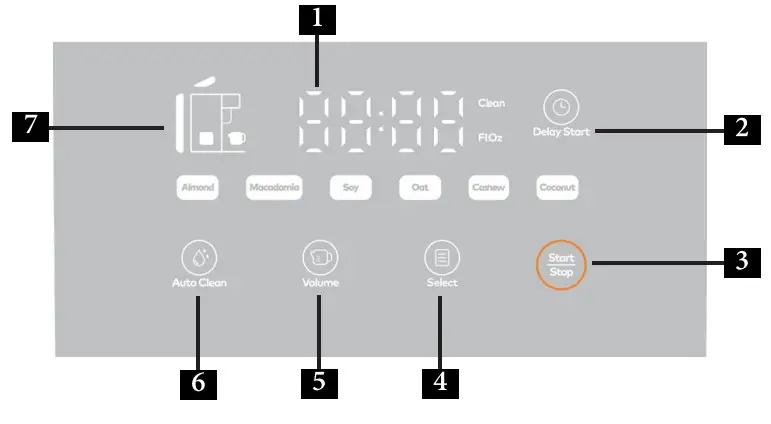
- Digital Display
- Delay Start Button
- Start/Stop Button
- Select Button
- Volume Selection Button
- Auto Clean Button
- Error Indicator
SAFETY INSTRUCTIONS
When using electrical appliances, basic safety precautions should be observed. Please read and follow these warnings and instructions:
- This appliance is intended for household countertop use only. Do not use this appliance for commercial purposes. Do not use it outdoors. Using it for unintended purposes will invalidate the warranty.
- Keep the appliance and cord out of the reach of children and pets. Appliance should only be used under adult supervision.
- Do not damage the power cord or plug in any way. If the appliance or its power cord has been damaged, it must be replaced by the manufacturer, a service technician, or a similarly qualified person, in order to avoid a hazard. Do not attempt to modify this appliance.
- Do not use the machine for purposes not specified in this manual.
- To protect yourself from electric shock, do not immerse the main unit, cord, or power plug in water or any other liquid.
- Only plug the machine into a grounded outlet. Be sure to use a power outlet with a rated voltage of 120V.
- First, attach the plug to the appliance, and then plug the cord into the outlet. Keep the cord away from hot surfaces. Do not touch the plug or operate the unit with wet hands.
- Do not attempt to alter, disassemble, or repair the machine.
- Do not use external force on the dispense valve.
- The appliance should always remain unplugged from the outlet when not in use. After operating, turn off the power and gently unplug the machine from the outlet. Do not jerk or pull the power cord. Unplug the unit and let it cool down for 30 minutes before cleaning or storing as the heating element will be hot. Avoid contact with skin.
- Keep the machine cover closed during operation.
- Do not heat the glass pitcher on a stove.
- Do not remove the glass pitcher during operation, as this may cause hot liquid to spray out.
- Avoid contact with the steam cover during automatic cleaning process, as hot steam seeps out of the machine during the cleaning process and may cause harm.
- Take care after operating the machine as the glass pitcher, dispenser, and grinding compartment cover will be hot. Make sure to avoid contact with the skin.
- If there are unprocessed ingredients left inside the grinding compartment after use, employ the automatic cleaning function to clean the compartment.
- When making beverages, make sure to use cold purified water.
- The grinding compartment will become stained when using ingredients with dark pigment.
- After adding ingredients to the grinding compartment, make sure to clean the surrounding area of any food residue so that the grinding compartment cover closes completely.
- Do not disconnect power during automatic cleaning.
- Please note that when using the scheduling function, the duration of operation and time of post-operating alarms may vary slightly; this is normal and will not affect the quality of the beverage. The duration of operation will automatically adjust depending on altitude and voltage.
- If a power outage interrupts operation for more than 30 seconds, do not consume the beverage.
- Take care when washing the grinding compartment as it is quite sharp.
- Ensure that the wastewater basin is installed correctly before beginning the automatic cleaning procedure.
- When making beverages, do not add water directly into the grinding compartment.
Recommendation:
- If the machine is used continuously, make sure to clean the machine and its accessories weekly.
USING THE MILK MADE NON-DAIRY MILK MAKER:
Non-dairy milk programs available:
- Almond
- Macadamia
- Soy
- Oat
- Cashew
- Coconut
Sizes include:
- 10 fl. oz.
- 20 fl. oz.
Note: You do not need to use a nut milk bag to strain the pulp from the milk. The ingredients will be ground up sufficiently to create smooth milk.
- Fill the water tank with 10/20 fl. oz. (as desired). The water level should be at or just above the line.
- Press the “Cover Lock Release” button at the top of the machine to open the grinding compartment. Pour the dry ingredients into the compartment and close the lid.Note: Nuts and soybeans DO NOT require presoaking.
- Place the glass pitcher on the stand, and ensure it is locked in place.
- Press the “Select” button and continue pressing to scroll through the menu. Select the desired non-dairy milk from the list of programs.
- Press the “Volume” button to select the desired volume of milk.
- Press the “Start/Stop” button to begin. If you are making 20 fl. oz. of milk, 00:12 to 00:16 will be displayed on the control panel. If you have selected 10 fl. oz., 00:05 to 00:12 will be displayed.
- The Milk made will remain silent for a few minutes as it begins to steam and presoak the ingredients.
- As the Milk made enters the grinding/blending phase, there will be some noise.
- The Milk made will beep when the milk is ready, and milk will start to flow into the pitcher.
- Enjoy!The actual time it takes to make milk will vary slightly depending on the program and volume you choose. Helpful Tip: Keep the lid securely affixed to the pitcher to reduce the amount of splatter when the Milk made dispenses milk.
Delay Start: If you would like to schedule the Milk made in advance, press the “Delay Start” button on the control panel. Continue pressing the “Delay Start” button until you reach the number of hours you would like to delay the machine. For example, when the display shows 08:00, it indicates that the milk will be made in 8 hours.
Standby Mode: If the machine is not in use for a few minutes, it will go into standby mode. Simply press the “Start/Stop” button to turn the control panel back on.
CLEANING THE MILK MADE NON-DAIRY MILK MAKER:
The machine will automatically enter “Self-cleaning” mode after the milk-making process. The cleaning cycle is a total of seven minutes, as such the control panel will flash 00:07. Check the water tank at the back of the machine. Water should reach the cleaning mark on the water tank. If there is insufficient water in the tank, the machine will beep. Open the lid and pour more water into the tank until it reaches the cleaning mark. Once the lid is closed the cleaning cycle will begin. The Milk made will beep again when it has finished self-cleaning.
After the machine has completed the cleaning cycle, make sure to empty and clean out the wastewater basin with water. The glass pitcher, water reservoir, grinding compartment cover, and steam cover can all be removed, cleaned with water, and air-dried. The grinding compartment should also be cleaned and air-dried with the cover open.
Additional Cleaning Programs
If the self-cleaning cycle doesn’t sufficiently clean the machine, you may perform an additional cleaning cycle. Choose one of the three cleaning programs below, depending on the level of cleaning intensity you prefer.
- Quick Clean – Press the “Auto Clean” button once for a quick clean. 0:03 will be displayed on the control panel and the “Clean” indicator lights up.
- Deep Clean – Press the “Auto Clean” button twice for a deep clean. 0:08 will be displayed on the control panel, and the “Clean” indicator lights up.
- Dry Clean – Press the “Auto Clean” button three times to choose the cleaning program that will clean without water. 0:10 will be displayed on the control panel. Please note: the “Clean” indicator will not light up.
DESCALING THE MILK MADE NON-DAIRY MILK MAKER:
The machine should be descaled once a month to remove hard-water deposits that can clog the heating elements and water passages.
- Fill the water tank halfway with a solution of equal parts cold water and a natural descaling agent (juice of one fresh lemon, lime, or white vinegar).Note: Do not fill the water tank past the max fill line for cleaning.
- Press the “Auto Clean” button and wait for the cycle to complete.
- Discard the wastewater.
- To prevent any vinegary or citric aftertaste from seeping into future cups of milk, refill the water tank with cold water and repeat Steps 2 and 3 again.
TROUBLESHOOTING
|
Error Code |
Problem |
Solution |
| Indicator light will not turn on | Power cord is not properly plugged in | Make sure the power cord is completelyplugged in |
| Display panel malfunction | Contact customer service | |
| Indicator light is on, but the machine does not function properly | No program selected | Select a program |
| The water reservoiris either empty or notadequately filled | Fill the water reservoir to the appropriatewater level and place the reservoir in itscorrect position | |
| Temperature sensor orwater level electrodemalfunction | Contact customer service | |
| The grinding chamber does not intake water | Water pump damaged | Contact customer service |
| Water reservoir filter is blocked | Clean the filter at the bottom of the waterreservoir | |
| The motor runs continuously withoutpausing | Water has seeped into the machine | Contact customer service |
| The machine is overheating | Temperature sensor damaged | Contact customer service |
| Buttons don’t work | System is not fully reset after a brief powerdisruption | Disconnect the power for two minutes beforepowering back on |
| Display panel button malfunction | Contact customer service |
| Ingredients are not completely broken down | Grinding compartment is too full or too empty | Add ingredients according to the recipe |
| Machine failure | Contact customer service | |
| Incorrect program selected | Choose the correct program for the recipeyou are looking to make | |
| Overflow | Incorrect program selected | Choose the correct program function forthe recipe |
| Grinding compartment is too full | Add ingredients according to the recipe | |
| Machine failure | Contact customer service | |
| Burnt pot | Grinding compartment is not completely clean | Make sure the grinding compartment iscompletely clean before use |
| Grinding compartment is too full | Add ingredients according to the recipe | |
| Operating duration is abnormally long | Water temperature is too low | Use standard temperature water |
| Incorrect program selected | Choose the correct program for the recipe | |
| The beverage is not properly dispensed intothe glass pitcher | Glass pitcher is not positioned correctly | Reposition the glass pitcher |
| Dispense valvemalfunction | Contact customerservice | |
| Wastewater is not properly emptied into the excess water basin | Excess water basin is not positioned correctly | Reposition the excess water basin |
| Glass pitcher is not positioned correctly | Reposition the glass pitcher | |
| Dispense valve malfunction | Contact customer service |
| Abnormal noises | Standard machine operation | Occasional noise is normal |
| Abnormal power connectivity | Power disconnects for less than 30 seconds | After reconnecting to power, the operation will resume automatically |
| Power disconnects for more than 30 seconds | After reconnecting to power, the machine will be reset. The remaining ingredients can be processed and removed by pressing the cleaning button. After cleaning, new ingredients may be added. |
ERROR CODES:
| Error Code | Cause | Solution |
| E01 | Gloss pitcher is not positioned correctly | Reposition the glass pitcher |
| E02 | The water reservoir is empty, or the reservoirfilter is clogged | Add water to the reservoir to the correct water line or clean the filter at the bottom of the reservoir |
| E03 | The grinding compartment cover is not installed properly or is missing | Tightly position the grinding compartmentcover |
| E04 | The excess water in the basin is not correctly positioned or is not emptied | Position the excess water basin correctly orempty the wastewater |
| E05 | The motor is overloaded by too many ingredients | Reduce the amount of ingredients and manually clean the machine. The machinewill overflow if using the automatic cleaningfunction when there are too many ingredients. |
| E06 | The upper water electrode is sticky or there are too many ingredients | Clean the water an electrode or reduce theamount of ingredients |
| E07 | Abnormal voltage signal | Using a regulated power supply, test to see if the voltage is below 90V or above 140V |
| E08 | Abnormal internal connection port | Contact customer service |
| E09 | Abnormal internal connection port | Contact customer service |
| E10 | Drink dispense valve is blocked by a foreign object | Disconnect the power. Remove the obstruction and clean the machine. |
| Ell | The temperature sensor detects a circuit error | Contact customer service |
| E12 | The grinding compartment temperature sensordetects a circuit error | Contact customer service |
| E13 | Flowmeter malfunction | Contact customer service |
| E14 | Missing zero-crossing signal | Contact customer service |
| E15 | Grinding compartment heating timeout | Contact customer service |
TECHNICAL SPECIFICATIONS:
- Rating Voltage: 120V
- Rated Frequency: 60Hz
- Rated Power: 1000W
- Weight: 11.7 lbs.
- Product Dimensions: 13.6 x 6.5 x 12.8 inches
CHEFWAVE GUARANTEE
This product is guaranteed against defect in materials and workmanship for a period of one year from the date of purchase. Under this guarantee, the manufacturer will repair or replace any parts found to be defective, provided that the product is returned to one of the authorized service centers. This guarantee is only valid if the product has been used in accordance with the instructions and if it has not been modified, repaired, or interfered with by any unauthorized person or damaged through misuse.
This guarantee does not cover wear and tear nor breakables. This guarantee does not affect your statutory rights nor any legal rights you may have as a consumer under applicable national legislation governing the purchase of goods.
If the product fails to operate and needs to be returned, pack it carefully, enclosing your name and address and reason for returns. If within the guarantee period, please also provide proof of purchase.
Milkmade Non-Dairy Milk Maker
 report this ad
![]()
[xyz-ips snippet=”download-snippet”]