![]()

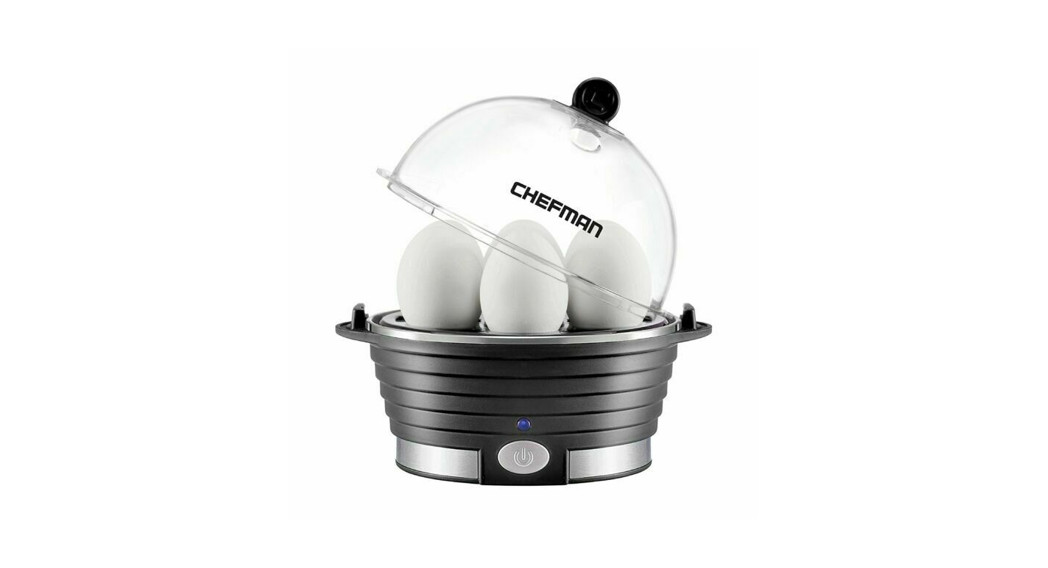
ELECTRICEGG COOKER
This is your one-stop guide to using your product. From the below links, you can jump ahead to a specific document if desired.
QUICK LINKS
- Quick Start Guide
- User Guide
- Recipes
PARTS AND ACCESSORIES
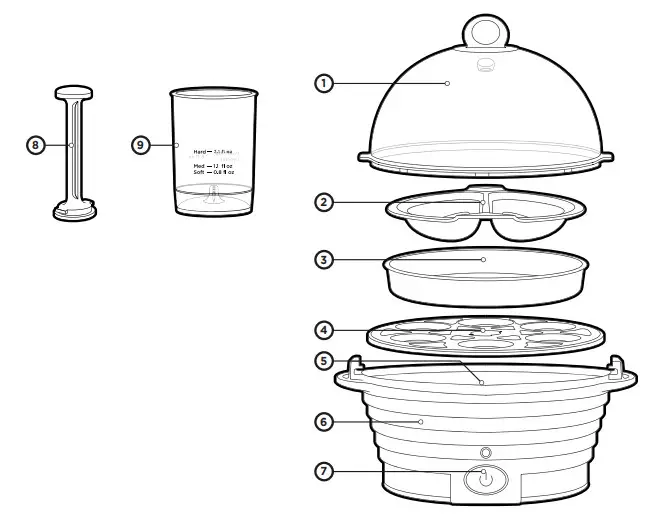
| 1. Lid | 6. Base |
| 2. Poaching Tray | 7. Power Button |
| 3. Omelet Tray | 8. Egg Tray Removal Tool |
| 4. Egg Tray | 9. Measuring Cup and Egg Pin |
| 5. Heating Plate |
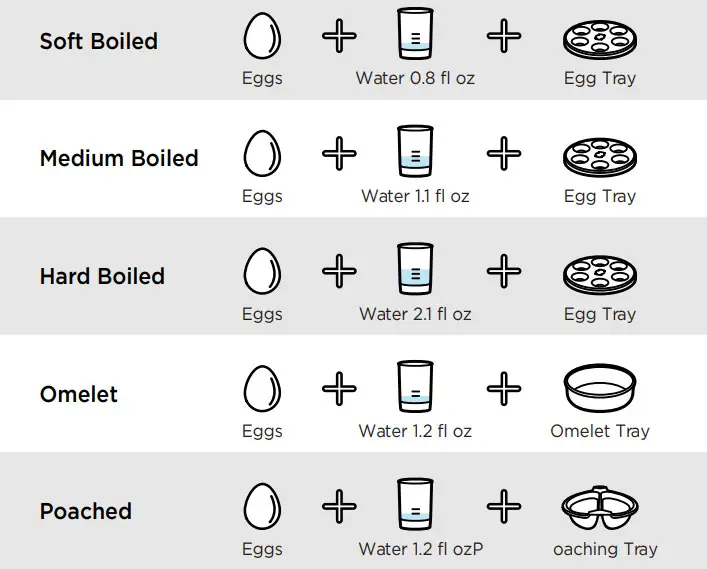
QUICK EGG COOKING FORMULAS
USER GUIDE
Thanks for purchasing a Chefman® appliance.Love to cook or rarely enter the kitchen? We’ve got you covered.Creating innovative kitchen appliances and guides for all skill levels just so happens to be our expertise.
Saving time, reducing stress, and cooking more efficiently are just a few things to enjoy as you create restaurant-quality meals using our products.You’ll embrace a new world of culinary possibilities and cook with confidence. We like to call this the cooking forward effect!So go ahead, promote yourself from cook to head chef in your household. (You deserve it!)From our kitchen to yours,Chefman® Team
| READ ALL INSTRUCTIONS BEFORE USEFor your safety and continued enjoyment of this product, always read the instruction manual before using it. |
SAFETY INSTRUCTIONS
IMPORTANT SAFEGUARDS
WARNING: When using electrical appliances especially when children are present, basic safety precautions should always be followed to reduce the risk of fire, electric shock, and/or injury to persons, including the following:
- To protect against electrical shock, do not immerse the Chefman Egg Cooker power cord or power plug in water or in any other liquid.
- To avoid possible accidental injury, close adult supervision is necessary when any appliance is used by or near children.
- Unplug the appliance from the outlet when not in use, before putting on or taking off parts, and before cleaning the appliance.
- Avoid contact with moving parts.
- Do not operate any electrical appliance with a damaged power cord or power plug or operate it after the appliance malfunctions, or has been dropped or damaged in any manner.
- The use of accessory attachments not recommended by the appliance manufacturer may result in fire, electrical shock or injury to persons.
- Do not use outdoors or for commercial purposes.
- Do not let the cord hang over the edge of the table or counter, or allow it to come into contact with hot surfaces including the stove.
- Do not place appliance on or near a hot gas or electric burner, or in a heated oven or microwave.
- Do not operate Egg Cooker in water or under running water.
- Do not use the appliance for anything other than its intended use.
SAVE THESE INSTRUCTIONS
WARNING: This appliance has a polarized plug (one blade is wider than the other). This plug is intended to fit into a polarized outlet only one way. If the plug does not fit fully into the outlet, reverse the plug. If it still does not fit, contact a qualified electrician. Do not attempt to modify the plugin anyway or force it into the outlet. This could result in injury or electric shock.
SHORT CORD INSTRUCTIONSA short power-supply cord is provided to reduce the hazards of entanglement or tripping over a longer cord. Longer detachable power-supply cords or extension cords are available and may be used if care is exercised in their use. If a longer detachable power-supply extension cord is used:
- The marked electrical rating of the extension cord should be at least as great as the electrical rating of the appliance.
- The cord should be arranged so that it will not drape over the countertop or tabletop where it can be pulled on by children or tripped over unintentionally.POWER CORD SAFETY TIPS
- Never pull or yank on a cord or the appliance.
- To insert the plug, grasp it firmly and guide it into an outlet.
- To disconnect the appliance, grasp the plug and remove it from the outlet.
- Before each use, inspect the power cord for cuts and/or abrasion marks. If any are found, this indicates that the appliance should be serviced, and the power cord replaced. Please contact Chefman Customer Support for assistance.
- Never wrap the cord tightly around the appliance, as this could place undue stress on the cord where it enters the appliance and causes it to fray and break.
DO NOT OPERATE THE APPLIANCE IF THE POWER CORD SHOWS ANY DAMAGE OR IF THE APPLIANCE WORKS INTERMITTENTLY OR STOPS WORKING ENTIRELY.
California Proposition 65: (Applicable for California Residents only)![]() WARNING:Cancer and Reproductive Harm – www.P65Warnings.ca.gov.
WARNING:Cancer and Reproductive Harm – www.P65Warnings.ca.gov.
![]() Do not place the appliance on a stovetop or any other heatable surface.
Do not place the appliance on a stovetop or any other heatable surface.
FEATURES
| 1. Lid | 6. Base |
| 2. Poaching Tray | 7. Power Button |
| 3. Omelet Tray | 8. Egg Tray Removal Tool |
| 4. Egg Tray | 9. Measuring Cup and Egg Pin |
| 5. Heating Plate |
OPERATING INSTRUCTIONS
BEFORE FIRST USE
- Rinse the lid, poaching tray, and cooking rack in hot soapy water.DO NOT submerge the base of the unit. The base can be wiped clean with a damp cloth.Please refer to the User Maintenance section for more information.
- Place poaching tray, beaker, and egg holders next to the unit.
- Position the cooking tray over the base.
- Place the lid over the cooking tray.
- Plug-in power cord. Your egg cooker is now assembled for use.
HOW TO USE YOUR ELECTRIC EGG COOKER
For hard, medium, and soft-cooked eggs:
- Place egg cooker on a clean, dry surface.
- Remove lid and cooking rack.
- Determine the consistency of cooked eggs preferred (Hard, Medium, or Soft).Using the measuring cup, locate the consistency and number of eggs to be cooked. Fill to the appropriate line with cold water. For best results, use distilled water, since tap water has minerals that can cause discoloration of the eggs.
- Pour cold water into the heating plate.
- Place cooking rack on top of the base.
- Rinse the number of eggs desired – cook up to 6 eggs at one time.
- Place lid on top of the unit and plug into a wall outlet. Press the power button to start the cooking process. The indicator light will be lit.
- When liquid is completely evaporated, the eggs will be cooked to the desired consistency. Cooking time will vary depending on the number of eggs and consistency. See Approximate Cooking Time chart, page 6.
- When cooking is complete, a continuous buzzing sound will indicate eggs are ready. Press the power button to turn off the buzzer and indicator light.
- Unplug the cord from the outlet.
- Remove eggs immediately to prevent overcooking.
- Run cold water over eggs.
- Eggs are now ready to serve. To remove possible mineral buildup on the heating plate, moisten a paper towel with one tablespoon of white vinegar and wipe the heating plate clean.
* Cooking times will vary slightly depending on the number and size of eggs, the temperature of eggs prior to cooking, temperature and amount of water used, altitude, and length of time eggs remain in the cooker following the cooking cycle.
APPROXIMATE COOKING TIME
| Consistency of Egg Desired | Number of Eggs | Approximate Cooking Time |
| SOFT(Runny Center) | 1-6 | 6-9 minutes* |
| MEDIUM(Partially Cooked Center) | 1-6 | 10-13 minutes* |
| HARD(Fully Cooked Center) | 1-6 | 16-18 minutes* |
FOR POACHED EGGS
- Place egg cooker on a clean, dry surface.
- Remove lid and cooking tray.
- Fill measuring cup to the omelet/poached line indicated with cold water. Pour cold water into the heating plate.
- Lightly butter or spray vegetable oil on the poaching tray.
- Break one egg for each poaching section – cooks up to two poached eggs.
- Place cooking tray on base and place poaching tray on top of cooking tray.
- Place lid on top of the unit and plug into a wall outlet. Press the power button to start the cooking process. The indicator light will be lit.
- When liquid is completely evaporated, the eggs will be poached.
- When cooking is complete, a continuous buzzing sound will indicate eggs are ready. Press the power button to turn off the buzzer and indicator light.
- Unplug the cord from the outlet.
- Remove eggs immediately to prevent overcooking.
- Use a small spatula to remove poached eggs from the tray.
A number of eggs: 1-2. Approximate cooking time: 7 minutes
FOR OMELETTES
- Fill measuring cup to the omelet/poached line indicated with cold water. Pour cold water into the heating plate.
- Lightly butter or spray vegetable oil on an omelet/poaching tray.
- Scramble one egg then pour into each side of the omelet/poaching tray.
- Place cooking tray on base and place tray on top of cooking tray.
- Place lid on top of the unit and plug into a wall outlet. Press the power button to start the cooking process. The indicator light will be lit.
- When the liquid is completely evaporated, the omelet will be ready.
- When cooking is complete, a continuous buzzing sound will indicate eggs are ready. Press the power button to turn off the buzzer and indicator light.
- Unplug the cord from the outlet.
- Remove eggs immediately to prevent overcooking.
Number of eggs: 1. Approximate cooking time: 6 minutes
HELPFUL TIPS & SUGGESTIONS
- When purchasing eggs, choose only those eggs that are stored in a refrigerator case. Refrigerate eggs until ready to use. (For baking, eggs may be placed in a bowl of warm water for 5 to 10 minutes to bring them safely to “room temperature” for best baking results.)
- Don’t know if your eggs are fresh? Place them in a bowl of salted cool water. If they sink, they are fresh – if they float, they are not.
- To prevent the development of bacteria in cooked egg dishes, eggs should not be left at room temperature longer than 2 hours (count preparation as well as serving time.)
- Chill and refrigerate hard-cooked eggs immediately after removing them from the Egg Cooker. For best results, plunge cooked eggs into a bowl of ice water—this will stop the cooking process and prevent a dark ring from developing around the yolk.
- Is the egg hard-cooked or raw? Can’t recall which ones you have cooked? Play spin the egg. A cooked egg will spin, a raw egg will wobble.
- Fresher eggs (less than a week old) are harder to peel than those a little older.
- To peel hard-cooked eggs easily, roll gently on the counter, using the palm of your hand to crack. Dip in a bowl of cold water and begin peeling from the larger end.
- Hard-cooked eggs in the shell will keep for up to one week properly refrigerated. Hard-cooked eggs out of the shell should be used immediately.
- Hard-cooked eggs that have been colored and displayed decoratively should not be consumed – enjoy their colorful display and discard. Cook extra eggs for eating and consider the discarded eggs an inexpensive way to decorate.
- To serve soft or medium-cooked eggs out of the shell, break the shell through the center of the egg with a knife. Use a teaspoon to scoop the egg out of each half onto a serving dish or piece of toast.
- To serve soft or medium-cooked eggs in a cup, place the egg in a cup, small end down. Slice off the large end, about one inch from the top, using a knife or egg scissors. Eat from the shell with a teaspoon or serve with toast strips to dip in the soft yolk.
RECIPES
DEVILED EGGSPerfectly cooked eggs from the Chefman Egg Cooker make our version of this American picnic classic simple to prepare.
Makes 12 deviled egg halves:6 hard-cooked eggs, completely cooled3 tablespoons low-fat mayonnaise1 tablespoon Dijon-style mustard¼ teaspoon Kosher salt3-5 drops hot sauce
- Remove shells from eggs and discard. Slice each egg in half lengthwise. Wipe the knife with a paper towel after slicing each egg, to prevent the yolk from showing on the white. Remove yolks and arrange whites on a plate.
- Place the egg yolks in the work bowl of a mini-prep processor and pulse to break up, 5 times. Scrape the work bowl. Add the mayonnaise, mustard, salt, and hot sauce to taste. Process for 10 seconds on grind; scrape the work bowl. Process 10 seconds on chop; scrape the work bowl.
- Spoon the deviled yolk mixture into the reserved egg white halves. Or place the deviled yolk mixture in a 1-quart freezer-weight plastic bag. Cut about ¼ inch off one corner of the bag. Use the bag to squeeze the yolk mixture into each egg\white half. Refrigerate until ready to serve. Just before serving, sprinkle with paprika or chopped fresh parsley or chives.
Nutritional information per serving (two halves):Calories 98 (68% from fat) • carbohydrates 1g protein 6g • fat 7g • saturated fat 2g • cholesterol 214mg sodium 174mg • calcium 25mg • fiber 0g
SERVING TIPS:
- If you don’t have a “deviled egg” plate, make a bed of alfalfa or radish sprouts on a plate to steady eggs for serving.
- To transport and store deviled eggs safely for a picnic, make filling and place in a sealed food storage bag. Place egg whites in a separate storage container.Chill both in the cooler with ice. When you are ready to serve eggs, pipe the chilled filling into the chilled whites.
EGG SALADThis basic egg salad is great for sandwiches. It can be “dressed up” by adding chopped green onion or shallot, chopped pickles, chopped sun-dried tomatoes or chopped fresh herbs.
Makes about 2 cups/4 servings:6 hard-cooked eggs, completely cooled½ stalk celery, about 4 inches, cut in 1-inch pieces¼ cup low-fat mayonnaise2 teaspoons Dijon-style mustard¼ teaspoon kosher salt⅛ teaspoon freshly ground white or black pepper
- Remove shells from eggs and discard. Cut eggs in quarters and reserve.
- Place the celery in the work bowl of a food processor. Pulse to chop finely, about 15 times; scrape the work bowl.
- Add the quartered eggs to the work bowl; pulse 5 times to chop roughly.Add mayonnaise, mustard, salt, and pepper.
- Pulse until mayonnaise and mustard are completely mixed in and desired texture is reached, 10 – 20 times.
Nutritional information per serving (cup): Calories 196 (71% from fat) • carbohydrates 3g protein 11g • fat 15g • saturated fat 4g • cholesterol 378mg
CLEANING AND MAINTENANCE
CLEANING YOUR ELECTRIC EGG COOKER
- Always unplug your Chefman Egg Cooker from the electrical outlet before cleaning.
- Wash lid, cooking, and poaching trays in hot, soapy water or in the top shelf of a dishwasher.
- Clean the heating plate with a paper towel moistened with one tablespoon white vinegar. This removes any mineral deposits left behind from the water and also works as an antibacterial agent. You may wipe the heating plate using water and a damp cloth if desired.
- NOTE: If the unit is not cleaned with white vinegar (see above) on a regular basis, minerals naturally occurring in water will build up and cause discoloration of eggshells. However, discoloration of the eggshells does not affect the taste of the eggs.
- Wipe main body housing with a damp cloth. DO NOT immerse in water.
- Place clean cooking tray, poaching tray, beaker, and egg holders inside the egg cooker for storage.
TERMS & CONDITIONSLimited Warranty
Our products are backed by a limited 1-year warranty. To register, follow the instructions on the Chefman® Warranty Registration page in this User Guide.We offer a limited 1-year warranty from the date of purchase. This warranty is void without proof of purchase within the USA, Canada, or Mexico. Service centers and retail stores do not have the right to alter or change the Terms & Conditions of this warranty.WHAT THE WARRANTY COVERS
- Manufacturer DefectsChefman® products are warranted against defects in material and workmanship for a period of 1 year from the date of purchase when used in accordance with the Chefman® User Guide.
- Qualified ReplacementsIf your product does not work as it should, we will send you a new one. If the product is no longer available, we will replace it with an identical product or one that is comparable.
THIS WARRANTY DOES NOT COVER
- Misuse – Damage that occurs from neglectful or improper use of products; damage that occurs as a result of usage with incompatible voltage. See Safety Instructions for information on proper use.
- Poor Maintenance – General lack of proper care. See Cleaning & Maintenance Instructions for information on proper maintenance.
- Commercial Use – Damage that occurs from commercial use.
- Altered Products – Damage that occurs from alterations or modifications by any entity other than Chefman®; removal of a rating label.
- Catastrophic Events – Damage that occurs from fire, floods or natural disasters.
- Loss of Interest – Claims of loss of interest or enjoyment.
CHEFMAN® WARRANTY REGISTRATION
Register your product to extend your warranty for 3 months.What do I need to register my product?

- Contact Information
- Model Number
- Proof of Purchase (i.e. online confirmation, receipt, gift receipt)
- Date code
How do I register my product?We offer 2 convenient ways to access the Chefman® registration form:
- Visit chefman.com/register.
- Scan the QR code below to access the form:
 http://www.chefman.com/register
Have a question?Please reach out to us at Chefman.com/contact.
 report this ad
Need more help?We’re here for you! Contact us at [email protected] or 888.315.6553 Monday-Friday.
OTHER LIMITATIONS: ALL WARRANTIES OF ANY KIND WHATSOEVER, EXPRESS, IMPLIED AND STATUTORY, ARE HEREBY DISCLAIMED. ALL IMPLIED WARRANTIES OF MERCHANTABILITY AND FITNESS FOR A PARTICULAR PURPOSE ARE HEREBY DISCLAIMED, PROVIDED THAT IF ANY IMPLIED WARRANTIES OF ANY KIND IS REQUIRED BY ANY JURISDICTION, INCLUDING MERCHANTABILITY AND FITNESS FOR A PARTICULAR PURPOSE, THE DURATION OF SUCH IMPOSED IMPLIED WARRANTY IS LIMITED TO ONE (1) YEAR. THIS WARRANTY DOES NOT COVER, AND CHEFMAN® SHALL NOT BE LIABLE, FOR INCIDENTAL, INDIRECT, SPECIAL, OR CONSEQUENTIAL DAMAGES, INCLUDING WITHOUT LIMITATION, DAMAGE TO, OR LOSS OF USE OF THE PRODUCT, OR LOST SALES OR PROFITS OR DELAY OR FAILURE TO PERFORM THIS WARRANTY OBLIGATION. THE REMEDIES PROVIDED HEREIN ARE THE EXCLUSIVE REMEDIES UNDER THIS WARRANTY, WHETHER BASED ON CONTRACT, TORT, OR OTHERWISE.
This Warranty gives you specific legal rights, and you may also have other rights that vary from state to state or Province to Province. Some states or provinces do not allow the exclusions or limitations set forth in this Warranty, so the above limitations or exclusions may not apply to you depending on the jurisdiction of purchase.Chefman® is a registered trademark of RJ BRANDS, LLC. ETL CM is a registered certification mark of Intertek Testing Services NA, Inc.
![]() @ mychefman
@ mychefman
![]() www.chefman.com@ CHEFMAN2020
www.chefman.com@ CHEFMAN2020
References
[xyz-ips snippet=”download-snippet”]