Chord Electronics Hugo TT 2 User Guide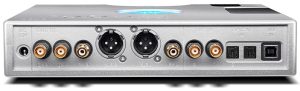
Introduction
Welcome to the Hugo TT 2 Quickstart Guide. This shortened guide issupplementary to the main manual which should be referred to for full safety and operational information.
Please note, more information on any of these topics is listed within the full manual.
Warranty
The Hugo TT 2 comes with a comprehensive 3-year warranty. To activate this warranty, please register your device via the ChordElectronics website: chordelectronics.co.uk/register-product
Note: please do not use a third-party charger with the Hugo TT 2 as it voids any warranty.

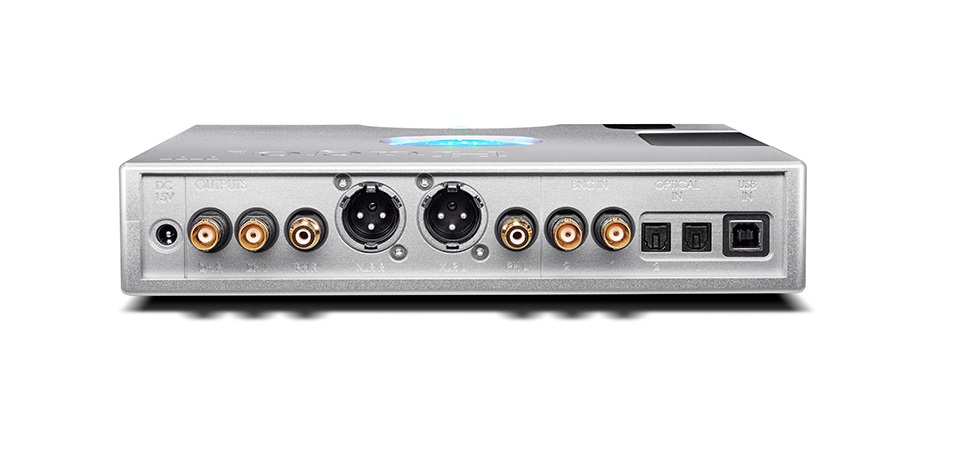
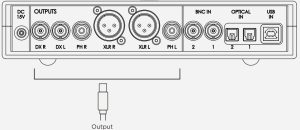
Connecting your source to Hugo TT 2
In order to use the Hugo TT 2 you must connect your source to any input of the device. You can connect multiple sources if you wish. If you are using a MAC/Linux device you will not need a driver but a Windows device will need a driver from the Hugo TT 2 section of our website:https://chordelectronics.co.uk/product/hugott2/
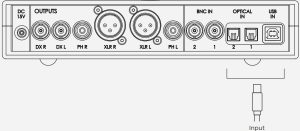
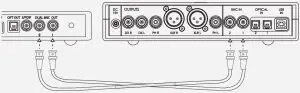
Connecting to a Hugo M Scaler from the Hugo TT 2
If using Hugo M Scaler you should use the Dual BNC cables provided to connect it with the Hugo TT 2. By using M Scaler all of your inputs must now be connected to M Scaler and not TT 2 – refer to the M Scaler User Manual.
Connecting an amplifier to Hugo TT 2
To connect an amplifier, such as TToby, to the Hugo TT 2, you should connect the outputs of TT 2 to the inputs of your amplifier.
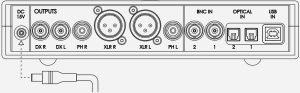
Connecting the power to Hugo TT 2
Connect only the supplied power supply to the DC 15V input of Hugo TT 2. Once connected to the Hugo TT 2, it may start automatically.Please make sure none of your other devices are switched on at this point.
For more in-depth information on the safety and warranty of the Hugo TT 2 please see section 1 and 2 of the manual.
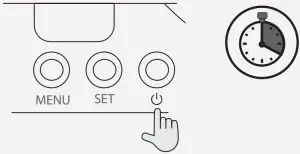
Switch on the Hugo TT 2
Once all inputs are connected, you should not yet initiate playback.Turn on the Hugo TT 2 by pressing the power button, the device will run its start up sequence before it is ready to be used. The Hugo TT 2 will start up in DAC mode, learn more about this mode below (8.0).
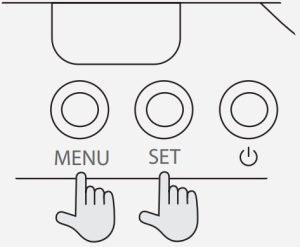
During use you may need to navigate Hugo TT 2’s menu, this is simple. Simply press the menu button until you land on your intended setting.You can both cycle and set the menu option parameter by pressing the ‘SET’ button. You do not need to confirm a selection, the ‘SET’ button will perform both tasks.
Selecting DAC or AMP mode
You will need to select between DAC or AMP mode depending on your intended use. When changing settings, it will take TT 2 15 seconds to activate, during which time the device will be non-operational and produce no sound.
DAC MODE: For use with a preamplifier, you can select DAC mode. This will set the output to a fixed 3V. You will not be able to use the volume function and as a result, the ball will not illuminate.
AMP MODE: To use TT 2 as a headphone amplifier or preamplfieir you must select ‘AMP’. The volume ball will illuminate and you will be able to attenuate the volume. For optimal use, please refer to ‘Setting the gain (volume) range’ – 9.0.
WARNING: Never select DAC mode if you do not have a means of attenuating the volume. Permanent damage to your equipment and hearing can occur.
Setting the gain (volume) range
Hugo TT 2 has an enormous volume range, making it suitable for sensitive IEMs, to be a standalone preamplifier, or for large circumaural headphones and because of this you have a choice of two gain (volume) ranges; Low and High.
The gain range selection is only available in ‘AMP’ mode and you should always begin on the ‘Low’ gain mode, but if you find that Hugo TT 2 is not loud enough then you should switch the ‘High’ gain mode, always remembering to begin on the lowest volume level.
You can change the gain range from within the menu.
Selecting input
To select your input for playback, use the ‘MENU’ button to highlight the input and the ‘SET’ button to change the setting. For a more information on inputs and different features Hugo TT 2 has to offer, find the Hugo TT 2 manual on the Hugo TT 2 section of our website:https://chordelectronics.co.uk/product/hugott2/
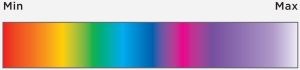
Selecting the correct volume
Using the volume graph below, please ensure your Hugo TT 2 is at a low volume setting before you begin to play music on your device. Once set at a low volume, turn your other devices on and begin playback.Slowly increase the volume to a comfortable and safe level.
Product registration
Now that you have successfully completed the setup of your Hugo TT 2 you can immediately begin to experience its transformational quality on your digital music collection. However, we advise that you register your product with us. Registering helps us give you the best possible support and protects your investment:Product registration 12.0 chordelectronics.co.uk/register-product/
For more in-depth information on the safety and warranty of the Hugo TT 2 please see section 4 and 5 of the manual.
References
[xyz-ips snippet=”download-snippet”]