CHORD Electronics Ltd 
Introduction
Welcome to the Blu MK II Quickstart Guide. This shortened guide is supplementary to the main manual which should be referred to for full safety and operational information. Please note, more information on any of these topics is listed within the full manual found under the product page: chordelectronics.co.uk/product/blu-mk-2
Warranty
The BLU MK II comes with a comprehensive 5-year warranty. To activate this warranty, please register your device via the Chord Electronics website: chordelectronics.co.uk/register-product
Connecting BLU MKII to a source
In order to use your BLU MKII as an upscaler/upsampler, you must connect your source to any input of BLU MK II. You can connect up to 2 devices. When using a MAC/Linux device with USB you will not need a driver but a Windows device will need a driver from the BLU MKII section of our website: chordelectronics.co.uk/product/blu-mk-2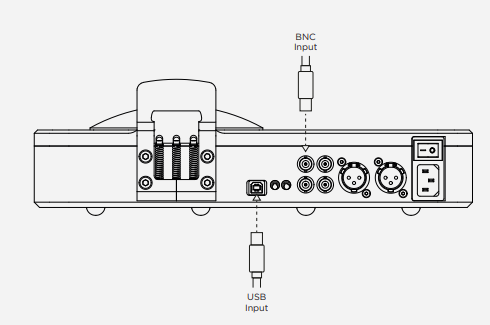
Connecting BLU MKII to DAVE
Connect BLU MKII to DAVE via dual data mode. You can use either BNC 1 and 2 or BNC 3 and 4. Navigate forward (not backwards) to BNC 1 if outputs from BLU MKII are connected to BNC inputs 1 and 2 on DAVE, or navigate to BNC 3 if outputs from BLU MKII are connected to BNC inputs 3 and 4.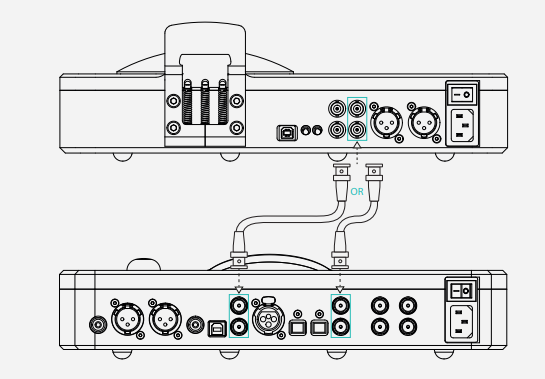
Connecting BLU MKII to third-party DACs
Use the Dual BNC, single BNC or AES outputs to connect your BLU MKII with a third-party DAC. Dual BNC will only fuction with the 2 further right hand side BNC ports. The bottom left BNC port can not be used as a Dual BNC connector.For single BNC connectors use any of the 3 BNC outputs shown below in Blue. The top left hand side BNC port is only to be used for an input into the BLU MKII.
Setting the upsampling qualities
With BLU MKII you are able to choose which upsample rate is best fitted for your system. On the back of BLU MKII are 2 switches, one is the sample rate switch and the other the dither switch. In this section we will talk about the sample rate switch on the left hand side of BLU MKII. See the table below for switch positions. For use with the DAVE we recommend using high up sampling to get the best out of your experience. For third-party DACs, refer to their manual to select the best rate suited.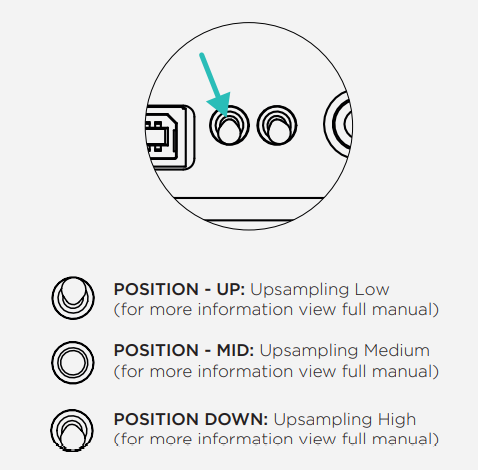
Connecting BLU MKII to power
Connect the supplied IEC cable to the input of BLU MKII. Please make sure none of your other devices are switched on at this point.
Powering up BLU MKII
With all devices correctly connected, the system is ready for playback. Again, ensure any volume controls are set to the minimum before switching on your source and pre-amplifier, then power amplifier. This sequence should always be followed to protect connected devices. Commence playback before slowly increasing the volume to a comfortable listening level.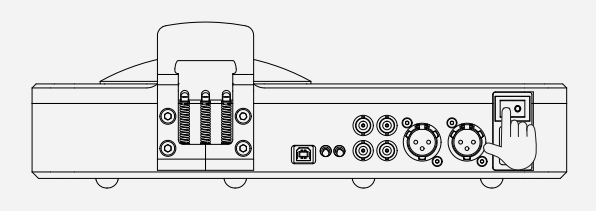
Opening the CD mechanism
To open the CD lid, locate the hinge at the rear and gently lever the sprung mechanism in a fluid downward motion (never apply force). Gently use the hinge to lever the lid open or closed.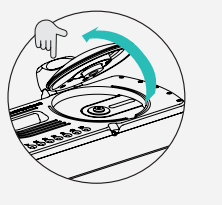
Display and basic operation
All basic CD functions can be accessed through the top pannel buttons. Below is a diagram of the screen section system, using the top panel buttons to navigate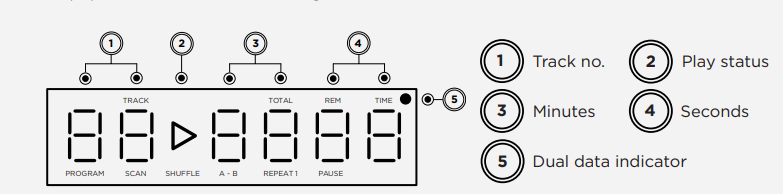
Product registration
Now that you have successfully completed the setup of your BLU MKII you can immediately begin to experience its transformational quality on your digital music collection. However, we advise that you register your product with us. Registering helps us give you the best possible support and protects your investment: chordelectronics.co.uk/register-product/![]()
References
[xyz-ips snippet=”download-snippet”]